DIY Christmas tree decorations for children. DIY Christmas tree decorations: master class, photo
Homemade toys for the Christmas tree can be made not only by needlewomen. There is enough simple options, which will not take much time. They can be done with children or on your own. The most important thing is that your furry beauty will not be like others. And the warmth of your hands transferred to the toy will be noticed by all your loved ones. 
Greetings to all readers of my blog, New Year is magical holiday! It carries so much warmth, kindness and inspiration that it should be enough for the next 365 days! Preparing for the New Year is a real sacrament. Buying (or even better - creating with your own hands) gifts for family, loved ones and friends, planning the New Year's menu, decorating apartments and houses and, of course, the most important New Year's process... It's time to decorate the Christmas tree!
But now the next question arises: with what? Surely every home has a box of Christmas tree decorations. Some people have old Soviet houses with snow roofs, ruddy Santa Clauses and bullfinches lying there. They are, of course, dear to the heart, but they are already old, tired, and the paint is worn off. By the way, I advise you to read it, because the holidays are so fleeting.

Others have bright identical balls in the color of the curtains and golden bows.

Stylish, no doubt. But it’s the same – like everyone else’s. So what can we come up with? The answer is the simplest: make homemade Christmas tree toys! Everything about this process is perfect: from the search for ideas to the preparation of materials, from the first detail to the final result.
The flight of fancy is not limited! You can create any crafts from any materials, by any means. But sometimes it’s difficult to come up with an image on your own. In this case, there is no shame in looking: what are others doing? And taking the proposed options as a basis, come up with something of your own, or simply repeat some very cute little thing.
That is why I “climbed” onto the Internet in search of everything tasty and interesting. It’s not for nothing that mine was opened. There are a lot of tips. We'll look at some of them.
Paper Christmas tree toys
Cardboard, paper and glue are the most accessible materials. They are always in the house, especially when the baby is growing. In addition, such homemade Christmas tree toys are easy to make, do not require special handicraft skills and can be made by a child aged 8-10 years independently or with a little parental help if your child is younger.
Paper balls
These balls are quite easy to make.
 Decoupage glass ornaments with vintage German newspapers
 Source
We will need:
- 1 ball (you can use foam balls or plastic ones, which are sold in handicraft stores as blanks for Christmas tree decorations) or hemisphere (for example, molded from plasticine);
- glue (preferably liquid, it would be ideal to dilute the paste, but you can also use PVA);
- newspapers;
- thin wire (you can use a paper clip);
- a thread;
- glitter, stickers or scrapbooking paper - optional.
We tear the newspapers into thin strips, coat each of them with glue and gradually cover the ball with them. As soon as the base is no longer visible under the layer of newspapers, put the product aside and let it dry - about 40 minutes. Then create 2, 3, 4 and 5 layers - similar to the first. If you are using a ball base, you do not need to remove it. If you have only made half of the base, you will have to first make the decoration from individual parts and then glue them together.
After complete drying, you can apply a layer of varnish and add glitter. Homemade Christmas tree decorations are so valuable because they can be decorated in any way and with anything!
When the ball itself is ready, we begin making the “top”. If the work was carried out with New Year's balls, then we attach their holders on top. It’s even easier to glue a tinsel bow to the ball and tie a thread or ribbon on top so that you can hang the product.
To make “named” balls, just attach a piece of paper with a name to the tinsel using a thread. You can write wishes, compliments and any other pleasant little things on these stickers.
Gift decoration with vintage paper
In the same source I saw a New Year's craft that can be done in 10 minutes! You need to make an “accordion” from a sheet of music notes, alternately bending the paper into 1-2 cm strips in one direction or the other. Repeat with another sheet. Bend each accordion in half and glue along the free side to make it look like a “half-toy”. Then connect the resulting semicircles to each other along the sides that remain without folds.

You can use it as a gift for someone dear to you. Take a simple box that you can find at any craft store, decorate it with an old map and the resulting paper toy.
Musical muse
To make beautiful homemade Christmas tree decorations with your own hands, you need true love to the music!

Source
Required:
- glue;
- scissors;
- old sheet music;
- rhinestone (you can simply cut a circle out of cardboard in color).
We cut three A4 sheets with notes each into 4 parts. We will make large rays from the first two, and small ones from the third. We roll a quarter of the sheet into a cone and glue the joint. Please note that the glue will first need to be applied so that both sides of the cone stick together into one. And then carefully glue the rest. You need 8 such elements.
The next step is to cut the quarters of the last sheet in half. We get 8 parts. The scheme is the same. After this, each ray needs to be glued to a rhinestone or cut out circle. The back part can be covered with a layer of music paper, and a thread can be glued under it.
Another tip: to age paper, you need to soak it in a bowl of strong tea and then dry it. Then crumple and iron with an iron at minimum temperature. I really like the look of the paper, which is scorched at the edges.
Be careful to only burn sheets in close proximity to a water source!
DIY vintage toys
These vintage DIY Christmas tree decorations will harmoniously fit into any interior.

Source
To make such a New Year's beauty, you will need:
- colored paper(or scrapbooking paper);
- glue;
- scissors;
- wooden stick for the base.
Cut out strips from colored paper. Their length should be the same, but the width of each next one should be 1 centimeter more than the previous one. The number of strips and their size can be any - it depends on how you want your homemade New Year's toys to the Christmas tree.
Twist each strip into a tube and glue the joint. Then connect all the strips together and put them all together on a wooden base (can be cut out of cardboard). Don't forget the star and thread!
If regular colored paper is used, then I would additionally decorate this madame with cut out balls, circles, stars, sparkles, and pieces of tinsel. Give your child plenty of room for imagination. Let him paint the stripes and stick on bright stickers. Homemade Christmas tree decorations for the New Year can be as colorful and catchy as you like. The main thing is with the soul!
Christmas tree toys made of cardboard
If your New Year's homework is a DIY Christmas tree toy for school, then you can make an owl like this.

Source
For this you will need:
- toilet paper roll;
- dye;
- glue;
- scissors;
- colored paper;
- stickers white with glitter.
You will need to glue the edge parts of the base and paint the product with white paint. Cut out all the details from paper and place them on top. I would also knit scarves for the owls and add thread tassels to their ears.
Another interesting and unusual idea is to make a cup of hot chocolate from a sleeve.

Source
You will need:
- sleeve;
- cocktail straw;
- colored paper;
- glue;
- scissors;
- cardboard.
We prepare a paper cylinder from the sleeve - cut it to the desired size. Then from thick cardboard we cut out one cylinder of the same diameter - for the bottom, and another - for the “coffee” - a little smaller so that it fits inside but does not fall out. Spread a small circle with glue and place a circle of brown paper on top, slightly bigger size. Next, let's move on to the mug itself. According to the “recipe,” we are asked to cover it with a strip of colored paper, leaving a protruding part on both sides. At the bottom you should cut it with a “fringe” and glue each fragment to the bottom separately.

But I would simply wrap the homemade New Year's decorations on the Christmas tree with packaging material, fixing the joints with glue or a stapler. Or even just foil! But if according to the recipe, then don’t forget to glue the circle to the bottom.
After the packaging is ready, you need to put our “hot chocolate” inside, applying glue to the paper from the inside. Then we work on the top edge: carefully cut the free edge and glue one piece at a time. We insert the “drink” into the vessel. Here in side edge make a hole for the future thread.

Now for a pen: rolled paper, soaked in water and left to dry will work just fine. Glue it to the mug.

The base is ready, next is the decoration. There are no restrictions here: you can do it like the author, you can decorate it differently, for example, add a “slice of lemon” using a curly eraser, or draw a picture from “foam” using a corrector or contour. Homemade Christmas tree toys for the New Year can be very non-standard.
There are many tutorials on the Internet on how to make Christmas tree decorations with your own hands, incl. video. For example, to make a ball, you need:
- foam base;
- many different buttons;
- hot glue;
- tapes.
We cover the ball with buttons, make a bow from a ribbon - and you're done!
For me, threads are a closer material. About how many different mercies can be connected, write and write, this will be a life-long post. In addition, this is an activity for mothers, probably not for a child. Therefore, I will just show a few interesting things that I found, without going into details.

Source

A knitted ball can be made in any color and any size. The thread is quite simple to sew on. You can tie a foam base, or you can stuff the toy with synthetic padding or other similar material.

Source
But you can make things much simpler from threads. Homemade Christmas tree decorations made from thread always look very interesting, tasty and unusual.

Source
These wonderful decorations can be ordered, but are easier to make!
You will need:
- leg-split;
- foam base for the ball;
- double-sided thin tape or hot silicone;
- scissors;
- lace.
If you don't have tape, you can try using silicone, but this is more painstaking work. Carefully, one row after another, you need to wrap the base with rope, gluing the thread.
If you decide to use tape to make these homemade Christmas tree toys, then just make a “belt” for the ball from an adhesive strip (from left to right), and then two more lines perpendicular to the belt (from top to bottom).
Be careful not to glue one strip on top of another to avoid problems with removing the protective tape. Attach a string to half of the balloon. Then form a free part by unwinding a little twine, and, as if making a “dead loop,” return to winding the ball in the same direction as you started. Once the first round is completed, secure the “reference point” with a small pin or nail. And start moving around this pin, gluing new pieces of adhesive tape when necessary.
In principle, you can use any thread - thin or thick wool, yarn. In addition, strips of felt, woven fabric or braids, and anything else will work. When the winding is finished, you need to let the product dry and soak, if you used an adhesive mass, and then start decorating.
Here you can learn how to decorate the base for a ball using twine. In addition, there is a wonderful option for decorating the resulting craft using ribbons, lace and beads.
You can wrap any figures in the same way. The convenience of this manufacturing method is that subsequent decoration can be made with any elements. You can sew them, glue them, tie them, attach them with Velcro and whatever else you want to do with them!
Here's another option - this is the famous striped candy wrapped in twine. Fortunately, these plastic imitations can now be bought in bags and quite cheaply. Working with them is easier than with balls. You just need to secure the twine with silicone from a hot gun, and then wrap it along the entire length and do the same from the other end.

Source
Another option is to do without foam plastic altogether. For example, like in this video about how to make Christmas tree decorations with your own hands. The neck of a regular plastic bottle is used as a base. First, cover the lid area with mounting tape, making it level. Then put the bag on the bottle. And using glue, carefully wrap the container to a certain level (depending on what size bells you want to end up with. As soon as the product dries, you should remove it from the neck and free it from the bag. And the final step is decoration.
You can make homemade Christmas tree decorations from threads with your own hands, using practically nothing except this very thread!

Source
To make such an adorable snowman, you need:
- white yarn;
- small cardboard;
- scissors;
- needle;
- a little felt.
The whole action is based on the principle of making pompoms for a hat. You have to wrap the cardboard in 30 circles with wool and cut the thread. Carefully remove the resulting skein, tie it in two places, preparing areas for the head, belly and legs. Prepare another skein, smaller, for the hands. Remove it from the cardboard and make two narrowings. Then spread the threads in the second segment in the frontal plane and thread future handles through the hole.

Schematically the snowman is ready. Cut the loops of thread on the arms and legs. And then start decorating. Trim all the ends of the fur so that nothing sticks out. From felt you can make a face and a scarf for our gentleman, as well as a hat. Or you can link it. Add a belt or buttons on the stomach. Tie a string so you can hang the toy.
Christmas tree star
So, the decorations for the branches are ready! Now our beauty is waiting for her “finest hour” - when we put a star on her top. But how, from what can you make it?
While I was flipping through the pages in search of something interesting, an idea came to my mind: why not decorate the Christmas tree... with a Christmas tree?! And here, for example, is an option!

We will need:
- sheet of cardboard;
- glue;
- green tinsel thread;
- bag of candy.
We make a cone out of cardboard and glue it along the joint. Glue a layer of tinsel onto the base. Then - a layer of sweets, one to one. Then again tinsel, and again sweets! Or you can replace sweets with a garland of lights and then our top will sparkle and shimmer, as it should be on the New Year!
If you made the musical decorations that were discussed at the very beginning of the article, then the star should be musical!

Source
You can make this by cutting out the parts according to the template. Then you have to fold along the dotted lines, glue the joints - voila, done! The only difficulty is that you will have to redraw the template, or print it initially on music paper. However, you can use any other material.
For balls covered with newspapers, a corresponding star is suitable.

Source
Making such a decoration is quite difficult. There is a special master class on how to make it, consisting of two parts. The first is about how to make an even pentagon, and the second is how to make a star out of it.
A star can also be made from book pages, just like a toy - from sheet music.

Source
You will have to fold pages or their fragments into cone-rays and glue them to the base.

A good option would be to make a three-dimensional star, for example, from papier-mâché, cardboard, or buy a blank.
- We are looking through an old book.
- Divide each page in half.
- We make an envelope from half.
- A cardboard or plastic star blank is pasted over with ready-made envelopes according to the pattern in the photo.
- Grease the edges with PVA glue and sprinkle with glitter.
To make it more convenient to install such homemade toys on the Christmas tree, I would advise making one large cone as a support. In addition, to make the star three-dimensional, the rays need to be glued not only on one side of the base, but also on the other.
Christmas is a holiday that for many is as important and significant as New Year. Therefore, the holiday tree must be decorated with themed decorations.

Source
You can do this, for example, using:
- wooden ring (you can use a special blank, a spare ring from a cornice or a foam ring);
- several beads;
- cap for beads;
- rondel (separator);
- crochet hook;
- scissors;
- threads


But this DIY Christmas tree decoration can only be made if you have shells lying around the house. However, find decorative material in stores (in the same Leonardo chain, which has representatives in 35 cities of Russia) today is not so difficult.

Source
To make this beauty you will need:
- shells different sizes;
- hot glue;
- a thread;
- decorations for every taste.
In my opinion, it would be unnecessary to talk about the production process; everything can be seen without words.
This master class tells in great detail how to make an angel from a sheet of cardboard, thread, Christmas ball, ribbons and a set of decorations. These homemade Christmas tree decorations are suitable and can be used as decorations for the New Year or Christmas table.
I sincerely hope, dear readers, that this selection of tips on how to make homemade Christmas tree decorations will help you find your inspiration, catch the wave and get carried away with your work! I wish you new ideas and wonderful results!
Good afternoon! I hasten to please New Year's ideas toys, and for those who have not yet made gifts for the New Year, I recommend not to delay this for too long and choose them this
Tell me, what do you prefer to give for the New Year? What about receiving? Probably everyone really likes receiving toys for the Christmas tree, and it’s just various kinds We agree, I remember when I published a post about crafts for the upcoming holidays, a lot of people sent me wishes and congratulations, so I also want to congratulate everyone on the upcoming holidays!
Having written a previous note about New Year's crafts, they came to me by email asking me to publish more options for what can be made from plasticine, I’m sharing with you my experiences.
She's so beautiful!

Do you like to sculpt Christmas trees and snowmen? Then use this step by step instructions with photo:


Where would we be without Santa Claus? Children simply love to see him at the holiday, and even more so to make crafts.

These are the kinds of compositions that can come out.

If you want, you can even sculpt Peppa Pig and her brother George from the cartoon.

You can make a dog lying near the Christmas tree, let it bring good luck and warmth to your home and become a talisman.
Such an affectionate and sad puppy girl.

Or playful Tuzik, what do you choose?

I remember once upon a time I had to work in a kindergarten, you understand that kindergartens are almost not funded, so at that time we made and decorated our group from whatever we could, from all sorts of things in general. Was it ordinary polystyrene foam or took a cheap one? ceiling tiles and this is what happened:

Agree, there seems to be nothing difficult, but it also looks original, with a twist.

Toys made from salt dough are a little more complicated and time consuming.


Beautiful felt toys for the New Year tree
Now, as for felt, well, you can create a lot of ideas and find them on the Internet.


Their diagrams and patterns are quite simple, you can easily draw them yourself.
Funny little deer.

The Christmas tree is a forest beauty.

If you are interested in this Christmas tree, or this bookmark for books in the shape of a dog, then write to me below, I will send you templates and a diagram.


Felt Snow Maiden.

How do you like such wonderful creatures, if you decorate a Christmas tree with them, there are enlarged diagrams, they will appear soon in another post, or write to me and I will send them.

By the way, I was so fascinated by the topic of felt that I will soon write a separate article on this topic, so fans, wait, add my blog to bookmarks and rejoice with me))). By the way, if you need crocheted toys, then don’t hesitate to go here, there’s a whole bunch of them
Master class on paper crafts in the form of balls and lanterns
Who doesn't love balloons on the Christmas tree? Probably everyone just loves them, let's make a simple version.
You will need colored or multi-colored paper, scissors and glue. You will need to cut out 20 circles of the same size from it. And then follow this pattern, roll it up as shown in these pictures.

Then, as shown, glue with good glue, it is better to use ericruser or PVA.

There is another option for such a ball for a Christmas tree made of paper.

I’m also giving you the most popular type of balloon decoration, in this video everything is shown in great detail and clearly, you just have to repeat the necessary steps after the leader:
And here's another one great idea, you definitely haven't seen anything like this before:
For school and kindergarten I can offer such interesting flashlights that everyone probably knows and remembers.


And another masterpiece in the form of a garland, it is not something unimaginably beautiful. Watch this video from YouTube channel:
Paper toys for the New Year
First place can rightfully be given to snowflakes different types and in origami style and volumetric options, who needs all sorts of ideas and templates, see snowflake patterns here


It is also easy to fold various figures from paper strips.


We make Christmas decorations for the Christmas tree with our own hands from plastic bottles and light bulbs
A fairly common craft, a souvenir, and someone will even give such a treasure as a gift, I recommend doing it yourself at home. Just be careful if you make a craft from a light bulb, it’s still not for children’s hands.


From plastic bottles will be safer and more durable.

The most beautiful Christmas tree decorations are those made by yourself. Such creativity will help you bring any fantasy to life and make your New Year's decor as original, unusual and very attractive as possible.
In modern stores on New Year's Eve, a person can find a huge assortment of Christmas tree toys from a variety of different materials : glass, plastic, wood, textiles, paper. But just more than half a century ago, it was quite difficult to find a beautiful decoration for the Christmas tree, and people I had to make them myself.
It is worth noting that manual work is very often was distinguished by her skill and was equated to works of art. Many needlewomen still prefer to bring something original to the decor of the room and the Christmas tree, made from the heart and with your own hands.
By following modern master classes, you can learn how to create toys of incredible beauty.
Eg, cotton wool decorations - budget handicrafts. For work you will need:
- Roll of pharmaceutical cotton wool
- Paste
- Newspaper
- Wire
- Paints (acrylic)
- Salty dough
Vatu is necessary pre-paint in different colors. This is done using textile paints, which can be purchased at a household chemical store. The painting process is very simple: put dye in a saucepan with water, add cotton wool, and bring to a boil. The cotton wool is infused for several minutes, after which it is wrung out and dried.
Cooking the paste is also very simple. It is easier to work with than regular PVA glue, as it is more transparent and has a more watery texture. To cook the paste, you need boil a glass of water and dissolve two full tablespoons of starch in it with a slide. The cooled solution will become very sticky.
Salt dough will be necessary in order to create realistic faces and muzzles for toys, since they imitate figures of people and animals. It's easy to knead this dough: mix two parts flour with one part salt and add water by eye so that the texture somewhat reminds you of plasticine.
The dough is formed into the required figurine with notches and baked in the oven for half an hour at a temperature 110-120 degrees. After this, the dough must be painted with acrylic paints, all the details must be drawn: eyes, lips, cheeks and covered with colorless nail polish.
From wire it is necessary make the base. All other elements will be attached to this base. The base should follow the preferred figure, for example, a person. For volume the base is wrapped in layers of newspaper soaked in paste. The ends of the wire (handles and legs) should be wrapped first with cotton wool, wetting it with paste. After that the newspaper also covered with a cotton layer.
The top of the wire should attach a face molded from salt dough (make a hole in it in advance). All details should be done very carefully, hands should be washed often, as the paint will remain on them and spoil the light shades. You can form braids, hats and other little things using thin wooden sticks, which should always help you in your work.
Master class with photos:
Forming a wire base, wrapping the ends with cotton wool and the body with newspaper  Wrapping the figurine with colored cotton wool, shaping the face
  Small parts for toys made of cotton wool
Beautiful Christmas toys made of cotton wool for the Christmas tree:
 “Girls” - toys for the Christmas tree
 Cotton Christmas decorations coated with varnish
 Colorful Christmas tree decorations made from cotton wool
 DIY cotton toys
  Homemade cotton wool toys for the Christmas tree
 Beautiful DIY Christmas tree decorations made from colored paper
Colored paper- the simplest and budget material for creativity. Modern stores can offer a large selection of thin colored sheets, colored cardboard, kraft paper, paper with designs and patterns, colored foil, gold and silver paper.
The simplest decoration you can make is multi-colored chain. It looks quite festive and elegant; it can be used to decorate not only the Christmas tree, but also the entire room: walls, curtains, cornices, furniture. For product you will need:
- Lots of colored paper
- Scissors
From the sheets you should cut strips of the same width and length, depending on what kind of links you want to get in the chain: big or small. A strip of paper is rolled into a ring and the ends are glued to each other. After this, the next strip is threaded through the already formed paper ring and glued together in the same way. The chain can be made to any length.

 Chain made of colored paper for New Year's decor
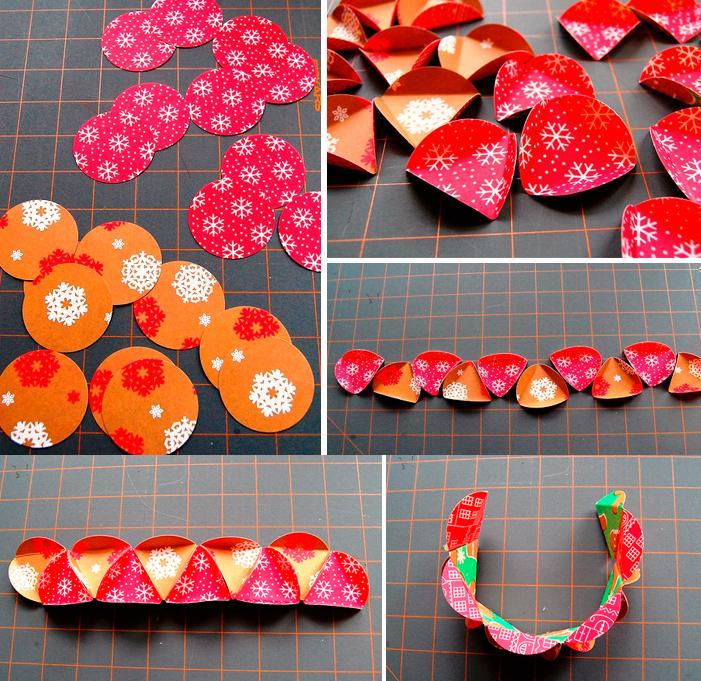
But the chain is far from the only thing paper decoration. From old postcards or colored cardboard you can make volumetric ball to the Christmas tree. You will need exactly eight identical circles, which should be cut one template at a time. To do this, you can use the bottom of the cup, because it is convenient to outline it.
After that Each ball is folded in half and then in half again. After this, four folded cut out circles should be glued to one small one, which serves as the base. The remaining four are also glued to the same base. Wait for the glue to dry completely and start unfold the edges of the glued halves.
Helps to secure the edges together stapler, this can also be done superglue or using hot gun. You can leave the resulting ball the way it turned out, or you can paint with acrylic paints to taste or draw patterns. To the ball on one side should glue a loop so that it can be easily attached to the Christmas tree.

 How to make a Christmas tree ball with your own hands?
 Paper balls, ideas for creativity:
 Christmas tree ball from old postcards
 Newspaper ball for Christmas tree
  Paper ball for a Christmas tree made of cardboard for creativity
 DIY bright paper balls for the Christmas tree
 DIY Christmas tree decorations from scrap materials
In fact, if you have imagination and large quantity decorative elements(ribbons, beads, rhinestones, sequins, sparkles, threads and much more), any material can be turned into an original, and most importantly, a beautiful Christmas tree toy.
Around November of each year, most craft stores offer to buyers Lots of ideas for New Year's decor: snowflakes, snow, silver, artificial berries and Christmas tree branches, miniature gifts, figurines and other little things.
Other ideas for creating Christmas tree decorations from scrap materials:
Christmas tree figurines from wine corksWine bottle corks can serve as an interesting material for creating Christmas tree decorations. You can collect them throughout the year, and then make a stylish snowflake or figurine that will be held on by wire or with superglue.
 "Soldier" figurine for the Christmas tree made from champagne corks
 Simple Christmas tree figures made from corks
  Bright New Year's toys made from wine corks "Christmas trees"
 Christmas tree decorations made from wine corks
 One of the symbols of the New Year is a snowflake. She can decorate not only yours holiday tree, but also the walls of the house. You can make it from anything: paper, cardboard, plywood, buttons and even pasta!
Ideas for New Year's toys made from scrap materials:
 Blue and white snowflake for a Christmas tree made of buttons on a wire basis White snowflake for a Christmas tree made of buttons on a metal basis
 Unusual snowflake on a Christmas tree made of pasta painted with gold paint
 Unusual idea for creating New Year's toys - iron bottle caps
 DIY felt Christmas tree toys: patterns
Felt is one of the most favorite and comfortable materials for creativity, including for creating Christmas tree toys. With felt convenient to work, the store provides it in a large number of colors. You can always choose thin or thick (felt) felt to work with.
SECRET: If you couldn't find felt in stores, but want to create a beautiful Christmas tree decoration, you can use modern washcloths. As a rule, they are sold in packs of three and their material is very similar to felt: it is just as dense and soft, and holds its given shape.
You can make a wide variety of toys from this material. It can be flat or three-dimensional figures, which, if desired, are decorated with embroidery, rhinestones, beads or sparkles. You can sew any figure from felt, any fabulous New Year's character . The filler in such toys is regular cotton wool or felt scraps.
New Year's toys for the Christmas tree, creative ideas:
 Bright toys for the Christmas tree made of felt
  Felt bears - Christmas tree toys
 "Christmas trees" - New Year's decorations
 Stylish felt Christmas tree decorations
 Flat decorations felt Christmas tree with embroidery
 Stylish red and white felt Christmas tree decorations
 The following patterns will help you make a neat and proportional toy:
 Patterns of animals and children's toys
 Patterns for creating New Year's toys from felt
 New Year's patterns for making felt toys
 Simple patterns for felt toys
 How to decorate felt Christmas tree decorations:
- Small parts of toys: eyes, mouths, mittens, horns, and so on, are also cut out of felt. They can be sewn to patterns using thread or glued with hot glue.
- Glitter, sequins and beads, which you can also sew on yourself with matching threads, will help add shine and shimmer to the toys.
- Covering the edges of the toy and sewing together the pattern elements can be done in two ways: using a running stitch and a buttonhole stitch (the latter looks more aesthetically pleasing).
- Think in advance about where to attach the loop on the toy and sew it on the inside.

 Running stitch
 Loop stitch
DIY Christmas tree toy cockerel: pattern, photo
The festive toy for the Christmas tree deserves special attention. shaped like a rooster. Rooster - symbol of 2017 and therefore his image must be present New Year's Eve in every home to bring happiness and prosperity to the family.
You can make a toy from wood, cut it out of plywood or cardboard, but best of all work with felt.
This material allows use many colors in crafts, decorate them beautifully with embroidery and sparkles. In addition, felt allows give any shape to the toy: Make the bird realistic or figurative.
You can cut out the shape of a rooster from felt at will or use a pattern.
 Pattern of a New Year's toy “rooster” made of felt
 Ideas for creativity in creating New Year's toys:

 Original “cockerel” made of felt for the Christmas tree
 Beautiful New Year's toy "rooster"
 Felt cockerels for the Christmas tree
 Red rooster - Christmas tree toy
 Felt chicken and cockerel christmas tree

 Original felt toy for the Christmas tree - “Rooster”
 DIY children's Christmas tree toys: for kindergarten
Children in kindergarten are often asked to bring handmade decoration from home to decorate the New Year tree at the matinee. Modern parents can be very inventive and come up with simple but original ideas. toys for decorating the Christmas tree and the room for the New Year.
Ideas for creating New Year's toys for kindergarten:
Paper lantern- a classic elegant decoration for the Christmas tree. Give it more festive look You can use gold or silver paint, glitter, tassels and many other decorative elements.

 How to make a lantern for a Christmas tree?
 How to make a three-dimensional star for a Christmas tree?Do volumetric sprocket The Christmas tree can be made from two flat pieces of cardboard. You need to decorate this decoration according to your taste: glue rhinestones, sparkles or stones. You can also smear the star with glue and sprinkle generously with gold sand. Golden sand can also be successfully replaced with small broken glass from old Christmas tree decorations.
A paper heart made from colored paper can be easily made from colored cardboard using the quilling technique. It can be of any color and size, decorated with ribbons, sparkles or snowflakes.
 Christmas tree decoration “heart” using quilling technique
 A Christmas tree decoration made from buttons will help surprise everyone. To do this, you will need to have buttons not only of different colors, but also of different sizes. This way you can form figures out of them.

 New Year's decorations made from buttons
 Bows will be a simple but elegant decoration for the Christmas tree. They can be made large or small using themed, bright or shiny ribbons.

 Bows - Christmas tree decorations
 DIY Christmas tree decorations made from light bulbs
Handicrafts captivate people so much that they are able to turn almost any available material into a beautiful Christmas tree decoration. The most unusual things are used, for example, glass bulbs. You need to use those that have already burned out and are no longer able to shine.
They can be very skillfully paint with acrylic paints, turning in funny snowmen. It is also very easy to attach decorative textile elements, buttons, eyelets and much more using glue.
To quickly paint light bulbs, you can use spray paint or car paint in a can.
Christmas decorations from old glass light bulbs, ideas for creativity:

 Light bulbs decorated with colored sequins
 Light bulbs "penguins" - toys for the Christmas tree
  Toy made from an old light bulb “Bear in a hat”
  Christmas decorations made from small light bulbs Colorful Christmas decorations made from light bulbs
 Simple and effective Christmas decorations made from old light bulbs
 Unusual snowmen on a Christmas tree made from old light bulbs
 DIY outdoor Christmas decorations
Outdoor toys for the Christmas tree, first of all, distinguished by their large size. Another feature of such jewelry is their simplicity, that is, they should be sufficient cheap and, but at the same time beautiful. People often make street toys with their own hands.
What can you make an outdoor Christmas tree toy from:
- From the box. You can use absolutely any box: shoes, candy, cookies, juice packaging. It should wrap in any beautiful paper to imitate a gift. At the end of decoration tie the box with ribbon and tie a bow. You can also try to create original design and make a pig, a nutcracker, a doll, and so on out of the box.
- Plastic spoons, or rather, their rounded part can serve as the basis for creating Christmas tree decorations. For example, they will make a snowflake, a Christmas tree, Santa Claus and other holiday symbols.
- If you know how to make buboes from yarn, you will also need this skill in creating New Year's decorations. You can decorate any ball or box with a large number of buboes to make a Christmas tree toy.
- If you have accumulated a huge number of Kinder Surprise packages, they can also serve as an idea for creating a Christmas tree decoration. They can be glued together to form a snowflake, which can then be easily decorated with foil or gold-plated paint.
Toysfor a street tree:
 Decorating the box in an original way
 Santa Claus made from plastic spoons
  Christmas toy made of fluffy pompoms
 Snowflake from Kinder Surprise packaging
 DIY Christmas tree decorations from plastic bottles
Decorations made from plastic bottles can decorate a street Christmas tree or a Christmas tree at a school or kindergarten party.
Ideas for decorating bottles as New Year's toys:
 New Year's bells from two glasses
  New Year's bells made of two large bottles from Cola
  Decorating bottles for the New Year
 Original Christmas tree toy made from the bottom of plastic bottles
 DIY Christmas tree toys made of fabric
Textile toys look very original. They are beautiful and always create festive mood. The main thing is not to be lazy and decorate each product as original as possible with lace, sequins, inserts from other fabrics, beads, and ribbons.
The following patterns will help you sew fabric toys:
 Patterns for textile toys for the Christmas tree
 Ideas for creativity, fabric toys:

 Colorful fabric toys for the Christmas tree
 Very delicate and beautiful DIY fabric toys
 DIY textile toys
 DIY fabric Christmas tree toys
 Original fabric toys
 DIY Christmas tree toys made of cardboard
Cardboard is affordable and durable material. You can use it to make beautiful New Year’s decorations that are suitable for decorating both the Christmas tree and the entire room.
New Year's toys made of cardboard:

 Christmas tree made of cardboard (folding two flat parts)
 Bright New Year's toys made of cardboard with decor
 Christmas tree toys made of thick cardboard with decor
 DIY Christmas tree toys balls
Threads can make very beautiful Christmas balls. You will need:
- Balloon
- Threads
- PVA glue
Making such a toy is very simple:
- Inflate the balloon. The ball should be the size you want the Christmas tree decoration to be.
- Tie the balloon so it doesn't let out any air.
- Dip the yarn into glue and start wrapping the ball
- If it seems to you that there is not enough glue, you can moisten the wrapped ball with glue again.
- Leave the ball to dry completely
- When the ball is dry, pop the ball with a needle.
- The ball will burst, but the thread frame will remain
- Attach a loop to the ball
- If desired, decorate it with sparkles or rhinestones
 How to make a ball of thread?
 Christmas tree balls made of threads
 DIY Christmas tree decorations for a large Christmas tree
Decorate big Christmas tree It can be very difficult only because small toys are simply not visible on her. Such a Christmas tree can be present at a matinee in the garden or at school, in the yard or in the square.
Ideas for toys for a large Christmas tree:
You can buy a foam base in the shape of a ball at a craft store. It can be decorated in any way, for example, with bright buttons.
 Large Christmas ball made of buttons
 The same foam base can be covered with newsprint and, after complete drying, opened with glitter nail polish.

 Christmas tree ball made from newspaper with glitter
 You can sew a large mitten from the fabric, which can be easily decorated with New Year’s symbols if desired.
 Mitten - decoration for a large New Year tree
 You can make a cuckoo clock from cardboard or thin plywood sheets, which will symbolize the New Year's time.
 Christmas tree toy
 The easiest way to decorate a large Christmas tree is to make candy from any box, wrapping it in colored foil or craft paper.

 Candy - decor for a large Christmas tree
 Beautiful and original DIY Christmas tree decorations for the competition
During the New Year's Eve, children often participate in various competitions where they present their crafts. Help you win the competition original ideas to create Christmas tree decorations:
- Toys made from broken mirrors (glass). This material can be used to decorate glass balls or other figures made of cardboard, plywood, or paper.
- Volumetric felt Christmas tree toy ( wool fabric) . To do this, the fabric is folded in several ways to create a pattern of folds.
- Toys made from fabric. Such decorative elements must be done very carefully, choosing textiles and decorations wisely.
- Beaded toys. Such decoration can be completely woven from beads, or decorated with them.
- Plywood toys. You can buy the base for such decorations at a craft store. You can color them to your liking.
 Painted toys for the New Year Decorating toys with a broken mirror
  Volumetric toys made of felt or drape fabric
  Beautiful textile toys
 Beaded toys for the New Year tree
 DIY Christmas tree toys made from threads
Threads can become original decor for Christmas tree decorations. you can use figures on any basis, for example, cardboard. Cut out your preferred shape and use yarn or canvas thread wrap the decoration tightly.
Lubricate the base with PVA glue so that the thread holds tightly and confidently.

 New Year's toy made of cardboard and canvas threads
 New Year's star made of cardboard, canvas thread and felt
 DIY Christmas tree decorations made of polystyrene foam
Often sold in craft and craft stores foam bases different shapes : balls, cones, cubes. Such figures can be decorated to your liking with any material: ribbons, lace, paper, beads to get beautiful Christmas tree decorations.
Ideas for creativity. Foam-based toys:

 Decorating a foam ball with needles and sequins
 sticking glitter on foam ball

 Ready product
 DIY Christmas tree toys made from disks
Make mono Christmas tree decorations from materials such as CDs. Most likely in the house modern man there are a lot of them and most of them are either inoperative or not in demand.

 Fish - decoration made from disks
 Flat decorations made of disks, decorated with threads
 Decoration for a large Christmas tree
 DIY Christmas tree decorations made from salt dough
WITH salt dough Children often work. This classic way to sculpt a figurine, including New Year's: Christmas tree, Santa Claus, Snow Maiden, deer, snowman and much more. The finished figurine can be painted, decorated with sparkles and varnished.
The recipe for kneading salt dough is very simple: two parts flour, one part salt and a little water by eye, so that the mass becomes similar to plasticine. The dough is baked for half an hour at a temperature of 120 degrees.

 Salt dough stars
 Salt dough figures for coloring
  Beautiful Christmas tree decorations made from puff pastry
 DIY Christmas tree decorations made from pine cones
Natural buds can serve as an excellent basis for creating beautiful Christmas tree decorations. In addition, cones are easy to find in the forest, in the park, on the street - they are free and always look natural.
You can transform any bump using paints with gilding, sparkles, ribbons and rhinestones. How bigger bump- the better and more impressive your craft will look.
In the craft store you can find a huge number of ideas for handicrafts: snowflakes, artificial snow, silver.

 Cone decorated with beads and seed beads
  Pine cone decorated with ribbon Snowflakes made from pasta
 DIY Christmas tree decorations made from satin ribbons
Satin ribbon- a very beautiful material with which you can make a Christmas tree toy. As a basis you need to use foam ball. It's necessary cut on four sides, as if into slices.
Wide tape cut into four pieces. Then, using a stationery or regular knife the tape is inserted into the cuts made very tight on all sides. Decorate seams you can use rhinestones, chains or other contrasting thin tape, glued with superglue.

 Notching the ball and moving it inward satin ribbon

 Ready product
 Video: “Unique DIY Christmas tree decorations. Elena Epinatyeva"
Hello, dear subscribers!
The magical time has come. When you go to the store, and there is such beauty, everything is dressed up and decorated. The soul rejoices and the eyes rejoice. The most amazing thing in all this is when you meet her, and there are toys hanging on her, and they are so different. Just like in that song, there are balloons and firecrackers.
Now there are a lot of all kinds of products on sale, artificial snow, rain, tinsel - all this gives us a fairy tale and gets us going. And of course it lifts your spirits. But, besides all this, we all eagerly begin to create for the New Year and do it with the children, which we happily hang on the forest beauty.
You can make New Year's toys with your own hands from anything, waste material or improvised means. And if you still don’t know what to make them from, then you did the right thing by looking at me in this article. Now you will be shocked and quickly run to make something.
And the main thing is that all these ideas are so simple and unique that they will charm anyone. All the crafts that you conjure can be given to friends and colleagues, as well as to please your favorite teachers or... anyone. Friends, create together with your children, because they certainly won’t wait for it.
So, choose the job you like and get to work, because there is very little time left, before you know it, bam and the holiday has arrived! Get ready today. Good luck.
It seemed that nothing could be easier than taking something unnecessary and creating some wonder. But in order to accomplish this you need inspiration, so that you have something to start from. To do this, I have collected a lot of ideas for you, so that from all the variety you can find something that suits your soul.

I want to offer you one interesting option that you will be absolutely delighted with. Let's make toys from plywood. You think it’s impossible to do this, I thought so too, until I saw the step-by-step instructions. Afterwards I gave my husband a task, and the children enthusiastically glued napkins onto the cut out figures and used the decoupage technique. In addition, you can paint with paints. In general, let's take it in order and you, too, will become wizards))).
First, find suitable layouts for which you will make blanks. And of course, find a sheet of plywood or thin scraps of lumber, they will also be suitable for this purpose.
Such homemade things can be made in any size, and unlike glass souvenirs, they do not break, and there is no need to worry about them.

The plywood sheet should be no more than 4-5 mm thick, without knots and without any kind of veneer defects. You should use a jigsaw and an electric drill. Perhaps a hand drill, PVA glue and a heat gun may come in handy.

It is preferable to use acrylic paints and you will also need aerosol varnish. To make the figures shine and sparkle, decorate them with sparkles, tinsel or artificial snow.
On a sheet of plywood, draw all the blanks you have chosen; you can also draw any decor yourself.

Then carefully and slowly cut them out with an electric jigsaw.
Advice! When cutting, guide the file along the outer line (contour) of the depicted templates.
Then you need to make a hole into which you will insert a thread or satin ribbon.


The first layer of paint should be exclusively white; after it dries, apply any other colors and decorate the craft.

And finally, another option that is amazing is decoupage. You can decorate the cut out figures with regular paper or cloth napkins, can you imagine?

For this purpose, take PVA glue and dilute it with water in a ratio of 1 to 1. Cut out the plot you need and glue it to a piece of wood.

Don’t forget to add brightness to this miracle after drying.


Or from paper strips, which you fold like an accordion and then glue together like this:


Among other things, you are the same as last time, when we created New Year symbols from threads, remember? You can take the idea as a basis, and in the same way balloon glue with silicate glue or PVA thread. And after drying, pierce the ball and you will get a light New Year's souvenir.

In the same way, you can make a big snowman and put it under the Christmas tree.


The next job is wow, interesting. It will especially appeal to kids who can’t wait for their moms and dads to want to build everything together, a snowman from cotton pads. Well, did it really turn out lovely?

If you have an old CD lying around, then an ordinary plastic ball will shine from it. How to do it? Yes, from disk fragments, and insert a shiny cloth inside.


In addition, you can decorate ordinary glass or transparent balls in completely different ways. For example, by pushing a photo or your family photo into it.


Another work that is made of tinsel or confetti will make an impression.


Another option is to take a foam sphere and glue or stick sequins onto it.

The next work will be bright and green, this is a charming Christmas tree, which will not be difficult to complete, the trunk will be made from an ice cream stick or take wooden skewers. Follow this masterclass:


Such a forest beauty can become a great gift or decorating any interior in a room or hall.
And here is another craft, which is also in the form, but it is made from cinnamon sticks and artificial tinsel. Instead of decorations, multi-colored buttons are perfect.
We will need:
- tinsel
- glue gun
- buttons
- cinnamon sticks
- rope
Stages:
Cut three strips from tinsel different lengths and attach them to the stick.
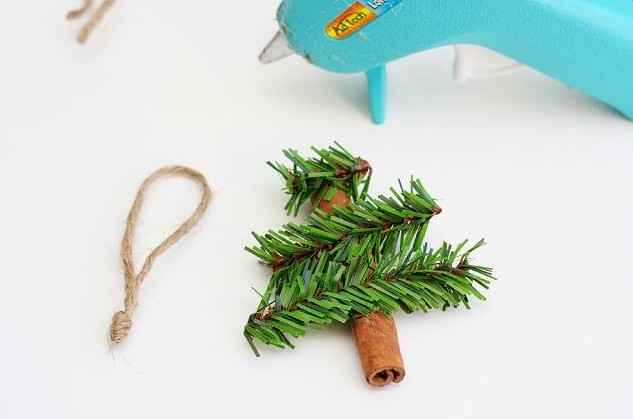
Make a loop out of the string and glue it and the tinsel to the cinnamon stick. And then arrange the buttons in a chaotic order.

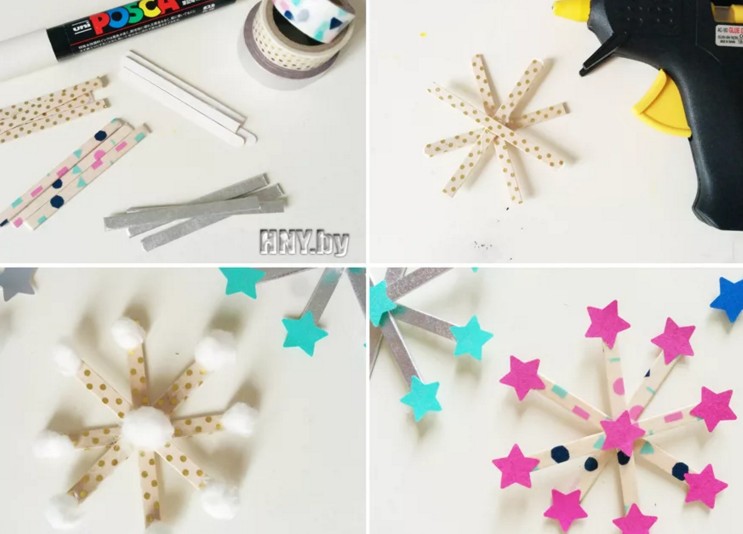
Some small masterpieces in the form of houses or snowflakes are also created from ice cream sticks.


And also from tubes:

Or from wooden clothespins, the main thing is to decorate with sparkles.

You can find a lot of interesting things, even pasta souvenirs. It was necessary to think of such a thing, crazy hands do not know boredom).

The kids will love another craft option: take a pine cone and turn it into an animal.

Shape the head and ears, and all other parts of the body. You will get the face of a bunny.

Now glue it onto the pine cone.

This is the kind of animal you will get))).

Using the same scheme, you can also make a hedgehog or a squirrel.


Or decorate the cones with soft balls and glue them using a heat gun.

A very unexpected option made from nuts, but look what wonderful animals the author created. Such beauty will also decorate any holiday tree.

Using the classics, you can easily decorate an ordinary pear-shaped light bulb with acrylic paints.

A cool option is to make a Christmas tree-mandala out of threads; you wouldn’t even be ashamed to give one like that. Such a creation looks quite impressive, no one will refuse such work.


From scraps of fabric, make a magnificent souvenir that will delight anyone, for example, mom or grandpa.


It’s also not difficult to make all kinds of creations from ordinary fabric:


Enough original crafts is a beaded Christmas tree, which is made in the form of a spiral using wire.


New Year's toys for the Christmas tree 2020 made of felt (patterns and templates inside)
I think that many came to this article to find exactly the right ones felt toys, and take the necessary stencils from the site and go to cut and sew. Among other things, I have one wonderful post on my blog that contains many other schemes and developments, so don’t be shy, go ahead and choose.
I propose to consider a Christmas star, which is made of ordinary white fabric, and the cap is made of felt.

First, take a blank, print it out and apply the outline to the fabric.


Then fill the toy with cotton wool or padding polyester. And then the fun begins, color the star with instant coffee, brew this drink in a glass, and then decorate it.

Sew the cap to the star. Glue the eyes and embroider the nose and mouth with thread.


Now take the following sample as a basis. Who does he remind you of? Yeah, of course a snowman.


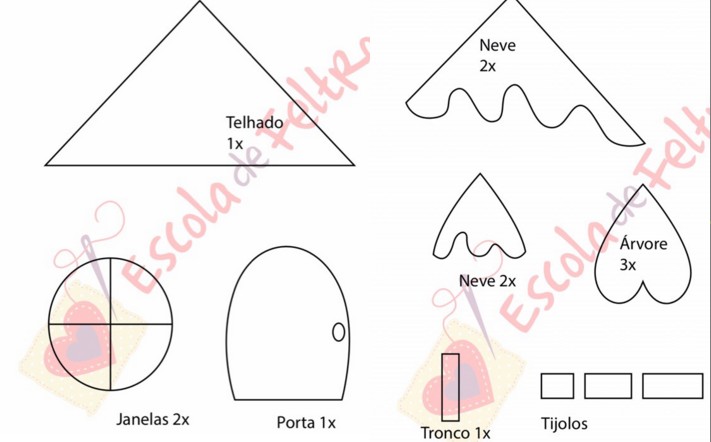
It would also be an excellent solution if you cut and sew such a house. Catch his sketches.


I also met very beautiful toys in blue tint, and they were decorated with snowflakes and beads. Great, I thought, and decided to show them to you. Make a printout of the Christmas tree, star and circle.

Cut out the necessary parts from felt.

Then attach the snowflake and bead like this, as shown in this photo.

Carefully glue or sew on the decor, and do the same with the beads.


Another job, take note.


And here are a couple more ideas, I really liked the cedar cones and the boot that Americans give on this holiday, January 31st.


Master classes on stylish crochet toys for the New Year
Well, let's move on. And be sure to first of all knit the symbol of the New Year, which must be present in every home. Choose a scheme and go ahead. In fact, I have a separate topic on my blog, which is collected so if you are interested, come visit.


A cute pig that any boy or girl will have if you suddenly decide to knit such a miracle.


These are such funny little pigs or pigs.


Take this video as a basis, it shows everything from A to Z and you will also get the same souvenir:
And if you want to tie New Year's balls, then here's another story for you.
Now another pattern, take it as a basis, because everyone also likes a knitted Christmas tree, no one doubts it.


It will turn out very cool and attractive.

Or like this simple work from a lace that is knitted from posts.

The next work is a bell.

I liked the idea of a snowflake, look how painted it is.

It turns out that even such a winter masterpiece as a Christmas tree is knitted from threads. Cool.


Funny and perky snowmen. Do you want the same? Voila, they are already yours).

Where would we be without Santa Claus, tie him up too.
And a few more diagrams and descriptions.


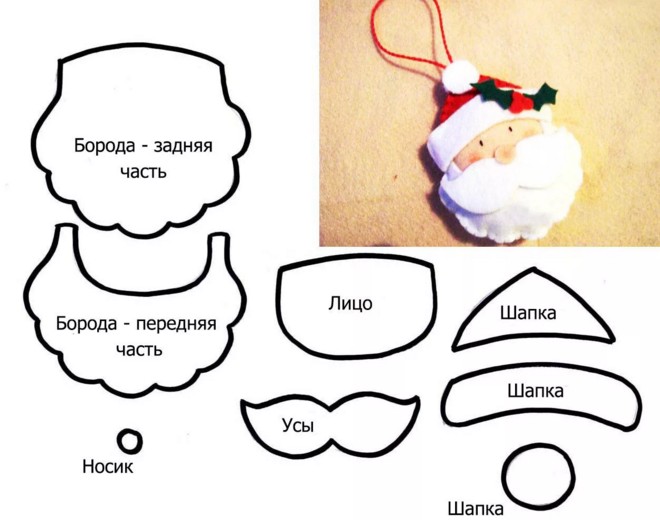
Making Santa Claus with your own hands: 8 best ideas
You can make a grandfather from different materials, for example, from ordinary cotton pads and ordinary red yarn. You will also need another disposable spoon. Step-by-step pictures will help you understand everything.


The spoon will need to be glued between cotton pads.


Now we make Frost out of paper, or perhaps he will remind you of Santa.


It’s also easy to make a figurine of your favorite character from a regular cone.

You can make a craft using the origami technique.


In addition, there are already ready-made stencils using which you can easily glue such a craft together.


Step-by-step instructions on how to make Christmas tree decorations from cotton wool
I recently came across a video that amazed me. I didn't even imagine that this was possible. It turns out that I’m sharing them with you. Create such wonderful souvenirs and decorate the forest beauty with them.
Souvenirs from plastic bottles
What a beauty, I took a soda bottle, spotted the idea right there and now the craft is almost ready. Take into account all your ideas and choose the one that suits you or the one that is easier to do. Involve your children in this activity. Well, let's see.


Craft Christmas tree made from salt dough
Now let's look at another popular option. After all, many needlewomen love to make handmade using regular dough. And you can see what comes out of it right now:

We will need:
- Flour – 3 tbsp. l
- Water – 10 ml
- Recess for dough - herringbone
- Gouache
- Thin brush
- Table salt – 6 tbsp. l

Stages:
Mix all the ingredients according to the list, you should get an elastic dough.

Let the bun lie for 5-10 minutes and rest.

Then roll out the cake and use a Christmas tree mold to squeeze out the shape.
Roll out the dough to a thickness of no more than 5 mm.

This is how the preparation will turn out.

Let it dry for about 24 hours. And then take gouache and paint.

Volumetric star on the top of the Christmas tree
Well, how can a Christmas tree be without a tip, it usually comes out five pointed star or spire. Let's learn how to make a star yourself so you don't have to run to the store and buy it. How do you like this idea?
All you need is flexible wire and beads, see the master class:


There is another option, it is paper. Although the star looks gorgeous. And the whole point is that scrap paper is used, but it will also shine from ordinary colored paper.

Prepare everything you need for work. These are sheets, glue, scissors and a pencil.

Fold the square in half, and then in half again.

Then fold the leaf diagonally.

With all the folding you get this, shown in the figure:

Now turn the piece over to the reverse side, inside out, and make the cuts. Use a ruler to measure and mark a dot. This is done like this, in the photo you can see that there are 4 squares, and those sides that are located towards the center of the sheet, measure them and divide them in half. Cut it.

Connect each cut to a line to create a triangle on each side.

Apply glue to one side of each triangle.

And attach the opposite one and glue it together.

Thus, you must complete two blanks. It is from them that the star is assembled.

And then glue them together.

Here’s another idea that will attract children’s attention: this craft is made from threads that are well moistened with glue.


Don't forget to let the toy lie down and dry completely. Enjoy the holiday you created!

The simplest star, like this one with decorative little things in the form of buttons.


Or something like this nice option, which is made of cardboard, and then rewound with threads and decorated with felt leaves and berries.


DIY garland for the New Year - all the fun
Not a single New Year celebration is complete without all kinds of garlands; they flash on the Christmas tree and charge it with multi-colored lights. Interesting option you can create from various materials, use the skins of citrus fruits, imagine what the smell will be. You can also dry them in advance.
To work, you will need cookie cutters or a regular knife, but they are more difficult to create such creations.

And this is what happened, by the way, in this way you can make figures from sweet dough and bake them in the oven.

Gather all the parts onto a thick thread and hang it on a tree.

Not only citrus peels, but also the pulp itself are also suitable. Dry the pieces.

And when the fruits are ready, collect them on a string.


It is quite possible to sew a garland; use regular felt or foamiran.


I found one video on the YouTube channel that shocked me, it shows one super craft, I want you to watch it. Because you have to complete this garland today:
Here are a few more options, take ready-made templates and get creative. To do this, fold the paper like an accordion, circle the desired symbol, and cut it out.


Making New Year's toys from paper and cardboard with children
Now let's create with kids or schoolchildren. The first job will be unusual and at the same time interesting. Make a hexagon out of cardboard and make cuts on each side with scissors, as shown in the picture. Next, take a ball and thread the thread through these cuts.

It will turn out quite attractive and a child can easily make such a toy on his own and hang it on a forest beauty.

Or decorate your home with such souvenirs.

The next option is a paper Christmas tree. Keep instructions:


Or make the following toy using the vytynanka technique:


Print out the stencil and carefully cut out three blanks with a stationery knife, and then fold each of them and glue them to each other. Entrust the gluing work to a schoolchild.

You can also quickly build such a craft from dry twigs or sticks; the base will be made of thick paper or cardboard.

Cut a strip and pierce it on one side, use a hole punch or a regular pencil.

Glue dry sticks from largest to smallest.


Also, using a triangular base made of thick cardboard, it is easy to make a Christmas tree; wrap the workpiece with green woolen threads.

And if you want to surprise everyone, use a clock or alarm. This type of work will last a long time in your home.

To do this, you need to take a circle of tape and glue a wire onto it, into which stick parts from a Kinder Surprise egg.

To fill the circle, glue a piece of cardboard and a sheet of colored or scrap paper on top of it. Prime with acrylic paint.

Make icicles from glue.

Customize your watch in any way, for example like this:

It’s beautiful and not at all difficult with children from kindergarten to primary school create such a snowman from stripes.

Or almost also a heart:

When I was a child, I remember making these balls, oh, how wonderful they were. Let's remember and follow these steps.


Or make these cute flowers from 12 pieces of paper strips. Connect each strip, or rather its ends, with a stapler.


From ordinary cardboard you can make an applique in the form of a medallion, or decoupage.

Here is another craft for a child, I hope everything is clear to you.


Or use another idea, this involves a white napkin, which can later be painted green:


Hooray! That's all I have for today. I shared what I could find online, make toys for the New Year and decorate the Christmas tree with them. I wish everyone good mood and have a positive evening.
Bye-bye everyone. Join the group in contact, write comments and reviews. I'll be glad.
The New Year is approaching, which means that a magical time of miracles is coming, in which not only children, but also adults believe. A tradition has taken root that if you decorate a Christmas tree beautiful jewelry made with your own hand, and at the same time make a wish, then when the chimes strike, it will certainly come true. In this article we will tell you how make a Christmas tree decoration with your own hands.
Paper is a universal material for needlework. You can use it to make extraordinary New Year’s decorations not only for the Christmas tree, but also for your home.
The modern market offers us many options paper materials for hand-made. These include:
- Cardboard
- Corrugated paper
- Self-adhesive paper
- Colored paper of different weights
In addition to decorative paper materials, you can also use old postcards, newspapers, and magazine sheets. You just have to show your imagination and creativity to make original ones DIY Christmas tree decorations made of paper, We’ll tell you later what techniques are best to use.
Toy made from paper tubes using scrapbooking technique
We invite you to decorate your Christmas tree this year with this beautiful snowflake:

To make it you will need the following material:
- Several varieties of colored cardboard (two sheets will be enough)
- Scrapbooking paper (you will also need 2 sheets)
- Scissors, high-quality glue (preferably quick-drying or heat gun)
- Braid of any color and fastening from an old chain (in the form of a ring)
When all the materials for the work are in your hands, proceed to complete this DIY Christmas tree decorations made from cardboard. It won’t take much time – literally half an hour, maximum 40 minutes. The algorithm of actions should be as follows:
- Prepare squares of colored cardboard of different sizes. 14 pieces should have sides of 2.5 cm, and 14 should have sides of 3 cm.

- Make tubes from the resulting squares, gluing their ends together to form a rhombus.
- Make a circle out of cardboard (its diameter should be 5 cm).

- Mark the middle on this circle and start gluing the tubes one after another. The first row should consist of large tubes, and the second - of smaller ones.

- Decorate the resulting snowflake with rhinestones, a brooch, attach a braid and a chain attachment to it - the decoration is ready and can be used for its intended purpose.
New Year's paper toy in quilling style
You can do something like this DIY Christmas tree toy for school:

After all, every year on the eve New Year's holidays children are given as homework prepare original decoration on the Christmas tree using improvised materials. The quilling technique is the best in this regard, because you don’t need to spend money on decorative paper, you can use:
- ordinary newspaper sheets
- baking molds (in the form of stars or hearts)
- minimum office supplies - glue, scissors and varnish
- braid for attaching the toy to the Christmas tree
Making the toy is very simple:
- Cut out many different strips of 5 cm wide from newspapers and fold them in half lengthwise towards the center. For an example of how this should look, see the image below:

- Twist each strip into circles, gluing them so that they do not fall apart. They should look like this:

- Place the base of the future toy in strips in a baking dish (along its perimeter). In our case it will be like this asterisk:

- Lubricate the base with glue and fill the mold with circles (they will also need to be glued together).
- When the toy is dry, open it with colorless varnish, and then remove it from the mold, thread it through the braid and hang it on the Christmas tree.

DIY paper ball toys for the Christmas tree
Some people throw away old books, but from their shabby, already yellowed pages you can create such a very beautiful three-dimensional Christmas tree ball:

In addition to book pages, you will need:
- Fast drying glue
- Any container that you circle to make circles out of paper, or a compass
- Scissors
- Chopped glitter
- Paper clips
- Braid
- Needle and thread or sewing machine
Creating this paper Christmas tree decoration will not take much of your time. In half an hour you will make an original decoration if you follow this procedure:
- Cut out circles from book paper

- Sew them in the middle using sewing machine or needles and thread

- Using paper clips in a checkerboard pattern, clamp the edges together as in the photo:

- These edges need to be glued together to form a ball:

- Fill the resulting holes with glitter or use other decor.

All that remains is to attach a ribbon to the toy and hang it on the Christmas tree.
DIY Christmas tree decoration made from fabric
Fabric ranks second among the materials most often used to create Christmas tree decorations. Such toys are very practical, as they do not break. In addition, they look very bright and are completely safe for children. They can be made flat, but they look much more attractive if they are filled with some material, for example, padding polyester or cotton wool, so that they gain volume.

Since the Fire Rooster will be the patron of 2017, we offer you an example of making DIY toys for the Christmas tree, symbolizing the year of the rooster.
To make it you will need the following material:
- Fabric 5 different colors
- Buttons for making eyes for a cockerel
- Sintepon
- Braid
- Pattern
- Thread and needle

- Using this pattern, you cut the fabric, then gradually sew the parts together, gradually filling them with padding polyester.
- Seams can be reversed
- When the product is ready, sew a braid onto it, with which you will hang the toy on the Christmas tree
In addition to the symbol of the coming year, you can make others Stuffed Toys DIY Christmas tree:
- Boots
- Mittens
- Birds
- Asterisks
We have attached the DIY Christmas tree decoration patterns that we have listed for you in this article:


DIY felt Christmas tree toys
Felt is a material that does not require additional processing in the process of making Christmas tree decorations. You can make a huge number of toys out of it. New Year. We will tell you about the simplest but original options.
Felt Christmas tree

- Cut out 5 circles of different diameters from green felt. The maximum diameter should not exceed 10 cm.
- In each circle you need to make a cutout in the form of a triangle, such as shown in the photo below:

- Make cones from these circles, the ends of which need to be glued with quick-drying glue.

- From the cones, assemble a pyramid and sew it with thread. Attach a ribbon to the top.

- Make a Christmas tree trunk from brown felt - cut out a rectangle, twist it into a tube and sew it to the Christmas tree so that the toy looks like this:

Felt candies

- Cut strips from felt, the width of which is 1 cm and the length is 20 cm

- Glue 6 strips of three different colors together

- Twist the resulting volumetric strips into a circle

- Attach sticks and braid to these circles so that you get these Christmas tree decorations:

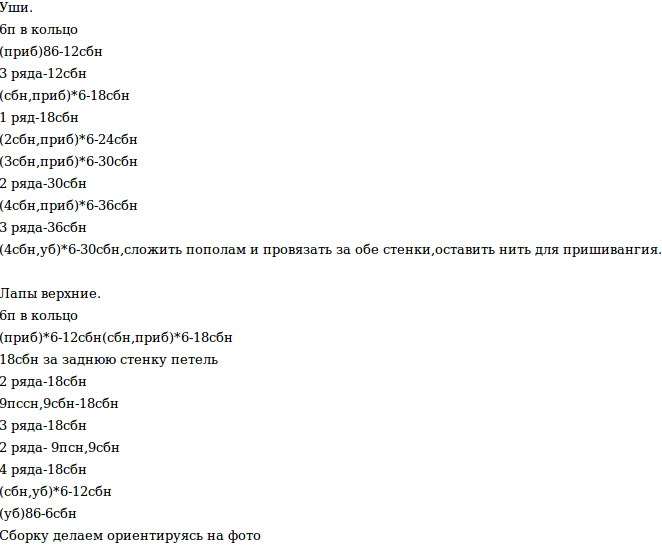
Crochet Christmas tree toys
Few people master the art of crocheting, because this activity is very painstaking, requiring time and certain knowledge. But with the help of a hook and knitting threads you can make a very simple but original decoration for old New Year's glass balls.

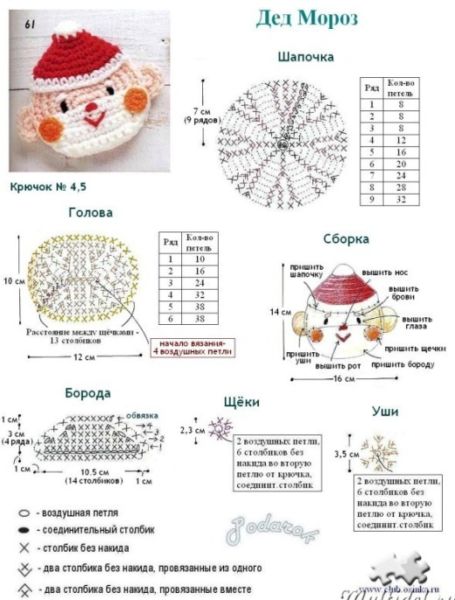
Here are a few Christmas tree toy schemes crochet:


DIY Christmas tree toy from a bottle
The most popular toys on the New Year tree there are snowflakes, because they symbolize the onset of winter and holidays. Oddly enough, you can do something like this Christmas tree decorations made from plastic bottles. They will look very attractive not only on the New Year's beauty in the apartment or at school. Snowflakes from bottles are suitable as handmade toys for the city Christmas tree.

It's very easy to make them:
- Separates the bottom of the bottles from its main part, which you will not need
- Paint the bottom of the bottles with white paints to create a frosty pattern. You can sprinkle them with glitter on top
- All that remains is to attach the ribbon and hang the toy on the Christmas tree
DIY Christmas tree decorations made from disks
In every home you can find many damaged CDs, from which you can make wonderful decorations for the Christmas tree. There are several simple but original options:
- Cover a round disc with knitting threads, fringe, fabric, beads or beads:

- Cut the disk into small pieces, and then paste them over an old glass ball or a ball made using the papier-mâché technique:

- Cut out a bell or a Christmas tree from the disk using a stencil, and simply attach braid to the figures. Due to the natural shine of the disc, such toys will look very bright:

DIY beaded Christmas tree toys
Beading is very popular today. This type of activity is rightfully elevated to the rank of high art, because only gifted craftsmen can create beautiful products from small beads. But this material can also be used to make simple decorative items, for example, Christmas tree decorations. In this article we will present several techniques for making New Year's decorations using beads:
- Cover an old New Year's ball with beads
Everything you need to make this beautiful ball, This:
- Glass bowl
- Glue brush
- Multi-colored small beads or large beads
Coat the ball with glue and roll it in beads so that it evenly sticks to the ball:

- Weave a toy according to the pattern
This option is suitable only for those who know first-hand what beadwork is. Using beads, wire and a diagram, you can create such a beautiful snowflake:
You can safely do this DIY Christmas tree toy for a competition New Year's decorations. Approximate patterns for knitting snowflakes or stars from beads are presented below:


- String beads onto a wire and twist a Christmas tree with a snake

DIY foam toy for Christmas tree
Foam plastic, this is the material from which you can make big toy on the Christmas tree with your own hands. This material can be processed in any way:
- It can be painted with paints
- Cover with decorative tape or oracal
- Glue beads on him
- Decorate using decoupage technique

Do-it-yourself voluminous Christmas tree toys made from natural materials: photo