An original large DIY New Year's toy. DIY Christmas tree decorations
The New Year is coming, and this is always exciting. The coming year is the time of reign of the bright, willful, somewhat eccentric and eccentric, but very family-oriented and homely sign - the Rooster. 2017 belongs to the element of Fire, and its color is red. The Year of the Rooster, especially the Red Fire Year, has its own specific characteristics. Time will tell what the next year will bring for each of us, but we must all be well prepared to meet it.
Everyone knows that the New Year tree is the embodiment of celebration, joy and happiness. Christmas decorations occupy almost the first place in the formation of a magical atmosphere of expectation of a miracle, and DIY Christmas tree decorations give real, genuine emotions and impressions; they will help you become the creators of this magical mood.
Most housewives prefer to decorate Christmas trees on their own, that is, to make Christmas tree decorations themselves. It is believed that the craftswoman, in the process of work, puts a piece of her warmth, her soul into every toy, into every product. That is why they always turn out much more elegant and prettier than ordinary store-bought balls and cones.
DIY Christmas balls made of thread for the Christmas tree
For the manufacture of New Year's balls from threads you will need:
- office glue;
- air balloons;
- multi-colored threads;
- PVA glue – 50 ml;
- sugar – 2 teaspoons;
- water – 50 ml;
- disposable gloves;
- scissors;
- ribbons, sequins, sparkles, beads, etc.
Step 1. First you need to inflate the balloons to a slightly smaller size than average. The size of the balls will determine the size of the decorations.
Step 2. In a bowl, mix sugar, water and PVA glue.
Step 3. Carefully lower the threads into the resulting solution and let them soak thoroughly. Slowly wind the threads around the balls in different directions.
Step 4. Now you need to hang the balls to dry for 5-6 hours, and after drying, pierce the balls with a needle and carefully pull them out of the thread shell.
Step 5. Using stationery or other glue, glue bows, ribbons, beads, etc. to the dried surface of the balls. The decoration is ready to delight you and your guests!
Sweet Christmas decorations

To make sweet Christmas tree decorations you will need:
- thick paper of golden color;
- paper of a different color;
- glue;
- wide ribbon;
- narrow ribbon;
- scissors;
- various sweets.
Step 1. From gold paper (or any other thick paper bright color) cut into squares with sides of 15 cm.
Step 2. Using a compass, you need to mark the shape of a semicircle and cut off the excess along the line.
Step 3. Carefully roll the sheet to form a cone and glue the edges together.
Step 4. Take a wide ribbon and cut 15 cm, glue it along the outer edge of the cone.
Step 5. Make a loop from a thin ribbon so that you can hang the cone on the Christmas tree.
Step 6. Place sweets inside an improvised bonbonniere (cone) and feel free to hang the sweet decoration on the New Year's tree!
DIY Christmas tree decorations made from salt dough

To make toys from salt dough you will need:
- water;
- flour;
- salt;
- cookie cutters;
- rolling pin;
- dye;
- baking paper;
- straw;
- braid.
Step 1. For the dough, take 1 cup of flour, a pinch of salt, and enough water so that the dough does not stick to your hands, but has a fairly dense consistency.
Step 2. Using a rolling pin, roll out the dough to a thickness of at least 9 mm;
Step 3. Now you need to take the baking figures and squeeze out the blanks for future Christmas tree decorations onto the rolled out dough. Use a drinking straw to make holes for loops on the toys.
Step 4. Carefully place the cut out shapes on a baking sheet lined with parchment and place in an oven preheated to 250 degrees for 3 hours.
Step 5. When the toys are “ready”, you can paint them in different colors and thread ribbons and threads through the holes to hang them.
Volumetric soft toys for the Christmas tree

To make soft Christmas tree toys you will need:
- fabric pencil or chalk, a piece of soap;
- dense fabric (velvet, velor or felt);
- thin colorful fabric;
- threads and needles;
- various buttons;
- ribbons and lace;
- cotton wool or synthetic winterizer;
- scissors.
Step 1. On thick fabric, draw the shapes of future toys and cut them out. Each toy requires two molds.
Step 2. Now you need to sew two identical shapes. Don't forget to leave small holes for stuffing with cotton wool or padding polyester.
Step 3. After filling the products with cotton wool, you need to sew up the holes.
Step 4. Sew to the toy thin fabric a different color or shade (for a tree toy, a fabric in the shape of a green leaf is suitable, for a house toy - a door and window made of a different fabric, for animal toys - eyes, ears, bows, etc.).
Step 5. To give the toys more splendor, you can sew fringe or lace along the edges.
Step 6. All that remains is to attach loops to the Christmas tree decorations and you can hang new toys made from .
Christmas balls made of cardboard

To make cardboard balls you will need:
- dense colored paper, cardboard or old postcards;
- template or compass;
- pencil;
- glue;
- ruler;
- scissors;
- ribbon or beautiful rope;
- awl.
Step 1. Using a compass or glass, draw and cut out 20 circles of the same size.
Step 2. Inscribe an equilateral triangle into each circle using a ruler (to make things go faster, you can cut out a triangle template from thick paper and trace it on each circle).
Step 3. Now on each circle, along the lines, you need to bend three “petals” that are directed upward relative to the front side.
Step 4. For five circles you need to smear the side “petals” with glue and glue the circles behind these “petals”. This will be the top of the ball.
Step 5. Using an awl, make a hole at the very top and thread the ribbon, securing it with a knot on the inside of the future voluminous faceted ball.
Step 6. In the same way, glue the next five fragments using the “petals”. This will form the bottom of the ball.
Step 7 Using the remaining ten elements, make the middle of the New Year's ball. Gluing the circles by the “petals” in a row, then close them into a ring.
Step 8 All that remains is to glue together the three parts of the ball and an amazing decoration Christmas tree You can hang it in a place of honor!
Original Christmas tree decorations - “New Year’s Hedgehogs” with your own hands

To make original Christmas tree decorations you will need:
- foam balls with a diameter of 4.5 cm;
- beads made of plastic or cut glass with a diameter of 5 mm;
- long pins (tailor's);
- silk ribbon;
- glass beads;
- scissors.
Step 1. Thread a small bead onto a long pin, then a bead, and stick the pin into the foam ball.
Step 2. In this way, you need to “prick” the entire ball so that there is practically no empty space left.
Step 3. Having covered the entire surface of the ball with beautiful beads and seed beads, attach a ribbon loop to it. To make the “hedgehog” look impressive, the ribbon can be pre-tied with a bow.
Christmas decorations made from pasta

To make unusual Christmas tree decorations you will need:
- a wide variety of pasta (shells, spirals, tubes, etc.);
- dye;
- glue;
- ribbon or braid;
- scissors;
- sequins, beads, beads, gold or silver sprinkles.
Step 1. Let your imagination guide the process from beginning to end. Think over the design of the future decoration and start gluing vermicelli.
Step 2. You can add chic to a decoration already painted in your chosen colors by adding sparkles, beads and sequins in any order or according to a pre-planned pattern.


You can also paint the pasta first, and only then glue them into fancy shapes, or you can glue the pasta first, and leave the painting for dessert.
From pasta you can make snowflakes, garlands and flowers, as well as cute little angels by arranging pasta different types. A decorative Christmas tree made from pasta tubes will also look great. Such a Christmas tree can be placed next to a living New Year's beauty, or you can give it to a dear guest as a souvenir.
Join to exciting process You can also invite children to create original decorations for the Christmas tree. Entertaining pastime will help not only create Christmas mood, but also to develop children's imagination.
The New Year is approaching, which means that a magical time of miracles is coming, in which not only children, but also adults believe. A tradition has taken root that if you decorate a Christmas tree with beautiful decorations made with your own hands, and at the same time make a wish, then when the chimes strike, it will certainly come true. In this article we will tell you how make a Christmas tree decoration with your own hands.
Paper is a universal material for needlework. You can make extraordinary things out of it. new Year decoration not only for the Christmas tree, but also for the home.
The modern market offers us many options paper materials for hand-made. These include:
- Cardboard
- Corrugated paper
- Self-adhesive paper
- Colored paper of different weights
In addition to decorative paper materials, you can also use old postcards, newspapers, and magazine sheets. You just have to show your imagination and creativity to make original ones DIY Christmas tree decorations made of paper, We’ll tell you later what techniques are best to use.
Toy made from paper tubes using scrapbooking technique
We invite you to decorate your Christmas tree this year with this beautiful snowflake:

To make it you will need the following material:
- Several varieties of colored cardboard (two sheets will be enough)
- Scrapbooking paper (you will also need 2 sheets)
- Scissors, high-quality glue (preferably quick-drying or heat gun)
- Braid of any color and fastening from an old chain (in the form of a ring)
When you have all the materials for work in your hands, proceed to complete this DIY Christmas tree decorations made from cardboard. It won’t take much time – literally half an hour, maximum 40 minutes. The algorithm of actions should be as follows:
- Prepare squares of colored cardboard of different sizes. 14 pieces should have sides of 2.5 cm, and 14 should have sides of 3 cm.

- Make tubes from the resulting squares, gluing their ends together to form a rhombus.
- Make a circle out of cardboard (its diameter should be 5 cm).

- Mark the middle on this circle and start gluing the tubes one after another. The first row should consist of large tubes, and the second - of smaller ones.

- Decorate the resulting snowflake with rhinestones, a brooch, attach a braid and a chain attachment to it - the decoration is ready and can be used for its intended purpose.
New Year's paper toy in quilling style
You can do something like this DIY Christmas tree toy for school:

After all, every year on the eve of the New Year holidays, children are asked to homework prepare original decoration on the Christmas tree using improvised materials. The quilling technique is the best in this regard, because you don’t need to spend money on decorative paper, you can use:
- ordinary newspaper sheets
- baking molds (in the form of stars or hearts)
- minimum office supplies - glue, scissors and varnish
- braid for attaching the toy to the Christmas tree
Making the toy is very simple:
- Cut out many different strips of 5 cm wide from newspapers and fold them in half lengthwise towards the center. For an example of how this should look, see the image below:

- Twist each strip into circles, gluing them so that they do not fall apart. They should look like this:

- Place the base of the future toy in strips in a baking dish (along its perimeter). In our case it will be like this asterisk:

- Lubricate the base with glue and fill the mold with circles (they will also need to be glued together).
- When the toy is dry, open it with colorless varnish, and then remove it from the mold, thread it through the braid and hang it on the Christmas tree.

DIY paper ball toys for the Christmas tree
Some people throw away old books, but from their shabby, already yellowed pages you can create such a very beautiful three-dimensional Christmas tree ball:

Except book pages, you will need:
- Fast drying glue
- Any container that you circle to make circles out of paper, or a compass
- Scissors
- Chopped glitter
- Paper clips
- Braid
- Needle and thread or sewing machine
Creating this paper Christmas tree decoration will not take much of your time. In half an hour you will make an original decoration if you follow this procedure:
- Cut out circles from book paper

- Sew them in the middle using sewing machine or needles and thread

- Using paper clips in a checkerboard pattern, clamp the edges together as in the photo:

- These edges need to be glued together to form a ball:

- Fill the resulting holes with glitter or use other decor.

All that remains is to attach a ribbon to the toy and hang it on the Christmas tree.
DIY Christmas tree decoration made from fabric
Fabric ranks second among the materials most often used to create Christmas tree decorations. Such toys are very practical, as they do not break. In addition, they look very bright and are completely safe for children. They can be made flat, but they look much more attractive if they are filled with some material, for example, padding polyester or cotton wool, so that they gain volume.

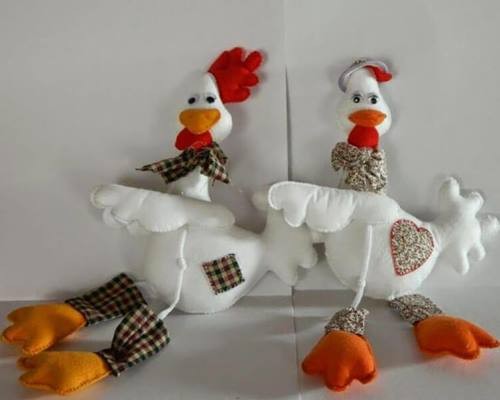
Since the Fire Rooster will be the patron of 2017, we offer you an example of making DIY toys for the Christmas tree, symbolizing the year of the rooster.
To make it you will need the following material:
- Fabric 5 different colors
- Buttons for making eyes for a cockerel
- Sintepon
- Braid
- Pattern
- Thread and needle

- Using this pattern, you cut the fabric, then gradually sew the parts together, gradually filling them with padding polyester.
- Seams can be reversed
- When the product is ready, sew a braid to it, with which you will hang the toy on the Christmas tree
In addition to the symbol of the coming year, you can make others Stuffed Toys DIY Christmas tree:
- Boots
- Mittens
- Birds
- Asterisks
We have attached the DIY Christmas tree decoration patterns that we have listed for you in this article:


DIY felt Christmas tree toys
Felt is a material that does not require additional processing in the process of making Christmas tree decorations. You can make a huge number of toys from it for the New Year. We will tell you about the simplest but original options.
Felt Christmas tree

- Cut out 5 circles of different diameters from green felt. The maximum diameter should not exceed 10 cm.
- In each circle you need to make a cutout in the form of a triangle, such as shown in the photo below:

- Make cones from these circles, the ends of which need to be glued with quick-drying glue.

- From the cones, assemble a pyramid and sew it with thread. Attach a ribbon to the top.

- Make a Christmas tree trunk from brown felt - cut out a rectangle, twist it into a tube and sew it to the Christmas tree so that the toy looks like this:

Felt candies

- Cut strips from felt, the width of which is 1 cm and the length is 20 cm

- Glue 6 strips of three different colors together

- Twist the resulting volumetric strips into a circle

- Attach sticks and braid to these circles so that you get these Christmas tree decorations:

Crochet Christmas tree toys
Few people master the art of crocheting, because this activity is very painstaking, requiring time and certain knowledge. But with the help of a hook and knitting threads you can make a very simple but original decoration for old New Year's glass balls.

Here are a few Christmas tree toy schemes crochet:


DIY Christmas tree toy from a bottle
The most popular toys on the New Year tree there are snowflakes, because they symbolize the onset of winter and holidays. Oddly enough, you can do something like this Christmas tree decorations made from plastic bottles. They will look very attractive not only on a New Year's beauty in an apartment or at school. Snowflakes from bottles are suitable as handmade toys city Christmas tree.

It's very easy to make them:
- Separates the bottom of the bottles from its main part, which you will not need
- Paint the bottom of the bottles with white paints to create a frosty pattern. You can sprinkle them with glitter on top
- All that remains is to attach the ribbon and hang the toy on the Christmas tree
DIY Christmas tree decorations made from disks
In every home you can find many damaged CDs, from which you can make wonderful decorations for the Christmas tree. There are several simple but original options:
- Cover a round disc with knitting threads, fringe, fabric, beads or beads:

- Cut the disk into small pieces, and then paste them over an old glass ball or a ball made using the papier-mâché technique:

- Cut out a bell or a Christmas tree from the disk using a stencil, and simply attach braid to the figures. Due to the natural shine of the disc, such toys will look very bright:

DIY beaded Christmas tree toys
Beading is very popular today. This type of activity is rightfully elevated to the rank of high art, because only gifted craftsmen can create beautiful products from small beads. But this material can also be used to make simple decorative items, for example, Christmas tree decorations. In this article we will present several techniques for making New Year's decorations using beads:
- Cover the old one with beads New Year's ball
Everything you need to make this beautiful ball, This:
- Glass bowl
- Glue brush
- Multi-colored small beads or large beads
Coat the ball with glue and roll it in beads so that it evenly sticks to the ball:

- Weave a toy according to the pattern
This option is suitable only for those who know first-hand what beadwork is. Using beads, wire and a diagram, you can create such a beautiful snowflake:
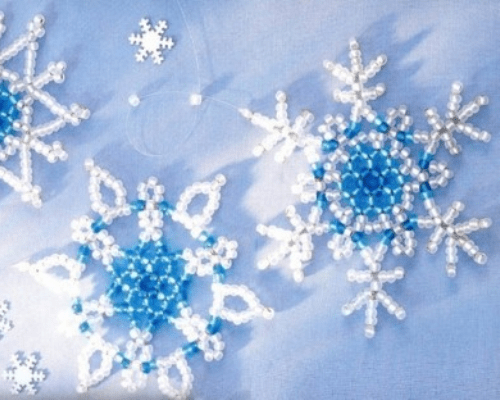
You can safely do this DIY Christmas tree toy for a competition New Year's decorations. Approximate patterns for knitting snowflakes or stars from beads are presented below:


- String beads onto a wire and twist a Christmas tree with a snake

DIY foam toy for Christmas tree
Foam plastic, this is the material from which you can make big toy on the Christmas tree with your own hands. This material can be processed in any way:
- It can be painted with paints
- Cover with decorative tape or oracal
- Glue beads on him
- Decorate using decoupage technique

Do-it-yourself voluminous Christmas tree toys made from natural materials: photo


Handmade Christmas decorations allow you not only to decorate your Christmas tree and home in an original way for the New Year, but also to have fun and give free rein to your imagination. In addition, homemade toys will bring special comfort, harmony and love with which they are made to your home.
When making Christmas tree decorations, bring your most incredible fantasies to life. You will have most available materials at your disposal, for example, plastic bottles, felt, burnt out light bulbs, cotton wool, foam, natural resources.


DIY Christmas tree decorations master class
Nowadays, you can easily buy Christmas tree decorations, but sometimes you really want to decorate your home with something unique, beautiful, and special. If you have a desire to create, try making a few toys yourself.
Multi-colored paper balls look stylish and modern on the Christmas tree. As a rule, they are made from colored paper, but let’s leave this material for the children in kindergarten, and use a spectacular scheme for making balls from colorful greeting cards or calendars.
What you will need:
- postcards;
- stationery scissors;
- glue;
- cup.
Let's start our master class:
- Using a glass, we make a mark on the cards and cut out eight identical circles.
- Fold each circle in half, then fold the semicircle in half again.
- Cut out one smaller circle and glue the folded circles to it.
- Then we turn the workpiece over and glue the remaining four folded circles on the other side.
- When the glue dries, unfold each circle and connect the walls to the adjacent circles. Use a hot gun or stapler.
- Attach a ribbon to one side to make it easy to secure the ball to the tree.
- The ball can be left as is, or decorated acrylic paints, multi-colored glitters, rhinestones.

You can make different balls from postcards using blanks different forms- triangles, semicircles, cones.

A great idea for homemade Christmas tree decorations - multi-colored designs from wine corks. For work you may need:
- paints;
- ribbons;
- beads;
- wire;
- threads;
- Super glue;
- special New Year's decor(miniature twigs, snowflakes, berries in the snow, etc.).
For example, you can make a silhouette of a Christmas tree from cork:
- Using a sharp knife, divide each cork into three equal parts. We prepare 18 blanks for work.

- Now on a flat surface we lay out 6 corks in the form of Christmas trees and glue them together. You will get 3 Christmas trees.

- While the trees are drying, cut three pieces of twine or ribbon, each 40 cm long. We make a loop in the middle.

- We apply the knot to the top of the tree, and wrap the edges around the perimeter. We attach the twine with glue.
- We tie the ends together and further strengthen them with a drop of glue.

- We form the remaining two trees in the same way.

- Additionally, the plugs on the Christmas trees can be decorated with rhinestones, confetti, sparkles, and painted.

Do you want to decorate your Christmas tree with unusual snowflakes?! Then go to the store for pasta! Choose rings, shells, spirals and other unusual shapes. Additionally, get hot glue and spray paint.
So let's get started:
- Grab a handful of shells and wheels. It is advisable to choose products of the same size.

- Come up with a snowflake template or use ready-made patterns.

- Arrange the pasta in the required order and glue them together using hot glue.
- Spray the snowflakes with spray paint and let dry.

- Tie ribbon loops to the snowflakes.
- If you want to make snowflakes more attractive, cover them with a thin layer of PVA and sprinkle with glitter.

- By the way, it is not necessary to make snowflakes white. For example, you can add gold and get bright and mysterious snowflakes...

- ...or change direction and make a quirky creation out of navy shells and farfalle.

DIY Christmas tree decorations made of cotton wool, with photos step by step
Cotton wool makes cute and budget-friendly Christmas tree crafts.
Let's make a cute Snow Maiden from cotton wool.
You'll need:
- a lot of cotton wool;
- varied decor;
- glue;
- newspapers;
- textile paints;
- wire.
How to make a toy:
- Divide the roll of medical cotton into several fragments. Then color them using textile paints. This is easy to do: pour water into a fireproof container, add dye, add cotton wool and bring to a boil. Let stand for 15 minutes, remove the cotton wool from the water and squeeze it out.

- The next stage is preparing the paste. Bring 200 ml of water to a boil, dissolve 2 tbsp in it. l. starch. Instead of paste, you can also use PVA.
- If you want to make the Snow Maiden realistic, you will have to knead salty dough to make a face out of him. Combine two parts flour, part salt, and a little water. Form a face from the dough and dry it in the oven at 120⁰C. When the face has cooled, paint on the elements - eyes, nose, eyelashes. Attach it to the frame using hot glue.

- Take a piece of wire and make a frame out of it that resembles a human body. Soak the cotton balls in the paste and wrap them around the parts of the workpiece that will be your future arms and legs. Then tear a piece of newspaper into pieces, moisten it with paste and wrap it around the “body”, modeling the silhouette of the Snow Maiden.

- At the end, apply another layer of cotton wool with paste, from which you form clothes, a braid and a hat for the Snow Maiden. At this stage, make sure your fingers are clean, as your beauty’s outfit can easily get dirty.

Will complement your outfit holiday tree cute sheep.
For creativity you need to prepare:
- roll of cotton wool;
- toothpicks;
- paste;
- cotton pads;
- empty chicken egg;
- syringe.
Master Class:
- Make a paste from a glass of water and 2 tbsp. l. starch.

- Pierce the washed egg with a syringe needle on one side and carefully remove its contents. Rinse the inside of the shell twice with water using the same syringe to prevent a rotten smell.
- Divide the cotton wool into parts. Separately, prepare 15-20 cotton wool balls with a diameter of up to 2 cm.
- Place the balls on toothpicks, moisten with paste and let dry.
- Make two punctures on the side of the egg with a needle and insert the thread. The distance between the holes should be 2 cm.
- Spread half the shell with paste and stick cotton wool on it. Do the same steps on the other side of the egg. You will get a ball of cotton wool with two threads.
- While the cotton ball is drying, roll the pieces of cotton into four cones - these will be the legs. Paint them with black acrylic paint.
- Make an oval 4-5 cm long from black cardboard. And also two smaller ovals - these are the ears. Immediately glue them to the sheep's head.
- From cotton pads cut out the eyes and attach them to the head.
- Glue the head and legs to the body using PVA. At the end, glue cotton balls - this will be the wool of the New Year's lamb.

Or you can make Winnie the Pooh:


DIY Christmas decorations for kindergarten, ideas with photos
On the eve of the New Year in kindergarten They organize exciting competitions for the best Christmas tree decoration. So as not to waste a lot of time coming up with ideas original toys, we offer three great ideas.
Beautiful and bright felt toys:

Unusual button balls:

Christmas tree decorations made of paper:

Do-it-yourself national Christmas tree toy, ideas with photos
If you want to move away from foreign Santa Clauses and elves, decorate your Christmas tree with national toys. For example, you can make several nesting dolls from felt.

If you have already mastered the technique of making toys from cotton wool, make a stork and a peasant woman.

And, of course, you can’t do without Santa Claus. Using quilling you can make such a cute toy for the Christmas tree.

DIY Christmas tree toy for the competition, details with photos
If you are making a Christmas tree decoration for a competition, a New Year's ball using the quilling technique will ensure your victory.
You will need:
- Blank ball made of foam plastic.
- Quillig paper.
- Glue.
- Satin ribbon.
How to make a toy:
- Select a few quilling elements to use and make them out of paper.

- To better attach the quilling elements, stick several paper strips around the perimeter of the ball.
- Then, using PVA, glue all the blanks onto the ball in accordance with the design idea.


Another one great idea for a Christmas tree decoration for the competition - crafts made from felt sheets.
Prepare:
- multi-colored satin;
- sewing threads;
- toy patterns;
- decor
You need to start making a Christmas tree toy by choosing a high-quality pattern. Without it, the toy will be sloppy. You can use these templates:


Additionally, cut out small details from felt - eyes, noses, etc. It is advisable to glue them to the toy using glue. To make the toys attractive, decorate them with beads, sparkles, and sequins. This is the beauty you will get:

Well, another option for a Christmas tree decoration for the competition is New Year’s figures and characters made from buttons and beads. All you need is a set of multi-colored buttons, a sewing needle, beads and thread. Using your imagination, you can create these original Christmas tree decorations:

DIY Christmas tree decorations from scrap materials, details with photos
Get original decorations for your Christmas tree using light bulbs, sparkles, ribbons, plastic bottles and other little things.
The first option for a Christmas tree decoration is decorated light bulbs that have already served their purpose. They can be painted with multi-colored acrylic paints and then dressed up as a snowman. You can use a cut baby sock as a hat:

Or decorate them with colorful glitter and ribbons using hot glue:

You can also attach twigs to the light bulbs to make snowman arms, and then attach a piece of twine as a loop:

The second version of a beautiful Christmas tree toy - a Christmas tree made from branches:
- Take three popsicle sticks, a few thin twigs and some braid.

- Using PVA, attach the broken branches to sticks, starting with the shortest and ending with the longest, so that the silhouette of a Christmas tree emerges.
- Then glue on a loop of braid and some sparkles in the shape of snowflakes.

The third version of the toy is decorated with pine cones:
- Take a few pine cones and cover them with glitter varnish or spray paint if desired.

- Insert a pin into the base of the cone and tie a ribbon to it.
- Then decorate the cones with colorful balls, beads or glitter, securing them with hot glue.


DIY outdoor Christmas decorations, with photos
You can decorate a Christmas tree outside with homemade toys. It looks fashionable, stylish, original.
Bells made from plastic bottles:
- Prepare several half-liter bottles, for example, Coca-Cola or Fanta.
- Cut them in half, and take only the top parts of the bottle with the cap.
- Make a hole in the lid and attach a string to it.
- Degrease the surface of the bottle with alcohol and cover it with acrylic paint.
- If desired, decorate the surface of the resulting bells with rhinestones, sparkles, and glitter.
- Tie a festive bow around the cork.
- Attach a bell in the middle of the bell.

And don’t rush to throw away bottle bottoms. From them you can glue a New Year's ball like this:

Decorations made from jar lids will look impressive on the Christmas tree, although it is advisable to take large lids.
- Prepare a piece of fabric whose colors will resemble the winter holidays.
- Also purchase New Year's stickers of a snowman, deer, snowflakes, or cut out similar silhouettes from thick paper.
- Using a sharp knife, cut out the bottom of the lid, wrap it with fabric and place it in place. At this point, tie a piece of twine to the lid body.
- Attach the design to the fabric, cover the entire surface thick varnish for street work.

You can decorate the Christmas tree in your yard with wooden decorations. True, to work you will need a burning machine, as well as round cuts of wood, wire and a drill.
- Using the machine, burn snowflakes onto wooden circles.
- Make a hole and thread it.
- Coat toys with varnish to extend their life.

Video: DIY Christmas tree decorations
Interesting ideas for New Year's toys in the video:
Do-it-yourself pig Christmas decorations, with photos
The pig is the symbol of 2019, so the presence of the hero of the occasion is simply mandatory.
You can make cute felt pigs quickly and beautifully. A little pink felt, thread and scissors are all you need to get creative. See what you can do with these simple materials:

A pig made from thread will be no less attractive. You need to take a container with glue, insert an acrylic thread through it, which should be wound around balloon. Soon the ball can be deflated and the missing elements can be attached to the pig.


DIY Christmas tree decorations made from ribbons, with photos
A scattering of satin ribbons is a universal material for beautiful crafts. Using ribbons, foam blanks, and glue, you can make wonderful Christmas tree decorations.
Satin ball for Christmas tree:
- Divide the foam ball superficially into four slices.
- Take four pieces of crimson tape and use a sharp knife to “slide” them onto the slices.

- Then decorate the ball with a chain of beads, covering the joints of the ribbons inserted into the cuts.

Christmas tree in kanzashi style:
- Take a red and green ribbon of sufficient width and a few beads.
- Make a Christmas tree using this simple pattern:

Now you've got some inspiration, so get creative!
If annually before New Year holidays you dress up street tree DIY toys, then these master classes are for you. You will discover new ideas and learn the secrets of making decorations for the New Year's tree.
Features of toys for large Christmas trees, which decorate squares, streets of cities and towns:
- large sizes of toys: at least 20 - 30 cm in height for a regional-scale Christmas tree and up to 50-60 cm for giant city Christmas trees,
- weather-resistant material (especially for the southern regions, but due to general warming, even in mid-latitudes it may suddenly rain in December or January),
- lightweight materials, hollow structures (so as not to weigh down the Christmas tree branches).
Baby penguin, sheep and chicken made from napkins
Admire what big crafts- toys for the city Christmas tree- can be done with the skillful hands of a mother and daughter.
“I, Pavlova Elena Vladimirovna , I work as a kindergarten teacher. Every year, our children make crafts to decorate the city Christmas tree. They did this work with their daughter Polina, she is 6 years old. I saw the idea for the craft on the Internet, but there was no description of the work there. We came up with everything ourselves during the work process. The result delighted everyone! We present to your attention our “ Baby Penguin«.
To make such toys for the city Christmas tree you will need:
- napkins of different colors,
- stapler,
- balloon,
- thick threads,
- PVA glue and “Moment”,
- colored cardboard,
- satin ribbon.
Progress:
We fold several napkins together (3-4), fasten them with a stapler in the center, cut out a circle, and using the crease method towards the center, crumple each layer of napkins. It turns out to be a flower. (You can also watch a master class on colors made from napkins).

You need to make a lot of these flowers. We used: 6 packs of 100 sheet napkins blue color and 3 packs of white.
We previously prepared the basis for the craft: we inflated the air balloon, wrapped it woolen threads with PVA glue. Let it dry thoroughly.


We pasted the ball with our flowers, giving the shape of a blue back and a white tummy (we used Moment universal glue).
Then we supplemented the craft with elements made from colored cardboard: eyes, beak, wings, legs. So that our “little penguin” could be hung on the Christmas tree, we attached a ribbon to him, tying it to the tail of the ball, which we left at the top.

Now our little penguin is on the city Christmas tree!

We were so fascinated by the work that we also made a cute sheep and her friend - a chicken - a symbol of care and motherhood.”


Thanks to Elena and Polina for the wonderful toys for the city Christmas tree.
Large toys for the street Christmas tree
Bells
The first version of this toy is made of wire decorated with twine. Decorations include plastic multi-colored balls and bright bows.

And this bell is made from... a figured flower pot! The white plastic base needs to be covered with pieces from. Tinsel is glued along the edge, and a loop is placed on top.

Balloons
Just look at the beauty that came out of simple disposable items. plastic cups, glued to a regular rubber ball. Cups can be used either transparent or made from multi-colored plastic. Tinsel is used as decoration.

And this ball is made of papier-mâché. Ordinary balloon, inflated with air, is pasted over with pieces of newspaper dipped in PVA glue. After drying, the craft becomes durable and strong. It can be decorated with paints, decorated with sparkles or multi-colored snowflakes.

Candy
This is a classic of the genre. It is based on a cylinder twisted from thick cardboard. It needs to be wrapped in shiny wrapping paper and tails made on the sides. The decor around the perimeter is satin or plastic ribbon.

Snowflakes
Two options from different materials. A large white snowflake is cut out of a piece of thin foam using a stationery knife.

The second craft is glued together from newspaper strips. To do this, sheets of newspaper are cut along the long side into 2 or 3 equal parts, each folded several times to form a dense strip. The middle is rolled up from strips of equal width, and the rays are glued to it. The top of the snowflake is painted with golden spray paint and varnished for durability.

Dog
The frame of the animal is cut out of hardboard or thick cardboard. The surface is covered with yellow oil paint; the craft can be decorated with silver tinsel. This is a craft from 2018, for 2019 you can make a symbol in the same way - a pig.

Asterisks
The first option is made from thick twigs fastened with wire in the shape of a five-pointed star. The frame is wrapped in tinsel and decorated with small multi-colored balls.

The basis for this star is cardboard covered with shiny fabric and blue tinsel.

The third star is made entirely of natural material. The frame is made of twigs, as in the first version, only twine was used as decoration. In the center of the craft there is a composition of spruce branches, cones and ribbons.

boot
The toy is made of burlap, filled with padding polyester and decorated with white openwork braid. Additional decor includes sequins, snowflakes, pine cones, and gifts. Eco-style toys are very popular now.

Caterpillar
Her entire body is formed from. The balls are coated with transparent varnish on top so that the craft does not become soggy under wet snow. The decor (eyes, beads, etc.) is made of fabric.

However, you can just make balls from thick cord:

Snowmen
This is another option for using used disposable tableware. The cups are connected with a stapler, resulting in balls. different sizes. All that remains is to glue the cap, carrots, eyes and put on the scarf.


This snowman is made of white and blue fleece, its interior space is filled with padding polyester. In his hands he has a broom made of twigs. This is how a neat little snowman turned out.

All these toys can appear on your New Year's beauty if you work a little before the holidays.
The description of the crafts was prepared by Tatyana Yablonskaya.
Christmas tree toy made from CDs:
Another option is .

Street Christmas tree toys « «:

Snowman made using papier-mâché technique -


City Christmas tree toy made from plastic bottles “Santa Claus’s Workshop” (more details).

Giant cardboard toy “Reindeer”

“Christmas tree toy “Squirrel”. Kulikov Kirill, 7 years old, Khabarovsk, secondary school No. 41.
Decoration for the street christmas tree“Squirrel” is made of waste material: the base is nylon tights and synthetic padding, finishing – cut and glued petals of foam rubber, covered with acrylic paints, contours, glitter.


"Christmas tree decoration". Svintsov Vadim Denisovich.
The Christmas tree toy is made of a foam ball covered with pine cones. The cones are painted in places with white gouache to imitate snow cover. Decorated with shiny snowflakes in silver and red bows made of satin ribbon with white beads arranged in a chaotic manner. A Christmas angel is made from twine to decorate Christmas ball. Using a loop, the New Year's ball can be hung on the tree.

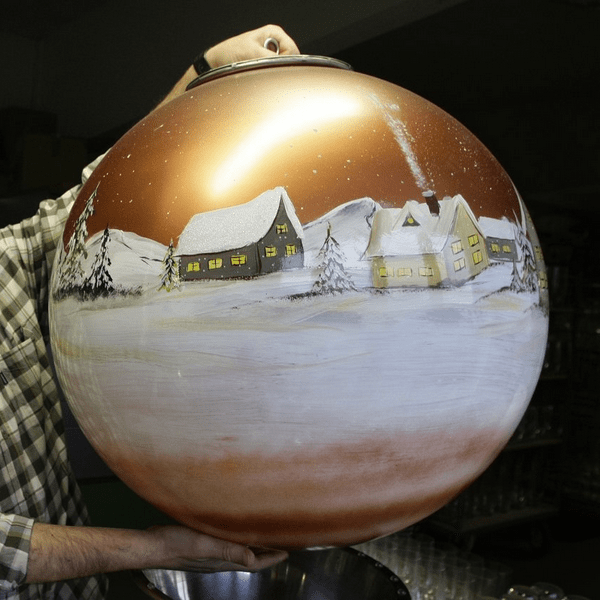
"New Year's ball!" Abramova Varvara.
The ball is made of fiberboard, large in diameter, for an outdoor Christmas tree. For painting, we took regular gouache, after drying, we painted snowflakes and decorated it with rain, having previously cut it finely. Then it was varnished.


Decorating a Christmas tree depends entirely on your imagination: you can make a simple New Year's tree decoration with your own hands at home, or you can make a real masterpiece, which will take a lot of time and patience. Perhaps these photos of the most beautiful DIY Christmas tree decorations will give you some inspiration:

New Year's toy "Bunny"

New Year's toys from cones

Wooden Christmas toy
Materials for Christmas tree toys
Large and small original DIY Christmas tree decorations made from scrap materials can be very different:
- – felt is most often used: easy to work with, a pleasant, versatile material color range. Toys made from it are usually not very complex and simple models Younger children can do it too. Of course, complex designs require certain skills, effort, and accuracy;
- – origami Christmas tree decorations are very diverse, and they usually do not require a needle or special equipment: only patience, manual dexterity and sometimes a little glue;
- clay or plaster figurines they look very interesting on the Christmas tree, they can be creatively colored and come up with different images and shapes;
- toys and beads look not only original, but also elegant and noble - almost weightless, they do not weigh down the branches of the Christmas tree at all;
- fantasy from sewing threads will allow you to make simply huge toys: completely airy snowmen, balls, stars, etc. look magical in the interior, and creating such big toys it will take a little time.
Are you wondering what you can use to make a New Year's toy? From scrap materials: pieces of wool or champagne corks, baby socks or a small piece of satin ribbon: Don't limit your imagination!
How to make a giant toy for the New Year with your own hands
For large Christmas tree decorations, sometimes there is even one rule: they shouldn't be heavy. Most often, such wonderful jewelry is made from ordinary threads: even a small child can handle such work.
- Inflate the balloon to the desired size and tie it tightly at the base.
- Holes are pierced in a soft bottle of PVA glue and, using a needle, the thread for the craft is pulled through (you can moisten the thread with glue in any other way).
- The inflated ball is randomly wrapped with thread and glue - try not to leave completely “bald” places: the toy will look beautiful and delicate if the thread is wound evenly.
- These unusual DIY Christmas tree decorations are left to dry for 24 hours.
- After 24 hours, the ball is burst and its rubber shell, which became the basis for the craft, is removed.
- For decorative purposes, the remaining airy form of threads can be coated with silver or gold paint, decorated with beads or beads, sequins, bows, and thin satin ribbons.
These balls look very elegant when made from light and bright threads. By combining different or the same size, you can make, for example, a snowman or a caterpillar. If you use as a basis cardboard cone, using this technique it is easy to make a Christmas tree, figures of Father Frost or the Snow Maiden. Can become a magnificent giant toy Nutcracker from a large household box, designed according to a well-known image. We offer pictures of a Christmas tree with creative New Year's crafts and Christmas tree decorations - we are sure that you will certainly find something interesting for yourself.
New Year's giant toy
Master class on making vintage Christmas tree decorations with your own hands
Vintage Christmas tree decorations are good because can be anything: a beautiful pine cone with a canvas bow, a birch bark owl, a wooden spool of thread with a textile or lace ribbon, twigs decorated with beads, you can We offer master class on making a very simple vintage Christmas tree decoration, which even a child can handle.
To make this magnificent star you will need very little:
- thick wire or flexible sheet metal about a centimeter wide;
- thick wool thread or twine;
- glue;
- ribbon for hanging.
The method for making such a toy is very simple:
- We create from wire the required form(for example, stars or a herringbone outline).
- We glue the tip of the rope to the base and begin to carefully wrap the outline of our toy, trying to ensure that each next row lies next to the previous one, leaving no gaps.
- Securely fasten the remaining rope tail with glue.
- We hang the toy on a beautiful ribbon - vintage Christmas decorations ready!
We also offer photos of original Christmas tree decorations, made with your own hands using vintage techniques:

Christmas toy in vintage style

Vintage Christmas toys

Christmas toy using vintage technology
Do-it-yourself voluminous Christmas tree toy made of plaster
As already mentioned, homemade New Year's decorations can be made from a wide variety of materials. One of the fairly plastic, but not entirely simple, is gypsum: the figures made from it are voluminous and easy to paint, but you need to work with this rather fragile material quickly and carefully. Plaster can be replaced and you will get lightweight and beautiful New Year's toys.
This master class will help you decorate your Christmas tree with New Year's items and figurines made from plaster yourself:
How to make unusual Christmas tree toys from wire with your own hands
We have already looked at a simple example of a wire toy, so we really devote this section to original designs, which will require a little more time. Wire figures can be very diverse - correct technique will allow you to create an amazing, truly creative decoration for New Year.
For a wire toy you will need:
- wooden base board;
- carnations;
- a well-bending wire of suitable length - it is better to take it with a reserve: the excess can always be cut off, but if the length is just a little short, the toy will have to be completely remade;
- round nose pliers, wire cutters.
Execution process:
- On a flat wooden board, chosen as a base, nails are placed at key points - the tops of corners, straight segments, etc. If the toy is supposed to have rounded lines, ovals, smooth curves, then wooden elements of the appropriate diameter and shape will be needed.
- According to the design of the toy, the wire is passed along these key points - this is how the figure takes shape.
- Round nose pliers and other tools allow you to create perfect curls, waves, and angles.
- The finished design can be coated with special paint.
An openwork wire figurine made using this technique will look impressive not only on the branches of a Christmas tree, but also in the interior of a room or as a decoration for festive table or gift box.

DIY Christmas tree decorations made from plastic bottles
Indeed, Christmas tree decorations can be made from any material that is at hand. Even if it's simple plastic bottle , with some skills and imagination, it can turn into magnificent flowers, snowflakes, balls, etc. The toys turn out to be quite large, they can decorate a street Christmas tree, children's educational institution, Vacation home or the entrance - absolutely waste material acquires a second, and such a beautiful life!
Here is a master class on how to create hollow volumetric snowflakes from plastic bottles.
For this toy we will need:
- bottoms from two identical plastic bottles;
- acrylic or enamel paints for applying rays, brush;
- satin ribbons to match the colors;
- narrow double-sided tape;
- stationery knife.
How to make a snowflake:
- For one snowflake you will need two bottoms - carefully separate them with a stationery knife.
- On the inside of each bottom, you can paint snow patterns and rays of snowflakes - use your imagination, but don’t overdo it: the snowflake should look like a snowflake, and not like a painted tray.
- The finished pieces are connected in pairs using double-sided tape. The halves can be left empty, or you can fill them with candies, multi-colored dragees, rain, tinsel, confetti, etc.
- Cover the joint (“seam”) with a satin ribbon - it should not be too narrow, otherwise the joining line will not look very neat.
- Make a loop out of the ribbon and hang your handmade decoration.
New Year's toys made from plastic bottles
New Year's origami toys
Origami paper crafts they always look original and beautiful - their undoubted advantage is that the schemes offered in different sources have different complexity. Children can easily put together something simple on their own; adults will be happy to help them with more complex models. Christmas tree toys or decorations, animal figurines, balls (including modular kusudama models) is spatial thinking and imagination, and for kids it is also the effective development of fine motor skills.
Sometimes in one origami craft you can use paper of different colors or with a gradient - this makes the decorations even more interesting and original.
It would seem that, plain paper, accuracy, neatness and dexterity - and you’ll get such wonderful decorations for the Christmas tree or for the interior:
“Stars” for the Christmas tree using the origami technique
Origami ball for Christmas tree
Origami technique - Christmas tree toy
Felting interesting New Year's toys from wool with your own hands
Felting wool- a way of creating a New Year’s toy that is not so common even among needlewomen, but starting with a simple one and gradually moving to a complex one, you can achieve a truly masterpiece performance. Special wool, felting needle, various techniques(For example, wet felting or dry) – we present creative felted Christmas tree toys with photographs:
Homemade products for the New Year using the felting technique can be very diverse - it all depends only on the imagination of the author and his skills. Children will be quite able to make a small ball, icicle or snowman, and real masters create figurines of animals, elves, angels, painted balls and much, much more. If you don’t have wool on hand, you can always make one.
CDs are gradually becoming a thing of the past, making room for more modern storage media. Some people still have old and, most likely, unnecessary stacks of these shiny “blanks” - it seems like a shame to throw them away, but they won’t be useful in the household either. So make New Year's interior decorations out of them!
Discs are good because they round form is optimal both for creating a toy and for its further use: the absence of corners is perceived by the eye as a combination of harmony and tranquility. What decorations and in what techniques can be made using computer CDs as a basis?
- the disk will become a convenient basis for an impromptu New Year's cards or panel– usually in these cases the decoupage technique is used, and varnish coating makes such decoration durable;
- you can make it from a disk magnificent stained glass: a little imagination, spectacular contours and details, painting with stained glass paint - and no one will ever think that just recently this stunning owl or turtle was an outdated computer disk;
- a few beads, ribbons, a skein of colored wool, a twig - and now a CD has turned into in a cute New Year's wreath;
- braiding with threads will allow you to create a snowflake, sun or star with rays. Such a toy can be decorated with eyes and a mouth - if there is a child in the family, he will be incredibly happy about such a miracle.
New Year's toy made from disks
DIY ideas for Christmas toys made of polymer clay
Polymer clay– a material that recently appeared on the handicraft market is very flexible and has virtually no boundaries for realizing your imagination. Of course, the technique of working with polymer clay has its own nuances and not everything may turn out perfect the first time, but with certain skills, New Year's trinkets and toys from this material turn out to be very beautiful, original and durable.
So, we make toys for the New Year from polymer clay:
- The material itself is simple, like plasticine, but after firing it hardens to the state of ceramics. When working with it, you can take your time, but you won’t be able to stretch out the work over several days.
- One of the most simple options polymer clay toys are considered decoupage: the picture you like from a napkin is applied with the help of perfume or strong alcohol onto a rolled out layer of clay of the corresponding color. The remains of the clay base are trimmed along the contour. If desired, the toy can be covered with craquelure, which will “age” it, make it look vintage and so stylish. After firing, the decoration will become hard as stone.
- Millefiore technique (multicolor) also does not represent anything particularly complicated: the clay is rolled out into laces, which are applied to each other in a certain way, forming a sausage. The sausage can be additionally wrapped in a thin layer of clay, which will become the casing. We cut the formed sausage crosswise into thin circles or squares - depending on the size of the cut, such blanks can already become independent decorations, it is only important not to forget to make a hole in them. Or you can combine these squares into a large canvas and cut into stencils Christmas trees, animal figures, hearts, stars - whatever inspiration dictates!
- The most in a clear way working with polymer clay is ordinary modeling, just like from plasticine. Even the smallest ones can cope with this task! Painted houses, snowflakes, owls, penguins - the kid can make whatever he wants, even a whole fairy tale!
If you create Christmas tree decorations from polymer clay, do not forget to make a hole in them at the modeling stage for thread or ribbon: this will no longer be possible in a fired product.
Usually toys are made from polymer clay small in size- this is necessary for uniform firing, which should complete the creative process. The variety of colors allows you to make bright, realistic Christmas tree decorations, but single-color toys can also be very good - for example, in this photo of a Christmas tree with homemade white Christmas tree decorations, the fluffy beauty seems to be covered with magical frosty patterns:
Christmas tree with white Christmas decorations
How to make Christmas tree decorations from light bulbs
And in conclusion, we offer one more interesting master class, which shows how even from the most ordinary light bulb you can make a surprisingly positive, funny toy:
Remembering the New Year's bustle, start preparing for the New Year in advance: there is still time to sort through your home deposits of materials quite suitable for crafts and create something truly original, cute, very warm and cozy.
December 7, 2017, 01:33