Sewing buttonholes. Sewing buttonholes on a sewing machine Buttonholes on a brother machine
 Manufacturing loops on a sewing machine produced depending on the class of the sewing machine and the capabilities inherent in it. The loop itself is almost the same for almost all household sewing machines - it is a flat rectangular loop, embroidered with a regular zigzag stitch. But on computer sewing machines, which have an electronic mode control board inside, a simple rectangular loop and a loop with an eye are made. A computerized machine can produce several types and sizes of such loops. In the production of garments, a special machine is used - this is a buttonhole machine. It is intended only for making loops. But now, we think, we will tell you how to make buttonholes on your own home sewing machine and what the process of sewing buttonholes is like. Many sewing machines use different principles for making loops - according to the method of sewing. The process of making loops itself can be in automatic mode (this is an automatic loop), in semi-automatic mode and in manual mode. In both cases, a buttonhole foot is used.
1. Making a loop in automatic mode:
 A lot of modern household sewing machines sew loops in automatic mode. To do this, a special foot is installed on your sewing machine. A button is inserted into this foot, according to the size of which the future buttonhole will be sewn. There should also be a lever to switch the machine's speed in the opposite direction. this lever is located behind the threader lever. You need to push it down. Now let's get started - install the buttonhole foot on the machine, insert a button into it, the size of which will be used to sew the buttonhole, and pull the lever to change the speed of the machine, from forward to reverse, down. It will be helpful to read the instruction manual for your sewing machine before sewing a buttonhole. The button itself does not have to be exactly the one you are going to sew on, but you can use any flat button, it is important that its diameter matches the size of the original button.
In general, the process of basting automatic hinges extremely simple, the sewing machine will do everything for you. Place the fabric under the presser foot, press the pedal of the machine, and it will automatically move back and forth and do the tack. Automatic buttonhole making greatly simplifies and speeds up the work, but at first it requires some skill, since there are some peculiarities. Sometimes on some sewing machines, the reverse advance of the zigzag may differ in the width of the stitch in width from the forward movement; for this purpose, there is a fine-tuning regulator for this operation. And of course, we must not forget about the pressure of the presser foot on the fabric; in some cases it needs to be loosened, most often when the fabric is thin. Otherwise, the fabric may get jammed and instead of a loop you will get a piece of thread. Experienced craftsmen move the fabric additionally, by hand, but we do not advise you to do this, and the manufacturer also does not recommend this. Excessive tension on the fabric can cause serious damage to your sewing machine. It is better to make several training samples of loops, and only then sew them on the finished product; in some cases this is necessary; a chiffon blouse will not withstand repeated loop stitching. After adjusting the thread tension and adjusting the presser foot pressure, select the zigzag width and thread number and then the buttonhole will be beautiful, strong and even.
For more information on sewing a buttonhole, watch the video:
2. Making buttonholes in semi-automatic mode:
 The process of making a buttonhole in semi-automatic mode is almost the same as in automatic mode. performing a loop. The difference is that you control this process yourself. Simply put, any of the 4 operations with which a loop is sewn must be turned on separately with the handle for switching the loop making modes. At the very beginning, sew a small zigzag stitch, for example, forward, then switch the handle to a wide bartack and then switch to reverse advance, but next to the stitched line, and at the end - again a wide bartack. It is necessary to constantly switch operating modes of the sewing machine, but you watch how the loop is being made and you can always stop and correct any inaccuracy, or guide the fabric under the foot. If you are just planning to purchase a sewing machine, then we advise you to choose this option for sewing buttonholes with a sewing machine. This type of loop making is a must for economy class sewing machines.
3. Making a buttonhole manually.

To make a buttonhole by hand, your sewing machine must be capable of sewing a zigzag stitch. Usually these are sewing machines Podolsk, Chaika, Veritas of old releases and some economy class sewing machines, produced now and at a price not exceeding five thousand rubles. To make a buttonhole, you need to have a regular zigzag foot, it is already installed on your machine. We warn you that making front button loops manually on a sewing machine is not a very convenient process, but if there is no other option, you will have to learn.
4. Adjust the stitch width and length:
 The stitch length is set in values from 0.3 to 1 mm and the thread tension is selected on an experimental sample, but most often it is from 1 to 5 units, i.e. less than half. The presser foot itself, as already mentioned for zigzag sewing, must have a narrow and wide slot. Set the control knobs to the following positions: when passing the sides of the buttonhole, the sides of the buttonhole are: stitch width 0.2 cm, wide bartack maximum, or required by location: 0.5 cm. When sewing a wide bartack, be sure to set the stitch length to zero.
5. Procedure for performing a loop:

First, pierce the fabric with a needle at the point where the buttonhole begins. Lower the presser foot and sew four or five top wide bartack stitches. Stitch length without advancing the material. Now lift the needle up from the fabric and set a zigzag of a smaller width (at your discretion) and a stitch length of 0.5. Now start stitching the first side of the loop until it is the length you want. It is recommended before performing loops on a sewing machine, mark its length in advance with a pointed piece of soap or use tailor's chalk, simple chalk as a last resort. Having reached the marked end of the loop, lift the fabric needle up, now set the zigzag width to maximum, and the stitch length to zero. Make four to five stitches to make the second crossbar of the loop. Then stop the machine with the needle in the extreme left position. With the presser foot raised, but without raising the needle, unfold the fabric and change the sewing direction.
After removing the fabric from the machine, cut the loop with a special loop cutter, inserting stoppers in the form of pins in advance.
Welted loops (from time to time come in handy when I sew clothes for dolls) are a big headache, because they are needed small (on doll clothes) and very strong (because children are not always neat). I usually did it by car, but then I found another wonderful material from Frosya Burlakova- on how to make slotted loops by hand.
Hand-cut loops are a delicate matter, almost jewelry work... Yes, no, nothing particularly complicated, but everything must be very thoughtful, consistently and accurately executed, a missed nuance will definitely affect the result. I’ll be honest: no one taught me this. I slowly learned it myself :). You too will learn. Be brave, they are very beautiful!
There are dress loops here, so as not to clutter up the essence, maybe. for coats you also need a thick thread.
That's how much it takes to fasten one button - in the photo on the right.
We act consistently. All work is done on the face. Fabric - cotton cambric.
 The distance between the loops is from the pattern or by calculation.
The width of the loop is best marked using a paper strip.
Then it will turn out the same for all loops. A strip with a width of button diameter + 2 mm per button thickness.
I do it with a pencil, and in reality with a disappearing felt-tip pen.
2. Pulling out the thread.
 The loop must be cut exactly along the thread. IMHO, it is very unpleasant for my eyes when a loop moves even one thread along the inner or outer edge from the weft or warp. This often happens on machine loops.
If you have an absolutely precise eye and tool, then you can cut between two threads. This is also possible if the fabric threads are thick or sparse. If not, then I cut and pull out 1 thread along the width of the loop. This is the site of the future cut.
3. Bonding layers.
At a minimum, there are 2 layers of fabric in the loop, and there may also be a spacer. If it is not there, then it is better to add it locally in the form of a rectangular piece about 3 by 1 cm.
The layers of fabric for the loop need to be fastened together for work. The point is that they should not move during operation.
The classic method of fastening is small oblique stitches along the perimeter of the loop, 5 mm away from the future cut. Draw a rectangle like this around with stitches. I'm not showing this.
A method of fastening using thin double-sided adhesive is also suitable. So I glued a narrow strip of double-sided adhesive to the location of the future loop. The top and bottom are fastened.
4. Piercing the peephole.
I don't have a punch or special scissors.
For a small eye of dress loops, an awl or knitting needle is quite suitable.
First, I mark the location of the eye with a needle somewhere 1-1.5 mm from the edge of the loop.
Then I widen the hole by rotating the awl in it. Eye diameter - mm 2.
In this case, the threads only become denser around the eye hole.
5. Stitch around the loop.
It is necessary that the edge of the loop does not stretch (for horizontal loops it is weft). I take a thin silk thread. It may not be very thin, depending on your taste and the fabric. Maybe not very silky. But it’s long. It’s better to make the entire loop from start to finish with one thread; there’s no need for extra fastenings.
1 thread of my fabric has been pulled out.
 I’m retreating one more thread.
And between the retreated and the next thread I draw a forward needle around the perimeter with small stitches. You can put several on the needle. You need to start from the far side of the loop where the tack will be.
Then I circle it a second time. Total - a continuous stroke. I tighten the thread quite tightly, not loosely. You don't have to worry about the evenness of the stitching by varnishing it with a stitch.
If you wish, you can make the outline around the future eye rounded, but, in general, this is not important.
 The loop, of course, needs to be cut.
We put the scissors into the peephole and carefully cut along the pulled out thread.
7. Stitching the straight side.
 You should also start it from the far side of the loop, where the outline ends. It goes from left to right, so we sew the bottom side first (for women's clothing). It is more convenient to stitch from top to bottom, holding the loop vertically.
For overcasting you need SEAM No. 6 - DOUBLE LOOP. I talked about him in the thread about air loops. The beauty of the result is in the countability. We make each subsequent puncture through the same number of threads. I did it through 2 threads - for this fabric it is approximately 0.7 mm. The fabric density is 25 threads per 1 cm in the warp and 14 threads per 1 cm in the weft.
The stitch laid earlier should not be located along the edge of the cut, but close to the punctures of the stitching - it’s more beautiful. (Therefore, if a wider stitching is planned, then the stitch can be laid 1 thread of fabric further from the cut).
I like the stitching that is not wide and not continuous. This makes the transition from fabric to loop look more natural.
Here I make punctures, leaving 2 threads of weft and 1 thread of laid stitching under the stitching.
Very important.
When tightening the loop, I pull the thread slightly back.
It is then that the edge of the loop turns out taut and clear. If you pull straight up or slightly forward, the edge relaxes. The pull is quite strong.
8. Stitching the eyelet.
We sew the eyelet in a circle, maintaining approximately the same distance between the punctures.
Along the eye itself, the thread will thicken and form a dense scar.
9. Closing the loop.
 The second side of the loop is sewn like the first, and now I have come to the beginning.
This is where the fastening is done.
But first I close the loop, those. I move with a loop stitch to the first side.
 Three ways. I'll say right away that I like the third one. That's why the first one doesn't have pictures.
1) Lay several loop stitches, grabbing the fabric, perpendicular to two sides.
2) Sew a cross stitch forward on the needle several times in place (this can be seen in the first picture, you can leave it like that).
3) Overcast the tiny arc obtained in step 2) with a double loop. Make a tiny transverse air loop like this.
All done with sewing! If it’s new, then not even a year has passed :). If the first stitch took you less than an hour, then you are an exceptionally capable student :). But even with a lot of experience, this is not a quick task. 15 minutes is very good, 10 minutes is great.
 Cover the cut with oblique stitches and iron it. It’s you, dear girls:).... If you know how to do it neatly, you can do it without basting - it’s more relevant on thick fabrics... Here she is, this beauty!
No, really, it’s beautiful, tell me? Even very much, my dears!... It’s even better in nature, I’m telling the truth.
There is a very simple way in which you will learn how to make buttonholes on a sewing machine without a special function and a buttonhole foot. In this master class we will talk about this.
Most often, the loops on the clasp of a product are processed at the last moment, when the entire product is almost ready. It is important to remember that the locations of the loops must be duplicated, for example, using adhesive doublerin. It is advisable to choose dublerin of a non-contrasting color relative to the color of the fabric of the product.
You will need:

Tailor's pins for medium fabrics;
Tailor's pins for thin fabrics;
Small scissors;
Ruler;
Disappearing fine line fabric marker.
Step 1. Marking

Determine the width of future loops. The loop is usually made several millimeters longer than the diameter of the button.
Button diameter - 2.7 cm, selected loop width - 3.0 cm.

Mark the position of all the loops at the site of the future fastener. Using a washable marker, draw a loop frame that is 3.0 cm long and approximately 0.5 cm wide.
If you don't have a fine marker, you can mark the frame using marking stitches.

Baste the layers of fabric in the fastener area or pin them with tailor's pins.
Place pins for thin fabrics on the loop frame, pinning them along the short sides, this will ensure convenience and accuracy when processing the loop frame on a sewing machine.
Step 2. Frame

This operation is performed on a sewing machine.
Settings: straight line, 1.5mm stitch length.

According to the marking, stitch the frame with a line with a short stitch: the length of the stitch on the long sides of the loop frame is limited by pins, in the area of the short sides of the loop frame it is better to count the number of stitches, it should be the same on all short sides of all loops, this will ensure maximum accuracy of the loops.

Hinge frame. It is better NOT to remove the pins located on the short sides of the loop frame at this stage.
Step 3. Long sides of the loop

At this stage, the long sides of the loop are processed in a tight zigzag.
Settings: zigzag stitch, stitch length ~2.5 mm, zigzag density ~0.4 mm.


The zigzag must be laid along the long side of the loop so that the stitches lie on both sides of the laid stitch that forms the loop frame. Length guidelines are pins.
Step 4. Short sides of the loop

At this stage, the loop frame is closed - the short sides are processed with a tight zigzag.
Settings: zigzag stitch, stitch length ~6.0 mm, minimum zigzag density ~0.2 mm.

On a test sample, it is better to pre-select the stitch length to process the short edge of the loop. The stitch should cover the width of the loop. The machine foot is located exactly in the center of the loop, and the short side is clearly under the needle.
To close the width of the loop you need to make about 10 stitches back and forth, making point tacks at the beginning and end of the operation.


The loop frame is stitched, you can remove all the pins and markings.
Iron the loop area.
Step 5. Final processing

All that remains is to cut the loops. This operation can be conveniently performed using small and sharp scissors. It is very important not to touch the zigzag threads when cutting through.

Carefully trim the excess threads inside the loop, cutting out any excess threads.
How to easily and easily sew a button on a leg

To make it more convenient to sew on a button, forming a small “leg,” you can use a sewing machine needle: place the thick part of the needle under the button, and inject the sharp part into the fabric.
By training, Daria is a PR specialist and economist, but several years ago she devoted herself entirely to her favorite activity - sewing.
She learned to sew from magazines, books and using the Internet; she also has sewing courses, but Daria considers herself self-taught. She loves to study specialized literature on sewing from different years and countries, and then apply the acquired knowledge in practice.
At the end of 2017, Daria became the winner of a holiday competition from the site.
She runs her page on Instagram and group
To sew buttonholes with a continuous stitch, special feet are used. The width and length of the loop are usually set before stitching, but in principle they can be changed during processing. Buttonhole stitching can be done either semi-automatically or automatically, it all depends on the type of presser foot installed.
On the automatic foot, adjust the length of the buttonhole by inserting the button into the holder. When processing a buttonhole with this foot, it will completely match the size of the button, which is very convenient. When using thick buttons, you need to manually increase the length of the loop slightly on the machine. Each machine has different adjustments; to do this, read the user manual that comes with the machine.
The semi-automatic presser foot has markings on the left side for adjusting the length of the buttonhole. Before you start stitching a buttonhole, mark its length on the product and move the sliding gate, matching the bottom marking on it with the beginning of the buttonhole on the product. When sewing, keep the ends of the threads on the left side of the foot.


These loops are worked with a zigzag and secured in the corners with long stitches. You can process “built-in” loops in 4 or 2 stages, it all depends on the functions of the sewing machine. In the second case, a machine pass is made in one direction, then securing stitches are made, then a pass is made in the opposite direction and transverse securing stitches are made again. Overcasting in 4 stages is more versatile, since during the processing of the loop it is possible to adjust the frequency of stitches.
- Place the stitch line in the center of the foot, and its beginning directly under the needle. Lower your foot and start stitching.

- Do the stitching slowly. Place the loop marking slightly to the left of the center line. When finished, raise the needle, move the fabric slightly to the left, lower the needle and raise the presser foot.

- Rotate the fabric 180°. Move the needle to the right, make a stitch and raise the needle. Make 6 wide securing stitches. Finish the stitch with the needle position on the left.
Those who sew clothes with their own hands know that the overall appearance of the product largely depends on how the sewing buttonholes look. It is the stitching of the buttonhole that is considered the most important operation, which is most often impossible to redo “without traces”. Therefore, before making a buttonhole on a sewing machine, especially in the “automatic” mode, be sure to try making a test buttonhole on a piece of fabric that has the same number of fabric folds and adhesive materials.
In this article we will give you some useful tips on how to make buttonholes on a sewing machine in automatic mode with a special foot, and in semi-automatic mode with a regular zigzag foot.
Video on how to make buttonholes on a sewing machine in four steps.

It is easier to sew buttonholes on thick woolen fabrics, since the machine moves the fabric well in both directions, without any problems. But when the fabric is very thin and delicate, the small pitch of the zigzag stitch can “slip”, and an incorrectly adjusted rack (teeth) can pull the fabric under the foot. In both cases, the sewing loop will have to be redone, and most often with consequences in the form of punctures in the fabric, and sometimes tears.
Therefore, first set up the sewing machine. Adjust the tension of the upper and lower threads. Adjust the height of the rack (if there is such an adjustment). Check the pressure level of the fabric foot. In order for the fabric to move confidently under the foot, it must be pressed well against the teeth. For thin fabrics, the teeth cannot be raised high, otherwise the fabric will be chewed.
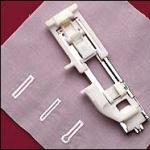
Don’t forget to attach a special lever to the presser foot that automatically switches the operating mode of the machine. Those sewing machines that come with a foot like the one in this photo must also have a lever for making automatic buttonholes.
Sewing a buttonhole in the "automatic" mode

For a foot that makes a buttonhole in automatic mode, there is no need to mark the buttonhole on the fabric. One vertical and one horizontal landmark is enough. The machine will automatically determine the size of the buttonhole based on the size of the button installed in a special mount on the foot. But this foot does not have such a device, however, the size of the loop can be set visually. However, read about this in detail in the instructions for your sewing machine. Our task is to protect you from common mistakes made when sewing buttonholes.
And one of them is that they often make mistakes with the size (loop length). Place a button in the foot and immediately punch through the loop. As a result, it turns out that its size does not correspond to the diameter of the button. First check what the loop will be like by making at least 5-7 prototypes.

In the automatic buttonhole mode, the operation cannot be stopped unless the power of the machine is turned off. But you can always manually operate the reverse lever. And in some cases, this opportunity can help you out, just practice.

In fact, this sewing machine is designed to sew automatic buttonholes, but we will show you how you can use it to sew buttonholes in a semi-automatic mode, with the ability to control the process of sewing loops.
To do this, you need to replace the special foot with a regular zigzag foot and be sure to pull the reverse lever down (all the way).

We begin to sew a loop. At the same time, you can clearly see each stitch of the loop and, most importantly, you can always stop the machine if necessary.
Once the stitches reach the desired border, you only need to switch the lever in the opposite direction. Moreover, the machine can be temporarily stopped.

You see how beautifully, and most importantly, while controlling the process, you can make a buttonhole using a regular zigzag foot. But the main thing this method allows you to do is to create a good gap between the stitches (slightly move one of the sides), which will allow you to carefully cut a hole for the button.

This is actually a fairly important part of making a buttonhole because it is very easy to damage the bartack threads and overcast stitches when cutting the buttonhole.
To make it easier to cut a buttonhole, learn to slightly move one side of the stitching while the machine is stopped.
And in order not to damage the securing stitches, it is enough to put two pins, as in this photo.

Now you can check how the button fits into the cut loop and then sew the button.
The button should fit tightly so as not to unfasten arbitrarily when worn. In addition, over time, the buttonhole will increase slightly, so a little force when inserting the button into the loop will not hurt.
We also recommend
 Sewing buttonholes on a sewing machine Buttonholes on a brother machine
 Interesting facts about metals and their alloys
 Making a Lego Batman mask from cardboard with your own hands
 Makeup that ages - how not to turn into an old woman Wrong choice of lipstick
 Retrochorial hematoma - causes and symptoms of the disease, diagnosis and manifestations, treatment methods
 My husband texts girls: how to behave?