Ice pattern on glass. How to draw frosty patterns on paper
This master class was born completely spontaneously, and the work was done literally in the evening. In general, not very complicated, but incredibly sweet, and looking at her, you want to smile and believe in a fairy tale.
Let's get started. There are not very many photographs, and the main thing here is the materials for creating frosty patterns - Maimeri body painting gel and snow-white glitter(I have Rayher, like in the photo, only completely white, without any tints of color).


Everything is clear about glitter, so I’ll tell you about the gel. This is actually a texture paste that retains its volume and when dried becomes completely transparent and glossy. It can be tinted, but it needs to be applied in a not very thick layer, no more than 3-4 mm, and it takes a very long time to dry if the layer is thick (a very thick layer may not dry out inside and remain white). But we will apply it in a very thin layer :)
So let's get started.
Master class on decoupage paintings with frosty patterns
1. We take a regular frame with glass, the backdrop turned out to be cardboard, but this is even better.

2. Print out a suitable picture on a regular office sheet of paper ( laser printer) - I have Father Frost and Snow Maiden, very sweet and kind, not funny, not comic, but just like real ones, surprisingly there are not many such pictures on the Internet...

3. We have already positioned the picture so that the position of the characters in it is like this: how can it be behind an ordinary window on the first floor of a village house, so to speak :) That is. I need to the faces were not from above, but closer to the center of the picture.
We see that in the position we need, the picture on top does not reach the border, and we need to glue it so that the difference is not particularly visible. Alternatively, you just needed to print it, placing just below on a piece of paper to glue the entire sheet.
But you can do it this way: I tore off the top edge and thinned it slightly with tape: I glued a strip of tape to the edge and pressed it firmly into the paper with my finger.

Then I simply peeled off the tape along with the excess paper.

4.Glue the picture to the cardboard backing. I didn’t even prime - why? The office sheet is quite thick, and if the image loses its brightness, it will be only slightly.
Soak the leaf in water for 5 minutes, place it on a file, and blot off excess water. Apply thick glue to the cardboard and the sheet on the reverse side, attach the file with the sheet to the cardboard and remove bubbles from the center to the edges. Everything is like with a napkin))) Laser ink (or rather, powder) is quite fragile, it’s better to work with them through a file. You can also coat the top with glue.

Cardboard can become deformed from moisture, then after drying, you can put something heavy on the cardboard so that it dries in a straight position. But we still need a slight bend :)

5. After drying We coat our picture and cardboard with varnish. Painting in the missing parts- a little sky and yellow around the flashlight. I didn’t paint particularly carefully, the main thing was that the white background and cardboard were not visible.
6. Take a little medium or any means to increase the transparency of acrylic(I have a medium for flowing effects Plaid), you can take drying retardant mixed with varnish. Add a little dark dark blue there (not ultramarine!!! I have this Navy Blue from Maimeri with a drop of black).
We can do it translucent dark black-blue paint. We take a little on a sponge and from the edges to the center we begin to make night in our picture.

Don’t forget about Santa Claus’s flashlight; we darken only what will be in the shadow, including the right half of the face of both heroes. Just imagine, they are standing in front of you, holding a flashlight slightly in front of Santa Claus and to the side of the Snow Maiden. What will be in the shadows and what will be lit by low light? It is not necessary to achieve absolute verisimilitude; part of the image will not be visible at all.

Almost finished.
7. Cover the picture matte(!) varnish if you don’t want to add anything else. I also put a little gold on the Snow Maiden's earrings.
8. Degrease the glass (I washed it with dishwashing detergent). Again, take a little medium and add a little white to it. We frost the glass from the edges to the center - use a sponge with a drop of our mixture to press it from the edge to the center. We leave the middle and just above the middle (where the faces will be) untouched. This will add opacity to us where transparency is not needed. It looks like this (I just started, as a result everything should be heavily matted at the edges, and should gradually fade away towards the center and faces):

9. Dry it. Turning the glass over and on the other side we make frosty patterns.
Let's take gel for body painting, place it in a heap on the palette and add drop of blue and white paint, mix thoroughly. Take a bristle brush and apply test smears, wait for it to dry. Our task is to make a white-bluish-transparent mass, which, after drying, matches the color of the frosty patterns. This is difficult because the gel itself is white in its fresh state, and the colors are distorted due to this whiteness. It is impossible to immediately say what it will be like when it dries, so samples are needed. Just add paint a small drop at a time, I have in this mass blue and white about 2-3 sq. mm.

You can dry the samples with a hairdryer; they dry quickly. When the color suits you, we begin to apply to the work with short strokes, like twigs. You can take the picture and the Internet as the original. Bristle brush leaves textured strokes, you don’t need to apply a very thick layer, and you don’t need to apply a thin one either.

By the way, in some places you can simply pierce with bristles, holding the brush vertically: we don’t have patterns there, but just frost. This is how we paint the entire glass from the edges to the center - completely! We work quickly so that it does not have time to dry.

10. And now... We erase our patterns with our hands in the place where the faces and the edge of the lantern will be. There is no need to clean the glass completely - after all, when we erase frost from the glass, it remains in some places. AND immediately cover all the glass with glitter, they stick to the raw gel and harden on it. Our gel retains its texture and shines glossy, and we see exactly those branch-patterns that we drew. Everything shines differently from different viewing angles. Amazing effect!

While it dries, we work on the frame: I applied bitumen varnish to it and began to erase a little from the protruding parts. It turned out to be such an old wooden window. She applied shellac on top (according to the instructions, bitumen varnish is coated with shellac). Shellac gave a slight yellow tint, the wood became warm :) But you could just paint it with acrylic, lightly rub it and cover it with matte varnish.
We insert glass, behind it - cardboard. The cardboard bends a little, and the picture does not adhere closely to the glass - this is good.
Knock Knock! We go to the window, wipe off the frost with our hands - and there...
Pictures can be enlarged - just click on them :)
Under normal lighting:

Or you can do this:


I’ll tell you a secret - at the back I dug the cardboard in the place of the flashlight down to the paper, put a little putty there (more at the edges of the hole, so that the degree of illumination gradually decreased), and glued a small flashlight onto the tape...
Today I bring to your attention a new competition entry, in which Tanya and her mother playfully studied natural phenomena that have amazed all of humanity with their beauty and charm for many centuries. Now it has become possible to create frosty patterns on glass with your own hands together with small children.
But first I will share with you information about how everything happens in natural conditions. A small children's poem will help kids understand the essence of the phenomenon.
Fairy tale on glass
Frost on the glass
I drew a pattern
Applied silver
White lush forest.
Early in the morning
I'll go to the window
I'll be in that forest
Listen to the silence.
And trembles in the darkness
White smoke of birches -
Fairy tale on glass
I drew frost.
T. Shorygina
How frosty patterns form on window glass in winter
By their nature, winter patterns on glass represent the same frost as on tree branches or on the ground. When the air temperature drops, the humidity always decreases. At zero temperature, water freezes, condensation of air moisture settles on cold glasses in the form of ice crystals, that is, it immediately passes from a gaseous state to a solid.
Since dust collects on the surface of any glass, there are cracks and scratches, the pieces of ice that settle on them, stacking on top of each other, form bizarre patterns. Most of the moisture accumulates in its lower part due to the force of gravity, therefore, the frosty patterns in those places are thickened, and in the upper part of the windows only thin patterned lines are visible, or the glass does not freeze there at all.
In order to get frosty patterns on glass, two conditions are required simultaneously:
1. Presence of moisture in the air
2. Cold glass surface, below 0 degrees.
Modern plastic windows, if they are installed correctly, do not fog up inside, have reliable thermal insulation and no gaps between the glass and the frame. Therefore, they do not freeze in winter if they are not opened for ventilation. Have you noticed what colorful patterns frost draws on the glass surfaces of loggias and balconies? How do water bottles placed in refrigerators in stores fog up during the hot season?
If one of the listed factors is missing, no patterns will simply work. In natural conditions, the direction of the wind also matters, which contributes to the rapid growth of ice crystals, which increase in volume so much that the glass ceases to be transparent.
Knowing the physical explanation for the formation of winter patterns on windows, you can learn how to make frosty patterns on glass with your own hands. There are many different ways to do this, I will try to tell you about some of them today.
How to make frosty patterns on glass yourself
1. The first method is familiar to many from the time of their childhood, when everyone drew on the windows with tooth powder or toothpaste. It is absolutely safe for children, everything is easy to wash, it even shines better than before. You can use not only a brush, but also a spray bottle, spraying a solution of white paste on the glass.
2. I like the other option because it is simple and clear. To do this, you need to take 50 g of magnesia, purchased at a pharmacy, dissolve it in 100 g of light beer, and then lubricate clean glass with the prepared solution with a sponge or cotton pads. To make the liquid dry faster, it is convenient to use a hair dryer. After a few minutes, you will see crystals forming a pattern on a flat surface. This option is more suitable for schoolchildren and adults.
3. Take 40 hyposulfite, dissolve in half a glass of water, then lubricate the surface of the glass. After drying, you will get an opaque dense pattern, reminiscent of the natural beauty on windows with a headwind. By repeating a simple experiment, you will know how to make frosty patterns on glass yourself, as if by magic.
4. It is better to use this method with small children. First, place the stencil on the glass and apply glue with a sponge. Let your child sprinkle baking soda, vanillin or powdered sugar on top with a cosmetic brush. Children's delight is guaranteed, and safety is maintained.
5. Another method will be told to us by the Zinovievs Ksenia and Tatyana, who sent their personal experience of conducting the experiment to the competition:

To make frosty patterns on glass with our own hands, we needed to take:
5 g dry gelatin,
1/4 cup cold water,
A piece of glass
Freezer.
Progress of the experiment:

Add a teaspoon of gelatin to a glass of water.

You have to wait for it to swell

then heat in a water bath until the gelatin crystals are completely dissolved.

After the solution has cooled, pour it onto glass and put it in the freezer.

The next day we take it out and admire the frosty patterns that have formed.

This is how we got them.
This idea was suggested to us by Tatyana Pirozhenko in the magazine “My Mother - Vasilisa”, we played with pleasure, and also shared our photos, sending them to the “” competition in the young researcher category. So we say thank you to them.
Write, have you and your children tried making frosty patterns on glass with your own hands? Share your secrets with readers, because various methods allow you to create unique masterpieces that imitate natural beauty, grace and imagination.
Winter has many symbols that, just looking at them, remind us of clear cold days, the sun sparkling on the snowdrifts, exciting games and fun in the fresh frosty air, and also ice patterns on glass.
What masterpieces can you see on the inside surface of a window when it’s frosty outside! People with a developed imagination, and even simple observers, see winter painted landscapes and ornaments that can cover the entire surface of the glass or creep in from the corners, framing the view from the window. There are spruce branches, and snowy plains, and thickets of ferns, and pine forests, and what else a spellbound viewer of a winter patterned creation might see.

In fact, all this beauty is a natural manifestation of physical phenomena. The main participant in the process is water, a well-known combination of two elements, hydrogen and oxygen (H 2 O), which is famous for the fact that it can take on three of its forms: solid, liquid and gaseous, within the external environment with an insignificant, in general chemical concept, change temperatures from 0 to 100 degrees.
.jpg)
When there is humidity in the air and the temperature drops below zero, the moisture gradually condenses on the cooled surfaces. I immediately remember how in the heat all kinds of bottles, cooled in refrigerators, sweat invitingly. When the temperature is above 0, water vapor transforms into liquid, but when it is lower, passing through the liquid state, it becomes ice, or rather its tiny crystals. When the room is warm, any moisture that finds itself near the window glass, behind which it is freezing, turns into micro-ice, falling on the cooled surface. This is all clear, but where do such unique and varied patterns come from?

Every glass is not perfectly clean: it retains dust particles, small scratches, fingerprints, and all kinds of “traces” of environmental influences. The moisture that gets on the glass is also not distilled. Therefore, regular ice crystals with six sides, which are formed in laboratories, cannot appear on glass. Crystals grow along the edges of surface microcracks, around dust particles and other inclusions. A film of moisture, even a very thin one, tends downward according to the laws of physics, so in the lower part of the glass the ice formations are always denser, and at the top they are more openwork and patterned. The direction of air flow near the glass surface also matters. While there is not too much water, the curls are thinner and more delicate; with an increase in the amount of moisture deposited on the glass, the crystals begin to grow not only on the plane, but also in volume, covering the pattern with a dense white veil.

Some scientists even came up with the idea that all natural creations are subject to identical laws, i.e. the way chemical crystals are formed, the cells of living organisms are formed and arranged according to the same principles. That is why some glass patterns resemble pristine tropical forests. Well, scientists cannot live without a flight of fancy, because this served as the beginning of many discoveries.

It remains only to note with some sadness that modern double-glazed windows, which pride themselves on their constant temperatures, no longer provide the opportunity to enjoy the artistic painting of frost. But they say that our famous lacemakers from Vologda and Kostroma took the subjects for their extraordinary lace of fine workmanship, looking at the frozen window in winter...

There are several technologies for creating frost patterns on glass with your own hands. We will tell you about them.
DIY patterned frosts. Option 1
This option is the simplest. To create frost patterns on glass with your own hands using this technology, you will need white toothpaste and brushes, preferably hard ones. Our parents drew such patterns with tooth powder.
First, dissolve toothpaste in water and spray the glass with a spray bottle - this will create a haze. Then take toothpaste slightly diluted with water and start creating with light strokes. Apply strokes from the edge of the window glass to the center, creating shapes imitating frost patterns. For example, you can keep several photographs of real frosty patterns on hand and copy from them, or you can use similar strokes to create a stylized Christmas tree, snowman or other figures.
If you don't know how to draw, feel free to use stencils!
The advantage of this method is its simplicity and economy, and also the fact that after the New Year holidays you remove toothpaste easily from glass by simply washing it with a sponge and warm water.
DIY patterned frosts. Option 2

A more cunning and complex, but also more naturalistic method of creating frost patterns on glass with your own hands is method with beer and magnesia. Wash and dry the glass. Dissolve 50 g of magnesia or urea in half a glass of light beer and apply to the glass in any way: you can use a brush, a sponge or a cotton swab.
When applying, imitate frosty “feathers” and curls. When the liquid begins to dry, crystals will begin to appear on the glass, similar to real frosty patterns. You can use a hairdryer to speed up the drying of the glass. This solution also washes off window glass quite easily.
DIY patterned frosts. Option 3

Another way to imitate frosty patterns on window glass is to dissolve 30–40 g of sodium hyposulfite in half a glass of water (this photographic fixer, it is also called sodium thiosulfate pentahydrate, you can try to find it in stores for professional photographers or in chemical reagent stores). Using the method described above, apply the mixture to the glass and wait until it dries. In this case, the crystals are denser, white, and opaque.
DIY patterned frosts. Option 4
In order to write congratulations or draw some pictures on the glass, you can use regular glue and powdered sugar. To make the drawings more even, you can make a stencil: using a sponge, apply glue to the glass using a stencil and then apply powdered sugar to the glass using a powder puff or brush. Powdered sugar can be replaced leaves, baking soda, vanillin. The only negative is that your drawing may “float” if condensation accumulates on the glass, and this will be very noticeable (unlike previous methods).
After decorating the glass with frosty streaks, don’t forget about the window sill. Place white fabric or batting on it to imitate snowdrifts, sprinkle with glitter, arrange pine cones, toys, fruits (tangerines - of course!). On top of the window you can hang gold and silver stars cut out of shiny cardboard or glue them with small pieces of double-sided tape to the upper corner of the glass.
If you don't really want to clean the windows, decorate your house
Everywhere turned white overnight
And there is a miracle in our apartment!
Outside the window the forest disappeared -
A magical forest has grown there! 
Frosty patterns on glass are a well-known and common phenomenon in winter; almost no one pays attention to them and even measures are taken to prevent them from appearing on windows. 
Why do frosty patterns appear?
"TO KNOW THE INVISIBLE, LOOK CAREFULLY AT THE VISIBLE"
If the glass has a negative temperature, and from the inside in the room (or between the glasses) there is a positive temperature, then instead of condensation (the process of water transitioning from a gaseous state to a liquid), a sublimation process will take place on the surface of the glass (the growth of crystals from the gas phase, bypassing the liquid state ). 
The process takes place in the form of an increase in stripes (lines) of crystalline water, which randomly intersect with each other, which creates a unique pattern on the glass. 
With high-quality glass sealing, patterns do not appear on the glass, because no temperature difference.
And by the way - as a result of the process of sublimation (I repeat - this is a transition from one state to another, bypassing the intermediate one) snowflakes and hail from thunderclouds are formed. 
Frosty patterns are simple in their chemical composition, but are very diverse. Tree-like formations and wavy structures are most common. They resemble grass, fern or palm leaves, spruce branches. 
The nature of the patterns is light, airy, joyful. The ice patterns are very beautiful and they say they serve as models for our northern lacemakers. These patterns are found in Vologda lace, downy scarves and scarves. 
What kind of master is this?
Applied to glass
And leaves and grass
And thickets of roses... 
You can see in the frosty window
How a deer wanders through a magical land
Birds soar in the sparkling air
Fluffy snowflakes fly quietly 
On a window silver with frost,
The chrysanthemums bloomed overnight.
In the upper windows - the sky is light blue
And getting stuck in the snow dust
(Zastrakha - in peasant huts: the lower, hanging edge of the roof, as well as the beam supporting the lower edge of the roof. There is a Swallow's nest under the zashrekha)

This work of nature does not last long - the sun begins to warm up and the frosty patterns become less clear, blur and flow in streams of water down the glass.
You can try to make the following patterns for yourself at home: First, prepare a colloidal solution: add 3-5 g of dry gelatin to a quarter glass of cold water and let it swell well. Heat the water to 50 degrees in a water bath and make sure that the gelatin is completely dissolved.
Ice patterns can be preserved on this jelly. Pour the still warm solution onto a piece of glass and immediately place it in the freezer. The water will crystallize, like on windows in winter. After three days, take it out and let the gelatin thaw. It will leave a clear pattern of ice crystals.

We also recommend
 Four beautiful DIY hair ties - master classes for fashionistas and their mothers Homemade hair ties
 Sometimes you really need to be supported...
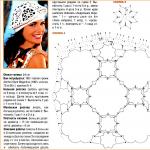 Several options for knitting a beret for beginners
 Men's dark gray noble vest
 We sew cool pillows: step-by-step master classes
 We sew a simple nightgown for beginners: everyone can do it!