How to cut knitted fabric. Tips and master classes
You will need
Yarn (50% polyacrylic, 35% sheep wool, 15% alpaca wool; 125 m / 50 g) - 400 (450–500–550) g pink; knitting needles No. 4.5; circular knitting needles No. 4 40 cm long.Patterns and schemes
Semi-patent pattern
When knitting in rows in forward and reverse directions: the number of loops should be even + 1 stitch.1st row (= knit row): * P1, k1, from * repeat, p1.
2nd row (= purl row): * K1, 1 p. slip with 1 yarn over, as in purl knitting, from * repeat, k1.
3rd row: * P1, knit the next loop together with the knit yarn over, from * repeat, P1.
When knitting in the round: the number of loops must be even.
Row 1: * P1, k1, from * repeat.
2nd row: * Purl 1, slip 1 st with 1 yarn over, as in purl knitting, from * repeat.
3rd row: * P1, knit the next stitch together with the knit yarn over, from * repeat.
In height, perform 1 time from the 1st to the 3rd row, then repeat the 2nd and 3rd rows.
Garter stitch
Front and back rows - front loops.When knitting in the round, knit 1 row alternately and purl 1 row.
Decorative side reductions
From the right edge = chrome, 7 stitches of a semi-patent pattern, knit 3 stitches together with a slant to the left (= remove 1 stitch, as in knitting, knit the next 2 stitches together, then pull the removed loop through the knitted ones).From the left edge = 3 stitches knit together, 7 stitches of semi-patent pattern, chrome.
Decorative decreases for armholes
From the right edge = chrome, 2 stitches in garter stitch, knit 3 stitches together with a slant to the left.From the left edge = 3 stitches knit together, 2 stitches in garter stitch, edge stitch.
Decorative decreases for the neck
From the right edge = chrome, 1 stitch of semi-patent pattern, 3 stitches knit together with a knit stitch tilted to the left.From the left edge = 3 stitches knit together, 1 stitch of semi-patent pattern, chrome.
Knitting density
19 p. x 38 r. = 10 x 10 cm, knitted with a semi-patent pattern.Pattern

Completing of the work
Back
On knitting needles No. 4.5, cast on 89 (97–105–113) sts and in 1st r. (= front row) distribute the stitches as follows: chrome, 2 p. garter stitch, 83 (91–99–107) p. semi-patent pattern, 2 p. garter stitch, chrome.After 19 cm = 72 r. from the cast-on row on all loops between the edges, knit with a semi-patent pattern, at the same time for side bevels on both sides, reduce (see Decorative lateral decreases) 1 time for 2 p. = 85 (93–101–109) p. These decreases are similarly performed 1 more time in the next 54th row. = 81 (89–97–105) p.
After 27 cm = 102 r. from the first decrease on the first and last 7 stitches, knit in garter stitch.
After 28 cm = 106 r. from the first decrease, first close on both sides for the armholes 1 time, 4 stitches each, then decrease (see Decorative decreases for the armholes) in every 4th row. 5 times 2 p. = 53 (61–69–77) p.
After 20 (22–24–26) cm = 76 (84–92–98) r. from the beginning of the armholes, the average 29 sts. For the neckline, leave temporarily and finish the left side first.
To round the neckline, decrease from the inner edge (see Decorative decreases for the neckline) in the next 2nd row. 1 time 2 p.
After 1 cm = 4 r. From the beginning of the neck, close off the remaining 10 (14–18–22) sts.
Finish the second side symmetrically.
Before
Knit like a back, but for a deeper neckline, leave the middle 21 sts temporarily at a height of 11.5 (13.5–15.5–17.5) cm = 44 (52–58–66) r. from the beginning of the armhole and finish the left side first.To round the neckline, decrease from the inner edge (see Decorative decreases for the neckline) in every 2nd r. 3 times 2 loops.
Assembly
Sew shoulder seams.For the collar, to the left loops of the front and back neckline, cast on another 19 sts = 88 sts on circular needles No. 4 in the curved areas and knit in a circle 6.5 cm = 31 r. semi-patent pattern, then knit 2 more rows. knit and bind off the loops.
Sew the side seams, leaving the lower sections 19 cm long for the cuts open. Along the edges of the armholes, cast on 74 (80–86–92) sts on circular needles No. 4 and then bind off the loops, as in knitting. Tie the edges of the lower cuts in the same way, casting on 66 loops on circular needles No. 4.
Photo: magazine"Verena" No. 1/2017
Dimensions: 36/38 (40/42) 44/46
You will need: yarn (70% sheep wool, 30% silk: 140 m / 50 g) - 350 (400) 400 g light gray; knitting needles No. 4; circular knitting needles No. 3.5 and 4, 40 cm long.
Rubber: alternately 2 stitches in stockinette stitch, 1 stitch in garter stitch.
Facial surface: front rows - front loops, purl rows - purl loops In the circular rows, knit all the loops with the front ones.
Garter stitch: front and back rows - front loops. When knitting in the round, knit alternately: 1 row with knits, 1 row with purls.
Knitting density:(knitting needles No. 4) elastic band = 20 sts x 33 r. = 10 x 10 cm; front stitch = 23 p. x 31 r. = 10 x 10 cm.
Back: on knitting needles No. 4, cast on 99 (107) 115 loops and knit for the strap with an elastic band, while in purl row after chrome start with 1 stitch in garter stitch and 2 stitches in stockinette stitch and finish symmetrically. In the 33rd r. add 1 p = 100 (108) 116 p. After 10 cm = 33 r. From the bar, continue knitting in stockinette stitch. After 24.5 (23.5) 23 cm = 76 (74) 72 r. close from the bar on both sides for armholes 1 x 2 (3) 4 p.. then in every 2nd p. close another 5 (6) 7 x 1 p. = 86 (90) 94 p. After 17.5 (18.5) 19 cm = 54 (56) 58 r. from the beginning of the armhole, close on both sides for shoulder bevels 1 x 5 (5) 6 p., then in every 2nd r. close off another 2 x 5 (5) 6 sts and 1 x 6 (7) 5 sts.
Simultaneously with the first decrease for the shoulder bevels, close off the middle 36 (38 - 40) stitches for the neckline and finish the left side first. Along the inner edge for further rounding, close in every 2nd r. another 1 x 3 p. and 1 x 1 p. Finish the other side symmetrically.
Before: For cuts, first knit a piece from 3 separate parts. For the middle part, cast on 46 (49) 52 stitches and knit 30 r. with an elastic band, and in the purl row after the edges. start with 2 purls and 1 purl in garter stitch, finish symmetrically. For both side parts, cast on 28 (31) 34 loops on knitting needles and also knit 30 r. with an elastic band, and distribute the loops as on the middle part. After 30 r. transfer all parts onto one knitting needle, while knitting the adjacent edge stitches together and then knitting them in stockinette stitch. On the 1st decrease O (1) 2 p. - 100 (108) 116 p. Next, knit as for the back, but for a deeper neck close after 12.5 (13.5) 14 cm = 38 (42) 44 r. from the beginning of the armholes, average 18 (20) 22 sts and finish the left side first. Close along the inner edge for further rounding in every 2nd r. another 1 x 3 p., 1 x 2 p., 7 x 1 p. and in the next 4 p. 1 x 1 p. Finish the other side symmetrically.
Sleeves: On knitting needles No. 4, cast on 44 (47) 50 stitches for each sleeve and knit for the placket with an elastic band, while in the purl row, start after the edge. with 1 purl, 1 p. garter stitch and 2 purl stitches and finish symmetrically. In the 63rd r. add 1 p. = 45 (48) 51 p. After 20 cm = 63 r. From the beginning row, continue knitting in stockinette stitch. For bevels, add 3 p.m. on both sides. from the bar 1 x 1 p. and then alternately in every 8th and 6th p. add 8 x 1 p. = 63 (66) 69 p. After 21 (20) 19.5 cm = 64 (62) 60 r. Close the front stitch on both sides for edging 1 x 2 (3) 4 p., then in the 2nd p. 1 x 2 p., in every 2nd p. 5 (6) 7 x 1 p., in every 4th p. 5 x 1 p., then again in every 2nd p. 5 x 1 p,. 1 x 2 p. and 1 x 3 p. After 15.5 (16.5) 17 cm = 48 (50) 52 r. from the beginning of the okat, close off the remaining 15 (14) 13 sts.
Assembly: sew shoulder and side seams. On the front, sew the slits to a length of 1 cm. For a round collar, starting from the right shoulder seam, cast on 105 (108) 111 stitches along the edge with circular needles No. 3.5, close the work in a ring and turn so that the side with the pattern is inside, then knit with an elastic band, while starting with 1 stitch in stockinette stitch and 1 stitch in garter stitch. After 9 cm from the beginning of the collar, switch to circular knitting needles No. 4. After 19 cm of elastic band, loosely bind off all the loops. Turn the collar outward. Sew sleeve seams and sew in sleeves.
 Classic knitted sweater with slits on the sides
  Classic knitted sweater with slits on the sides
 When knitting, the side (edge) edge is most often designed in the form of a braid. This edge is convenient for subsequent stitching of parts and has a beautiful appearance.
We'll introduce you to two methods for crocheting a side edge that give the same results. Choose the one that is more convenient for you.
First way
We knit the last (edge) loop of the row as it is obtained from the pattern: knit or purl.
At the beginning of the row, we look at which loop lies on the knitting needle. If the first (edge) loop is a front stitch, remove it, inserting the right knitting needle behind the front wall of the loop, as when knitting.

If the first (edge) loop is purl, remove it from the back wall.

Rule: To obtain an even side edge of knitting, remove the front loop from the front wall, and the purl loop from the back.
Second way
Another way to obtain an even side edge of knitting: the last loop of the row (edge) is always knitted “” purl. Turn the work over and remove the stitch, transferring it from the left needle to the right.

In both cases, the side edge is obtained in the form of a pigtail.

Video tutorial on knitting an even side edge
Dimensions: XS(S)M(L)XL(XXL). Finished product dimensions: chest girth - 80(88)96(104)114(124) cm, length -52(54)56(58)60(62) cm, inner sleeve length - 45(46)47(48)48 (49) see
You will need: yarn Novita 7 Veljesta (75% wool, 25% polyamide, 300 m/150 g) -350(350)400(400)450(450) g white(011), yarn Novita 7 Veljesta Raita (75% wool, 25% polyamide, 300 m/150 g) -100(100)100(150)150(150) g melange in blue-turquoise tones (831), knitting needles No. 4.5.
Elastic band 1 x 1: knit alternately 1 persons. p. and 1 p. P.
Garter stitch: persons and out. rows of faces only. loops.
Facial surface: persons rows - persons. loops, purl rows - purl. loops.
Knitting density: 19 p. x 26 rows of faces. satin surface = 10 x 10 cm.
Back: On the knitting needles with white thread, cast on 81 (89)97(105)113(123) sts and knit with an elastic band 1x1 starting from purl. row with 1 persons. p. At the same time, knit the outermost 1 p. on both sides with garter stitch. At the height of the elastic band 1.5 cm, start knitting faces. stitch, continue to knit the outer loops in garter stitch until the end of the work. At a height of 10 (10) 11 (12) 12 (13) cm from the cast-on row, begin alternating stripes: 2 rows with melange thread and 4 rows with white thread. Complete 12 stripes in total and then knit with white thread until the end of the work. At a height of 19 (19) 20 (20) 21 (21) cm from the beginning of knitting, to form side bevels, decrease 1 p on both sides. Repeat the decrease again after 5 cm = 77 (85) 93 (101) 109 (119) p. At a work height of 34(35)36(37)39(40) cm for the armholes, close on both sides in every 2nd row 1 time x 4(4)4(5)5(6) p., 0( 0)1 (1)1 (1 time x 3 p., 1 (2)1 (1)2(3) times x 2 p. and 1 (1)2(3)3(2) times x 1 p. = 63 (67) 71 (75) 79 (85) p. At a work height of 18 (19) 20 (21) 21 (22) cm, knit 1 row of stitches (fold line), then knit another 2.5. cm in satin stitch and cast off all stitches.
Before: knit similarly to the back.
Sleeves: On the knitting needles with white thread, cast on 38(40)40(42)44(46) sts, knit 1.5 cm with an elastic band 1x1 Next, knit knits. satin stitch At a work height of 10(10)10(10)9(9) cm for sleeve bevels, add 1 stitch on both sides. Repeat the additions in each 10(10)8(8)8(8) row 0(2) 7(5)0(0) times and then in every 8(8)6(6)6(6) row 9(7)4(7)14(15) times = 58(60)64(68) 74 (78) p. At the same time, at a working height of 18 (19) 20 (21) 21 (22) cm from the cast-on row, begin alternating stripes: 2 rows with melange thread and 4 rows with white thread. Complete 12 stripes in total and then knit with white thread until the end of the work. At a work height of 45(46)47(48)48(49) cm for the sleeve roll, close on both sides in every 2nd row 1 time x 4(4)4(5)5(5) p., 1 time x3 p., 2 times 2 p., 8(9)10(11)12(13) times x 1 p., 1 time x 2 p. and 1 time x 3 p. Close the remaining loops of the sleeve in one step.
Assembly: lay out all the parts on a horizontal surface, moisten from the inside out. sides and let dry. Fold the top edges of the front and back along the fold line inward, and carefully sew with a blind stitch. Sew the shoulder seams, leaving the middle 23(23)24(24)25(25) cm free for the neckline. To decorate the cut along the side edge of the front (only along the white part before the start of the stripes), evenly cast on stitches on the knitting needles (approximately 21 stitches per 10 cm). Work in 1x1 rib starting from purl. row, as follows: 2 p. p., 1 persons. p., *1 p. p., 1 persons. p.* repeat *-* at the end of the row, knit 2 purls. p. At a height of 1 cm, bind off all the loops as knits. Similarly, tie all the lower edges of the front and back. Sew the side seams, leaving slits on the sides (placing the front side panels over the back panels). Complete the sleeve seams and sew the sleeves into the armholes.
Why cut knitted fabric?
The conversation will not only be about Fair Isle, the traditional technique of cut jacquard, which is knitted in the round, knowing that it will then be subjected to scissors.
In popular Scottish patterns, circular parts are first knitted - front-back and sleeves, and then the armholes and neckline are cut out.
Sometimes it turns out that you need to cut something that is already ready, knitted fabric: plans have changed, the dimensions have been missed, the product has stretched out after washing, or you just need to update an old sweater.
So, along, so that the loops don’t creep? Undoubtedly, it is necessary to strengthen the edges of the future cut.
This can be done using a regular needle and thread or, for example, a crochet hook if you go through a chain of air loops along vertical jumpers. By the way, you can avoid it altogether self made, if you have a sewing machine, simply lay zigzag stitches along the imaginary cut line.
If you have an overlocker, you can immediately cut the product not only lengthwise, but also in any direction, and the edge will immediately be overcast.
Well, if you don’t have the equipment at hand or don’t need stitching, then there are others ways to cut knitted fabric so that the loops do not creep and the edge does not unravel.
How to cut knitted fabric. Master classes
5. Useful article: How to cut knitted fabric from the site "Podelochka".
We also recommend
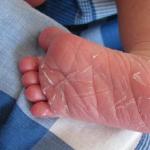 The skin on the child's fingers is cracking
 DIY witch costume for Halloween: patterns, instructions DIY children's witch costume for Halloween
 Lovely congratulations on March 8 to mom
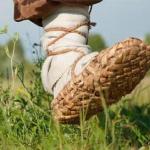 How to wrap foot wraps correctly: methods Wrapping the left leg
 How to make your child have beautiful handwriting Words starting with the letter w to improve handwriting
 Electronic wedding invitation (options)