DIY Christmas decorations from ceiling tiles. Crafts from ceiling tiles: toys, cards and decorations
Marina Pichkaleva
Hello, dear colleagues! I thought for a long time, and finally decided to submit my work to the site. I know that I will not discover America by saying that from the usual ceiling tiles You can do many useful things that can be used in the work of a teacher. Many people use this material in their work, and I am among them. Of course, I am still far from the masterpieces of Elena Shvetsova, but I hope that someone will want to use my creative ideas. So, I suggest making it from foam plastic pendant toys New Year theme : snowflake, snowman, bell. They can decorate chandeliers, ceilings, windows in a group kindergarten and at home too. They are light and quite durable.
So let's get to work!
For work you will need:
Smooth ceiling tiles, stationery knife, pencil, water-based paint, colors or gouache, brush, cardboard templates (snowflake, snowman, bell, hairspray with glitter, buttons, a piece of tinsel.
1. Lay out on tiles all the templates and trace them one by one with a pencil

2. Cut out the templates along the lines with a stationery knife.

3. Cover the front side of the finished workpiece with white paint using a sponge, if it is colored or has a noticeable pattern. Waiting for it to dry

4. Now we just need to decorate ours a little pendant toys.
We make a hole at the tip of the snowflake and thread a raindrop into it, from which we will hang our toy to the chandelier or ceiling. To make the snowflake shine and shimmer, spray it with hairspray with glitter (at both sides).

5. And we decorate the bell with a bow made of tinsel, threading it through a special
hole made.

6. Bottom of the bell (at both sides) decorate with decorative rhinestones (or something else to your taste, which we glue on ceiling glue(maybe another one, but not "Moment" and not "Super glue").

7. We paint the snowman using water-based paint mixed with color. desired color or gouache.

8. Glue buttons to our snowman (as you wish).

Our New Year's toys-pendants are ready, all that remains is to find a suitable use for them.

I hope that my work will be useful to someone. I wish you all creative success in New Year!
You can make unique decorations and crafts from ordinary foam ceiling tiles. New Year. The article contains examples of these and a description of how to do them.
Often there is a desire to decorate your home with holiday crafts. This ritual is especially important on the eve of the New Year. After all, it is for this celebration that people expect some kind of miracle. Children expect magic first, so they try the hardest.
Crafts can be made from various materials, and there is a lot of information about this online. Very original toys for the Christmas tree are made from ordinary foam tiles, which are glued to the ceiling. Next, let's look at examples of New Year's decorations made of polystyrene foam in detail.
How to make a white fairy house from ceiling tiles: diagrams, description, photos
To get started, first of all, stock up on free time. This process will require patience, skill, and desire. And the kids will be delighted with this work.
Prepare materials and tools in advance:
- scissors, marker, glue
- tile, sharp knife
- felt-tip pens, gouache, colored paper, foil
The house can be made in one plane, or rather, simply cut out a mold for the roof, front panel with a window and a pipe on the roof from foam plastic. Or you can build a whole 3-D model of a real fairy-tale gingerbread house or Baba Yaga’s hut.
For the second option do the following:
- Cut out four walls of the house from polystyrene foam
- Two identical roof parts
- Two isosceles triangles for the front and back of the attic part of the building
- Then carefully make openings where the windows and doors will be
- In the future, you can decorate them with colored paper and make curtains inside
- Glue all finished parts of the product
- Cut the pipe and glue it to the roof
- To make the house more fun, you can also make a whole courtyard
- There, make a Christmas tree in the yard (again, from polystyrene foam)
- Use felt-tip pens and paint to decorate it and draw toys on the branches.
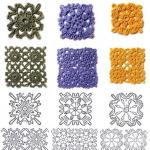
How to make snowflakes from ceiling tiles: cutting templates, photos
What would a New Year's holiday be without beautiful white snowflakes? different shapes. They are cut out not only from paper, but from ceiling tiles. It’s just worth considering that you can’t fold polystyrene foam like paper so that the snowflake turns out strictly symmetrical.
To create neat products you will need patterns (templates that you can make from cardboard). Such patterns are subsequently not difficult to transfer to the material using a regular felt-tip pen; you just need to outline the contours.
You will see a number of such examples of patterns in the image below.

They can be printed on a printer, and then carefully cut out and glued to stronger paper. Again, cut them out, after which you can safely transfer them to the foam tiles.
Now cut out the intricate patterns of snowflakes on the foam with a sharp knife. Hang the finished products on the Christmas tree or decorate them with garlands and chandeliers in the house.


IMPORTANT: When you cut out snowflake figures from ceiling tiles, keep in mind that the material is brittle and perform the process carefully, with maximum accuracy.
How to make a Christmas tree from ceiling tiles?
If the tree is already in the house, then the children know that gifts will definitely appear under it for the New Year. But there are unexpected situations when adults did not have time to buy the most main symbol New Year. In this case, don’t be upset; a nice Christmas tree will turn out from different sizes of ceiling tiles.
True, the product will require thicker tiles. In addition, you need to collect more squares, then the artificial beauty will come out large.
Fold the squares into a pyramid, as in the picture below. Glue a small top on top.

 Christmas tree - do it yourself
 IMPORTANT: Any decoration for the Christmas tree will do. Silver rain, garlands, beads will be very useful.
How to make Christmas tree decorations from ceiling tiles?
As Christmas tree decorations, you can use a variety of figurines with a suitable New Year theme.
 Santa Claus with gifts
 Deer - do it yourself
How to make decorations from ceiling tiles?
From one ceiling tile you can cut dozens of small decorations that hang on front door or to other places on the eve of New Year's celebrations.
Anyone who knows how to draw well will, without much effort, beautifully decorate products using felt-tip pens, gouache and other auxiliary materials. To keep them on the garlands, Christmas tree, stars, bells, snowflakes, tie threads.
 Beautiful decorations for the New Year
 IMPORTANT: Follow safety rules. After all, polystyrene foam melts and easily ignites when exposed to high temperatures, fire. Therefore, it won’t hurt you to explain to your child that you can’t play around with fire to avoid a fire.
How to make flowers from ceiling tiles?
Flowers, like snowflakes, must be cut out after you transfer the design from the template to the foam. To make them different colors, decorate them with gouache. A varied pattern will be created on the surface of the flowers, as there are interesting patterns on the ceiling tiles.

How to make a snowman from ceiling tiles?
Using the appliqué technique, make a snowman from ceiling tiles. Then place it under the tree on a small stand made of another tile so that it does not fall. Cheerful snowman will delight you and your children and charge you with positivity throughout the winter holidays.

 Snowman on New Year holidays from ceiling tiles
 How to make Santa Claus from ceiling tiles?
You will get a cute Santa Claus on the Christmas tree in the form of a toy if you cut him out according to a template from ceiling tiles. Moreover for beautiful design he can be dressed in a hat or a fur coat made of red fabric. And paint your face with paints. Make the beard, mustache, and edges out of white plush. Progress:
- Cut out the foam pieces
- Start by assembling the bottom of the tank
- Glue all the other parts of the craft together
- Carefully color it with felt-tip pens and paint.


Polystyrene foam is an excellent material for this type of craft. If you have imagination, you can come up with various toys for the New Year yourself. Thus, please yourself and your little family members by making them together.
Video: How to make an airplane from ceiling tiles?
Everyone knows that the profession of a builder and finisher is respected, vital and considered, although difficult, but profitable. Without builders and finishers there will be no home, no comfort in the house. And, like any profession, construction workers have their own professional holiday. Of course, they celebrate the New Year together with the whole world, but they bring their own Christmas trees. 😉
I suggest you admire one of these construction Christmas trees, which was made from improvised materials left over after finishing the ceiling. The Christmas tree is low-budget and won’t hurt your pocket, so if you’re looking for an interesting creative idea to bring it to life for the New Year, then take a closer look at this original decorative element. Here and now you will find out what it is like in moments of leisure.>>>
This copy was made with gold pens Olga Malinovskaya (Melnik) without glue or nails, from almost nothing. Only one ceiling tile was used. To repeat this decorative New Year's idea, you will need dense ceiling tiles that are uniform in composition when cut. You can take a structural one, or without embossing. As the author notes (presumably this was not the only instance of the snow-covered beauty), if there is a pattern on the tile, then a single-color tile with imitation will look beautiful frosty patterns, which are on the glass in the cold.
The tiles are cut like a puzzle from one sheet, and the parts are connected together “groove to groove” with absolutely no glue. By the way, not all ceiling tiles can withstand the effects of glue. Foam tiles, for example, melt on contact with certain adhesives (tested personally).
When cut correctly, one tile produces three parts. If convenient, you can use this template:
True, you will have to copy from the screen, or make your own patterns, since the author did not make a pattern or does not provide one. It is also noted that the photo distorts the real picture. It is also worth considering a small nuance! If the tile is one-color, then there is no need to worry, but if it is colored, then when cutting the last, third side of the tree, you will need to turn the pattern over to the other side, because 2 sides are the same, and one has the outline in a mirror image. Of course, you only need to draw and cut from the inside out.

Olga made the decoration in the form of gold “” on the Christmas tree from strips of isolon. The stripes are narrower on one side and wider on the other, eventually narrowing to nothing. You need to start twisting the “cones” from the wider edge into a spiral. The “cones” twisted in this way (or maybe it’s even better to call them “roses”) are then attached with an ordinary tailor’s needle-pin to a decorative crown of ceiling tiles. The crown is made in the same way. Jewelry can also be secured using tailor's pins. The author hung her old beads on the stylish beauty, and you must agree, everything looks very pretty!

So the builders not only have their own holiday, but also their own professional Christmas tree. In principle, repeating a decorative idea is not difficult, if only you had the desire and the right ceiling tiles! 😉 I don’t recommend taking cheap polystyrene foam tiles, as they are very difficult to cut evenly; they crumble right under the knife.
Thank you very much Olga Malinovskaya for such a wonderful idea and permission to share the news on other blogs. When quoting, please indicate the author's name! And of course, an open hyperlink to the site from which you are quoting is required.
Well, friends, what do you think of the idea? Who has already run for the tiles? 😉 You can freely write your opinion in the comments, because you don’t need to register for this at all!
Have a nice time and successful implementation decorative ideas to life from the site and, of course, Happy New Year!
MK turned out to be very long and detailed. Why was such a material used as ceiling tiles? It shows very good veining and the star looks very impressive! And such a star is made very, very quickly.
0:391 0:401For one ceiling tile you need a little less than 1.5 m of film and a pack of pins. Quantity 50-60 pcs. The cost of such a star is from 1 to 1.6 rubles.
0:636


Take a holographic self-adhesive film
3:1178
We apply a star and mark the ends of the rays with dots.
4:1788 4:97
For clarity, I connected the points with lines. We cut out the resulting polygon, remove the protective paper and glue our workpiece.
5:858

The next stage is pasting the rays. To do this, cut the self-adhesive as in the photo (make sure it reaches the very corner)
7:2105
We begin to fold the film. If the rays are thin enough, the film will be wider than the ray.
8:683Immediately cut off the excess
8:728
But this is only on one side of the ray. On the other side, we don’t cut the film, we carefully glue it with a fold. The connection on the back side is not visible, but it will hold on so tightly that you can even hang it out in the cold.
9:1621

So all the rays were sealed. If you need a double-sided star, then we do exactly the same pasting on the other side, with the same bend.
11:1251
12:9
Back side.
12:58

Here it is, our star is ready. But that is not all....
14:1370
Draw little stars. It is possible with a different number of rays and different sizes.
15:2031
So, close together, on one tile, you can fit up to 60, different sizes, stars.
16:666

Now let's embellish our star. Let's cut out a smaller star from a contrasting color from holographic film and glue it on. If you do this option, then the veins should be drawn at the very end, when all the layers are glued.
18:454

And for fastening, we insert an ordinary tailor's pin into the end of the beam. We just try to stick it in the very middle so that it doesn’t come out somewhere on the side and accidentally scratch us.
20:1800
This way you can fasten them together in 2-3 pieces. If you want to make a whole garland, then you need to glue the pins. Another option is to glue 2 stars of different sizes together. Then you need to cover the stars with self-adhesive on one side. This is the most effective option.
21:1008
And finally, another scattering....
22:1581
DO. DECORATE. GIVE IT TO YOUR FRIENDS!
23:574 23:607 23:631Nowadays, there is a huge variety of building materials, the remains of which we most often throw away. After the renovation, there are a lot of pieces and scraps left that can be used for all kinds of souvenirs and to make useful things for the house.
Most people have a creative streak, and especially if you have children, there are an endless number of interesting crafts you can make with them.
Foam plastic as a material for crafts
Remains of foam ceiling tiles are an excellent material for creativity.. It is easy to cut with a knife or scissors, durable, tolerates coloring very well, and glues perfectly. Therefore, just like from simple polystyrene foam, crafts from ceiling tiles can be made with your own hands easily and simply (see).
Of course, from household foam, which is usually used to cover household appliances, you can make more voluminous things (see). Because it is thick. In those cases, you can even cut out a ball or an egg using a sharp blade. Flatter tiles provide no less opportunities for creativity. Let's remember our childhood together and just figure out what can be made from the remnants of ordinary ceiling tiles.
DIY crafts from foam tiles
The simplest type of craft that can be made from ceiling tiles is pendants or Christmas decorations.
New Year decoration

You will have fun and useful time with your children if you start making this kind of jewelry.
- Using a stationery knife or just scissors, the figures are cut out according to the outline previously drawn on the tile. These could be hearts, bells, flowers, stars or snowflakes.
- Do not immediately take on too complex drawings; to begin with, these can be simplified forms. If the children are small, help them by cutting out the main figures yourself.
- Now, using PVA glue, you can stick on any designs made from colored paper, glitter, rhinestones or beads. You can draw pictures on the blanks.
Note! Please note that the paint should not contain acetone or other active substances, since the foam will melt from them. It is best to use gouache, tempera, felt-tip pens or artistic oil paints. However, it is worth noting that oil paints take quite a long time to dry. Pencils will not work, as they will only push the material, but not draw.
Holidays, especially new Year decoration– the pendants are made to your liking, then a loop is glued to each one. For example, simplified figures of Santa Claus and Snow Maiden, snowflakes, etc. They are then painted and, after drying, hung on the Christmas tree or made into a garland.
Another thing you can do from ceiling tiles - volumetric Christmas tree for the New Year.
- To do this, take about 10 pieces of foam plastic (more is possible), and draw a circle on each one. Moreover, the first circle is the largest, and all subsequent ones are smaller than each previous one. And so on - until the smallest. The largest will be the bottom, and the smallest will be the top.
- Now on each circle, teeth are cut along the contour. These will be the branches with the needles of the future Christmas tree.
- Next, we take a fairly stiff wire, one end of which we insert into a pre-prepared piece - a stand, bending the tip from below.
- Mugs with teeth need to be painted in green color and, after drying, we string them onto a wire frame (the future tree trunk). We start from the bottom, that is, from the largest circle. And so on in order, to the very top.
The Christmas tree is ready. All that remains is to decorate it according to your taste and desire.
Cards and Valentines

Greeting cards or valentines are another type of DIY craft.
- Valentine cards are cut out in the shape of hearts, then painted to your liking.
- The sparkles applied to them will look very original. This is done very simply. After the paint has dried, the finished heart is smeared with transparent glue in the right places. PVA or office glue is best. Then, until it dries, these places are sprinkled with small sparkles. Manicure glitters, which are sold in haberdashery stores, are very suitable for this purpose.
It is better to make postcards in the form of a book. To do this, two identical halves of polystyrene foam are cut off, then fastened along one edge with a glued paper strip. The card can now be opened and closed.
Educational toys

Letters and numbers are useful crafts for your child's development that you can make with him from ceiling tiles. You can cut out the whole alphabet, which, by the way, will be perfect for a child if he is learning to read and count. You can cut out letters for a greeting, such as happy birthday, for a member of your family and hang this phrase on the wall. This will be a pleasant and original surprise.
More complex crafts - three-dimensional pyramids, houses, cars, etc.
Individual parts are cut out (walls, roof), then glued together into a finished product. For the car, they cut out body parts and wheels, then glue everything together in the same way.
Note! Thick PVA glue is best suited for such purposes, since the paint may lie unevenly on office glue after it dries.
This way you can build an entire city. To do this, take a large thick sheet of cardboard, then glue each fence, house, car and other parts to it.
Cutting crafts

Cut-out crafts made from foam leftovers look very original.
As we understand, this is only a small part of the ideas that can be implemented even by those who are not good at creative activity(cm. ). In fact, there are a lot of options for crafts made from ceiling tiles that anyone can make. The main thing is desire and imagination. Then you will spend time usefully for yourself and your loved ones.
We also recommend
 How to dress beautifully every day (for girls)
 How to crochet a simple napkin: diagrams and photos of work for beginners
 What to do if your husband is rude and nervous?
 Tunic from motifs - “mills” How to crochet the “Mill” motif
 Knitted women's pullover with V-neck
 Bob haircut for short hair photo, front and back views