Dress patterns for beginners. Simple DIY patterns
For the hardworking - a bright light burns through life, for the lazy - a dim candle
Constructing a base pattern - THE MOST CLEAR METHOD (for beginners)
comment 331 comments
Good afternoon I would even say a beautiful day. Because we are finally starting a series of articles on tailoring for adults. We have already sewn a lot of things for little girls - both dresses and bodysuits are different - now we will sew for big girls. That is, for myself. And since you and I have already practiced sewing, the fear of the pioneer has passed.
THAT MEANS IT'S TIME TO TAKE A NEW FRONTIER. And master the wisdom of sewing using real adult patterns yourself, with your own hands and your own brains. We will draw the base pattern ourselves - new the easy way(I spent more than one week creating this lightweight method for creating a base pattern). And then we will sew a bunch of all kinds of dresses, tops and tunics.
No- I won’t give you a single finished pattern!
I'm not Madame Burda. I am Madame Klishevskaya.))) And the main harmfulness of my character is... That I will make your head work and give birth to bright and clear discoveries in the field of sewing. The easiest and most understandable of all types of art. Believe me, this is true.
Yes- sewing yourself is very easy and simple!
Right from scratch you will get more and more beautiful and well-tailored things.
Moreover, you will do everything yourself, without a state of hypnosis, but in a sober mind and clear memory. YOU will DO it - moreover, you will UNDERSTAND what exactly you are doing.
I will tell you the secrets that I know. Moreover, I will teach you to discover more and more secrets of the world of sewing and clothing design.
I will not lead you (blind and stupid) by the hand in the chaos of letters and numbers denoting the intricacy of numerous lines of the design drawing. NO, I WILL NOT TAKE YOU HERE:
Well, you must admit, one such picture can instill fear and make a girl who doubts her own abilities really, really wants to sew a dress- But I wasn’t very good with geometry and drawing during my school years. Even I adore both of these school subject- I beat around the bush for several years - not daring to start delving into the construction of such a drawing: “How much time will it take to draw something like this, and after all, everything must be calculated correctly and not get confused in the letters...”.
And, nevertheless, today we will draw a pattern.
We will draw a base pattern (you see a piece of it from above.))))
But - don’t be afraid - we will create our pattern a little differently. Away from the engineering design method - and closer to human understanding.
We will draw one for you - just one- pattern.
And then from it we will create more and more new dress models. And it will be very easy and simple.
- No confusing formulas
- No confusing calculations.
- And without the letter-number cobweb.
So how? Have I already alleviated some of your concerns?
I'll relax now - we won't start drawing right now. First, we'll take a nice walk through the pattern. The purpose of the walk is to get to know and become friends with the pattern and remove the last doubt that you can sew any dress.
So... what is a pattern - the basis?
To put it figuratively, this is a cast of your body. This is your individual imprint. Any item sewn according to YOUR base pattern will fit YOUR figure perfectly.
Yes, you heard right - ANY THING can be sewn on the basis one single pattern. All dress models are born, modeled, and sewn from one source - this is the base pattern.
I will now prove it to you with an example. Even with three examples - in the form of photos and pictures.
Here is the first photo (below). Our pattern base is essentially your sheath dress (the one that fits your body perfectly). Dress made by yours pattern base, will follow all the curves your his bodies. This simple sheath dress is sewn using a regular base pattern. You see, it’s like a plaster cast of a girl’s figure.
And today, having drawn the base pattern, you can safely cut it on the fabric - and you will get a dress like this. The only thing you can change is the neckline - giving it the shape that suits your face shape.
All other (any kind) dress models are just a modification of a sheath dress - fantasies on a free theme.
That's how it works in the fashion world.
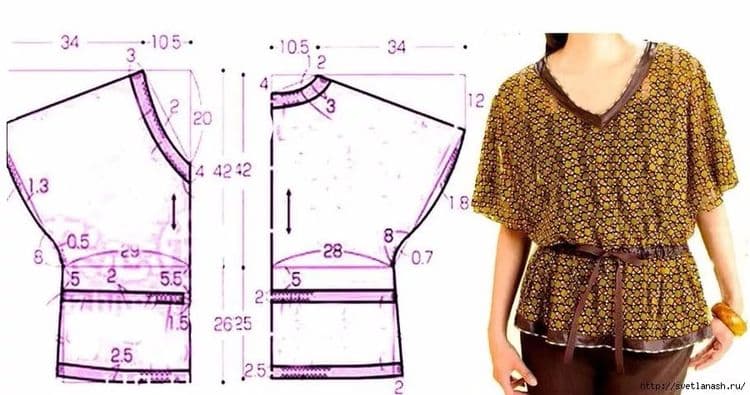
One day a fashion designer thought...“What if the bodice of the dress at the top is held on the shoulders by a round yoke (yellow outlines - figure below), and the bodice itself is made in the form of overlapping intersecting triangles (red outlines - figure below). The result is what we see in the photo below.

Beautiful? Beautiful! What did the fashion designer base his fantasies on? Based on a pattern. And you can come up with something of your own. We women have just a lot of imagination.
By the way - since we're talking about round yoke— on this site there is already one of my articles on creating and
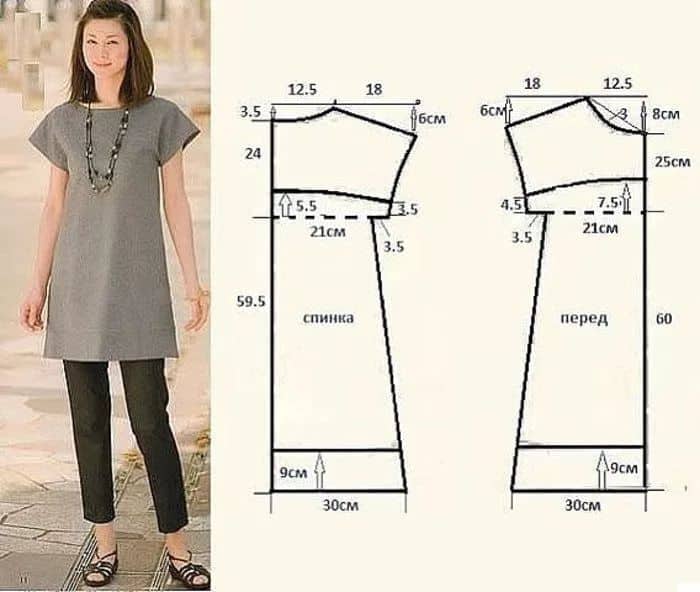
And another fashion designer thought: “What if you give the sheath dress a looser cut - make it wider. And make the shoulder line longer so that it hangs over the arm.” And in the end it is born new model(photo below) – also very beautiful. And it's very simple.
You can do this too. If you will UNDERSTAND what the base pattern consists of. And by what laws does it exist?
That is why I don’t want to stupidly give you instructions on creating a base pattern (like “draw a line from point P6 to point P5 and mark the place where it intersects line X with the next point...” - ugh!).
I want to awaken you bitch. I want you to feel the pattern, to know its soul. Haven't learned to see what a simple drawing hides behind a photograph of any dress, even an intricately tailored one.
Therefore, for the next 30 minutes we will not draw anything - we will walk through the pattern itself. Let's get acquainted with all its elements - find out what each line serves, and why it is located here and drawn this way.
After such an “educational walk” you will feel a joyful clarity of understanding of everything, everything, everything. It's like you've already drawn basic patterns many times. And you will take up the drawing with the feeling that this is a couple of trifles. Ha! Business!
As the sage said: “We are afraid only of what we cannot understand and explain logically. But as soon as the thing that frightens us becomes clear to us, it ceases to cause us fear.”
So let’s go and tame this “terrible beast” - the base pattern. Let's tame and draw in 20 minutes. Yes, yes, in 20 minutes - because after a walk - the pattern drawing will seem old and familiar to you simple drawing- like a grid for playing tic-tac-toe.
Where does the base pattern come from?
So where does the base pattern come from - usually it is obtained from the following drawing:
The drawing contains half of the back part + half of the front part.
We will also draw a similar drawing with you - only more simple and understandable.
And what these halves are needed for, and where to use them - now I will clearly show everything.

Here (!) I dug up a wonderful sample - below - in the photo black and white dress Our halves are very clearly visible - both the back half and the front half. So to speak - clearly and understandably.
Yes, in Potnovian language the halves are called “shelves”. Today we will draw these same front and back shelves. But first, let’s take a closer look at what elements each shelf consists of. And most importantly, I will tell you why each element is needed and what it serves.
To make everything as clear as possible, I will illustrate each of the elements both in pictures and in photographs of real dress models.
First, let's get acquainted with two incomprehensible words: DOT And ARMHOLE.
Of course you may know them. Or maybe not. My job is to introduce you.
So, meet - PROYMA
When drawing a base pattern, you will create exactly that bend and size armhole that suits you – when the armhole does not pull or dig into your arm.
That is, the pattern base contains acceptable minimum size armholes. You can model the armhole to your taste, in any configuration. But your fantasy armhole should not be smaller than on the base pattern. That is, the armhole is based on a pattern - These are the boundaries beyond which your imagination should not cross.
Your model armhole can be as large as you like - but it cannot be smaller than on the base pattern. More - yes, less - no - otherwise it will dig into the armpit. This is the rule in modeling designer armholes.
Now let's get acquainted with the darts.
BACK DARTS – shoulder dart + waist dart
In the picture above, I wrote everything about the back darts - and in the photo of the dress you can find 2 waist darts - one to the right of the zipper, the other to the left of the zipper.
But you don’t see the shoulder dart on this dress. And many dresses don’t have it either. Because for convenience and beauty, this dart is moved from the middle of the shoulder to the zipper (or along the edge of the armhole, where the sleeve will be, a corner is simply cut off). That is, the excess fabric is not pinched at the middle of the shoulder and is not sewn inside the dart. And the extra fabric cut in the form of a corner at the edge of the shelf, where the zipper is sewn in, or at the edge of the armhole - where the sleeve will be sewn in.
Also, darts are not necessary if you sew from stretch fabric - it itself follows the curves of your body and shrinks both in the shoulder and waist areas.
Let's get to know each other next... DARTS ON HALF FRONT
Oh, I could write a whole poem about her.
I spent a long time wondering how to explain more clearly - why it is needed and by what laws it lives. I thought and thought... and came up with an idea.
The fact is that a woman has breasts.))) That is, in front adult girl no longer flat. This means that the dress should be convex in the chest area. The dart on the front shoulder gives the dress that same bulge in the bust area. Now I’ll show you everything in pictures. How does this happen.
For example, we have a flat piece of fabric, but we need to make a convex piece out of it. To do this you need to make a tuck on it. For example, this flat circle of cardboard will now become convex with the help of a dart.
And here's how a bust dart creates a bulge on the front detail
You will notice that the top of the convexity (that is, the peak of our round pyramid) is at the tip of the dart. Pay attention to this. Because when we draw the bust dart, the point of our dart will be at the top of the chest(where the nipple or bra cup is usually located).
Remember that sometimes you tried on a dress of your size in a store, which somehow strangely skewed on the chest - this is because the dart in the dress with its point was directed by the tops of your chest. So the breasts did not fit perfectly into the bulge of the dress. This product was not cut at the factory to suit your breast shape.
But that is not all, what I want to say about the chest dart.
The fact is that in almost all dresses this chest dart is located not on the shoulder- A on the side just below the armpit. This is done for beauty. The dart on the shoulder catches the eye more, but on the side, and even covered by the hand, it is not noticeable.
When creating a base pattern, we draw a chest dart on the shoulder only because it is more convenient to draw there from the point of view of constructing a drawing.
And after the drawing of the base pattern is ready, we very easily and simply transfer the dart from the shoulder area - to axillary area. Don’t think that you need to make new drawings for this. Nope, everything is simple here - like opening a carton of milk - one minute and that’s it.
Here, in the picture below I schematically depicted transferring the bust dart from the shoulder to the side seam under the arm.
Well, do you already feel how wiser you have become in these 15 minutes?))) Or there will be more... Let's continue our walk through the pattern and now let's get acquainted with the lines. Horizontal lines
CHEST LINE
The first acquaintance is the chest line. (It’s a beautiful dress, isn’t it? We’ll make it for you. Don’t even hesitate)

The bust line is the most remarkable line on the pattern. It is so convenient to focus on it when drawing a base pattern because:
- We know that we finish drawing the waist dart of the back at the bust line.
- We know that we finish drawing the front waist dart not reaching 4 cm from the chest line.
- We know that the shoulder dart is in the front - we finish drawing it at the chest line.
- We know that the lower edges of the armholes also follow the bust line.
Well, no, of course, you don’t know that yet. I am all these simple rules I'll give it to you when we start drawing. And now I just want you to know that when drawing many elements of a pattern, you can simply focus on the chest line (and there is no need to painstakingly put down these letter-number dots).
As you can see, there’s a lot of everything!! Therefore, go ahead - study, sew and enjoy life)))
WHAT TO DO NEXT - WITH THE PATTERN BASE? - you ask
And we will start sewing according to the base pattern of the TOP. Namely tops, T-shirts, tunics and then dresses.
You might ask, “Hey, why not just dresses?” I give the answer to this question in the first article of the series. So to be continued)))
Happy sewing!
0 173 948
Soft toys are loved by all genders and ages. They return adults to carefree childhood, and children become best friends and companions in fun games.
Therefore, we have prepared for you a selection of simple lessons from which you will learn how to sew a toy with your own hands. Homemade dogs, bunnies and bears carry a powerful charge of love and positive energy. It is also a wonderful and bright decorative element for a child’s room and a win-win gift.
Cheerful teddy bear made of soft fleece
Does your child love soft toys? Please him with a cute teddy bear who will become his favorite friend and partner in mischievous fun.
To work you will need:
- soft fleece;
- pins;
- needle and thread;
- a piece artificial leather for the spout;
- 2 black beads for pupils;
- filler.

Cut out 2 blanks from fleece for the body, 4 for the legs. Prepare circles for the eyes from white fleece, and a nose from leatherette.

Attach the eyes to the body and secure them with pins. Sew by hand or using sewing machine.

Connect the paw blanks in pairs. Sew along the outline, leaving the bottom unstitched. Turn out the resulting blanks.

Align the body parts with right sides facing inward. At this stage, insert Mishutka’s paws between them. Secure the workpiece with pins.

Sew the toy, stepping back 0.5 cm from the edge. Leave a hole at the bottom for turning inside out. Turn the product right side out.

Fill with filler. Sew the bottom of the bear with a blind stitch.

It turns out to be a cute little animal. All that remains is to turn it into the declared bear. Embroider the outline of the mouth with black thread.

You can start making a large nose. Go along the edge of the circle with a needle-forward stitch. Tighten the thread and stuff the workpiece.

Sew the nose to the muzzle. Sew pupil beads to the eyes.

Our sweet little bear is ready. He will be happy to live in the children's room.

Using the same principle, it’s easy to make him a whole group of cheerful friends: a mischievous kitten, a big-eared hare and a surprised dog. You will receive a whole troupe of artists for your home puppet theater.

We invite you to download working patterns for funny toys right now, without putting this matter off for a long time.
Kitty:


Bunny:


Doggie:


Volumetric hippo
Are the shelves in the nursery already full of soft toys? Are there hippos among them? If not, you need to urgently correct the mistake. A cheerful and friendly hippopotamus really wants to visit you. Thanks to step by step lesson even a novice handicraft lover can make it.
To work you will need:
- dense cotton fabric two colors;
- filler;
- eyes or black beads;
- 3 small buttons for nostrils and tail;
- a piece of ribbon.


Cut out the resulting patterns and cut out the parts of the future toy from the fabric. It is better to take a material for the body that is dense and elastic, so the toy will look more neat.
The belly and back of the hippopotamus can be cut from the same fabric or made in different colors. If you stopped at monochromatic version, open the whole piece. To do this, connect the two parts of the pattern in the muzzle area.

First of all, sew the ears and paws, connecting the parts with the right side inward. Sew the foot circles to the bottom of the paws.

Turn the pieces inside out and stuff the paws, leaving free space at the top for sewing.

If you took a fabric that is not very dense, glue a piece of non-woven fabric on the back side where the eyes should be.

If using two parts for the body, sew them along the muzzle.
Baste the side pieces to the body, starting from the ear to the back. Then again from the ear to the bottom of the muzzle. By the way, at this stage do not forget sew in the ears and paws themselves.

Where the muzzle bends, the fabric needs to be gathered a little. It is better to secure it with a pin and then stitch it.

The result should be a piece with one unsewn seam at the back (where the butt is).

Machine or hand sew all seams except the opening at the bottom of the back. Turn the toy inside out.

On the muzzle, make cuts in place of the eyes and secure them. You can make do with beads or glue half beads.

Fill the toy with padding polyester.

Sew up the hole left earlier. Sew a loop of braid in place of the tail and a button on it.

Don't forget about the button nostrils. As you can see, making this cutie is not at all difficult.

Unusual pet self made is ready to move into your home. It will also be an excellent gift for loved ones. They will definitely appreciate your efforts and care.

Gray bear in a vest
Do you want to make a sincere gift for a child and more? Sew a cute voluminous teddy bear. This textile toy will definitely become a favorite - children on a subconscious level feel the positive energy from things made with love by their mother’s hands.Thanks to our step-by-step guide for beginners, you can sew a cool bear yourself.

To work you will need:
- gray linen fabric;
- needle, pins and thread;
- filler;
- embroidery threads;
- beads for eyes;
- scissors;
- pattern.
Fold the fabric in half, lay out the parts on it, placing the part with the fold towards the fold of the fabric. Circle them with chalk or a special marker. Don't forget the seam allowance. Cut out the blanks.

At the initial stage, sew the seams of the body, folding the blanks with the right sides inward. Leave approximately 10 cm of the seam from the back of the toy and the top edges unsewn.

Sew darts on the side parts of the head and press the seams to one side. Baste the parts of the head, not forgetting to align the control marks.

Sew all the seams on the head except the bottom edges. Turn the workpiece inside out and stuff it with filler, leaving a little space for further stitching to the body. Sew on beady eyes, embroider a nose and mouth for the bear. Place the head into the body through the opening left on the back.

Manually sew the head to the body and only then turn it inside out. Stuff the toy with stuffing and sew up the seam on the back.

Place two ear pieces with right sides facing each other and stitch them together. In the middle of each ear, fold and baste the crease. Turn out the resulting blanks. Sew them to the head, tucking the lower sections inside the ear.

Fold the paw blanks in pairs and stitch them together. Leave the top of the paws unsewn. Also, don't sew up the bottom of the hind legs, that's where the feet will be.
Sew the soles to the hind legs. Turn out all the blanks and stuff them. Now you can sew up all the remaining spaces.

Sew all the finished legs to the body. To do this, it is better to use thick threads and a long needle.

The handsome Teddy Bear is ready to conquer children's hearts. You can sew a stylish and beautiful outfit for him yourself, at the same time choosing the gender of your pet.

If you use plush to make a toy, get a real teddy bear. Such a homemade pet will delight not only the baby. Any adult will be glad to see a guest from his childhood.
DIY toy zoo
Every second master class offers sewing of popular cats and dogs. And we found more interesting ideas for inspiration. Meet the spotted giraffe, the cute flower hare with long ears and the blue whale.
To work you will need:
- any knitted or cotton fabric with an interesting print;
- patterns;
- needle and thread;
- filler.
You can download all animal templates for free. If A4 format is used to print images, the dimensions ready-made toys will be like this:
- giraffe - 29cm;
- whale - 14 cm length and height 9 cm;
- bunny - 15 cm excluding ears.

You can choose any size of giraffe legs. When cutting out parts, allow 0.5 cm for allowances.
Sew spots on the body, and those that go on both halves of the toy, cut in half and place symmetrically on both parts. When combining the halves of the body, common spots should be obtained.
Stitch the legs together, turn them inside out and stuff them, leaving some free space at the top. Baste the blanks to the wrong side of one of the halves of the body.
Baste the rope tail and sew the giraffe's body, placing the halves right sides together. Be sure to leave an opening at the neck for turning.
Make notches in the convex places of the toy and turn the workpiece inside out. When stuffing the toy, fill the neck as tightly as possible so that the giraffe holds its head proudly. Sew up the remaining hole.
Embroider the eyes and nostrils of the toy. The new pet is ready. Make it your own: add decorative elements, tie a bow, use an unexpected combination of colors and textures. Any experiments are welcome.
Is it scary to start your toy making career with a giraffe? We need to make a bunny. It is easy to perform: no complex techniques or skills are required.

Cut out the parts for the toy. Sew a decorative heart onto the belly. Sew and turn the ears, sew them to one of the halves of the body.
Sew the workpiece, matching the parts right sides together. Leave some room at the bottom to turn it inside out. Make notches on the convexities of the toy. Turn the bunny inside out and stuff it with stuffing. Embroider his eyes and mouth with a nose.
The optimal toy for a beginner is a baby whale. It’s so easy and quick to do that you can trust even children to do this activity.

Cut out the pieces, place them right sides together and sew. Leave room for turning the workpiece inside out. Notch the fabric in the convex places and turn the workpiece inside out. Stuff the toy, sew up the hole left, embroider or draw eyes.
Such funny and cute little animals will decorate a child's room or will be a heartfelt gift for your loved ones.
Master classes with photos
We present you with a number of other ideas for implementation. These crafts are so easy to repeat that they do not need additional description. Look at step-by-step photo instructions and take action.Felt elephants will be an excellent Christmas tree decoration:
elephant diagram:

A cat and a cat in love will delight your other half on Valentine's Day!
Cat diagram:

And a little terrier is, in general,... Prepare gifts in advance and with love.
Coffee rates:
Doggie schemes:


Animal patterns for downloading
Don't limit the flight of your imagination. We have selected patterns for a variety of toys for you. Download them, print them and create. With a little effort, you can create a whole zoo at home with your own hands.Pattern of a cat and a cat:

Funny cat:

Impressive cat:

Natalia Kostikova's bunny:


Kitties:

Cat patterns:

Kitties:

Puppy cat

Little Frog:

Angels:

Mishutka:

Fawn:

Lamb:

Giraffe:

Create toys from soft fabric- This is not just an entertaining hobby. While working, they are filled with positive emotions and a lot of love. Try sewing a cute kitten or a pot-bellied hippo for your baby. You will see that this particular toy will become his favorite.


Create, experiment, gain experience and new knowledge. Give your loved ones more than just gifts, give them the love you put into your work.
New Year 2019 is coming very soon, and many are starting to prepare for this important event in advance. To this New Year brought a person good luck, financial and mental balance, it is necessary to appease the animal. To do this, you can embroider a picture in the shape of a pig, knit a cute craft, or sew a toy. Felt pig – great gift for close relatives.
Symbol of 2019
Many people already know that the symbol of the New Year is the Yellow Earth Pig. This animal is distinguished by its kindness and cheerfulness. Since Pig likes to spend his life in tranquility, she is not in a hurry, then a person in the New Year does not need to rush anywhere, or worry about trifles once again.

The symbol of the year 2019 is distinguished by calmness and resistance to stressful situations. In addition, in 2019, many can improve their financial situation. This year you don't have to put in a lot of effort to make money. The most important thing is to remain calm and be confident in your abilities.
How to use a felt pig
A hand-sewn product can be used in different ways. You can make a small one. At the same time, you can make a lot of funny outfits for Piglet, and decorate the Christmas tree with these funny animals.

A felt pig can be a great toy for children. The product can also be used as a small keychain. It can be hung on a wallet, handbag, backpack, keys.
The product can also be decorated. A small decorative pig can be placed on a child's backpack as a decoration. You can decorate children's clothes and kitchen aprons with it.
Materials and tools
To sew a felt pig with your own hands, you will need to prepare a minimum amount of materials and tools:

Everything you need to create toys can be found at home. Felt cannot be found in every fabric store; this fabric is expensive, and it is sold in small pieces in already cut leaves.
Manufacturing technique
To make the pig beautiful, you need to use special templates - patterns. First you need to prepare small paper blanks, place them on the fabric, and cut out the blanks.

To sew a toy, you just need to connect all the components of the workpiece, following the instructions. The elements of the toy are sewn together with ordinary threads and filled with various materials, with the help of which the product becomes voluminous.


Once the elements of the toy are sewn, they are joined together. Next you need to sew on the pig’s eyes. You can use small buttons for this. You can make it out of ribbon small bow, and sew it to the body of the toy. A felt pig is somewhat reminiscent of a regular applique. You just need to cut out the parts and sew them.


Choosing a filler
Can be used as a filler different materials, there are no special requirements for it. The best filler is padding polyester or holofiber. It doesn't get lost and helps the toy keep its shape.

If it is not possible to use synthetic materials, you can fill the pig with foam rubber, cotton pads, cloth, ordinary cotton wool. Great for filling toys with fluff, wood shavings, and polystyrene foam. The most important thing is that the toy is easy to care for during use.

A little advice! To draw Pig's cheeks or give relief with color, use colored pencils. Carefully sharpen the pencil lead with a blade, and then cotton swab or use your finger to touch up the “cheeks” or other parts of the toy.


How to care for a felt pig?
To ensure that the toy always looks attractive, it needs to be washed periodically. To do this, add a little liquid to a container with warm water. washing powder. A toy is placed in the resulting solution. You need to carefully remove stains, if any. After this, the pig is rinsed in water.

If the toy has many decorative elements, as detergent It is better to use shower gel or shampoo. After rinsing, the product is lightly wrung out and placed on a horizontal surface until completely dry.
Sewing a felt pig is not difficult; even beginners can cope with this task. Small child. It’s enough just to find a high-quality pattern, prepare materials and connect the parts.
Photo ideas for implementation


Patterns and templates for printing
Attention! We tried to collect as many patterns as possible, so they may be loaded with a delay. Please wait a little. Everything will be now! :)


Currently, handmade products have gained unprecedented popularity, and it doesn’t matter what it is: soft toy or women's dress. Many people ask the question: why sew clothes when you can either buy them in a store or seek help from a professional tailor? The answer is simple: An item made with your own hands will definitely be of high quality and unique, you can be 100% sure that no one has a second dress like this, which means the chances of meeting a double on the street are zero.

Sewing a dress with your own hands is easy and simple
At first glance, it may seem that sewing a dress is an incredibly difficult task that not everyone can do. However, taking a closer look and typing the phrase in the search: We sew our own dresses for beginners patterns you can make sure that there is nothing difficult about this and in just a couple of evenings you can easily sew a beautiful and stylish dress. Simple patterns for beginners will turn the process into a fascinating game, and the sewing process will seem not as scary as it was perceived before!
Pros of a dress made by yourself:
- Truly exclusive
- Can make custom design
- Your creative abilities develop
- Opportunity to make money from your hobby
- Significant savings in time and budget when buying new clothes.
As you can see, a dress, and in general clothes sewn with one’s own hands, has more advantages than disadvantages than store-bought ones.
How to sew a dress with your own hands for beginners? Patterns below
There is nothing better in the heat than a beautiful, bright, weightless dress. What if you sew it yourself?

But before taking on this difficult task, the amateur will have many questions: how to create a dress pattern for beginners? How to make a base pattern for beginners? Which fabric should you choose for your first product? How to sew a summer dress? We are ready to answer these many questions in order. Any dress model is a “sheath” perfectly tailored to your body, and small changes (like lowered sleeves or a slightly looser waist will make your look more interesting) don’t be afraid to experiment, because now there are a great many master classes online. However, there are several general rules which should be strictly observed:
- The fabric is always marked on the wrong side
- You can use tracing paper or plain paper as material for the pattern.
- Before tracing the template, you should pin the cutout with pins so that everything turns out neatly.
- Spread the fabric on a large, flat surface (for example, a huge table, a large floor) this will help you carefully cut the desired piece.
- Don't forget to trim the hem and edges of the product at the end of sewing.
Taking into account all these simple rules, you will end up with a light and simple dress, just what you need for hot weather.
The stores offer a wide variety of beautiful summer clothes. But the best solution would be to make the outfit yourself and get incredible pleasure from the process. The first and most important step is choosing the fabric. It should be light and flowing. Cotton or silk work great (however, silk is more difficult to work with)

- Take measurements of your figure properly (this will affect how the dress will fit you in the future). The following parts of the body are required for measuring: waist, shoulders, hips and, if desired, arms.
- Draw the pattern according to the measurements taken on the fabric. Building a base pattern is the easiest way for beginners = look and choose the most suitable one
- Cut out carefully.
- Sew the parts together on a sewing machine, but you can also sew by hand, in which case the process will take much longer.
- Process the edges of the finished product and steam.
This is a general algorithm for sewing a summer dress with your own hands.
Blouse patterns for beginners, easy DIY patterns?
What is it like? the simplest dress? That's right, two sewn rectangles of fabric, with slits for the arms and head.
However, even this miracle can be made carefully and beautifully if you take standard measurements from the model, which will serve as the basis for the future masterpiece.
How to make a base pattern for beginners
BASIC MEASUREMENTS (WITHOUT THEM IT IS IMPOSSIBLE TO SEW THE PRODUCT)
- OG – 96
- OT – 75
- OB – 101

BACK MEASUREMENTS
- Dst (back length to waist) – 41
- Shsp (back width) – 35
- Shoulder width – 12
Front measurements.
- Dpt (front length to waist) – 43.5
- VH (chest height) – 26.5
- CG (centre of chest) – 18
- Vhk (oblique chest height) – 24
- SH (chest width) – 37
- Gp (armhole depth) – 20
Remember that the side seams must completely match, only then you will get a neat and beautiful product.
How to sew a baby dress with your own hands for beginners patterns
If our visitors have little princesses, then closer to the holiday season the question of how to dress the young beauties becomes urgent. Typing in any search engine patterns for children's dresses for beginners, simple DIY patterns You will be surprised by the abundance of all kinds of styles, patterns and master classes; choose the most suitable option for yourself.

The algorithm for sewing dresses for girls is exactly the same as for adults, although their delicate skin requires only natural and high-quality fabric.
How to sew a floor-length dress with your own hands for beginners patterns
A floor-length dress looks beautiful and romantic; it is the best choice for young girls, because such clothing allows you to emphasize grace and lightness. For sewing, you can use absolutely any elegant fabric.
For beginners perhaps best choice There will be viscose knitwear and, of course, a standard needlewoman’s set, as well as an overlocker, so that the edges of the finished product look as smooth as possible. Many of these models do not have a pattern, but beginning craftswomen should use a template in their work.
How to sew a sheath dress with your own hands for beginners patterns
A sheath dress is nothing more than a second skin, which must be sewn to the unique measurements of each. This work requires a lot of diligence and diligence from the fashion designer and tailor, because it is quite difficult to get a dress to fit perfectly, but a beginner can try his hand at sewing a simple one, straight dress, based on exact measurements.

Dress patterns for beginners, simple DIY patterns ALL THIS is a great opportunity to try a new craft, find your hobby and possibly a new source of income, because all girls and women (and sometimes young princesses) love to dress up in beautiful clothes. Now you have expanded your knowledge base, which will allow you to produce truly exclusive and good clothes both for yourself and for your friends. Summer dress patterns for beginners - simple DIY patterns
Ten years ago, we could not even imagine that we would again sew our own clothes, rather than buy them in stores and supermarkets. However, the number of people who prefer homemade items is growing.
If you are not in the mood to spend money on magazines, or prefer electronic sources of information to paper ones, you are not losing at all. By entering the following queries into the search engine:
Why sew your own clothes?
There are many reasons why women are once again sitting down at sewing machines, as in the 90s and earlier years. Yes, as before, some housewives do this in order to save money: to use fabric that has been lying idle for a long time or to alter an unfashionable item from an even stronger material. As a rule, this is relevant for those whose budget has suffered significantly due to the economic situation in recent years.
Luckily, saving money isn't the only thing motivating women to sew in 2016. A much more common reason for this now is to create something special for yourself, not like others. Some leave orders for such exclusive items to professional craftsmen, while others do it on their own. The last option, of course, carries risks, but if successful, clothes made with your own hands become truly loved.

A considerable part of beautiful ladies resort to independent sewing in order to be able to wear dresses, skirts and blouses that fit exactly to their figure. After all, modern stores offer customers a variety of clothing models (of different colors, textures, styles), but all of them, as a rule, are tailored for women with standard hourglass figures ( thin waist with approximately the same volume of the chest and hips) and “rectangle” (the waist is not clearly expressed, the difference between the main volumes is minimal). It is more difficult for pronounced “pears” (hips much wider than shoulders), “inverted triangles” (hips much narrower than shoulders) and “apples” (have a noticeable tummy) to choose something that does not focus attention on the disproportions of the figure.
Where to start if you want to sew clothes?
Once you are convinced of the seriousness of your intentions, take care of the means of production, the main one of which is a sewing machine. If you have one, check that it is working properly and, if necessary, contact a technician. If you don't have a car, buy one. It is better to be guided not by the principles “the more expensive, the better” and “the more more famous brand, the longer it will serve”, but with technical characteristics and reviews of real people.

For example, when purchasing a sewing machine, it is fundamentally important to understand what types of fabric you will be processing on it. Not every machine can handle thick coat fabric or leather. Also, not all devices are suitable for sewing knitwear, thin tulle fabrics, and so on.
Then, having selected a number of machines that suit your characteristics, read reviews about them. They can be found on specialized review sites, handicraft forums, as well as on resources like Yandex.Market.
You also need to take care of purchasing such things as tailor's scissors, measuring tape, pins, chalk, and so on.
When all the funds are ready, you should move on to purchasing materials: fabric, threads, necessary accessories. If you decide to sew for the first time, you should not take the most expensive thing. Start with budget options.
What to sew first and where to get patterns?
Perhaps, novice needlewomen should not immediately take on products with a complex cut, made from capricious fabrics: coats, shirts, trousers. Better suited for debut relatively simple products, such as straight or pencil skirts, as well as casual dresses.
Patterns for future outfits can be found in several sources. For example, in cutting and sewing magazines, the most famous of which is, of course, Burda. As a rule, such publications contain not only intricate models, but also detailed instructions About, how to sew a simple one summer dress do it yourself for beginners. Here you will find materials about how to sew child dress DIY for beginners, patterns men's clothing, in general, having accumulated several years' worth of magazine issues, you can get a full-fledged textbook on cutting and sewing.

Traditionally, books devoted to handicrafts are also popular. A significant part of them is dedicated to inexperienced seamstresses. Thus, on the shelves of bookstores you can find publications containing recommendations for a specific type of product: “ We sew a dress with our own hands, patterns for beginners», « DIY dress: easy and simple to sew. For beginners" and so on.
There are also thick books, almost encyclopedias, in which you can find tips on how to sew any thing from an apron to a coat. They may be called " We sew ourselves. For beginners. Patterns and recommendations" or "We dress the family ourselves: a guide to sewing all types of clothes."
If a book contains not only a description of the algorithm for making a product and small illustrations of the parts that need to be constructed, but also full-size patterns, this is usually stated right on the cover. Pay attention to the publications with the titles “Patterns of summer dresses for beginners”, “Simple patterns. Now you can sew everything with your own hands”, “How to sew a dress with your own hands? Patterns and models”, “Simple patterns for summer dresses and sundresses for beginners” or, for example, “Patterns for children’s clothing for beginners. Simple DIY patterns."
To make sure that the book actually contains patterns, you need to leaf through it. And when ordering books online, choose those stores that add photos of the contents and sheets from it to the page of each publication. By the way, such advanced trading platforms often allow you to leave reviews of books. It will also be useful to read them so as not to make a mistake with your choice.
If an article from any resource turns out to be successful about, for example, how to sew a dress with your own hands for beginners, patterns were also quite applicable to reality - don’t be lazy, save the link to the site in your bookmarks. By following this rule every time, you will be able to accumulate a whole selection of links, following which you will receive high-quality “recipes” for clothes.
Summer dress pattern for beginners
Of course, within one article it is impossible to provide as much information on cutting and sewing as a specialized website, book or magazine file can provide. However, after reading our text, you are guaranteed to benefit from it. And it will be not only theoretical, but also practical. So, we present to your attention instructions on how to how to sew a summer dress with your own hands for beginners, patterns We'll give it to you too!
Beach clothes have always been considered the simplest cut. On vacation by the sea or river you don’t need much. Pleasant colors, a loose or semi-fitting silhouette, the presence of a small sleeve to cover shoulders prone to sunburn - these are the basics of success. beach dress.
In our example, a stylish dress with a V-neck and a drawstring at the waist is made in a rich yellow color, but you can choose another one. Turquoise, red or the color of young greenery are perfect.
The first thing we start with is constructing a base pattern. The easiest way for beginners- construction according to the model. In the diagram below you will see a reduced pattern of a beach dress for size 46-48 and height 160-170 centimeters. Whether you're shorter or taller, slimmer or plumper, it's difficult to how to make a dress pattern for beginners, should not arise either.
To ensure that the dress fits your figure exactly, remember that the length of the bust line (on the pattern it is 25 cm) should be a quarter of the circumference of your bust. So, a girl with a chest volume of 90 cm should set aside 27.5 cm in the drawing. The same principle applies to the waist and hip lines: their length on the pattern will be equal to a quarter of the actual volume + allowance. If you want the dress to be more spacious in the lower part of the body, instead of one centimeter, add two or three.
Try not to overdo the depth of the cutout. You can always increase it, but decreasing it can be problematic.
To make a drawstring, take a piece of fabric equal to the circumference of the dress at the waist. Sew it on the front side, tucking the edges inside, and iron it. Then make holes for the cord and stitch them. After this you can thread the cord.
When making shoulder seams, leave room for the cords and pull them through as well. This will allow you to play with the shoulder line and change the character of the dress depending on the conditions and mood.

We hope you are now convinced that sewing a dress with your own hands is easy and simple. Having successfully completed sewing a beach dress, you learned that creating a basic pattern for beginners is not so a big problem. This means that you should look for “how to make a basic pattern for beginners”, “how to sew a dress with your own hands for beginners”, “how to sew a simple straight dress with your own hands for beginners”, “how to sew a straight dress with your own hands”, “how to cut straight dress for beginners”, “how to sew a straight dress with your own hands for beginners patterns” will no longer be necessary.
It is enough to sew a dress with your own hands once - the patterns and models will no longer seem like Chinese writing. Simple dress patterns for beginners will not cause much difficulty, which means that soon you will be able to bring your wildest fantasy from the latest magazine or book to life.
After practicing on finicky fabrics and silhouettes, you can proceed to more capricious ones: silk, wool and others.
We wish you good luck in all your endeavors! Be unique in your own made outfits!
Dress in Greek style...mmmm...dream. Where to find, where to go to buy?
Ladies, head to a fabric store if you want a truly one-of-a-kind Greek dress.
Your goal is light, flowing fabrics (muslin, satin, silk, jersey, fine knitwear, velvet). The fabric should be fluid, thin, easy to fit into soft folds and not wrinkle too much.
(By the way, please note that among flowing fabrics, you can find those that do not fray when cut, then you will not need to process the edges after sewing the dress.) The length of the cut should be at least 3 meters.
We will create a dress in the Greek style ourselves. And no patterns! Just a flight of fancy and a mirror. And every woman necessarily has both.
Don't have a sewing machine? So you don’t really need it to create a Greek dress.
Have you ever sewn anything? And a Greek dress does not need to be “sewn” in the generally accepted sense of the word (with pattern drawings, darts and tufts).
The first way to create a Greek dress.
"Wrap up and tie yourself"
Here is a visual diagram:
Two decorative pins on the shoulders and tie with a ribbon at the waist or under the bust.
Of course, this simplified version of the dress will fly open in any wind. Therefore, this particular model would be appropriate at a beach resort over a swimsuit.
And in order to make a full-fledged Greek dress from this, you just need to sew the flaps of the dress along its right side from bottom to top, so that the body does not show through. The result is an elegant outfit in the Greek style. This model is good because, although it does not fit the body at all, it nevertheless emphasizes the beauty of its curves, thanks to the fluidity of the fabric, flowing seductively over the body. And according to this modeling method, it can turn out completely different dresses, depending on the color and quality of fabric you will use to create them.
For example: ivory-colored satin, a string of freshwater pearls around the wrist, a discreet but exquisite brooch on the shoulder made of the same pearls, hair scattered over the shoulders - and you get the image of a young Aphrodite emerging from the foam of the sea, and your wardrobe is replenished with a fashionable Greek day dress type.
Or the same model but: black silk, a brooch on the shoulder and a gold-colored bracelet, smoky eye makeup - and that’s already evening look formidable goddess.
The second way to create a Greek dress.
Drape on the body.
The great French fashion designer Madame Grès created her dresses in the Greek style, draping them by hand on the model's body. Her way of creating an antique dress has become classic, and her clients have included Grace Kelly, Jacqueline Kennedy, Marlene Dietrich and Barbra Streisand.
As the ancient Greeks used to say: “It’s not the gods who burn the pots,” let’s try ourselves in the role of a fashion designer.
Here is a picture of a Greek dress made from a single piece of fabric.
High-fashion? Yes, high, but not so high that we couldn’t reach it.
What you need: fabric a little longer than 2 times your height from heels to shoulders (if you want a floor-length dress). Decorative braid or ribbon of such length that it is enough to wrap around yourself under the chest and at the waist twice.
Let's begin. We spread the fabric on the floor, found the middle of it and drew a line with chalk. This line will lie on your shoulders.
Now you need to make a hole in the center for the head - draw a perpendicular line (about 15 cm to start with, so that the head fits through) and cut it with scissors.
We stuck our head through the hole, and now we need to decide to what level we will deepen the neckline. (The dress in the photo has a neckline deep to the waist. But you can also stop it under the bust, tie it there with a ribbon, and then you don’t have to wrap another ribbon around the waist, let the fabric flow freely down, starting to fall straight from the ribbon under the bust. And this will be a slightly different model of the Greek dress, less revealing). But let's continue...
So, they put it on the head and marked the desired level of neckline depth on the fabric with chalk. We took it off, spread it on the floor, drew a line to our mark and used scissors to cut the cutout to the end. We gathered the fabric along the shoulder line with pins and then proceed as shown in the figure.
They tied a ribbon under the chest, but not on top of the fabric, but underneath it, on the body. We take pins and, placing the fabric in folds, pin them to the ribbon, draping first one breast, then the other.
We do roughly the same thing with the tape at the waist.
Now that we already see the image of our future Greek dress, and we are satisfied with the way the fabric lay, we can thread a needle and, taking out one pin at a time, sew our folds to the ribbon with large stitches (or you can sew everything first, and then remove the pins already). The stitches can be made oblique and curved, anyway we will sew another ribbon or braid on top, and we will sew it on carefully.
So, we made the front part of the dress in the Greek style.
At the back you can do the same thing as at the front - with a cutout and two ribbons. Or show your imagination and play with drapery. Using the method of pinning and crab tucks for hair, find the very location of the folds when the fabric flows in the most interesting way for you, emphasizing your advantages and hiding your flaws.
The pictures show 3 ways to drape the back of the dress. The third method, “swing”, is achieved by gathering the fabric upward (the left and right edges of the fabric are gathered, and the middle sags freely, forming these most beautiful “swings”) Accordingly, for the third method, the fabric on the back hem needs 1-2 meters more .
But when playing with the fabric and imagining, keep in mind that the dress must provide free entry and exit, that is, somewhere it must be fastened and unfastened. It is best to sew one elegant button on the side, at the ends of the ribbons on the front of the dress, and a loop on the ends of the ribbons on the back of the dress. Thus, it turns out that the dress above the waist does not have side seams, but is fastened with buttons (or Velcro, or decorative fasteners - to your taste).
The third way to create a Greek dress.
Drapery on the “facing”.
Let me explain what “sticky” is. Imagine what you have Short dress according to the figure, that is, almost clingy. But you don’t wear it and won’t wear it, because you once spilled bleach on it, and the stain cannot be removed. And if you still haven’t thrown it out yet, then rejoice, you don’t have to sew a special lining - this dress will serve as an ideal basis for creating your new one. gorgeous dress in Greek style. That is, it will be this very “sticky material”.
You put on the wrap, take flowing fabric to match, throw it over your shoulder (or cut a hole for the head, as in the previous method), form folds and pin them to the wrap. Then you sew them on first with a rough thread using simple coarse stitches, take out the pins, try them on again and, if everything suits you, sew them on by hand using neat hidden stitches. Pull out the rough thread, trim off the excess fabric, if necessary, make a seam. As a basis for drapery, you can use not only a sheath dress, but also a tight-fitting T-shirt or bra. The main thing is that the drapery completely hides the base, and the base itself is the same color as the drapery fabric.
As you can see, a dress in the Greek style can be made literally “with your bare hands.” Without any drawings or mathematical calculations. Guided solely by intuition and a sense of beauty.
Go ahead, grab some fabric and try and create! And you will definitely succeed!
As the ancient Greeks said: “To learn to play the harp, you need to play the harp.”
Original post and comments
Olga Klishevskaya specially for the site Women's Conversations 2010 - 2011, womenstalk.ru. All rights reserved.
We also recommend
 Tattoo Realism - Tattoos in Realism Style for Men and Women Realistic arm tattoos
 Comic gifts for women: birthday ideas
 Games and competitions for the anniversary Table competitions for the 30th anniversary of a man
 New Year's poems for grandson
 Scenario for the Victory Day holiday A holiday dedicated to Victory Day in kindergarten
 Step-by-step instructions on how to do makeup - photos for beginners and professionals Beautiful makeup at home