How to make a cat out of cardboard. How to make a cat out of colored paper: step-by-step photos
Would you like to know how to make a paper cat? Follow the step-by-step manual exactly and everything will definitely work out. This craft includes origami elements, but it is not at all complicated. I made a black cat for Halloween, and I’ll use this example as a basis, but your cat can be a completely different color.
What materials will be needed?
- Black cardboard, preferably thick;
- Yellow colored paper for eyes;
- Scissors, glue stick, black felt-tip pen, pencil.

DIY paper cat step by step
Cut the black cardboard into two even pieces. One half will be the head, and the other half will be the torso.

Let's make the torso first. Fold half of the cardboard in half. Draw a semicircle on one side.

Cut a semicircle on two pieces of folded cardboard at once. This is already part of the cat. It has a torso and 4 legs. Try not to make them too thin, that is, do not make the semicircle very large. My paws are 3 cm wide and my body height is 4.5 cm.

Make slits on the top near the fold of the paper. These are the places where the body is attached to the head and tail. Also fold the legs at the bottom. But this step is not just for the paper cat's completion, or beauty. In the original, the cat is glued to green paper on these folds. It seems that the cat is standing on a green lawn.

Now let's move on to creating the head of the black cat. To do this, take the second half of the cardboard and cut a strip on its narrow side, slightly less than 4 cm.

This stripe will be a chic tail. The ends of the strip need to be slightly narrowed. But later I cut off one narrow tip, making it straight, since the tail did not fit well in the slot of the body. I suspect that my cardboard is not hard enough. Perhaps you can do it.

Let's continue with our heads. Fold the remaining cardboard, the one from which we cut the strip for the tail, in half. Round off the ends of the forked part of the paper.

Open the paper and make side slits only on one part of it, up to the fold area.

Then return the paper to its folded position to create protruding ears.

Cut out long ones from yellow paper narrow eyes and draw vertical pupils with a felt-tip pen. Cut out a mustache from black cardboard - 6 stripes, approximately 5 mm wide and 9 cm long. You also need a nose.

Straighten the cat's face, round off sharp corners. Glue on the eyes, mustache, and nose on top.

Place the head into the slots on the back, placing its back half and tail into the slot. Kotofey is ready. You can glue it to green paper for stability or leave it like that. Now you know how to make a paper cat for Halloween and more. The cat turns out to be quite large, of course, if you need smaller sizes, you need to take half as much paper.

Black cat with a witch, see how to make one.

The dark trinity together. Step by step bat.

A ginger cat made of colored paper that walks on its own and does not need an owner. The shape of her body has a static position. Therefore, you can turn the craft into a convenient and practical stand for small items.
Necessary materials:
- colored semi-cardboard;
- White paper;
- black felt-tip pen;
- office glue;
- scissors;
- pencil;
- ruler.

Stages of making a cat:
1. The cat's torso will consist of a cubic shape. Therefore, to create it you will need to cut out a 17 x 5 cm rectangle from orange double-sided thick paper.

2. Mark along the top and bottom edges 4 cm four times. Connecting the markings. On the far left side we draw a semicircle to create the cat’s paws.

3. We bend the blank of the cat's body along vertical lines and cut it out along the intended contour to create paws. Let's reveal.

4. Apply glue to the side of the workpiece 1 cm thick. Glue the figure and get a cubic shape of the cat’s body.

5. From the same shade of paper, cut out a tail along the contour. Glue it to one of the sides of the body. You should also take white paper and cut out a semi-oval. Glue it on the opposite side of the body and get the front part where the head will be attached.

6. Draw the outline of the head and a long strip on an orange sheet of paper. Cut out the details. We bend the strip several times and glue it together to obtain a three-dimensional rectangle.

7. Let's embellish the cat's face with details. Cut out a couple of drops and circles from white paper. Glue it. We also cut out the middle of the ears, nose and mouth from pink paper. We attach it to the right places.
Let's add small details to the cat's face using a black felt-tip pen or marker. Draw pupils in the middle of each circle, long mustache, eyebrows, contour of ears and mouth.

8. Glue a volumetric rectangle to the back of the head.

9.
Next, apply glue to the side of the rectangle and glue the part to the wall of the body, where there is a white section of the chest.

10.
With this, our cute paper cat is ready in the form of a voluminous craft with a cubic body and a voluminous head. You can complement the craft with lines and small decorative elements that will create the desired effect.


Kids love to make crafts from different materials.
You can offer your child to make a “Cat” craft with his own hands. Children will happily get to work because they love these fluffy animals. In this article we will tell you how to make a cat from different materials.
Applications
Paper is a material that is easy to cut, bend, and glue. A master class video will help you make an applique of an original paper cat.
Another option is appliqué using pieces of fabric.
For work you will need the following materials and tools:
- foam base 3 cm thick, size 50x80 cm;
- multi-colored pieces of fabric;
- marker;
- scissors, manicure file, stationery knife.
A cat is drawn on the base sheet; you can use a stencil. All details are cut with a stationery knife.


A piece of fabric is cut out a little larger in size than the applique piece, placed on top of the design and carefully tucked into the slots with a nail file. The edges are secured with glue.
Volumetric figures
Do volumetric craft DIY cat is not difficult. There are options that will interest children of different ages.
Option 1
For this craft you need 2 cardboard tubes, paints and glue.
Progress:
- Fold the ends of one tube inward on one side and cut off the corners. This is the torso.
- The second tube is a cat's head. Diagonal cuts are made on the sides to create triangular ears.
- Both bushings are glued together.
- The background is tinted, eyes, nose, and mustache are drawn or pasted on.
- The tail is attached to the lower part of the body.


Option 2
A cat on springs is a toy that will interest older children. The work requires a little paper and patience.

Option 3
For the cat figurine you will need:
- white and orange paper;
- pencil, ruler, scissors;
- glue;
- markers.
Cut out the cat details:
- From orange paper:
- rectangles 6x13 cm and 7x14 cm are the torso and head;
- paws 4 parts 2x6 cm;
- oval tail 2x8 cm;
- 2 ear parts.
- From white paper:
- stripes on the body (3 elements 1x14 cm);
- stripes for the tail (6 parts 1x2 cm);
- oval muzzle 4x6 cm;
- ears (2 parts).
Glue the strips onto the body, roll them into a tube, and glue them together.
On the muzzle, draw or glue eyes, nose, mouth, glue the muzzle to the head, roll the part into a tube and fasten the ends with glue.
Glue white parts onto the orange parts of the ears and attach the ears to the head.
Connect the head and body.
Fold the paw parts, glue the edges, and glue them to the body.
Glue strips on both sides of the tail, the tail to the body.

Option 4
Their regular packaging cardboard is cut out with a cat's silhouette. Make 2 cuts at the bottom so that the figure can stand.
Glue on a muzzle made of colored paper and a mustache made from skewers.
The body is wrapped with colored woolen threads.
This cat will be warm even in the winter cold!
Origami
Origami – interesting way make a DIY “Cat” craft with your own hands. This technique develops thinking, logic, and accuracy.


The master class will help you cope with this task. A three-dimensional figurine of a pet will delight a child.
Chenille wire
Required:
- 2 foam balls with a diameter of 2 cm and 4 cm;
- wire white, brown, pink;
- heat gun.
A hole is made in the ball on one side, glue is applied, and a brown wire is inserted. The ball is wrapped around her. The same actions are performed with the second ball. Then the parts are glued together - these are the body and the head.
For the paws, take white wire and twist it in the shape of a trefoil. One part is glued to the body.


The white wire for the ears is twisted into a spiral, and pieces of pink wire are inserted into the middle.
The ears are attached to the head.
The muzzle is formed from white wire, the tail is made from brown, the parts are glued, the mustache is secured - and the cat is ready!
Plasticine
You can make a cat from plasticine or plastic mass. To create a more complex craft you will need:
- Draw the outlines of a cat on a beautiful background, drawing all the details in color.
- Make a lot of balls with a diameter of 2-3 mm from plasticine of different colors.
- Attach plasticine parts to the drawing of the cat.


It turns out to be a mosaic cat! Using the same scheme, you can make a panel with a cat, using multi-colored sand, beads, pebbles, cereals, pasta and other small objects as finishing materials.
Important! In this case, the parts must be attached immediately, otherwise the adhesive base will dry out quickly and the craft will look sloppy.
Soft cats
Handsome cats are made from felt or felt.
If a child knows how to sew, then using the template he can make a phone case, an anti-stress cat or a bookmark.
Felting wool is also useful. For the craft you will need wool of 1-2 colors, 2 foam balls, beads, and tools - a needle for felting.


The balls are wrapped in wool and carefully pierced with a needle, creating an even soft layer on the surface.
Ears and paws are laid separately.
The parts are connected to each other by placing pieces of wool or gluing them together. The cat is decorated with a ribbon, beads are glued instead of eyes. The DIY “Cat” craft is ready!
Patterned cats
The quilling technique allows you to create original panels.
Required:
- strips 5 mm wide;
- scissors, tweezers;
- quilling stick;
- glue;
- basis for work (designer cardboard, beautiful printed background).
A contour drawing is made on the base.
5 turns are formed for the head, 6-7 for the body, several parts in the form of a drop.
Ears (in the shape of drops) and paws are glued on, and whiskers are attached - wound on a stick and straightened strips.
Did your child lose a glove while out for a walk? No problem, the remaining glove makes a soft and cozy cat. You can see how this is done in the video

Available materials
To create a “Cat” craft with your own hands, you will need everything you can find at home.
Option 1
A disposable plastic plate quickly turns into a cat's face. The complexity of the work is low, production time is 20-30 minutes.


The plate is the head, the eyes and nose can be drawn with paints, but it’s more interesting to do it in volume:
- For the nose, take a black or Pink colour. It can be wound from threads. A triangle cut out of paper looks beautiful.
- Chenille wire is used for mustaches.
- You can use ready-made eyes or draw them with paints or a marker.
- All that remains is to glue the triangular ears - and the cat is ready.
Option 2
The cat silhouette template is transferred to the cardboard base and pins are inserted along the contour. Then the child weaves the threads, hooking them onto the heads of the pins, filling the inside of the outline.

Option 3
There are always a couple of empty ones in the house plastic bottles. They will come in handy to make a bright and cheerful cat that will fit perfectly into your country house design.


To help the young master - a master class in video format.
Option 4
The vegetable cat is easy to make. You will need 2 potatoes, carrots and a little plasticine:
- The potatoes are connected to each other with skewers.
- 4 legs, a tail and ears are cut out of carrots and secured with skewers.
- Make a nose, eyes and mustache from plasticine.
Important! You can make your own “Cat” craft from other vegetables, chestnuts and nuts.


Option 5
From cotton pads You will get a funny cat applique.

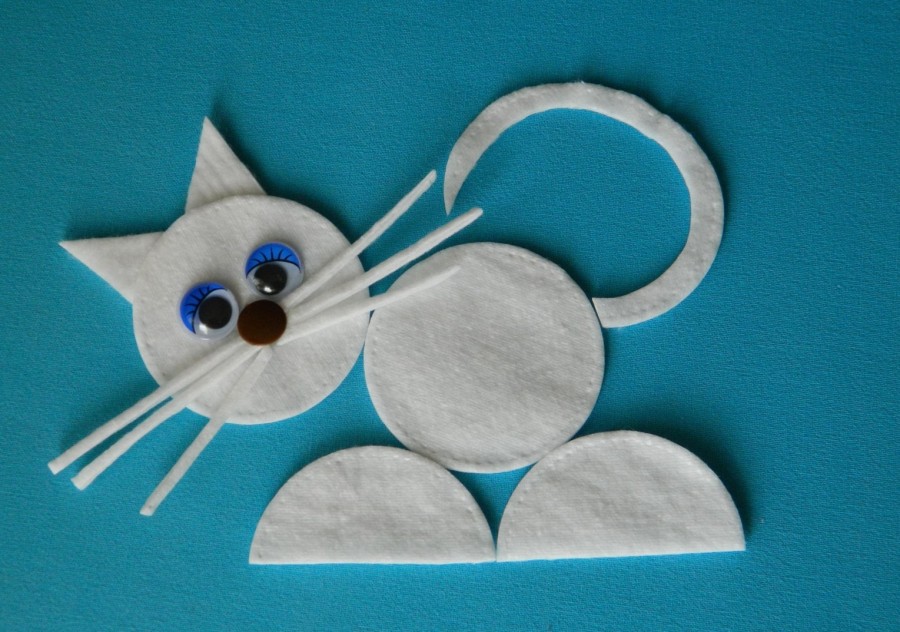
A video with a master class will help you create an interesting craft.
Another option is to use not only cotton pads, but also disposable spoons.


Probably every parent has at least once encountered their child’s violent desire to have a cat. But if you can’t buy or bring home a real one, why not please your family with a wonderful handmade toy?
Eared cat made of plasticine
This craft won't take much of your time or effort, so it's perfect for an evening out with the family.
First we roll a few balls different sizes(you can use multi-colored ones, it’s more interesting that way).

For the middle one, we make small indentations for the eyes (we fill them with white plasticine with inserts-pupils), sculpt a nose and mustache (you can use thin, short twigs). For the ears, take two small balls of plasticine and make them look like triangles with indentations.

We attach this structure to an oval body made from a large ball. From the remaining 5 balls we will make legs and a tail.

We put everything together and model the image. Now you have a wonderful one ready joint craft plasticine cats.

Wooden cat craft
This story provides two options: wood burning and a craft involving carpentry.


Woodburning
For wood burning you will need a board with a flat surface, a burning machine, copy paper and a photo of a cat for the craft.

To begin, place a piece of carbon paper on the board and a photo on it. Draw a thin, but not sharp, object along the outline of the lumps in the photo so that the lines are imprinted on the board.

Now carefully burn out the contours of the design with the device, controlling the pressure. The more you press, the darker the lines become, so you can add shades and create shadows to your craft to add visual dimension.

If a child is doing the burning, be nearby and make sure he doesn’t get burned.

Simple craft made from plywood
Carefully cut out four identical elements, we connect them into a volumetric rectangle. In the same way, we make a square half the size, and then two triangles (we do not fill the middle).

We connect the two structures and get a torso and a head with ears. Then we assemble the upper part of the paws: we make four narrow rectangles, for the lower part of the paws we make four more rectangles.

To make the structure stable, we create four small squares and place our craft on them. It is easier to make a tail for a cat from any other material.

You can draw a muzzle, or you can also carefully cut out the necessary details. The end result is a toy that looks like a robot, but is no less cute.

Origami cat craft
We fold paper triangles of the same size and build a circle. Next, we make a circle one smaller triangle and attach it to the previous one.


Thus, having created a pyramid, we get the body of the future cat. We make the head using the same principle, but smaller in scale, and attach it to the body.


We construct ears from the same triangles on top and glue the muzzle cut out on paper. The craft can also be painted in any color, giving it uniqueness, and a tail can be drawn.

Cardboard cat craft
The simplest and quick way– cut out the front silhouette of a cat from cardboard. Next, we cut out the back silhouette and glue it together.

We insert an improvised tail between the cardboards. The muzzle can also be drawn or cut out from the remaining pieces of cardboard.

Try another method too. Take two sheets of cardboard and draw a silhouette of a cat on the front on one sheet and the back on the other sheet.


Cut out these shapes and fold them into a three-dimensional image. Then place the structure on a stable surface, having first placed it on it thick sheet cardboard Glue the craft to the cardboard and let the glue dry well.

Family evenings are priceless
It turns out that you don't need much time to spend every evening with your family doing something interesting. Nothing unites like joint creativity that you want to share with your family.


And if you already have a pet in the house, especially if it is a playful kitten interesting toys- you can also make crafts for cats yourself.

Photo crafts cat


A child’s creativity begins with cute and kind crafts, which often feature various animals. The cat family has always occupied first place in needlework, since the cat itself carries the meaning of comfort in the home and family peace. There is nothing complicated in the question of how to make a cat out of paper; you just need to collect suitable materials near you and start creating a figurine.
Origami "Cat"
In the technique of creating compositions from paper, the art of origami always comes up; for beginners, the figure of a cat will not be difficult.
First you need to take a regular sheet of paper and make it square. To do this, pull one corner towards the other edge of the sheet to form an isosceles triangle, and cut off the excess part of the sheet.
The first part of origami: a square folded in half, but we already have it in stock since we did the previous step. We fold this triangle in half again to make an even smaller triangle. This is necessary to outline the middle line on the large triangle. From this center line we need to wrap two side corners into small triangles. If you put the piece on the table, it will look like a tulip with three petals. The last step in creating the cat's face is to bend the upper corner of the part to the two previous triangles. On the other side of the part you can draw eyes, mustache, mouth. When folding origami, you can use the following scheme:
For the body, you need to again make a square sheet, which is also bent in half. Holding the piece with the two free vertices of the triangles towards the left hand, bend the corner on the right slightly upward to form a cat's tail. After this, we attach the head to the body; you can also make a collar for the cat from a cord. You will get a product like this:

Volume craft
Without resorting to the origami technique, you can also make a cute craft in the shape of a cat. For this you will need:
- colored paper, cardboard;
- scissors;
- glue;
- markers, pencils or pens.
The following templates can be used to make parts:


In this craft, the templates can be printed on a printer or redrawn by attaching a sheet of paper to the screen. Each template is transferred to paper or cardboard of the selected color. If paper is used, then the “paws” and “tail” parts are glued to the cardboard. The body is made from a sheet of cardboard, folded in half and secured with glue at the junction. The following cat is assembled from parts:

Another kind paper cat can be made of a thick cardboard roll, the top of which is crumpled into a crescent on one side and the other. These details should be decorated with paints, outlining future cat faces in front of this pencil.

On the side opposite the muzzle, at the bottom, you need to use an awl to make a hole for the tail-wire, which can also be painted and needs to be smoothly bent before attaching. The cat family is ready:

You can also make the cat in a natural pose on all fours. For the body, cardboard is used, which is folded in half along its greatest length, after which a cutout is made in the middle, forming the paws. The head and tail are also made from cardboard, and for the muzzle elements, parts can be cut out of paper. Everything is held together with glue. Below are templates of simple and elegant versions of such cats.


To make a cat with your own hands, you can choose a completely different needlework technique. For example, for a cat made by quilling, you will need:
- strips of paper 5 mm wide;
- tweezers;
- tool for twisting strips;
- scissors;
- glue;
- paper.
For the head you will need a piece of five turns of paper, for the body - six, slightly elongated. The parts are glued and glued onto canvas paper. The ears are curled in the form of droplets, the legs are in the form of semicircles, and are also seated on glue. The whiskers are cut out in thin straight strips and attached to the muzzle, the tail is made from a strip curled at the end. You will get a cat like this:

In addition to this type of cat-themed paper art, you can use this material to make bookmarks, packages in the shape of cats, even a hat, the printable details of which are given below.

To make a bookmark from colored paper, you need to cut a strip measuring 10x5 cm. We design one of the edges of the strip in the form of a cat’s head, cutting out pointed ears and drawing the cat’s face. Just below the head, on the body, you need to draw two identical U-shaped paws directed along the length of the strip. These paws should be outlined with a blade or a stationery knife, but do not cut through the area of the paws at the top. After this, the cat bookmark is ready:

To make a paper cat package, you need to print the following template for the body:

Then you need to make the parts “tail”, “eyes”, “ears”, “nose”, “paws” and glue them to the body. You will get a package like this:

Video on the topic of the article
A selection of videos on making paper cats:
We also recommend
 Fights between women and men Mixed fights between women and men
 Types of hair removal and depilation The best way to do depilation
 Folk recipes for shampoos for oily, dry and thin hair
 Law of attraction and how it works
 Reasons for the appearance of bacteria in urine during pregnancy - effects on the fetus and treatment
 Congratulations on Valentine's Day Who is customary to congratulate on Valentine's Day