Make a Batman mask from cardboard with your own hands. Making a Lego Batman mask from cardboard with your own hands
Print Thanks, great lesson +20
One of the most popular superheroes after Superman is Batman. He first appeared in comics in 1939 and remains the most beloved character ever. Outwardly, it is impossible to confuse him with any other superhero: a black mask, a bat suit and a long cloak.
Surely your child has long dreamed of being like him. Therefore, today you can please him with such a wonderful Batman mask. However, the child himself can do it, and you can be nearby and, if necessary, help in difficult times.

- Black half cardboard
- Black ribbon or waxed cord
- Stationery glue
- Pencil
- Scissors
Step-by-step photo lesson:
On black half-cardboard we outline the silhouette of the Batman mask. It should not be too small or large for your head. After all, she will be uncomfortable. Therefore, it is better to immediately check and, if necessary, partially correct or redo it completely. Then we take scissors and carefully cut out the mask according to the intended silhouette.

We outline the silhouettes of the eyes on the mask. They will be approximately below the middle.

Using scissors, cut out the eyes according to the drawn silhouette.

Then measure the required length for the ties. There should be only one of them on each side.

Glue the ties to the back. Let the glue dry thoroughly before putting it on.

This completes the Batman mask made of colored paper. You should prepare a themed costume for this mask so that your child can fully feel like a superhero from a comic book. After all, what is Batman without his black suit with an emblem on the chest and a long cape on the back.

Which boy doesn’t want to feel like a hero, ideally Batman? Fortunately, this childhood dream is easy to fulfill - just sew a New Year's Batman costume with your own hands for a holiday in kindergarten or school. And how fun it will be to go to the Christmas tree in this costume and “fly” among other mummers. And, believe me, such a suit will not be worn just once. At least at home, the child will stage a home performance more than once, imagining himself as a superhero.
Our New Year's Batman costume will consist of a top (jacket) with "muscles", trousers, a cape, a belt and a bat mask.
To make a Batman costume, you will need:
Materials for the New Year's Batman costume:
4 types of fabric: black stretch velor, black crepe satin, gold brocade, black faux leather;
2 types of sequins: gold and black;
black threads;
contour on fabric with gold glitter;
regular black carnival mask;
3 black buttons, 1 larger and 2 smaller;
black satin ribbon for air loop;
tools for sewing a Batman costume:
sewing machine;
tape measure;
fabric chalk;
candle for finishing edges;
heat gun with hot silicone;
paper for patterns;
pen or pencil for marking;
some cardboard.
How to sew a Batman costume with your own hands - job description
Jacket for Batman costume
I decided to simplify the pattern of the sweater for the Batman carnival costume as much as possible; I approximated it based on a T-shirt that just fit my son. To do this, lay the T-shirt flat on the floor, place a sheet of paper on top and draw the necessary lines: shoulder seams, hem (we vary the length at our discretion), side seams.

Since the stretch velor fabric stretches well, you don’t have to worry that the upper part of the suit will not fit well on the child.
There’s also no need to be tricky with the sleeve: we just lengthen the pattern of the one on the T-shirt to the desired size. Here's what I got on paper.

To cut, we simply fold the fabric with the front side inward (since we remember that we need to cut out 2 sleeves and one part each for the back and front) and, not forgetting about the seam allowances (we make them 1 cm wide), cut out the cut according to contour.
Now let's take care of the muscles of our future Batman. I decided to make it from sheet synthetic padding: I copied the upper part (pectoral muscles) onto the padding polyester from the front pattern and then a rectangle - the “squares” of the abs. Unpretentious, easy to implement and effective!

We also sew “biceps” onto the sleeves. We still have the superhero Batman costume! This means that everything must be in shape.

Now we sew the shoulder seams of the jacket; then side seams. After this you can sew on the sleeves.
After assembling the product, we process the bottom of the jacket and sleeves.

To process the neckline, I used a crepe satin hem. Then it will not puff up and stretch. In order to cut out a piece from crepe satin, take our basic pattern for the front and back of the suit, step back 4-5 centimeters from the collar cutout and draw a line parallel to the head. Cut out the curved strip that you have obtained from the crepe satin (don’t forget about the seam allowances), place it with the front part of it on the front part of the neckline on the velor (separately in front, separately in back) and lay a connecting seam. This is what we got.

On the back we make a fastener from an air loop and a button.


Don't forget to trim the edges of the fastener; I also use a hem.

In general, our sweater from the New Year's Batman costume is ready, and now we can think about its decor. After watching more than one episode of this wonderful animated series with my son, I learned to draw the Batman emblem with my eyes closed. So, on the chest of our hero there should be a black emblem on a gold background. We make patterns and cut out the applique from the fabric.


We will sew the applique on a machine, this is what we will get in the end. I also added gold sequins and a glitter outline along the fabric.

Batman Costume Belt
Now let's take a look at the legendary hero's belt.
You don’t need a special pattern, just cut out a rectangle from gold brocade with a width of 24 cm and a length equal to your child’s waist circumference +5 cm.

We sew our belt by folding it in half lengthwise. We make decorative stitching.

In order for the Batman belt to fit well on the child, we sew 3 rows of elastic at equal distances. It is better to sew the elastic so that it is not visible under the raincoat: on the wrong side of the belt and only in the part that falls on the back.

Now the application. Cut out another emblem from faux leather; The same paper layout that we used to decorate the sweater will do. I made the oval from black sequins.

I decided to sew the appliqué for the belt by hand. Here's what you can see from the reverse side.

How to make a Batman mask
It's time to start the most difficult part of our Batman carnival costume - creating a mask with your own hands. Before starting work, I searched a lot on the Internet for various master classes and ideas, but I never found anything acceptable, although I must admit that I still tried to make it from papier-mâché. I won’t even describe what happened to me - darkness! Because, as always, on a sleepless night, a brilliant idea came to my mind. Use a regular black plastic carnival mask for the Batman mask.

Having removed all the extra decor (braid at the top of the mask, ties, etc.), I sat down to pattern the top of the mask with the ears sticking out.

Then, using the pattern, folding a piece of artificial leather in half, we cut out the most difficult part, after which we carefully glue the parts of our pattern to the mask on both sides. In order for the ears to stick out, using the same pattern, I cut out 2 pieces of cardboard and inserted them into the details of the ears of the Batman mask.

The gluing process is quite labor-intensive, but doable; do not forget about safety precautions and remember that the fabric will not stick to the metal parts of the mask.


According to the prototype from the cartoon, the hood that covers the head is missing. Let's make a pattern. We use velor for the hood.

Sew the hood; We process the inner seam using the thermo-method using a candle.

We sew the finished hood in three places to the Batman mask: near the ears and on the forehead. Then we try all this beauty on the child and grab the hood under the chin. Thus we get a mask-helmet.


Batman costume
We lay out the fabric (crepatin) on the floor and draw the future cloak on it.

Cut out Batman's cape; The cut edge can be easily processed using a candle.

Now we make a collar with two eyelets so that you can fasten the cape to the jacket of the Batman costume.

Accordingly, we sew 2 buttons on the jacket just below the shoulder seam.

Sewing trousers for a Batman costume is even easier: just make a pattern based on the trousers that currently fit the child (as we did with a T-shirt at the beginning of our master class), and sew a copy of them from velor, and the bottom can be gathered with elastic.

That's it, our Batman carnival costume is ready!


Natalya Druzenko specifically for the site
The classic character of the super hero Batman, beloved by all boys. Why not transform your baby into such a beloved image? If your child decides to become Batman on New Year's holiday, make for him a suit from a black robe, a super hero cape and a paper Batman mask. Don't know how? We will be happy to help you!
How to make a Batman mask for a child with your own hands
To make this paper mask you will need:
- black paper
- Cardboard
- Pencil
- Scissors
- Stapler
- PVA glue
First you need to cut 3 strips of cardboard:
1 – equal to the circumference of the child’s head,
2 and 3 are equal to half the circumference of the head.
Fasten the cardboard strips to form the frame of the mask.

Crumple 2 sheets of black paper to make it easier to form the mask.

Now straighten the sheet.

And wrap a black sheet around the frame of the mask.

This creates the base of the mask.
Print a template of the required mask elements or draw one yourself.

Cut out the missing mask elements and glue if necessary.

Glue the ears to the sides of the base mask.

Place the resulting part on the child’s head, attach the mask and use a pencil to mark the location of the hole for the eyes.

Make slits for the eyes, cut off the excess paper from the top of the mask and glue the pieces together.
The mask is ready.

Now the mask is ready!

Master class on making a Batman cap mask prepared by: E. Khorolskaya.
The superhero image always works with a bang! See how to make a Batman mask,hturtles-nDIY Inja, Spider-Man, and let Your reincarnation inspire You to good deeds and become the first step towards universal recognition.
How to make a Spider-Man mask
To create a Spider-Man mask you will need: felt, black thread, elastic, paper and... mom's help.
1. Print out the mask diagram on paper, enlarging it to the desired size.
2. Make two felt mask blanks. Make a line on one of them using a sewing machine. In order for the web to come out smooth, you need to attach a paper diagram of the mask on top, or make light notes with a marker.


3. Fastening the two halves of the mask with pins, sewing them together along the edges. Before doing this, do not forget to insert an elastic band between the blanks so that the mask stays firmly on your head.

This is what the back of the Spider-Man mask will look like.

And this is how the mask looks on a very happy child.

Option for girls:


A Spider-Man mask can also be made from paper. Print out the image of the mask, glue it onto cardboard and cut it out. Glue a cardboard strip or rubber band. All! The mask is ready.
But the most original solution will undoubtedly be face painting mask. Skillful application of red paint and spider webs to the face will create an impressive effect.

How to make a Teenage Mutant Ninja Turtle mask
To create a Teenage Mutant Ninja Turtle maskIYou will need: felt, scissors, glue gun, contact tape (Velcro).

1. Print out the mask diagram, or redraw it by attaching the sheet to the screen.

2. Transfer the pattern to felt. For the ties, make two orange stripes.


3. Using scissors, cut out the parts and glue them together with a glue gun.

4. Try on the mask, and in the right places fasten the ties with sewn pieces of Velcro tape, or simply tie a knot.

Hooray! Michelangelo's Teenage Mutant Ninja Turtle mask is ready.

Here's what else a mask of one of today's popular mutant turtles might look like.

And if it takes too long to sew a whole mask for you, you can transform into your favorite character with the help of a bright bandage. Here's how it's done:


DIY Batman mask
To make a Batman mask you will need: felt, contrasting threads, wide elastic band, needle, pencil and paper.
1. Print and cut out the mask template.

2. Cut out two Batman mask blanks from black felt.

3. Cut out the holes for the eyes using a razor blade.
4. Fix the elastic between the blanks in the right places, fasten the two halves of the mask with pins and stitch along the edges with threads of a contrasting color, retreating approximately 4 mm.
What boy doesn't dream of being Batman? After all, this superhero is the ideal of masculinity, fearlessness and strength. Comic book heroes leave no one indifferent, especially boys. The children's Batman mask is one of the most popular among boys, so why not please your beloved child and create such a masterpiece yourself right at home. There are many ways to create a Batman mask with your own hands. It can be made from paper or fabric, using one sheet, or made into a three-dimensional structure. All of these methods differ in the required materials and complexity, however, each of them can be used in the process of creating a product together with your child. He will be very interested in creating a carnival mask with you. 


 Such New Year's masks cannot go unnoticed. They are sure to attract attention, and your child will know that he has the most beautiful mask.
Paper version
The fastest and easiest way to make a Batman mask is from paper. We are talking about a standard version, for which you will need regular cardboard or felt. To create it you need:


 It is very easy to make options from paper and felt. With these masks, any child will feel like a real superhero.
Volume mask
Making flat blanks is not the only way. A voluminous mask, for example, is more difficult to make, but it also looks more impressive. The step-by-step plan presented below will help you create a real masterpiece. Have to take:
- stencils;
- cardboard;
- paper, preferably glossy;
- pencil;
- scissors;
- electrical tape;
- hot glue gun;
- Folded Bein.
Such a product may require a lot of effort and time. But the Batman mask template will help in the process.


 Don't forget to leave the layout to dry. Be sure that such a handmade creation will definitely make a splash at a children's party. This is a very affordable way to make a Batman mask from cardboard. It's not the easiest, but the result is stunning.
Fabric "Batman"
You can also sew a mask from fabric. At the same time, it is absolutely not necessary to know how to sew on a machine; you can do it with your hands, a needle and thread. There is an answer to the question of how to sew such beauty: it is done quite simply - you need a pattern, chalk, scissors. Parts are cut out of the fabric, parts of the top are sewn together. The ears are attached to the main elements on the wrong side, and the second part is attached. You will get a kind of helmet. Use scissors to cut holes for the eyes. The eye sections can be sewn on a machine. If desired, you can bring different ideas to life. For example, make a mask out of papier mache, decorate it beautifully, or come up with another interesting way to create the image of a superhero. But the best idea is to do it with your child so that he is directly involved in creating his costume. The methods outlined above will allow you to create a truly creative costume for your beloved child. After all, everything made with love always looks great. Watch similar master classes:
Comments
Related posts:
DIY monkey mask, New Year's, made of papier-mâché, paper / DIY toys, patterns, video, MK
We also recommend
 Four beautiful DIY hair ties - master classes for fashionistas and their mothers Homemade hair ties
 Sometimes you really need to be supported...
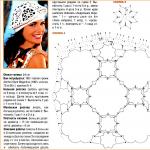 Several options for knitting a beret for beginners
 Men's dark gray noble vest
 We sew cool pillows: step-by-step master classes
 We sew a simple nightgown for beginners: everyone can do it!