Volumetric dog postcard. DIY postcard with a dog
Dina Fomina
Paper card craft"Dog"
Description: master class on making crafts-postcards« dog with moving ears". If you pull the tab up or down, the ears move down and up. It turns out to be a very modest puppy who hides his eyes if he is shy. From crafts you can make a greeting card.
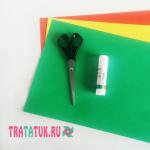
Equipment, materials: scissors, colored cardboard, glue.
We cut out the details - muzzle, ears, long tongue. The length of the tongue should be longer than the muzzle.


We bend the ears at the base. We glue the tongue with its base to the fold on the ears.

Take the base blank for the postcard and fold it in half. In the middle of the workpiece we make a cut - suitable in width for the tongue. We stick our tongue in dogs into this incision. The ears remain outside, glue them along the fold to the workpiece.


Fold the postcard blank in half. Glue along the edge. Glue a muzzle on top along the edge dogs. We don’t seal the bottom of the muzzle, where the tongue sticks out!

Decorate - glue on eyes, nose. The eyes can be glued exactly under the ears.
Ready! Pull the tongue down - the ears rise, the eyes become visible. Pull the tongue up - the ears go down, the eyes are not visible.


Publications on the topic:
Goal: To teach children to create the image of an elegant holiday Christmas tree. Instill the desire to create crafts with your own hands for your loved ones. Develop.
A wonderful, beloved holiday is approaching New Year. And an elegant Christmas tree is a symbol of this holiday. We have been decorating for many years.
Hello guests of my page. The pleasant “troubles” for the New Year have begun. I would like to bring to your attention a very simple one (to make).
Angels fly invisibly, glorifying the birth of Christ. The Virgin bowed over her Son, In her heart there is purity, Meekness, love and humility. The breath blows.
Women's Day is approaching - March 8th. What to give to your mother, grandmother, sister? Many kids think about this. Beautiful flowers from paper. which.
New Year is a time of miracles, and the main miracle we create is at home, on work, children's garden. Everything is given a festive look, creating a winter look.
Good evening, dear guests of my page! There are only a few days left until Valentine's Day. A lot has already been shown on our website.
Approaching new year holidays, you need to buy a bunch of gifts for friends and relatives, but you can do something yourself, because no one has canceled the principle of saving. Even if it’s really hard to find gifts, a postcard will be an excellent present. Whether you are visiting your parents or friends, a homemade card given in honor of the holiday will remind you of you for a long time.
Postcards with dogs: ideas
You probably already know that 2018 will pass under the sign of the Dog. It goes without saying that a handmade postcard for the Year of the Dog can be made in the form of this four-legged creature. Eat interesting ideas moving postcards. One of them is a dog moving its tongue and ears. It is done simply, from ordinary colored paper.
Video: moving postcard “Dog”
Another stunning idea is the dog from the animated series "Adventure Time". If the person the card is intended for is a fan of the series, then you will certainly hit the nail on the head.
 |
Prepare: a sheet of yellow cardboard, a small piece of black and white cardboard, a stationery knife, a ruler, a marker, scissors, a pencil. |
 |
Place a ruler in the center yellow leaf cardboard. Using a stationery knife, draw a straight line under the ruler. This is the fold line to prevent the cardboard from breaking. |
 |
We bend the sheet. |
 |
The workpiece should be square, so cut off the excess. |
 |
Cut out two circles from black cardboard. |
 |
From white cardboard we cut out two circles of smaller diameter. |
 |
Glue the black parts in place of the eyes. |
 |
We place white blanks on top. Glue on the oval nose. |
 |
We draw a smile with a marker. |
 |
We cut out a horseshoe-shaped blank from yellow cardboard. On the reverse side we glue double-sided foam tape to it. |
 |
We glue it above the nose. Foam tape will add volume to the card. |
Read Masks for split ends of hair
Other versions of postcards are mostly made in the form of appliques, although they are not devoid of originality. Look at the selection of photos. Among them there are funny, cute, charming specimens.


Indescribably charming scrapbooking - how to learn
That we are all about dogs, and about dogs, because if the Year of the Dog is coming, this does not mean at all that you need to give New Year cards only with them. It’s unlikely that anyone will be against a beautiful postcard using the scrapbooking technique, for example. If you are completely unfamiliar with this type of creativity, you can learn it by studying the master class.
 |
You need to cut out the base for the postcard from a sheet of thick cardboard. |
 |
From scrap paper you need to cut out a part 4-5 mm smaller than the base. |
 |
For decoration we use a flower made of foamiran, cuttings in the form of twigs, leaves made of foamiran, and artificial berries. |
 |
We age the scrap paper using scissors and scrape the edges. |
 |
Glue it to the base. |
 |
You need to make the back of the card. |
 |
We cut a piece of cardboard with a fold for gluing 2-3 cm. The width is arbitrary. Glue the part in the center. |
 |
We trim the corners. |
 |
Glue foamiran leaves to the front side. |
 |
Then - cuttings and berries. |
 |
We place a flower on top. Glue up small parts if necessary. |
 |
Making a bow for the ball. We sew the ribbons with a needle and thread. We tighten and wrap. We fasten the thread from the wrong side. |
 |
Glue the bow. We glue a bead on top. |
Here is another card that is not too difficult to make.
Video: scrapbooking with deer
If you, as a professional, are interested in something more original, watch the following instructions in the video.
Read How to celebrate New Year 2016 together
Video: multi-layer scrapbooking card
Are you familiar with shaker type cards? The shaker card is unusual. Shiny sequins shimmer and shimmer inside. Let's make a card in the shape of a Christmas ball. It's very simple.
 |
It will be so beautiful. |
 |
Prepare a cardboard base. In the middle of the ruler, draw a sharp object along the outside. Bend the workpiece. |
 |
Cut out the background sheet from decorative cardboard. |
 |
Then another smaller one. |
 |
In the second sheet we make a “window”. Use a tape reel as a stencil. You can use a compass or ruler with circles. |
 |
Cut it out. |
 |
To create a transparent window, you can use any transparent material, for example, from packaging. |
 |
Cut out the piece to the appropriate size. |
 |
The most important secret is applying foam tape. It needs to be glued in such a way as to create the required thickness, so we glue it in two layers, leaving no gaps through which the filler could spill out. |
 |
We select sequins, beads, micro beads. Pour into the center. We glue several sequins with Moment glue so that they remain in place. Remove the protective film from the tape and glue it. |
 |
Attach the decoration to the base of the card with double-sided tape. |
 |
Glue a bow on top. |
 |
We use gel and glitter to create a border along the contour of the ball. |
Video: Christmas tree shaker card
We invite you to view a gallery of works using the scrapbooking technique. Explore and be inspired.


Unusual cards: instructions and templates
In postcards, the most valuable thing is, of course, the congratulations, but the design is also important. See how to make a paper Santa Claus with a surprise inside.
 |
To make such a postcard you need a blank 28x10 cm. |
 |
The top part should be 8 cm long. |
 |
The lower part is 6 cm long. |
 |
Accordingly, the back part will be 14 cm long. |
 |
You can paint the cardboard with paint, or you can take a colored double-sided sheet of cardboard. |
 |
Let's prepare the belt. Cut out a strip of black colored paper 21 cm long and 2 cm wide. |
 |
And also a paper square with cuts along the edges. |
 |
We thread the black strip through the holes. |
 |
Then we wrap the postcard with a belt and glue the ends together. |
 |
Using curly scissors or simply cutting out the trim of the fur coat by hand. |
 |
Glue the strip in the middle of the bottom and along the bottom. |
 |
Cut off the excess. |
 |
In the middle of the top part of the card, also glue the “edge”. |
 |
You can apply glitter to the plaque. |
 |
Place your wish inside and secure the edges of the card with a belt. |
Read Decoupage champagne for the New Year
There is something mesmerizing about cards that open in unusual ways. Below you can find templates for similar postcards


If a child makes a postcard with a dog with his own hands, it will be a wonderful and memorable gift that can be dedicated to any holiday. And then, depending on the celebration, the card can be decorated with any decor, stickers, paper figures, drawings.
Materials for work:
- Double-sided colored cardboard: one shade for the cover, any desired for the body and a little darker for the ears, paws, muzzle. Red paper or cardboard for tongue;
- Black felt-tip pen, pencil, scissors, glue stick;
- Various decor, figured composter for creating paper decorations, postcards, etc.
DIY postcard with a dog step by step
Preparation
Use the template and cut out dog blanks from colored cardboard:
- Hind legs with tail;
- Body with front legs;
- head;
- muzzle;
- You can also cut out blanks from dark cardboard along the contour of the tips of the paws, or skip this moment and paint over that area with a felt-tip pen.


Glue small blanks to the tips of the paws or draw them with a felt-tip pen. Glue the ears on the sides of the paper circle and the muzzle and tongue on the front. Using a felt-tip pen or marker, draw eyes, a nose, dots and a line on the muzzle.

Make folds along the dotted lines. On the body these are the tips of the paws, in the middle and a small stripe on the narrow side. There are only tips on the hind legs.

Completion
Now it's time to make a cardboard cover for the card. To do this, cut a rectangle, taking into account the size of the dog, and fold it in half.

Glue on the back of the dog, with the tail area on one side of the cover and the tips of the legs on the other. Glue should be applied to the entire workpiece and completely glued, repeating the outline of the fold in the paw area.

Now glue the body with the front legs. The glue should be applied to a thin strip of the fold along the edge and to the paws. First glue the strip, close the card, and only then glue the paws. If you do this without closing the postcard, there is a risk of sticking it too far and the postcard will subsequently be crooked and at random.

At the end, glue the head a little to one side in front and the opening 3D postcard with a dog with your own hands is ready. Decorate it inside and out, taking into account the event in honor of which the card will be presented.
DIY dog postcard: Let's make a funny children's toy with the children - a postcard.

DIY dog postcard:
funny baby card
You can make this funny dog card with your own hands with your baby and give it as a gift for any holiday! Both children and adults :).
The dog postcard is based on the shape of a heart. We have already made a funny mouse based on the shape of a heart. Today let's make a kind hearted dog.
Postcard - DIY dog: tools and materials
And so, for work we need:
- white cardboard (you can use any cardboard),
— colored paper red, pink and black,
- paint for stamps,
- glue stick,
- brush, white and black gouache,
- scissors.
DIY dog postcard: step-by-step description
Step 1
Prepare dog shape templates from cardboard.

Step 2
Fold a sheet of white cardboard in half.
— Trace templates of the dog’s muzzle and ear onto white cardboard. Please note that you need to attach the dog’s head part to the fold line of the cardboard where it is indicated on the template (see the signature on the “fold” muzzle template).
— Cut out 1 piece of the muzzle along the fold and 2 pieces of the ear.
— Expand the details, check that the actions are performed correctly.

Step 3
Tint the edges of the parts of the muzzle and ears with stamp paint.

Step 4
Glue the dog's ears to the inside of the card.

Step 5
- Trace around the template and cut out 1 part of the nose, 2 cheeks, 1 part - a spot under the eye.
— Glue the parts onto the dog’s face.

Step 6
— Cut out 2 eye parts from black paper, glue them to the muzzle, and use a brush with white paint to add a highlight.
— Dip the brush in black gouache and place three dots on the muzzle to the left and to the right of the nose.
- Cut out a piece of tongue from red paper and glue it to the inside of the card.
- Brush with black paint make a stripe on your tongue.

The postcard is ready! All we have to do is come up with our good to the faithful dog nickname! What pet names do you know? Come up with nicknames together with your child and name your dog. And I gave my dog the nickname Hearty!
Good luck in your creativity! Give handmade gifts to your loved ones for joy!
A New Year's card - a banality or a sweet tradition passed down from generation to generation? Everyone has their own answer to this question. But we can say for sure that a handmade New Year’s card is a touching craft, and also very useful for children. Firstly, working with small details in the process of making a postcard has a very positive effect on the development of motor skills. Secondly, in order to draw or make a card for the New Year, you need to train perseverance and accuracy. And, thirdly, a DIY postcard for the New Year 2018 contributes to the development of imagination! And this is not to mention how much warmth, love and kindness they carry in themselves homemade cards. But aren’t these the main messages of the coming year? In general, if you want to please your family, especially mothers and grandmothers who love to keep children’s crafts, then be sure to take a closer look at the step-by-step master classes with photos and videos from today’s article. In them you will find different techniques making postcards from colored paper and cardboard, including scrapbooking. You will also learn what and how to draw on a New Year’s card, and you will also find options depicting the main symbol of 2018 - a dog. Almost all of the step-by-step lessons described below are suitable for use in kindergarten and school.
A simple DIY card made of cotton wool and colored paper for the New Year 2018 - step-by-step lesson with children
To do the next one simple postcard made of cotton wool and colored paper for the New Year with your own hands together with the children, you will need a minimum of materials and time. This is a kind of express version of a “last minute” postcard. Nevertheless, a simple postcard made of cotton wool and colored paper for the New Year 2018 with your own hands with children looks presentable, festive and original.

Necessary materials for a simple DIY card made of cotton wool and paper for the New Year with children
- white double-sided cardboard
- colored paper
- scissors
Step-by-step instructions for a simple DIY card made of colored paper and cotton wool for the New Year 2018 with children

Easy DIY postcard with buttons for the New Year for children - master class with photos, step by step
You will find another option for a simple and easy to make DIY New Year’s card for children in the master class with buttons below. This card can be made together even with very young children at home or in kindergarten. An easy DIY card with buttons for the New Year for children will become a good gift for parents.

Necessary materials for an easy DIY card with buttons for the New Year for children
- buttons of different colors
- cardboard
- felt-tip pens
- ruler
- nail polish with glitter
Step-by-step instructions for an easy master class on DIY cards with buttons for the New Year for children

Do-it-yourself dog postcard (symbol of the year) for the New Year 2018 - step-by-step master class, photo
Since the dog is a symbol of the New Year 2018, its image can easily be used to design a postcard at school. And it’s even more interesting to make the entire card in the shape of a dog - this original congratulations definitely won't go unnoticed. Read on to learn how to make a dog card (the symbol of the year) with your own hands for the New Year 2018 at school.

Necessary materials for a DIY New Year 2018 dog card for school
- colored paper
- scissors
- cardboard
Step-by-step instructions on how to make a dog postcard symbol of the New Year 2018 with your own hands at school

DIY New Year 2018 card with a dog - how to draw the symbol of the year, step by step
Would you like to draw a postcard with the symbol of the New Year 2018 as a dog? Then our next step by step lesson just for you. It suggests using an image of a cute puppy for the title page. holiday greetings. Read more about how to draw a postcard for the New Year 2018 with your own hands with a dog symbol below.

Necessary materials to draw the symbol of the New Year 2018 dog on a postcard with your own hands
- paper
- colour pencils
- simple pencil
- eraser
Step-by-step instructions on how to draw a postcard with the symbol of the New Year 2018 with a dog with your own hands

Do-it-yourself original card made of paper and cardboard for the New Year 2018 - step-by-step lesson with photos
You can make a simple but very original postcard for the New Year 2018 with your own hands from plain white paper and cardboard. Ready postcard it turns out voluminous and minimalist style. Therefore, you can give such original cards made of paper and cardboard for the New Year 2018 to both friends and family.

Necessary materials for an original DIY card made of paper and cardboard for the New Year 2018
- cardboard
- paper
- scissors
- simple pencil
- ruler
Step-by-step instructions for an original do-it-yourself postcard made of cardboard or paper for the New Year 2018

Beautiful postcard for the New Year 2018 with your own hands: how to draw easily and simply, photo
To draw a beautiful postcard for the New Year 2018 with your own hands easily and simply, you do not need to have any special artistic talents. Even with the help of an ordinary black marker you can create an original drawing for New Year's cards. Read more about how to easily and simply draw a beautiful postcard for the New Year 2018 with your own hands below.

Necessary materials to easily and simply draw a beautiful postcard for the New Year 2018 with your own hands
- black marker
- cardboard
- simple pencil
- cup or saucer
- eraser
Step-by-step instructions on how to easily and simply draw a beautiful New Year's card with your own hands

Do-it-yourself original postcard for the New Year 2018 using scrapbooking technique - step-by-step master class with photos
Scrapbooking - technique beautiful design memorable cards and photo albums, which everyone can master. We suggest starting with original postcard for the New Year 2018 with your own hands using the scrapbooking technique from the next master class. main feature This original DIY New Year's card is that the scrapbooking technique is used to decorate its interior.

Necessary materials for an original DIY New Year's card using scrapbooking technique
- red double-sided cardboard
- sheet of white paper
- scissors
- pencil and ruler
- gold foil
Step-by-step instructions on how to make a postcard for the New Year 2018 with your own hands using scrapbooking technique

Do-it-yourself voluminous New Year's card with children from colored paper for school, step by step with photos
Voluminous and very funny postcard for the New Year made of colored paper is good for children in primary school. It is done very simply and quickly. But the result is excellent, bright and interesting! How to make a three-dimensional New Year's card with your own hands from colored paper with children going to school next.

Necessary materials for a three-dimensional DIY New Year's card made from colored paper for children to go to school
- cardboard
- white and colored paper
- ribbons
- pencil
- scissors
- black marker
Step-by-step instructions for making a three-dimensional New Year's card from colored paper for school with your own hands

How to make a postcard with your own hands for the New Year 2018 for your mother and grandmother - step-by-step master class with photos
What kind of DIY New Year's card can you make for your mother and grandmother? Of course, sweet and unusual in a feminine way, for example, like from step-by-step master class with a Christmas tree below. Read more about how you can make a DIY New Year’s card for your mother and grandmother below.

Necessary materials to make a DIY New Year's card for mom and grandma
- threads
- beads
- needle
- fabric ribbon
- decorative tape
- cardboard
- stamp with a themed design
Step-by-step instructions on how to make a DIY card for the New Year 2018 for your mother and grandmother

DIY New Year 2018 card: how to draw a Christmas tree, master class with video
Beautiful card for the New Year 2018 with your own hands - always a relevant craft for small children, kindergarten and school. In addition to decorating such a card with colored paper and cardboard, it can be decorated with beads, sparkles or rhinestones. The scrapbooking technique is also well suited for this purpose. You can also draw a postcard with pencils, for example, like a postcard with a Christmas tree for the New Year 2018 with your own hands from the master class with the video below. You can always complement the drawing with a dog as a symbol of the coming 2018.
We also recommend
 How to do golden makeup
 Ultrasound of the mammary glands, when to do it and how many times?
 How to increase pensions for working and non-working pensioners: methods, step-by-step instructions Distribution of funded pension payments
 DIY paper Christmas ball for the Christmas tree
 Application from corrugated cardboard How to make corrugated cardboard by hand
 How to learn to write beautifully and make your handwriting perfect?