Volumetric flowers balls made of paper. Paper flower ball
Paper is an excellent material for crafts with children and more. Using the origami technique, you can create an endless number of options for figures and decorations. Our task for today is a ball of paper flowers using the origami technique.
In order to make an origami flower ball, we will need:
- Paper (plain or colored), cut into squares. I use 7cm note blocks. You can use larger or smaller paper. From squares with a side of 7 cm, a ball with a diameter of approximately 13 cm is obtained;
- PVA glue;
- Paper clips;
- Ribbon. You can use cord, chain, etc.;

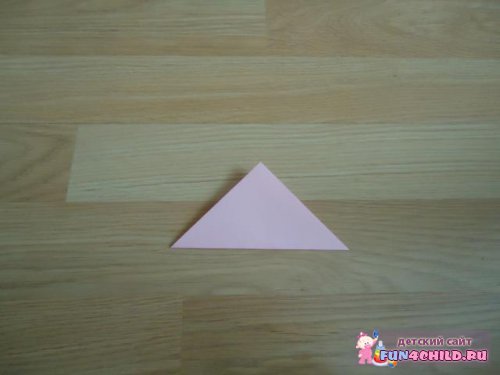
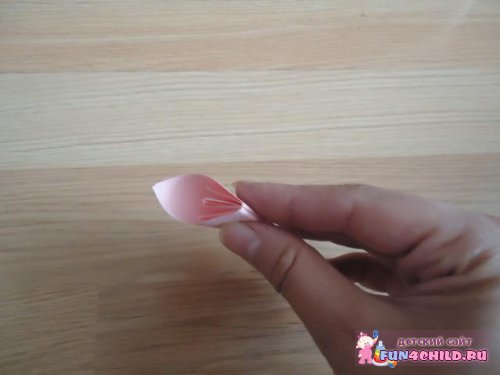
1. Fold the flower petals. To do this, take a square and fold it diagonally. It turns out to be a triangle.
2. We bend both corners to the top of our triangle so that we get a regular rhombus.

3. Now turn the corners out one by one.

4. Bend the protruding parts (ears) towards you.

5. Fold our corners inward along the fold line.

6. Apply glue to the halves of the corners and glue them together. Jam. When the glue dries. The result is one petal.
7. One flower needs five of these petals.

8. Glue all five petals together to create a flower.

9. For kusudama we need to make 12 flowers. They can be the same color, they can be multi-colored, as you like. As you can see, mine are colored.

10. When all the flowers are ready, we begin to assemble the ball. First, we collect two halves of 6 colors each. We fix the contact points with paper clips.

11. Then we connect the two halves of the ball with paper clips. This is roughly what should happen. Until we have fixed everything with glue, the flowers can be swapped.

12. When the composition is ready, glue the places where the petals touch each other with glue. Let the glue dry. It turns out like this origami ball of flowers.
The days have become longer. There is already a whiff of spring in the air. The sun is warmer than in winter. Together with the end of the cold season, we are looking forward to the holiday. Our eyes can be pleased with decorative elements made by ourselves. Today we present to your attention a master class on making a flower ball on a thread basis.
To make a flower ball, you need to prepare the following tools and materials:
1. For the ball:
- balloon;
- cream;
- 100% cotton threads;
- PVA glue;
- large darning needle.
2. For flowers:
- sheets corrugated paper;
- scissors;
- simple threads;
- glue gun.
Flower ball made of threads and corrugated paper:
1. Thread ball base
Let's inflate a balloon so that he gets round shape the desired size (in our case ≈ 20 cm in diameter). Let's tie it up carefully.
Cover the ball with a thin layer of cream. This will help you easily separate it from the threads later.
Pull a cotton thread through the eye of a darning needle, and then through a jar of glue in PVA (at the very bottom of the bottle).
Now we wind the thread, saturated with glue, in a random order around the ball (vertically, diagonally, horizontally, often changing direction).
When the ball acquires a thread cocoon, we cut the thread, securing its end at the base. Our base should dry well. Drying time varies - from 3 hours to a day.
 If the threads become stiff, it's time to remove them balloon. We carefully untied it and deflated it little by little. Thanks to the cream, the ball came out easily. And we were able to use it a couple more times for thread base.

2. Corrugated paper flowers
 Cut the colored one into strips about 10 cm wide.
 Fold each strip in half lengthwise.
 We wrap the end towards ourselves twice at an acute angle.
 Holding the left side with your fingers right hand carefully turn the wrapped part away from you, as if wrapping a candy wrapper.
 Again, fold the left side of the strip toward you, and then twist the right side away from you.
 We will make such waves along the entire length of the color stripe.
 Let's turn the curved strip over and begin to twist the flower, gradually turning the “petals” horizontally. We wrap the assembled flower with regular thread and tighten it well. Leaving 3-4 mm for the leg, cut off the excess.
3. Corrugated paper leaves
 Fold the green paper into a 10*10 cm square.
 From this blank we will cut out leaves.
 We'll make a small slit in the center.
 We will dress the flower in a frame of leaves. Wrap the thread again, pulling it tightly at the base of the flower. We'll cut off the excess.
4. Flower ball - assembly
 At our discretion, we glue the flowers onto the thread base using a glue gun.
 A flower ball made of corrugated paper and thread is ready.
The master class was prepared by Lilia Lyandres.
In this master class I will tell you how to make a flower ball out of paper. Plus, I selected detailed photographs for each step of the process. With such products it is very original to decorate the interior for a holiday or just for no reason.
It’s very easy to make, the main thing is to prepare necessary materials, namely:
- Corrugated paper in two shades, which is sold in craft stores, or you can use regular napkins;
- A foam or plastic ball as a base.
- Thin wire;
- Scissors;
- Pencil;
- A glass or round cardboard blank;
- Ribbon.
Start making flower balls from corrugated paper by creating flowers. To do this, first fold the paper into several layers in a strip and draw circles on it.

Now carefully cut them out and put them together in at least ten circles and secure them with a clothespin for convenience.

The more layers, the more magnificent the future flower will turn out. Next, in the middle of each group of circles we pierce two holes at a distance of about a centimeter from each other.

We bend the wire into a hairpin shape and push it through the prepared holes.


On the other side we twist it well.

Now we fluff the flower as shown in the picture.

First of all, we stick a loop into the foam base and insert a ribbon into it so that the ball can be hung. Next, we begin to fill the foam base with prepared flowers over the entire area, alternating different shades of flowers.

This is how it turns out beautiful balls made from paper with your own hands, which will magically decorate any interior.

Photos taken from the Internet. Unfortunately, it was not possible to determine their author. In any case, thanks to the author for the idea.

New Year and others winter holidays is just around the corner, but you can still have time to buy something on a Chinese website to make your home feel festive and cozy. We have made for you a top selection of popular jewelry and other products that you just can’t do without these holidays. Let's see what interesting products you can order on the Aliexpress website this year.
Surely, being on gala event you came across decorations in the form of various paper balls. They not only look impressive in the interior, but also, transforming the room, give it their own zest. Depending on the celebration or event, the color and texture of the paper is selected, from which it was decided to create these decorative elements. Our article is dedicated to various types paper balls, which you can make with your own hands thanks to our instructions.


How to make a paper pompom with your own hands from paper, master class
As a material for working on paper pompoms Corrugated paper works best. Its texture makes the pompom soft, and the density of the paper holds its shape for a long time.
To create a pompom, prepare the following:
- packaging of corrugated paper;
- nylon thread or piece of fishing line;
- scissors.
The first step is to cut the corrugated paper into rectangles measuring 25x50 cm. If you want to make small pom-poms, you should reduce the size of the rectangles. We cut 8 such sheets and stack them.
We fold the sheets accordion-wise according to their width.

Round off the ends with scissors.

Find the middle of the accordion and tighten it tightly with thread or fishing line.

Starting from the top sheet, separate each layer in turn, forming a ball.

After all the balls are separated, you can use the pompom as decoration.

Videos paper pompoms
Decoration with paper pompoms, photo


Honeycomb balls, photo


How to make honeycomb balls with your own hands from paper, step by step with photos
Honeycomb balls must be made from a pack of paper of the same texture. You should not combine simple colored paper and corrugated paper, since they will immediately lose appearance. So, to create honeycomb-shaped balls, prepare 25 sheets of multi-colored A4 paper or cut corrugated paper measuring 21x29 cm into 25 pieces.
Step 1. On a white A4 sheet, draw stripes across its entire width at a distance of 3 cm from each other. It is advisable to alternate lines with two different colors (we have red and black).

Step 2. Place all the cut paper in piles. Take a plate with a diameter of 20 cm or draw a circle on paper using a compass with a diameter of 20 cm.

Step 3. Cut out the circles, fold them in half and cut them. This way we will get 50 semicircles.

Step 4. Apply the first semicircle to the stencil so that the lower ends meet the edge of the stencil, and then apply a thin layer of glue to the red lines of the stencil.

Step 5. Apply a semicircle and apply glue along the black lines. We continue the gluing process with all the sheets.

Step 6. After all the parts have been glued together, we also coat the top part with glue according to a similar pattern (if glue was applied below along the red line, then we coat it along the black line and vice versa).

Step 7. Unfold the ball and glue the top and bottom parts of the semicircles. To ensure that the parts adhere well to each other, we fasten the gluing points with a paper clip and wait until the glue dries.

Step 8. Remove the paper clips and the ball is ready.

How to make honeycomb balls with your own hands from postcards, master class
Honeycomb balls from postcards can serve as both an element of interior decor and original crafts for decorating the Christmas tree. To create such a ball you will need any postcards, compass scissors and glue.


Decoration with honeycomb balloons, photo


Ribbed balls, photo


How to make ribbed paper balls with your own hands, master class
Even children can make ribbed paper balls. Therefore, if you decide to transform the interior, decorate the room for significant event, involve the children, they will be happy to help you create ribbed balls, and we will tell you how to do this.
1. Cut out 12 circles of the same diameter from paper. The larger the diameter of the circle you choose, the larger the ball you will end up with. For larger balls, use crepe paper as the material.

2. Fold each circle in half. Stepping back 1.5 cm from the fold line, apply a dot of glue to the edge of the circle and glue the circle in half. We do this action with each circle.

3. Place the resulting semicircles in a stack with the previously glued edges on one side. Glue the non-glued edges together, also applying a drop of glue to the edges of the circle, departing 1.5 cm from the fold line.

4. After the stack of semicircles has been glued together, at this stage of the work you can tie a thread or ribbon to the ball. To do this, the ball is pierced with an awl, after which a ribbon or thread is inserted into the hole. This will allow the ball to hang, and the ball itself will not lose its shape for a long time and will not fall apart. Next, a drop of glue is applied in the same way, the ends of the semicircles are brought together and glued.


DIY paper pompoms from napkins, step-by-step instructions with photos
Pompoms made from napkins look soft and airy. The balls themselves have a different big size, such as from corrugated paper, but are not inferior to them in appearance. To create such a ball, napkins of any density are suitable.

The napkin pompom is ready.

How to straighten paper pompom balls
In order for the pompom to have a beautiful appearance, each of the layers is opened separately. After the paper accordion has been tied with ribbon, one of the sides is stretched in length. The result is something like a fan.

Then the sheets are separated from this fan one by one towards the center of the accordion. You need to start separating the sheets from the outermost, holding the accordion well with your left hand.

Having fluffed one side, we perform all the same manipulations on the other side. This way you will get a fluffy, weightless pompom.

Honeycomb paper balls from Aliexpress
It’s not for nothing that honeycomb balls are also called Chinese balls, so their choice on the trading platform is incredibly wide. In the product category ““, where Chinese traders placed their offers, there is a whole storehouse of balls of different sizes and colors.
If you want to use the ball several times, it is not recommended to remove the strips of tape; bring the edges together and secure them with a paper clip. In a suspended state, the paperclip will not be visible, and you next time you will save significantly on decor.
Don’t be afraid, get creative, and you will create creative decor for all occasions with your own hands.
1. ROMANTIC GIFT FOR THE BRIDE OR LOVED. CRAFTS IN THE FORM OF A BALL FROM LIVE OR ARTIFICIAL FLOWERS
If you want to give an original gift to your mother for a birthday or make something unusual accessory for the bride for the wedding , then this article is for you! Here you will find useful ideas, diagrams with instructions, master classes, video lessons , with which you can make a beautiful flower ball with your own hands.
The most popular material for making artificial flower balls is paper. . Craftsmen make stunning spherical crafts with flowers from corrugated and colored paper , from newspapers and cardboard. But in addition to paper, pieces of leather can be successfully used to make such crafts, satin or rapeseed ribbons , pieces of fabric made of cotton or woolen threads.
There are a huge number of ways to fold balls from homemade flowers. For example, very beautiful compositions are made from paper using kusudama technique (direction in the art of origami). In one of the previous materials we told you how to make unique three-dimensional crafts with your own hands using modular origami technique. Balls of happiness (or kusudama) Origamists do it in a similar way. But instead of modules triangular shape paper flowers with petals are used to fold the composition into a ball shape different shapes.
Balls of artificial flowers can be used to beautifully decorate a room for children's party, banquet table, rooms for anniversaries and weddings. You can decorate such balls with serpentine and silver “rain” - excellent Christmas tree decorations for the New Year.
You can make elegant accessories for your wedding event with your own hands. - balls of white flowers (both artificial and natural), which will replace wedding bouquets for the bridesmaids. And multi-colored balls made of small paper flowers will look interesting on vases and in the composition of a wedding tree, in bouquets of sweets. 
From spherical crafts with large and small flowers, designers make interesting compositions in the form ornamental trees- topiary. They say that topiaries decorating window sills can attract good luck to your home! :) 
How can you make balloons from fresh flowers with your own hands? You can use a round floral sponge as a base. We take a flower (an excellent option is a carnation), cut off the stem, leaving 4-5 cm. We stick the blanks into the sponge, beautifully decorating the flower ball.
2. AN EASY TO MAKE BALL MADE OF PAPER FLOWERS. INSTRUCTIONS FOR BEGINNERS
to make a blank for the ball, take 3-4 sheets of thin paper (or corrugated paper) and at the same time fold them like an accordion;
Using a piece of tape, we tighten the workpiece in the middle, cutting off the edges and giving the desired shape on both sides of the workpiece;
We lift each fold separately. the petals of the future flower are obtained;
Carefully straighten each petal, holding the middle of the workpiece;
To decorate a multi-colored paper ball, use colored paper.
3. MASTER CLASSES AND SCHEMES. WE MAKE ORIGINAL KUSUDAMAS AND BALLS FROM PAPER FLOWERS WITH OUR OWN HANDS
Option #1:
MASTER CLASS. HOW TO MAKE A VERY BEAUTIFUL CRAFT FROM PAPER FLOWERS IN THE SHAPE OF A BALL. LEARNING TO CORRECTLY FOLD PETALS, COLLECT FLOWERS AND FORM A BALL - A WONDERFUL DECORATION FOR A TREE FOR THE NEW YEAR OR FOR A WINDOW ROD FOR A CHILDREN'S PARTY.
Option #2:
HOW TO MAKE FLOWERS FROM PAPER AND FOLD THEM INTO A BIG BALL USING THE ORIGAMI KUSUDAMA TECHNIQUE. STEP-BY-STEP INSTRUCTIONS WITH PHOTO.
Option #3:
LEARNING TO MAKE A CLASSIC MODEL OF KUSUDAMA WITH YOUR OWN HANDS. STEP-BY-STEP DIAGRAM AND PHOTO OF A FLOWER BALL MADE ACCORDING TO THE PATTERN.
Option #4:
DIAGRAM OF AN ORIGINAL BALL USING THE KUSUDAMA TECHNIQUE WITH FLOWERS IN THE FORM OF A STAR. A WONDERFUL OPTION FOR MAKING HOMEMADE CHRISTMAS TOYS FOR THE NEW YEAR.
Option #5:
HOW TO MAKE FLORAL .
Option #6:
A VERY BEAUTIFUL BALL THAT YOU CAN COLLECT FROM CUT-OUT PAPER BLANKS ACCORDING TO A PATTERN. IT IS PREFERABLE TO USE BRIGHT COLORED PAPER FOR YOUR WORK.
Option #7:
HOW TO MAKE IT WITH YOUR OWN HANDS