Making a Christmas tree craft. DIY Christmas trees
Children's Christmas tree
Kids love Velcro games. If you make a carpet board, you can come up with thematic tasks for kids from different materials by gluing Velcro on them. For example, laminated ones make a great game that can be quickly created and changed frequently.
For the New Year, I especially want to surprise and please the kids with something. You can make a personal Christmas tree for them, which you need to decorate more than once, but as often as you want. In addition, such a game for children with their own hands, coordination of movements, attention and perseverance, as well as aesthetic taste. If you try hard, this children's Christmas tree will become beautiful. holiday decor Your house.
Making a Christmas tree from carpet is very simple:
1. From a thin green carpet (it is often called “exhibition”, I bought it at the Epicenter chain of hardware stores), cut out a Christmas tree of the required height, having previously drawn its contours using soap or chalk.
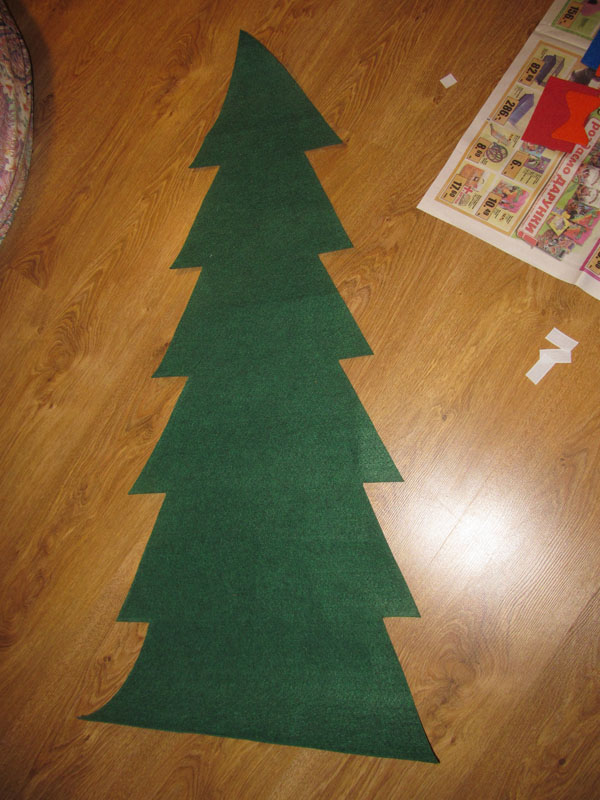
Christmas tree made of carpet
2. Draw several patterns of Christmas tree decorations on paper and cut them out.
3. Apply the patterns to small pieces of carpet of different colors and trace them with a pencil, marker or chalk. Cut out the required number of Christmas tree decorations.
4. Sew a small piece of Velcro onto each Christmas tree decoration. The toys for the Christmas tree are ready.

Christmas toys with Velcro
5. We choose a place in the apartment to place the Christmas tree and think about how to attach it there. We glued ours christmas tree on front door using strong double-sided tape. You can glue the carpet onto thick cardboard or fiberboard, and then hang the Christmas tree on a hook or nail. If you have a cork board, the easiest way is to attach the Christmas tree to it using pins.

Place the Christmas tree on the front door
6. Carpet Christmas tree toys can be scattered directly on the floor near the Christmas tree for the child to collect and stick, or they can be placed in beautiful basket next to the game.
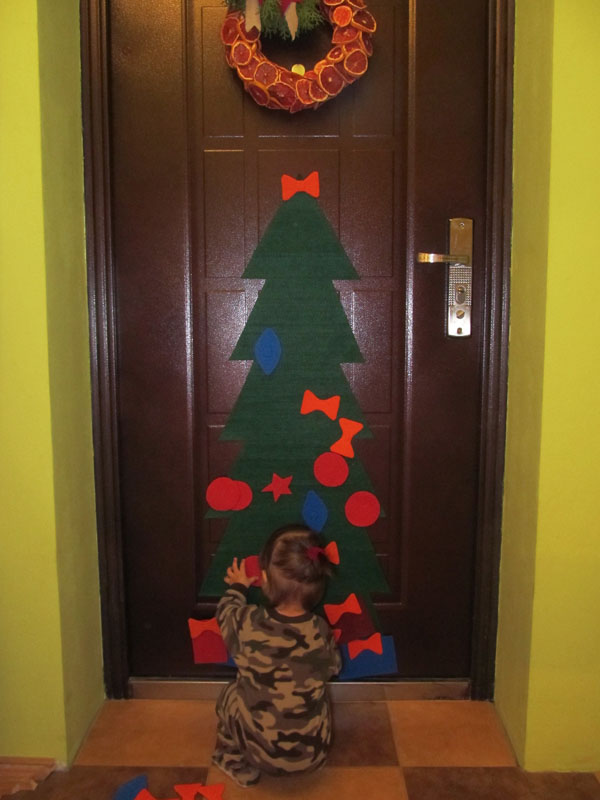
Baby, decorate your own Christmas tree
7. Play together with your baby, tell him about New Year, sing songs, let your DIY game for children evoke pleasant emotions in him. Believe me, the baby will remember for a long time how he independently decorated his own Christmas tree.
Goals:
Introduce children to A. Barto’s poem “It Was in January.”
Develop an understanding of the poetic text, accumulate active and passive vocabulary on this topic.
Introduce children to geometric figure“triangle”, consolidate knowledge about the circle, color, shape of objects.
Continue to teach children to compare objects by size, to understand the meaning of the prepositions “on”, “under”.
Teach children to follow basic instructions.
Practice sculpting, gluing and drawing with cotton swabs.
Develop auditory and visual attention, fine and gross motor skills, thinking, tactile analyzer.
Equipment:
An artificial Christmas tree covered with a large scarf.
Multi-colored clothespins, silhouette images of Christmas trees made of thick cardboard.
Diagram sheets of three triangles different sizes, green triangles of the same size.
Background picture with a picture of a Christmas tree, colored plasticine, large beads, cotton buds, white gouache.
A picture of a Christmas tree with large and small circles of different colors, large and small buttons of the same colors.
Counting sticks, pictures-schemes with the image of a Christmas tree.
A picture of a Christmas tree, silhouette images of hares and a wolf cut out of paper, and a glue stick.
Colored silhouette pictures of Christmas tree decorations and their shadows - black silhouette.
Audio recordings: “The Christmas tree is not cold in winter,” “A Christmas tree was born in the forest.”
Progress of the lesson:
Greeting "Everyone clapped their hands"
Everyone clapped their hands
Friendship, more fun!
Our feet began to knock
Louder and faster!
We'll hit you on the knees.
Hush, hush, hush.
Handles, hands up,
Higher, higher, higher!
Our hands began to spin.
They went down again.
Spun around, spin around
And they stopped.
Surprise moment “Guess what’s under the scarf?”
Can you touch what's under the scarf with your hands? What does it feel like? Prickly.
Green, prickly,
It grows in the forest.
She's on New Year's
He will come to visit us!
What do you think is under the scarf? Herringbone.
Didactic exercise “Different Christmas trees”
Christmas trees are different. Let's show what types of Christmas trees there are.
Tall - raise your arms and stand on your toes.
Low - squat down.
Wide - spread your arms to the sides.
Narrow - press your lowered arms to your body.
Construction of the “Herringbone”
This figure is called a “triangle”. Attach triangles of the appropriate size to the picture and you will get a Christmas tree. Place the largest triangle at the bottom, place a smaller triangle on top of the large triangle, and place the smallest triangle at the top. What did you get? Herringbone.
Game with clothespins “Christmas tree decorations”
Decorate the star and Christmas tree with colorful clothespins.
Modeling “Let’s decorate the Christmas tree with toys”
Children stick colored pieces of plasticine onto a colored background with a picture of a Christmas tree - Christmas decorations. You can place large beads on top of the plasticine.
Children walk along a path, bench, tunnel, etc. to the music.
Didactic game with buttons “Beauty Christmas Tree”
The Christmas tree is already decorated with circles. Show circles large, small, red, yellow, blue, green, white. Choose your buttons suitable color and size and apply it to the circles on the Christmas tree. Then the Christmas tree will become even more beautiful.

Didactic game with counting sticks “Lay out the Christmas tree”
Children place counting sticks on top of the drawn diagram.
Didactic game “Find the shadow of the toy”
Name what Christmas tree decorations are in front of you. Ball, cone, icicle, house, bell. Find suitable shape shadow and place a color picture on top of it.
Drawing “Snowball falling on the Christmas tree”
Children draw snowflakes with white gouache using cotton swabs.
Dynamic pause “A Christmas tree was born in the forest”
Children dance around the Christmas tree. They throw “snow” on it - lumps of cotton wool or tinsel.
Reading the poem by A. Barto “It Was in January”
It was in January, there was a Christmas tree on the mountain,
And angry wolves roamed near this tree.
Once upon a time at night, when the forest was so quiet,
A wolf and a hare meet a wolf under the mountain.
Who wants to fall into the clutches of a wolf on New Year's Day?
The little bunnies rushed forward and jumped onto the tree.
They folded their ears and hung like toys.
Ten little bunnies hang on the tree and are silent -
The wolf was deceived. It was in January -
He thought that there was a decorated Christmas tree on the mountain.
Application based on the poem “It Was in January”
Children first lay out and then stick hares on the tree, and a wolf under the tree. The teacher focuses the children's attention on the concepts of “on” and “under”.
Summary: How to make a Christmas tree with your own hands. Original Christmas trees made of pine cones and tinsel. Photos and templates of paper Christmas trees. Homemade origami Christmas tree. Christmas tree made of candies.
Even kids can take part in preparing for the New Year and making New Year's crafts with your own hands. For example, Christmas tree Even a two-year-old can make one out of an ordinary cone and plasticine. You just need to teach him to roll plasticine balls of different colors and attach them to the pine cone. The base of the Christmas tree is a spool of thread wrapped in foil.
Here are more complex versions of Christmas trees made from pine cones. In the first case, the bump was painted acrylic paint in green and white colors. In the second option pine cone decorated with beads.


You can make a Christmas tree like this with your own hands from a large number of cones. The basis for the Christmas tree is a cone made of thick paper or cardboard, which is then covered with cones on all sides using a glue gun. Decorate the finished Christmas tree with beads and large beads.

Another very simple homemade Christmas tree made from tinsel. You can make it in literally five minutes.

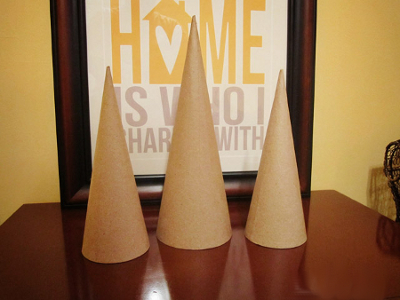
To do this, you need to make a cone out of cardboard and stick tinsel on it in a spiral.

Christmas tree made of candies. DIY candy tree. How to make a Christmas tree out of candy
If, before wrapping a cardboard cone with tinsel, you use tape to attach candies to the future Christmas tree, you will get a sweet Christmas tree made from candies. Detailed New Year's master For a class on how to make a Christmas tree out of candy, see the photo below or follow the link. When creating a Christmas tree from candies, it is convenient to use double-sided tape.


A large number of You can make Christmas trees with your own hands from paper. Let's start with the simplest New Year's crafts.
DIY paper Christmas trees
DIY Christmas tree made of paper (option 1)

Print on thick paper or cardboard and cut out the blanks with scissors >>>> Bend each Christmas tree in half and glue them together. This Christmas tree is made according to the same principle as the Christmas tree ball from our previous article. See link >>>>

The openwork Christmas trees from the website Country of Masters are made using the same principle.

The Singapore website of Epson offers ready-made templates for its Christmas trees:


DIY Christmas tree toy (option 2)
If you have an unnecessary cardboard box, then you can use the same technology to make a Christmas tree like this.

DIY Christmas tree toy (option 4)

Or you can make a curly Christmas tree by gluing a cardboard cone base with strips of rolled paper.


DIY Christmas trees made of paper (option 10)
To make such a Christmas tree, you must first cut out circles of different diameters from paper. You will also need wire and a stand, which can be successfully replaced by half of a large Kinder Surprise. The Christmas tree is easily assembled with wire, and, most importantly, it is easily disassembled. See link >>>>


Origami Christmas tree from a magazine
This origami Christmas tree is very easy to make with your own hands. Small format magazines that can be found in any home are suitable materials.

Work plan:
The procedure described below must be done with each page in the magazine. If the cover is thick, you can simply detach it (tear it off).
1. Fold the page, upper right corner, at an angle of 45 degrees to you.

2. Once again fold the sheet in half diagonally.
3. We go through all fold lines with a fingernail or other object so that they do not open, especially thick pages.
4. Fold the bottom corner that extends beyond the borders of the magazine upward.

In this way we add up all the pages in the advertising magazine.

The result will be a cute origami Christmas tree.

Origami Christmas tree from a magazine
Another origami Christmas tree model for the New Year. Unlike the previous origami Christmas tree from the magazine, the pages here are not folded, but figuratively cut out according to a template.

The manufacturing principle is very simple. You need to prepare a template for half of the Christmas tree, circle it on one page and cut it out. Further, the cut out page will itself serve as a template for other pages. You can cut out several pages at once, but you shouldn’t cut a lot at once, as the cut line will turn out uneven (crushed) and the tree will not open well.

The tree itself turns out to be more one-sided; to achieve volume, you can fold and glue 2-3 magazines together. But believe me, she looks good anyway.
Origami Christmas tree made of modules. Modular origami Christmas tree
Collect from triangular modules Origami Christmas tree is not at all difficult. It consists of individual branches, so you can make Christmas trees of a wide variety of shapes and sizes. In addition, from such branches you can make New Year's compositions, make toys, snowflakes, and stars. See the New Year's master class at the link >>>>

Christmas tree-coloring on the wall
Large Christmas tree painted on the wall. The individual parts of this New Year's beauty must be printed on 22 A4 sheets and pasted on the wall in the correct sequence. The advantage of this New Year's paper craft is that the Christmas tree is made in black and white, so the printer's ink consumption is low. In addition, this New Year coloring book with many small details will captivate the child for a long time. Link >>>>

DIY napkin tree
Master class on making very beautiful, unusual Christmas tree from napkins can be found at the link >>>>

How to do Christmas trees corrugated paper
The Country of Masters website invites you to make two Christmas trees with your own hands from corrugated paper.
Option 1. The candles and the Christmas tree itself are made of corrugated tubes. Link >>>>

A cone-shaped Christmas tree will create an unusual holiday atmosphere and will look good in any children's interior and your baby will never get bored. An interesting, entertaining green beauty will not only entertain your baby, freeing him from his demanding attention for a while, but will also contribute to the development of motor skills in the child’s hands.
You will need:
Glue stick;
- pencil;
- sewing machine.
Felt (thick fabric):
- 0.5 m of hard black felt (5 mm thick);
- 0.5 m of dark green felt;
- 2 sheets of white:
- 2 sheets of red;
- 2 sheets of pale yellow color;
- 1 sheet of dark brown;
- 1 sheet of blue;
- 1 yellow sheet;
- 20 cm of green elastic fabric (for edging);
- 60 cm of twine (thread of any kind);
- 35 red buttons (large and small);
- 1.5 m of red (white) tape 3 mm wide;
- scissors.
Threads:
- red, white, green, brown, blue, beige.
Instructions:
1. Make a pattern for the Christmas tree. Take black felt, thread and a pencil. Measure 60 cm of thread, tie a pencil to one end of it. Attach the opposite end of the thread to the edge of the felt. Having pulled the thread, draw a hemisphere with a pencil. Repeat this operation with dark green felt.

3. Sew 28 red buttons, placing them randomly but evenly across the entire surface of the pattern. Along the straight edge of the product in the center, make a notch with an inward angle to make it easier to roll into a cone.

4. Cut strips 4.5 cm wide from elastic green fabric. Finish the edges of the product with each strip. Bring the straight edges of the pattern together into a cone, securing with glue or rivets. The Christmas tree is ready.
5. Now it's time for toys. Prepare paper toy templates. Lay them out on colored sheets of felt and trace along the outline. By cutting, make 2 parts for each toy. On one side of the toy you will attach small parts, and on the other side you will hide all your stitches.
6. From white felt, make: 2 snowflakes, 2 doves and wings, 2 little angels, 2 lollipops, 2 Santa Claus, 2 deer, 2 gingerbread men, 2 rocking horses.

7. Made of blue - 2 baubles, 2 bells with a bow, 2 angels. From red felt you will get: 2 lollipops, 2 boots.

8. From yellow felt, cut out: 2 small stars, 2 small bells, 2 big stars, 1 semicircle with a diameter of 5 cm for big stars, which will show off on the top of the Christmas tree. From dark brown - 2 puddings.

9. To make a deer, divide the template into individual elements: body, scarf, eyes, nose, horns. Make the scarf from blue felt, the eyes and spots on the body from white, the nose from red, and the horns from brown.
10. Using a glue stick or glue, gradually attach all the parts to the base. After drying, sew a seam around each piece using the appropriate threads.
11. Prepare loops for toys. Take a 3 mm ribbon, divide it into pieces 5 cm long. If the buttons are too large, then the pieces should be made longer. The number of segments will depend on the availability of toys.
12. Fold each piece in half, placing the free ends at the top of one half of the toy. Using a glue stick (glue), glue the other half of the toy, covering the ends of the loop tape. Finish the edges of the toy with a zigzag stitch, matching the threads by color.
13. Make a top star. Fold the yellow semicircle in half into a cone and hand sew the straight sides together. Attach two yellow star blanks to the top of the cone, placing the top of the head between the two lower rays of the star. Secure with stitches. Finish the edges of the star with a zigzag.