Ideas for autumn crafts: paintings made from natural materials. Landscape of autumn leaves
An autumn girl was walking, teasing with her outfit,
Warming in the velvet light.
And with that girl, having met the gaze,
We suddenly forget about summer...Svetlana Efimova 2
D Good afternoon, my dear friends!
Today, I share with you my new experience in needlework. It will be a picture of autumn leaves, I wanted to call it: girl - autumn. Actually, I didn't plan to do this job. But at work, there was an annual competition of crafts made from autumn materials. The manager asked me to make some kind of craft from natural materials. As a boss, would you refuse a request? And I wasn’t going to refuse this request, it’s handicraft! And I really like handicrafts. This is what I ended up with.
Painting of autumn leaves: girl – autumn.
For work I took:
- Fibreboard – 50 x 40 cm;
- Natural materials - ears of wheat, a bunch of autumn leaves, twigs, acorns, rowan berries, flowers, grass, millet;
- PVA glue;
- Acrylic matte varnish;
- Acrylic paints - gold, bronze and white;
- Watercolor paint – yellow.
As a basis for the picture, I took a piece of fiberboard measuring 40 x 50 cm. For the front side of the picture, I chose the back side of the fiberboard, i.e. not smooth))) There was a scratch right in the middle, but it doesn’t matter, I’ll decorate it.

I decided to decorate the picture frame using the terra technique. For this, I needed a mixture into which I would press ears of wheat and millet. Usually putty is used for this, and I was sure that I had it. But during the whole break, I didn’t find it, it turned out that it was over, but I didn’t want to go to the store... But I had dry glue for tiles and I decided to experiment. Let the glue be the basis of the mixture. I needed to get a medium-thick mass into which wheat and millet could be pressed. In this case, the mixture should eventually harden and stick firmly to the frame. And I did this, mixed: tile glue (6 parts) + flour (3 parts) + PVA glue. I actually used PVA instead of water. That is, as soon as the mass became the consistency I needed, I stopped adding it.

Frame mix
First, I generously coated the canvas with PVA glue along the entire perimeter, in the place of the future frame. After letting the PVA dry a little, I began to apply the experimental mass, in a layer of about 1 cm, in advance.

Applied the base for the frame
And she immediately began to press ears of wheat into this mass, and then sprinkled it generously with millet. She pressed everything in so that the wheat and millet were pressed in, but at the same time were clearly visible.

Pressed wheat and millet

Pressed wheat and millet
Then, she put the picture on its edge and shook off the excess millet.
After about 30 minutes, I mixed PVA glue and acrylic varnish in equal proportions and covered the wheat and millet with this composition. When you apply this composition, it is white, but after drying it becomes transparent.


Covered with a mixture of PVA glue and acrylic varnish
When the mixture of glue and varnish had dried, I painted the frame liberally with gold paint. I painted with a wide brush. And after drying, I went over the ears of wheat with bronze paint.
Now, finally, the picture itself of autumn leaves. I want to say right away: I am not friendly with drawing, and especially with painting with paints! I painted it as I thought.))) I poured white acrylic paint into a separate container and diluted it lightly with water, so the paint would be applied more evenly. Then, I painted the surface of the fiberboard (without touching the frame). Thus, I prepared the canvas by lightly priming it. By the way, in the end, it looked like the painting was made on canvas. Once the white paint had dried, I began painting the background of the painting. I made all the strokes smooth, semicircular or something (I don’t know what artists call it). In the middle, closer to the top, I painted it with white paint again. Then she began to darken the background, bringing it closer to the edges. To do this, I gradually began to add gold to the container with white acrylic paint. The further to the edges, the more gold I added, making the tone darker.

Painted the fiberboard while making the background
After looking at the result, I wanted to add a yellow tone. I didn’t have yellow acrylic paint, so I took watercolor paints. Mixing white and yellow watercolor paints, I went right behind the edge of the white background. That's it, I put the painting aside until the paints were completely dry.
For this work, I collected a few different autumn leaves, thin birch branches, and grass. Also, twigs with rowan berries, acorns, flowers from narwhal flower beds (luckily they weren’t fined))). But my husband found the highlight for me. While helping to collect acorns, I found a sleeping dragonfly (it’s good that it was no longer alive).
I placed the leaves and flower petals between the pages of the books, so they stayed with me for about two days. I had them in my work, only slightly dried out.
But first, I drew a silhouette of a girl on paper (I found it on the internet) and applied it to the picture to determine the size.

I drew a silhouette of a girl
Then she cut off the skirt and painted the girl with gold paint. It could have been acrylic, but I had gold spray paint))). From the waist, I cut off a small pointed piece, these will be eyelashes.

Painted the “girl” with gold paint
Then, she glued the girl to the place that she had decided on in advance. I didn’t take pictures of my further steps, because... I'll tell you in words.
She formed a wreath for the girl from grass, leaves and twigs with rowan berries. Everything was glued using a mixture of PVA glue and acrylic varnish (in proportions 1/1). In the future I used this composition. Let me explain why I used exactly this composition. Before I started making the painting, I scoured the Internet in search of how to preserve the color of autumn leaves. And I found information that the color and elasticity of autumn leaves can be preserved, including with the help of this composition. Other options did not suit me (I won’t write about them).
I continue. The skirt was made from leaves. I glued it in rows, starting from the hem, going higher.
The bodice of the dress was made from flower petals.
Since, initially, there was a scratch on the fiberboard, I glued a twig with leaves in its place. And she glued the dragonfly, spreading its wings. I really liked this dragonfly.

I made a girl, glued a dragonfly and a twig
On both sides of the girl, I glued twigs and leaves, trying to imitate trees. I started gluing from the top level, then, going lower, I glued the next branches and leaves.
And in the lower left corner I glued panicles, small twigs of flowers and a few acorns.
And further! While examining the work, I discovered that there were unpainted areas on the frame. Therefore, I once again went over the frame with gold paint.

Glued grass and acorns
Then, I went over all the leaves, twigs and flowers again with a mixture of glue and varnish.
That's all. My painting of autumn leaves is ready. Of course, this is most likely not a painting, but a panel... But let it be a painting, I want it so bad)))

Friends, if you found my master class useful, share it with your friends!
Autumn gives us a lot of materials for creativity. These include leaves of various colors, chestnuts, dried flowers, acorns, and a decorative miniature pumpkin.
But, before you start making souvenirs from them, you need to properly prepare them, namely dry them and, if necessary, coat them with varnish or paint.
If you make a craft from unprepared raw materials, it will be a short-lived product.
As soon as the material dries on its own, the souvenir will lose its shape and will have to be thrown away. And besides this, half-raw leaves can simply rot or become moldy.
So let's start by drying out our autumn finds.
Let's prepare the leaves for the herbarium as follows:
1 way:
Place them between the book sheets and place them back on the shelf, pressing them tightly with other books to the side. In about a week to a week and a half, the leaves will be suitable for crafts.
This method is the best, since the natural color of the leaves does not change and then they do not break for a long time.
Method 2:
This method is good if you don’t have the strength to withstand a week and a half and want to get to work quickly. Place the sheet between two white sheets of paper and iron with an iron set to the lowest setting.

In this case, the yellow and red leaves retain their color, but the green ones may darken and become an ugly, brown shade.
We dry chestnuts, acorns and decorative pumpkins.
1 way:
Dry outdoors in the shade. It will be necessary to wait quite a long time before these materials acquire the dryness we need.
Sometimes this process takes a month. This is especially true for decorative pumpkins, which make wonderful DIY autumn crafts.
You will see for yourself when the moment of readiness for the gifts of autumn comes. Acorns and chestnuts will become lighter, and the pumpkin will become like a rattle, as the cavity inside will dry out and shrink, and dry seeds will beat against the walls.
Method 2:
We use the oven for this. It needs to be set at a temperature of up to 60C and dried until tender, stirring occasionally.

The main thing is not to rush and do not put on high heat, as the fruits will simply cook and become completely unusable.
Drying dried flowers
There is only one way and it takes a long time. Flowers need to be strung on a thread threaded through the stems and hung in a dry place, with the flower stems facing down.
Drying in a book or with an iron will not work, as the shape will be lost and they will become flat. After the dried flowers are completely dry, they need to be covered with a layer of hairspray. It will give them the desired density and will not allow them to crumble at the slightest touch.
Well, now, let's move on to specific master classes and examples.
1. Panel of autumn leaves
We offer you a great idea for a DIY leaf panel. It’s not at all difficult to make, but the result is quite impressive.
It would be nice if you placed other autumn decorative elements next to the finished leaf painting. For example, pumpkins, spikelets and other things that suit the style. Then you will have a whole autumn ensemble.

What we need for work:
- 1. Dried maple leaves of yellow-red color.
- 2. Tree branch for the trunk
- 3. A square piece of plywood
- 4. Stain or dark varnish
- 5. Simple pencil
- 6. PVA glue
- 7. A bunch of dry spikelets
- 8. Wicker basket for pumpkins
- 9. Several Jack Be Little or Baby Boo pumpkins
If you don’t have such pumpkins, you can fill the basket with chestnuts and acorns. But next year it wouldn’t hurt to grow them, as they look very colorful and festive. Of course, if you have a plot of land.
Look at the variety of varieties and how harmoniously they combine with each other:

Master class step by step:
1 step. Sand the board, paying special attention to the edges. They should be smooth.
Step 2. Cover it with stain or varnish, preferably with a brownish tint. Apply the coating in several layers, trying to make the board not a uniform color, but a slightly “spotty” one.
Step 3. Freehand draw a large maple leaf.
Step 4 Start gluing on the maple leaves. Start from the edges, gradually approaching the middle. The edges of the leaves should match the edges of the sketch as best as possible. The next row of leaves should overlap the previous one. Do not glue the ends, they must be “overhanging” to create a volume effect.
Step 5 Glue the selected twig in place of the stem.
Now hang the autumn panel you created with your own hands above a cabinet and place other decorative elements around it.
2. Topiary from herbarium and other autumn materials

Topiary is a decorative tree. In autumn, you can collect beautiful leaves and make such a wonderful and cozy decorative element.
Any leaves, dried flowers, acorns, spikelets will be used here. The main thing is to understand the essence and make the right foundation. And what to fill it with - your imagination will tell you.
What we need for work:
- 1. Ceramic pot of a dull color
- 2. A straight tree branch for the trunk
- 3. 1 ball made of foam rubber, polystyrene foam or special floral foam
- 4. Dry moss, sesame or a handful of beautiful pebbles, acorns, dry rowan
- 5. Glue gun
- 6. Dry plaster
- 7. Decorative elements: herbarium, dried flowers, rowan, acorns, etc.
Master class step by step:
1 step. Let's start with the basics. Take a foam ball and place it on a branch that will serve as your trunk. Then remove it and drop some glue from the gun into the hole formed. Reattach the ball and let it dry.

Step 2. Secure the trunk in the pot. To do this, drop a drop of glue onto the free edge of the branch and attach it to the base of the pot.
Then, dilute the plaster with water to the consistency of liquid sour cream and fill the container. Don't forget that you will still need to decorate everything on top with moss or acorns, so leave a gap of about 3-4 cm from the top.

Step 3. Now we insert leaves and dried flowers into the ball, sticking them with their stems inside. If you want to add acorns to the composition, then first place them on pieces of wire.
Step 4 Now all you have to do is decorate the top of the pot so that the plaster is not visible.
That's all. Using this simple scheme, you can make a wide variety of autumn crafts with your own hands, not only from leaves, but also from dry peas, nuts and so on. They will all look just great!
3. Roses from maple leaves

Looking at this elegant bouquet of roses, you wouldn’t even think that it was made from ordinary maple leaves!
But, nevertheless, it is so. You just need to learn how to fold them correctly and you will get a great basis for many ideas.
Such roses can be included in various autumn topiaries, wreaths, compositions and panels. They look great in combination with any natural materials.

Well, let's get down to business.
What we need for work:
- 1. Maple leaves are not dried
- 2. Thread or soft wire
- 3. Matte hairspray
Master class step by step:
1 step. We form the middle of the bud. To do this, fold the sheet as shown in the pictures below. Try to twist it as tightly and evenly as possible. First in half and then into sausage.

As a result, we should have something like this:

Step 2. Now take the second sheet, fold it in half again and wrap it around the base.

The sharp edges of the maple leaves should be carefully hidden inside, like this:

Step 3. We continue to build up the mass around the base, adding more and more leaves. If you want to end up with a bud, then twist it more tightly, but if you ate a more magnificent rose, then loosen the twist a little.

Step 4 When you see that a real rose has “bloomed” in your hands, you need to secure it with threads as tightly as possible.

Step 5 We trim the edges with scissors and place the rose on a lining of leaves, preferably already dry. We cover the composition with varnish and admire it!

These leaf roses last quite a long time, definitely enough for the entire autumn season. You can make as many of these flowers as you like. The more there are, the more chic this autumn composition, reminiscent of a fabric motif, looks.
4. Compositions of decorative pumpkins
Even if you do not grow this vegetable on your own plot, in the autumn you can freely buy them at the market and then dry them yourself. We have already told you how to do this above, so let’s not waste time talking.
Let's get creative!
There will be no master classes in this block, we will simply show you examples of such decor, and how to make them is already quite clear from the photo.
Of course, there are more complex techniques, for example, carving or painting on dry lagenaria, but this is a broad topic and worthy of a separate article. Here we will consider only the simplest compositions that even a schoolchild can do.
Option 1. Basket with a scattering of pumpkins. It couldn’t be simpler, and the view is spectacular!

Option 2. Candlesticks made from mini pumpkins. To do this, you need to cut a hole with a knife of such a size that you can place a foil-based candle in it.

Or this option:

Incredibly simple, right?
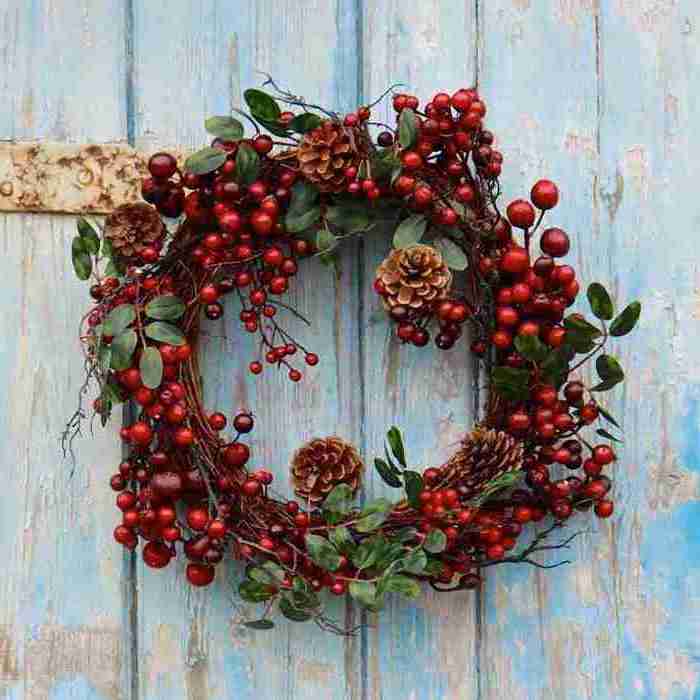
Option 3. Pumpkin door wreath. Take any circle as a basis, for example, an embroidery hoop, and attach mini-pumpkins to it.
Pierce the tails with wire and screw it to the base, circle. Use berries, acorns, twigs and autumn leaves as additional decorative elements.
It will look something like this:

5. Chestnut topiary

To create this spectacular autumn craft with your own hands, we will need the same materials for the base as for creating a decorative tree from the herbarium. And for decoration you just need other elements.
For work we will need:
1. Ceramic pot
2. Styrofoam ball
3. Dry plaster
4. Glue gun
5. Tree branch for the trunk
6. Cones, chestnuts, acorns
7. Harsh thread or twine for forming decorative balls
Master class step by step:
- 1. We form the base of the tree in the same way as in the case of topiary from leaves.
- 2. Secure the base in the pot using glue and plaster
- 3. Apply drops of hot glue to chestnuts, acorns and other elements and attach them in a chaotic manner to the foam crown ball.
- 4. Wreath on the door made of chestnuts

Such a wreath of chestnuts on the front door will cheer up not only you, but also passers-by. It's very easy to make. Follow all the steps given to make a pumpkin wreath.
Find some kind of dense base, then pierce the chestnuts and other elements through the back side, insert the wire, form a hook and use it to screw them to the circle.
Complete the chestnut composition with leaves, acorns, berries and other autumn decorative elements provided by this fertile time of year.
6. Autumn garland “Leaves” made from salt dough

This is a very impressive DIY autumn craft. The big advantage of such a garland is that it is not seasonal and will decorate your home for many years.
After all, it is made not from natural materials, but from salted dough, which does not deteriorate for years. The only thing is that such products are fragile and you need to handle them carefully so as not to break them. But, even if this happened, they can always be glued together, and the joint will not be noticeable.
What we need for work:
1. 2 cups flour
2. 1 glass of salt
3. 0.5 cups of water
4. Gouache
5. Sewing pins with hook eye
6. Twine
7. Oven
8. White landscape paper, pencil
Master class step by step:
1 step. We draw patterns of leaves of various types, but approximately the same size, on a landscape sheet. Let's cut them out.
Step 2. Knead a stiff dough from flour, salt and water. If the dough turns out to be unplastic, you can add liquid drop by drop. Knead the resulting material thoroughly and roll it out on a board. The layer should be approximately 5 -7 millimeters.
Step 3. Place the templates on the rolled out dough and cut them along the contours with a knife.

As a result, we should have approximately this many blanks.

Step 4 We make holes with pins and carefully secure the heads. We will hang our leaves on them. Use a knife to squeeze out the veins.
Step 5 Dry the dough in the oven at 50-60C until completely dry.
Step 6 We paint the dough pieces with gouache, trying to create natural tones and transitions.

Step 7 We string the garland onto a twine, making a knot over each leaf so that they do not move.

So our DIY autumn craft is ready. You can hang it anywhere, it will be in place in any corner of the house, especially if you have some other decorative elements in the autumn style.
7. Vases and houses made from ordinary pumpkins
Autumn is the time for pumpkins to ripen. It costs mere pennies and finding a beautiful shape and coloring is not difficult.
And making an element of autumn decor based on it is as easy as shelling pears! There are no step-by-step technologies or accessories needed here.
The only thing you need: pumpkins, a knife for carving, a tablespoon to pick out the pulp and flowers with which you will fill these colorful vases.
Look at our selection of photos of pumpkin vases. It looks very decent and autumn-like.


As you already understood, you just need to cut off the top and clean out the core of the vegetable. Then fill the container with water.
Or you can make pumpkin houses. To do this, you just need to cut holes in the right places. You can see exactly where they are located in the picture below. Kids love these things!

8. Wreath on the door made of natural materials
We have already given above an example of wreaths made of pumpkins and chestnuts. You already know how to make them. Here we simply present a selection of the most effective, in our opinion, ideas.


9. Acorn frame for a photo or mirror
Decorating any base in this way is very simple. We think no explanation is needed here.
The only thing we can advise is that you should not glue acorns with a glue gun or PVA. It's much better if you use plasticine.
Because, most likely, you will soon get tired of this decor and will have to throw it away. And so, you can always dismantle the acorns and get a regular photo frame back for use.
This is what it will look like.

On the photo frame there are whole acorns, and on the mirror there are only caps. This way you can create a variety of autumn crafts with your own hands and decorate any surface: boxes, bread bins, etc.
10. A bunch of grapes made from acorns

This autumn craft will look best if you paint the “berries” in natural colors, and instead of grape leaves add a herbarium of maple leaves of various colors.
Also, a bunch of acorn grapes is a wonderful element of any autumn wreath on the door or large topiary. After all, it can be made not only tabletop, but also human-sized!
But instead of a foam ball, you need to take a large plastic one. Making grapes from acorns is very simple, we will now tell you exactly how.
What we need for work:
1. Acorns without caps
2. Shilo
3. Wire
3. Glue gun
4. Acrylic paint
5. Autumn leaves for decoration
Master class step by step:
1 step. We poke holes in the base of the acorn with an awl.
Step 2. We break or cut the wire into pieces 7-10 cm long.
Step 3. Dip the ends of the wire into a drop of glue from the gun and insert it into the punctured holes.

Step 4 We paint the acorns any color you want. The main thing is that it is combined with leaves that will complement the composition.
Step 5 We collect acorns in a cluster, forming a wire rod on top. Then we attach leaves to it.
Now you can make any decoration based on this autumn craft. Panel, wreath, etc.
11. Autumn crafts from felt
Working with this fabric is a pleasure! The material does not crumble and holds its shape perfectly. This means that any beginner can make an autumn craft from felt with their own hands and it will turn out no worse than the products of experienced craftswomen.
We offer you a selection of the best and simplest decors in autumn style, and you can choose any of them! They are so simple that there is no need to describe their step-by-step technology in detail.

As you can see, based on felt leaves, you can make both a wreath and a garland, like the one we already made from salt dough. Here are a couple more options for DIY fall wreaths.

All you need is to draw the templates, cut out the felt and design it according to our photos.
12. Garlic and red pepper braid

How cozy it is when bundles of garlic, onions, and red peppers hang in the kitchen! But if you hang them fresh, they will very soon lose their appearance or simply run out because they will be eaten.
Let's do something like this, but for centuries! Now we will look at how garlic and pepper are made, from which we will form a cute braid for the kitchen.
For work we will need:
1. White nylon tights or a plastic bag (for the garlic base)
2. Cotton wool or padding polyester (for filling)
3. White coarse thread (for dressing and forming lobules)
4. Glue gun
5. Buckwheat or twine (to imitate garlic roots)
6. Fabric for sewing peppers or salted dough for sculpting them
Master class step by step:
1 step. We form the body of the garlic. To do this, we need to cut nylon tights or simple plastic bags into squares. Garlic made from nylon looks, of course, more realistic.
But even from the packages it looks good. But the main thing is that this material is always at hand. So, cut out a square, approximately 7 by 7 cm in diameter.
Step 2. We roll a ball out of cotton wool or padding polyester, put it inside a piece of nylon and form a head of garlic. It looks like the one shown in the photo.

Step 3. Then we begin to tie a harsh thread around the head, forming cloves of garlic. First we divide it in half, then into quarters, then into 8 parts.
Look at the photo, the process is clearly shown there.

Step 4 In the place where the roots of real garlic are located, drop a drop of glue and sprinkle this place with crushed buckwheat. If you want, you can replace it with twine, which needs to be unraveled and finely chopped.
Step 5 We make a braid from twine and attach the resulting garlic cloves to it.
Step 6 Now it's time to deal with the pepper. You can sew it, but peppers made from salt dough look much better.
We have already given the recipe for the batch, in the subsection “Garlands of autumn leaves.” These are the peppercorns you should end up with.

Step 7 We make holes in the tails of the peppercorns (we will then thread twine through them and use it to secure them to the braid with garlic). You can do this with an awl or any available item.
The main thing is to make them large enough so that you can thread the thread freely later. Otherwise, after drying, you will not be able to attach the finished product to the composition in any way.
And one more thing: if you make a hole, make sure that the edges of the leg remain more or less large. Otherwise, after you thread the thread, the thin walls may crack and the pepper will fall to the floor.
Step 8 We dry them in the oven, paint them with acrylic paint, and once dry, coat them with varnish. When the pepper shines, it looks more natural.
Dry at a low temperature, do not rush, otherwise your work may burst and you will have to sculpt everything again. You can't paint a cracked pepper the way you would like.
9. Attach the pepper to the garlic and hang this autumn composition in the kitchen. You can make several such bundles. You can make carrots from salt dough, and a bunch of onions from brown tights.
The principle of making bulbs is the same as garlic, only even simpler. There is no need to form slices.

Also, a bunch of mushrooms on the wall will look great, which you can also sculpt from dough and paint realistically.
Our big review has come to an end. You have seen many examples and any kind of autumn crafts with your own hands. We really hope that our master classes will be useful to you and that you will definitely take something into account.
Leaf paintings, created using the oshibana technique, can easily be considered works of art, but children’s first acquaintance with this type of creativity occurs in kindergarten, when they make their first applications with dry autumn leaves. To create such paintings, not only leaves are used, but also other natural materials, for example, flower petals, grass, tree bark, poplar fluff and various seeds. Before performing such work, all materials must be prepared: they are dried under a press, sometimes pre-treated with a special solution. If you want to become a true oshibana master, then when drying materials you should try to preserve their natural color.
Painting "Autumn" from leaves It is performed on paper or fabric, and the elements can be glued with glue, and several other methods of fixation are also used. Sometimes the paper is pre-painted with watercolors, a drawing is created, which is then supplemented with natural elements. A true craftsman arranges the elements with care and precision so that they take their place: leaves transform into trees, and flower petals outline the silhouettes of mountains.

This type of decorative art became especially widespread in Japan, where it appeared about 600 years ago. In the last 30 years, osibana has found a second life and began to spread throughout the world; many needlewomen resort to this type of creativity who want to learn new techniques for working with natural materials and show children how incredibly beautiful they can be.

Leaf paintings
Autumn gives us a wide variety of colors: pink, yellow, red, brown shades surround us everywhere, and this will definitely make needlewomen think about creativity, to which children must be involved. Osibana refers to floristry, because it is a unique way to create beautiful bouquets from leaves and flowers, but these bouquets will be flat and attached to a paper base.
Beginning craftsmen often make the mistake of trying to use only bright colors, but it is the inconspicuous leaves that, at first glance, can play the most important role in your composition.
You can use darkened leaves of hazel or aspen, they are gray-brown, however, if your composition contains rocks and stones, dark reflections, then these elements will be the best solution.

If you are chasing bright colors, then pay attention to the leaves of willow, apricot and mulberry; they should be harvested in September-October, patiently collecting the smoothest and most beautiful ones. Red color can be conveyed using viburnum and grapes. American maple and tulipwood also have gorgeous hues. Pay attention not only to the front side, but also to the back side, as in Norway maple these shades vary from pinkish to dark purple. Silver poplar allows you to convey white, gray and yellowish colors.
When you have collected the necessary material for paintings of leaves and flowers, they need to be dried, for this you can use the simplest way - place them between the pages of a book. They can also be dried under a press in another way: place them between newspaper pages, stack them on top of each other, and place some weight on top. If you dry elements between newspaper pages, then you need to change them from time to time.

You can also collect dry leaves that have already fallen and just iron them so that they are ready to create a craft.
You can build a drying press with your own hands; for this you will need two square shapes cut from thick plywood. You need to drill four holes in the corners and insert bolts. When you place the newspaper pages between the plywood, the bolts must be tightened, and your petals will dry in this pressed state. You also need to drill several thin holes around the perimeter of the plywood square for ventilation.
For creating paintings of autumn leaves don’t be afraid to experiment, dry various petals and leaves, even if you may not initially like their color, in the future it may fit perfectly into the composition being created.

Paintings from autumn leaves
Painting of leaves on the theme of autumn begins to be created the moment you go to collect material in a park or garden. When you get your hands on a new element, you can already imagine where you can use it. By the way, you must remember that materials are prepared not only in the autumn months, but also in spring and summer. In the spring you can collect young shoots of trees, flower petals - bird cherry, violets, lilies of the valley, viburnum, hawthorn. Summer is rich in herbs and flowers, which also boast their original shapes and shades. Even in winter you can collect materials, because they all now take on a dark, gloomy color.
It is better to do it on thick cardboard, on which you first draw a sketch with a simple pencil. Then you need to prepare the elements and begin the creative process. You can fix the elements on a cardboard base using PVA glue.
Since oshibana is not at all a simple application that can be made during a lesson in kindergarten or a lesson at school, then there is no time for such paintings from dry leaves it takes much more: depending on the complexity of the invented composition, from several days to months. It is also necessary to remember that you must predict in advance what kind of result you will get, because error is a constant creative search, and in the process of executing the composition you must continue to fantasize and experiment.

You can create a unique artistic effect thanks to natural plant shapes and textures, and there is no need to resort to additional decoration or use of other materials.
The finished painting must be properly designed, a mat and a frame must be selected. The baguette must be matched to the picture, sometimes even forgetting that it harmonizes with the interior. The baguette should complement it and not obscure it.
A passe-partout must be used to protect the painting from damage that glass can cause. The air gap allows protection from high humidity, condensation and other adverse conditions.

Compositions using pressed floristry must be under glass, otherwise dirt and dust will constantly settle on them, and the colors will fade from the influence of sunlight.
The ideal solution would be anti-reflective glass, which diffuses reflections of light, thus preserving the naturalness of the image. Anti-reflective glass also allows for high-quality color reproduction.
Considering leaf paintings photos, you can notice that they are very colorful, despite the fact that all its colors were created by nature itself, which is why such compositions fit perfectly into any interior, creating an atmosphere of warmth and comfort.

Painting "Autumn" from leaves
DIY leaf painting- a wonderful children's craft that children first become acquainted with in kindergarten. Applications can be performed in various techniques: some are accessible to the youngest, children are introduced to them in the junior and middle groups of kindergarten, while others can only be performed by primary schoolchildren. Each such application is unique and unique, and by preserving it, you will leave a long-lasting memory of your child’s first creative successes.
Children love the overlay applique, where dry leaves are placed on top of each other. In this craft, scissors are not used, and the missing elements are drawn with a marker, paints or felt-tip pen, sometimes elements from plasticine are added.
In silhouette appliqué, certain elements are cut out from leaves and then glued onto a cardboard surface to form a design. The type of model applique comes down to selecting leaves that are similar in color and shape, and then laying out an invented picture from them, and if you select the same leaves, then they will create an original symmetrical picture, for example, you can lay out a butterfly in this way.

DIY leaf painting
Admire on the Internet DIY leaf paintings photo, you can notice that even the simplest applications made by children will become a wonderful decoration for your interior.
We can make such paintings using leaves of any color and paint, designs can be made on paper or on fabric, even special prints can be made on cotton fabric, which is then used for sewing clothes or home textiles. If you will be painting on fabric, then you need appropriate paint that will not rub off or smear after washing.
The leaves must be large, openwork with pronounced veins, so that their texture is reflected on the paper or fabric surface. Even children can do it; they will be interested in coloring the leaves with paint and then applying them to paper. You can work on fabric with oil paints, and on paper with gouache.

Paintings from leaves: photos
DIY painting “Autumn” made from leaves in the form of stamps on paper, it is done like this: first, we place the sheet of paper face up (the side where the veins stand out) and carefully coat it with paint. You can also use a sponge to apply paint.
Perhaps the first time you smear the sheet too much, its imprint will be too “fat” and its texture will be blurry. Over time, you will find the perfect amount of ink that will allow you to get a crisp print. Also, be sure to choose coarse, dense leaves, for example, chestnut or grape are ideal, you can use oak, and if you take a shoot that is too young and soft, it will crumple during painting. To hold the element while painting, you can use a wooden stick or pencil. Then turn it over and press the painted side to the paper, cover it with newspaper on top and press it, thanks to this all the veins will be imprinted. You can use a rolling pin and roll it over the top.

In addition to paintings, you can also make bouquets that will delight you with their bright colors.
Our blank shows the required colors: yellow, orange, green, brown, blue. We chose the appropriate colors of gouache, only we took 2 shades of green: light and dark (for artistry). We made white and shades of blue in advance for another craft. Polina loves the color pink, so I had to make a little pink in a separate glass, which was then added to the picture a pinch at a time :-) . We put the millet into bowls and started coloring. Using a large brush, we carefully poured and stirred the dried gouache directly into the jars; the resulting liquid was gradually added to the millet and stirred thoroughly. I prepared spoons for stirring, but a brush turned out to be more convenient. As you stir, it becomes clear whether to add a little more water to the gouache or not. If at a certain point the millet stops coloring, you need to add a few drops of water and stir further. The main thing is not to overdo it with water, otherwise it will take a very long time to dry.
Our millet dried in about 40 minutes, but every 10 minutes I stirred it so that the lower layers would also dry. Again, for the sake of artistry, after drying we mixed our colors a little. A small pinch of yellow millet was added to orange, a whisper of orange to yellow, and so on. You can see this in the photo.
The long-awaited moment has come for the child, when the preparation is already completed and the fun begins...
I squeezed a lot of PVA out of the tube, but did not smear it, so that the layer of glue would be thicker. In this case, the cereal will stick to the paper better and will not crumble later. I applied glue to the paper in parts: first, trees on one side, and Polina covered it with millet, then they made trees on the other side, then grass, and at the very end they applied glue to our path in dots, sprinkled yellow and orange millet, like fallen leaves.
To make the landscape artistic and the colors to mix like paints, millet was scattered in small pinches, changing colors. For example, when making a tree with yellowed leaves, we alternated colors: a pinch of yellow, a pinch of orange, etc. It's more difficult with a green tree. It has 2 shades of green, and the leaves are starting to turn yellow, yellow and orange, and at the very end there is a pinch of brown on the side where the shadow is.
There is one important nuance: you cannot cover trees and grass equally densely; it just turns out to be a chaos of color, where shapes and objects are not visible. I only realized this when we were all fast asleep. I had to take a wooden stick and remove some of the millet from the grass under the trees. In the final version of our landscape you can see empty, unfilled stripes. Optimally, there should be even less millet.
When everyone was covered with cereal, they carefully pressed the millet onto the paper with the palm of their hand and left it to dry overnight.
In the morning we framed our autumn landscape and took it to kindergarten. They promised to return it, and if this happens, we will cover the picture with varnish so that the millet does not fall off over time, and hang it on the wall.
In order to create a cozy atmosphere in your home, every detail intended to decorate the interior must clearly fit into its overall style. The decorative sound of various accessories will help to emphasize the dignity of the interior, highlighting the advantages and hiding the disadvantages. One of these creations of home art are handicrafts made from natural materials. From our article you will learn how, with the help of simple things that surround us, you can create exquisite jewelry and original decorative items. The master classes below with photos and step-by-step instructions, as well as various ideas for home, garden, school and kindergarten, will help you easily cope with this task.
Beautiful crafts: do it quickly and easily (photo)
Kanzashi, topiary, decoupage, flower pots, origami - the world of handmade art tirelessly excites the imagination of needlewomen.
A variety of crafts made from wood, glass, shells, cereals, coffee beans, pasta, paper, stones, pebbles and other natural materials will help create unique comfort and a light romantic mood in any interior.
Advice! You can create a variety of supplies for making crafts from natural materials from absolutely anything, just look around, you probably have a lot of things suitable for this at home.


Hazelnuts and pine nuts, beans, buckwheat, peas, coriander, pepper are excellent materials for creativity.

Advice! To ensure that handicrafts bring you exclusively positive emotions, and the process of preparing material turns into a real holiday, you can combine business with pleasure.
- When you're at sea in the summer, stock up on beautiful shells and small pebbles. They make excellent wall hangings for the home.
- While walking through the autumn park, give your child the task of collecting acorns, chestnuts, and colorful fallen leaves. Products made from natural materials made by children's hands are endowed with special warmth and love.
- When caring for your own garden, do not be lazy to sow dried flower seeds. They store well in winter and are an ideal tool for creative work.

Crafts made from natural wood
Tree- a beautiful and pliable material that has gained popularity among designers, architects and ordinary amateurs. Natural solid wood can be easily combined with metal, glass, plastic and stone decor.
Wooden crafts will harmoniously fit into a cozy country-style room, set the tone for the brutal loft style, and will favorably change the classic, Scandinavian, minimalist decor.


We invite you to view a universal selection of interesting wood products that can transform the design of any interior, becoming its beautiful and bright accent:
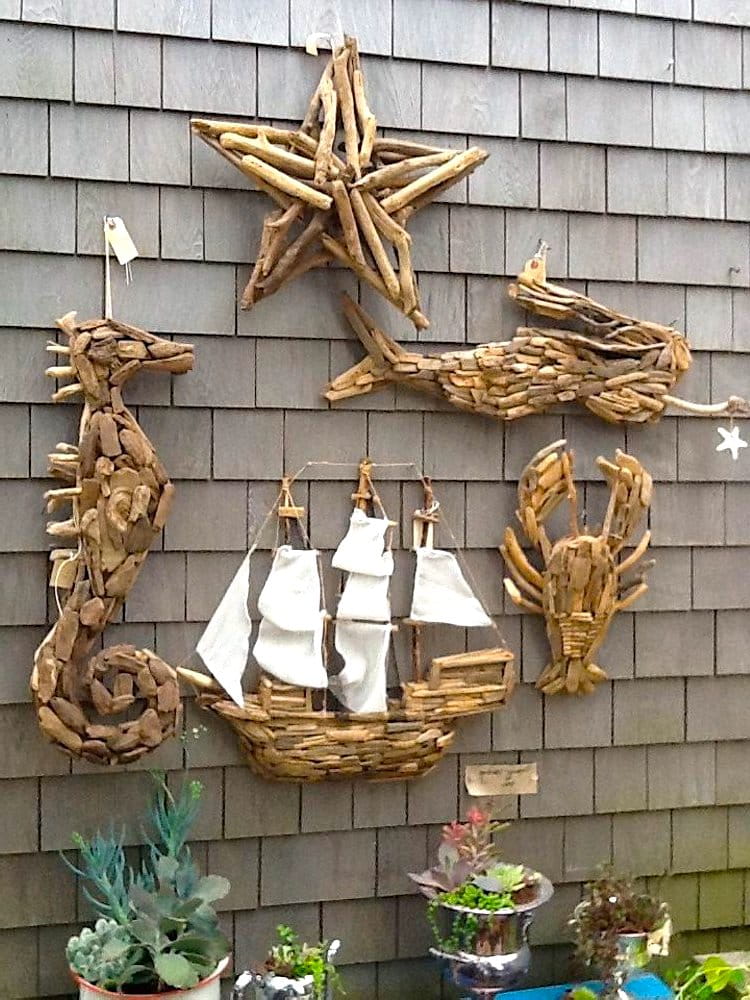
Tree branches
– a sophisticated natural material that allows you to create many original things for your home with your own hands: chandeliers, wall lamps, candlesticks, photo frames, hangers, headboards and much more.
- Painted dry branches with many branches will add special charm to the living room, kitchen, and bathroom.
- Tables, lamps, shelves, vases finished with sawn wood look nice.
- A romantic mood will be set by decorative panels in the shape of a heart, a bird, or a star.
- Gold, silver, white, and black rods placed in a transparent vase with stones attract attention.


Wood cuts
Tree cuts help create larger crafts: vases, clocks, frames, stylized wreaths. Wooden flower pots, shelves, and hot stands will fit harmoniously into the interior.
With a little imagination, it will not be difficult for craftsmen to build an unusual tabletop from these round pieces by fixing the wood cuts on a plywood sheet, filling the voids with shavings and opening them with varnish.


Bark of tree
Bark is a natural and affordable material. Modern craftsmen use birch bark to create unique paintings and appliques. Mugs, baskets, tues and boxes made of birch bark will last for decades.
Crafts made from natural materials will help you not only unleash your creative potential, but also turn your interior ideas into reality.


Decorative stone and pebbles
- Decorative rock- the unbridled power of the elements, which has a strong charge, which affects the overall concept of the design of personal plots and interior decoration.
Chests, caskets, vases filled with pebbles will dilute the routine furnishings of city apartments and office premises. Small stones will decorate walls, mirrors, door handles, stands for installations, as well as bottles. Look at the examples in the photo.

An interesting solution would be glass bottle candle holder filled with shells and colorful pebbles. Beautiful ones will look no less beautiful pebbles glued to the wall.
A decorative rug covered with flat pebbles mounted on silicone or special glue looks unusual and elegant. It will make your porch look stylish and beautiful.
Even children can create original compositions from stones. Just before that, you need to conduct a step-by-step master class for them.


Mosaic, painting, stone cutting- a great way to entertain children by creating magnets, flower arrangements, trees, cacti in decorated pots.
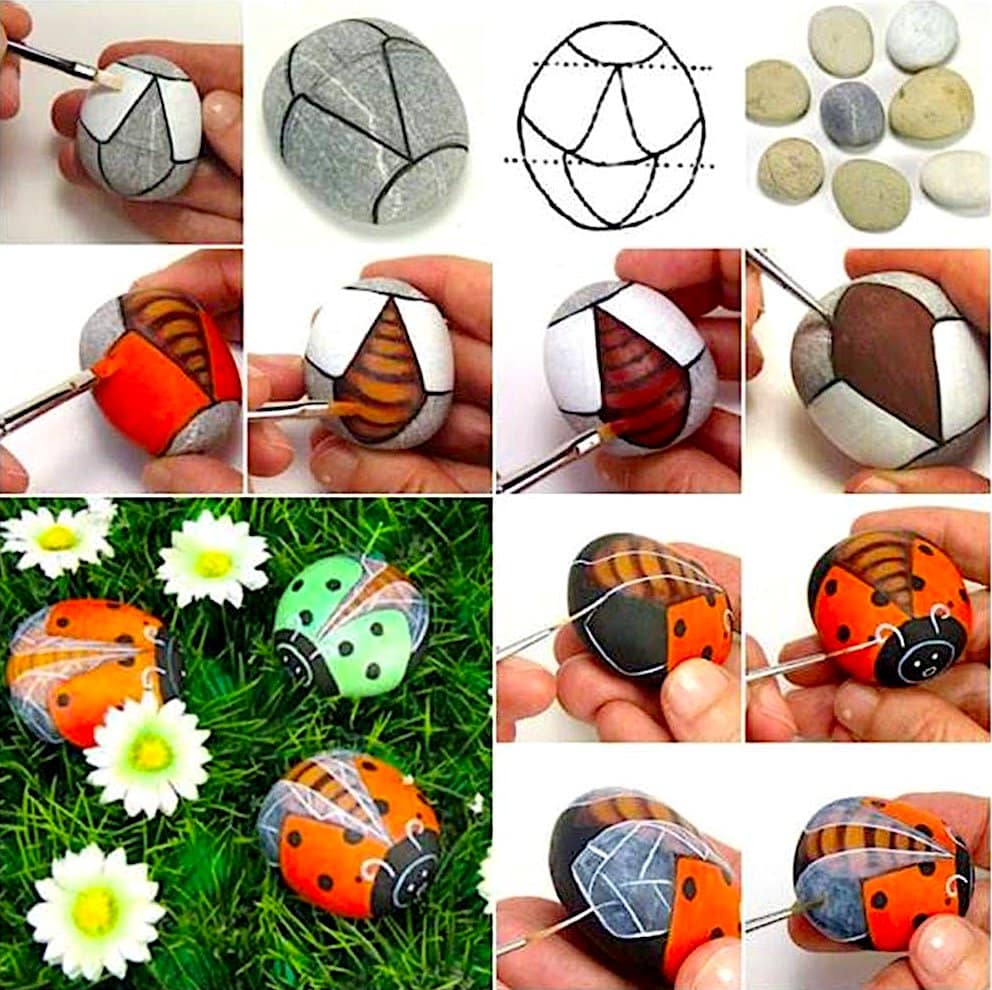
Advice! It is best to paint sea pebbles in one tone using special spray cans, but you need to apply drawings and fine lines on them using liner brushes.


- Decorative panels and figurines are made from multi-colored stones. Pebble cladding of walls, floors, fireplaces and window sills - the basis of kitchens and toilets.

A picture made of stones is a unique interior item

Summer crafts from fruits, leaves and flowers
The formation of a careful and caring attitude towards the environment is formed by activities with natural materials. An important stage of the work is the collection, processing and preparation for use of summer gifts.
You can make beautiful and original home accessories with your children’s hands from:
- leaves;
- poplar fluff;
- colors;
- seeds
Dry grass, fruits, flowers, tree fruits and plant seeds allow you to create complex volumetric applications, unique and colorful compositions and other original art objects on autumn and summer themes.


Advice! If wood (cuts, logs, bark, twigs) is used to create crafts from natural materials, it should be thoroughly dried before starting work. Using damp wood will significantly shorten the life of your homemade masterpieces.
Ideas for creating autumn crafts
Autumn is the best time to collect fruits, seeds, vegetables, as well as acorns, pine cones and chestnuts. Fallen leaves, dried flowers, grass will serve to create extraordinary bouquets, wreaths, and appliqués.


Natural compositions look good in ordinary vases, watermelon peels, coconut shells, and pumpkin shells. An original master class can be given to children, teaching them how to create crafts from natural materials with their own hands.
- The pine cones will make a cozy basket or wreath that can be hung on the front door.
- Zucchini decorated with berries and flowers will become the main character of the garden plot.
- A kaleidoscope of bright colors of pumpkins, potatoes, and eggplants will decorate your yard landscape if you come up with a worthy use for them.


Advice! When looking for ideas for creating crafts for kindergarten, pay attention to the wonderful houses made from bark and tree branches.


Crafts on the theme: “Sea and underwater world”
Sea crafts give bright emotions and a rosy mood even in cold winter. If you are lucky enough to collect a collection of shells during your vacation, hurry up to become the authors of three-dimensional applications, paintings, frames, a marine theater or an aquarium.
- Sea treasures are easily transformed into beads, pendants and pendants.
- Cold porcelain and salt dough will help complement the composition with starfish, corals, and colored stones.
- The ocean in a bottle is an entire underwater world that allows you to come up with different stories and study marine life.
- On a cool day, boats made from scrap materials will also give you warm memories of summer.


When making marine-themed decor, don’t limit yourself to anything - create, try, dare

When making products with a “sea” theme, you can use absolutely any natural material.
Feathers for needlework
- Bird feathers— used by craftswomen to create soft pillows, warm feather beds, decorations for hats, toys, and unusual souvenirs.
They also decorate the interior, complementing crafts with sequins, glitter, small ribbon bows and other decor.


Despite the fact that the pen is a very capricious material, working with it is quite simple and easy

Dreamcatcher - a magical talisman that attracts good luck


Important! Bird feathers can cause a severe allergic reaction in humans, so be careful when using them as decorative items for your home.
DIY crafts (step by step)
It’s easy to create crafts from natural materials with your own hands - the main thing is to get the necessary tools and materials. The step-by-step instructions below for creating universal decor for your home and garden will help you complete this simple task.
Colorful panel
Panel - decorative, facades. Currently, three main genres are used for its production: sculptural, mosaic and appliqué.
An interesting solution is an artistic panel made from natural materials: dry leaves, straw, nut shells, dried flowers. Its production takes place in 3 simple steps:
- First you need to make a base. It can be made from wooden boards knocked together into a board or a piece of plywood.
- Next, you need to cover the base with burlap material or make a straw lattice on top of it, on which the applique will be applied. You can make an applique from flat elements (leaves, grains, seeds), or get a relief surface by combining three-dimensional parts. An unusual solution would be to weave dried citrus fruits, moss and leaves into a straw net.
- The final stage is to create a rope or wire loop for attaching the panel to the wall. Check out the result in the photo!
Advice! If desired, you can add a frame of driftwood or vine branches to the resulting composition. It will make your work more elegant


Eggshells for indoor plants
Creating small flowerpots from eggshells requires special care, since the shell itself is a rather fragile material and can easily be damaged if moved carelessly.
Procedure:
- Prick the top of a raw egg and pour the contents into a container.
- Finish the edges until you get an even cut or leave them chipped.
- Stabilize your vases by using a stand or egg carton. An alternative option could be a plasticine flagellum that complements the bottom of the shell.
- The resulting container is ready for seedlings of wildflowers, greenery, moss, and small succulents.
Interesting to know! Eggshells can also make an elegant candle holder, Easter craft, or miniature flower bed.


To create your own mini-garden, you will need very little time, the main thing is to do everything carefully and adhere to the rules described above.


Candlesticks made from sawn wood
Preparing an exclusive candlestick from a stump or wood cut will take a minimum of time and effort. Get the necessary materials and tools to do the following:
- Impregnate the wooden base with compounds that prevent the formation of rot and insect pests.
- Using a drill and a special attachment, make a shallow hole in the center of the stump to install a standard candle. To ensure that the edges do not pose a danger, sand them with sandpaper.
- Decorate the item with burlap, tied with jute rope or a beautiful ribbon.
A wooden stand for 2-3 candles, made from simple driftwood attached to a wall, pendants or supports, will look unusual. Such an interesting handmade product will be the best attribute for romantic evenings.


Kitchen clock
A kitchen clock made from cutlery is very quick and easy to make. For this we need:
- clock mechanism with a beautiful dial;
- disposable plastic spoons and forks;
- glue gun.

Step-by-step master class
- First you need to disassemble the watch, separating the mechanism from the dial;
- Next, using a glue gun, we glue improvised arrows opposite each number so that the spoons and forks alternate and go one after another. This way the watch will look much nicer;
- All that remains is to let the glue dry, install the dial in place and insert the battery into the watch. Original and useful is ready!

Let's sum it up
It’s not difficult to make decor for your home, cottage, school, or kindergarten with your own hands, especially if you use natural material for this, which is a pleasure to work with.


You just need to enlist the help of your family and friends, use your imagination, and boldly create! Try, experiment, find your own!