DIY autumn crafts from salt dough for kindergarten. Autumn crafts from salt dough Crafts from salt dough on an autumn theme
Autumn crafts for the little ones: We make prints of natural materials on salt dough and paint them.

Autumn crafts for kids: making from natural materials and dough
This craft was sent to our competition “Autumn Workshop - 2015” by Victoria Yuryevna Sviridova and her son Oleg. When Olezhek made these crafts, he was only 1 year and 8 months old! Victoria and her son live in Kaliningrad.
Victoria writes: “My son is still only 1 year and 8 months old. We are actively involved in creative activities: we draw, sculpt, glue, etc. So we made some fun crafts for the “Autumn Workshop” competition.
You will need:
— salty dough for crafts (2 cups flour, 1 cup salt and 3/4 cup water),
- brushes or sponge for painting.
How to make a craft: everything is very simple!

Step 1. We collect cones, acorns, chestnuts, leaves, twigs. We bring them back from our walk.
Step 2. We make salt dough - see the recipe above in the “You will need” section.
I decided to combine exercises in modeling salt dough and then coloring it. My little son kneaded pieces of dough, played with it, and trained his fingers. We took our autumn preparations and began to imprint them on the dough - making their imprints. My son especially liked the prints from the acorn caps. Then I baked the products in the oven at 180 degrees for 30 minutes. While everything was cooling down, we went for a walk.
Step 3. In the evening we started painting the products. This turned out to be no less interesting activity :). As a result, my son painted almost everything himself, including himself :). Despite the fact that the prints were largely lost under a layer of paint, the process itself was very exciting.))
Modeling and drawing, it seems to me, are what children like of different ages. Therefore, if you adapt such an activity, complicating and supplementing it, for example, for an older child, then you can have fun with the whole family. Have a warm autumn everyone!”
More autumn crafts for little ones You will find step-by-step master classes from participants in the “Autumn Workshop” competition in the articles:
Lots of ideas and step-by-step master classes for autumn crafts with children and you will find
Autumn is a great time for needlework, because it gives us so many wonderful materials: leaves, vegetables, fruits, flowers, acorns, pine cones and twigs. And how cozy a house becomes if you decorate it with yellow and purple tones. In this material you will find 6 ideas for DIY autumn crafts for adults and children with step-by-step master classes and a selection of photos for inspiration.
Idea 1. Autumn topiary
Topiary is decorative tree, which can be used to decorate the dining table, mantelpiece or living room front door. To make it, you can use natural or artificial materials, for example: leaves, berries on twigs, acorns, cones, chestnuts, flowers, dried citrus slices, as well as felt, sisal, linen and whatever your imagination tells you. In the next slider you can see several examples of such autumn crafts.

Materials:
- Clay pot;
- Wooden stick or branch;
- Two polystyrene or floral foam balls;
- Materials for decorating the crown;
- Dry moss (you can replace it with sisal);
- Glue gun and several glue sticks;
- Scissors;
- Side cutters or pruning shears;
- Acrylic paints for painting the trunk, ball and pot (optional).
Instructions:
Step 1. Cut a hole in the base ball with a sharp tool for the barrel, about a third of its diameter deep. Place a drop of hot glue into the hole and insert the barrel into it.
Step 2: Insert the second ball into the pot. If the ball does not sit tightly enough in the pot, place newspaper around it. Cut a hole in the ball for the trunk, 2-3 cm deep. Insert the trunk with the crown into the hole and adjust its length. Next, drop glue into the hole of the ball, place the barrel in it and begin to fill the hole with glue, placing small pieces of paper around the barrel. This is necessary so that the hot glue does not deepen the hole too much.

Step 3: Paint the pot the color you want if you don't like the original look. IN this project the pot was painted with spray paint in a dark bronze shade from Rustoleum (sold in construction stores, for example, in Leroy Merlin).

Remember that the design of the pot should be simple and unpretentious so as not to distract attention from the crown. If necessary, paint the barrel and/or balls at this stage. It is advisable to paint the balls so that the gaps between the decorative details are invisible.
Step 4. While the paint on our blank is drying, sort the decorative parts by type and size. If you use artificial leaves, flowers and berries with a wire base, then when cutting them, leave “stems” about 2 cm long. This is necessary in order not only to glue the parts, but also to stick them into the ball - then they will hold more securely . If the “stems” do not have wire, then it is better to cut the parts “at the root”.
Step 5. Now it's time for the fun part - creating the crown. First, evenly distribute and glue the largest parts onto the ball, then the middle ones. Finally, fill in the gaps with small embellishments.

Step 6. Well, that's all, all that remains is to decorate the ball in the pot with dry moss or sisal, after treating it with glue.
Idea 2. Pumpkins made from toilet paper rolls
And here is another idea for an autumn craft on the theme of vegetables that you can make with your children - pumpkins from bushings from toilet paper. The possibilities for decorating these crafts are endless. For example, children can use colored paper, gouache or glitter, and adults - gold leaf, fabric or lace.

Materials:
- Toilet paper or paper towel rolls;
- Scissors;
- Leg-split;
- For decoration: brushes, gouache or acrylic paints, PVA glue and glitter or book pages, etc.;
- Cinnamon sticks or sprigs (to create the core of the vegetable);
- Burlap, felt or cardboard (for creating leaves).
Step 1: Flatten the toilet paper roll and cut into rings.

Step 2: Decorate the rings with a material you like, such as craft paper, scrapbooking paper, fabric, ribbon, or simply paint them with acrylic paint. You can also decorate pumpkins exactly as in this master class - with glitter and stripes of book pages.
Method 1. Using a brush, coat the outer sides of all rings with PVA glue, and then sprinkle plenty of glitter on them. Wait until the pieces dry, and then cover the glitter with a second layer of PVA glue to protect it from falling off.

Method 2. Cut thin strips of paper from book pages and glue them to the rings using PVA glue or a glue stick.

Step 3: To shape your pumpkin, pass a strand of twine through the rings, then tighten the two ends and tie a knot as shown in the photo.

Step 4. Now glue cinnamon sticks or cut branches into the center of the pumpkin.

Step 5. Hurray, your pumpkins are almost ready, all you have to do is add leaves cut from burlap, felt, cardboard or any other material you have on hand.

Using the same principle, you can make a pumpkin from rings of any material.

Idea 3. Panel of leaves
Next, we present to you an idea for crafts made from autumn leaves. Since this master class does not use hot glue or sharp objects, you can safely involve children in the work, and especially in collecting material.

An idea for an autumn craft made from natural materials that you can make with your children and use for seasonal home decoration
Materials:
Instructions:
Step 1. Cut out the wood with a jigsaw and sand the ends with sandpaper.
Step 2. Paint the board with stain and leave to dry.
Step 3. Use a marker to draw on the board. Maple Leaf by hand, using a template or stencil.

Step 4. Start gluing the pre-dried leaves (see how to dry them at the end of the article) like a fan, trying to place them so that their edges coincide with the outline of the picture. At the same time, you should not glue the leaves completely; let their tops be a little loose so that the panel gains some volume. Place a press of suitable size on each glued leaf for a minute.

Keep in mind that the leaves will not stick immediately, but after the glue dries they will stick well.

Step 5. To make the outlines of the design clearer, trim the leaves in some places. However, try to resort to such correction as little as possible so as not to lose the beauty of natural lines.
Step 6. Now attach the twig to your panel in place of the stem, break off the excess and glue it.

The following selection of photos presents examples of no less original autumn panels.

And finally, we suggest watching a video tutorial on how to make an autumn craft with your own hands in the form of a panel of leaves with a frame of acorns.
Idea 4. Wind chimes made from natural materials and more
The following project is an example of an interesting, but very easy-to-make craft from natural materials and ready-made parts, which a child can make almost independently.

Materials:
- Two or one sticks;
- Natural and manufactured materials for decorating threads: pine cones, flat stones, acorns, wooden beads, small metal candle stands (used in this project) and anything else that comes to hand and matches the fall theme;
- Leg-split;
- Hot glue gun and glue sticks.

Step 1. Paint some elements of the future wind chime, if necessary. In this master class, the author painted the pebbles in bright yellow and red colors.

Step 2. While the decorations are drying, tie two sticks crosswise and tie the center of the cross with twine as shown in the photo below. You can also just use one long stick or, say, a hoop.

Step 3. Cut 9 ropes of twine to the desired length with a small margin for knots, so that in the future you will have two rows on each branch and one in the middle.
Step 4: To create one row of wind chimes, take a piece of twine and begin stringing beads or other pieces onto it, passing the strings through the holes twice at a time or tying them well into knots. The stones should be additionally fixed with hot glue. In order not to make a mistake with the order, the parts should first be arranged in the desired order. By the way, it is better to place especially sonorous elements opposite each other so that their chime in the wind can be better heard.


Step 5. Tie knots at the end of each rope.

Step 6. Once each thread is finished, tie them to the branches on double knots with adding a drop of glue.


Below are other examples of this unusual decoration made from cones, acorns and leaves.

Idea 5. Candlesticks in the shape of autumn leaves made from salt dough
Leaves can be used not only as a decorative or finishing material, but also at the same time as a template and stamp for creating crafts from any modeling mass. Take note of the idea of autumn crafts with children in the form of these cute salt dough leaves. By the way, they are not only beautiful in themselves, but can also perform a practical function, for example, you can store various decorations or light candles.


Materials:
- Ingredients for kneading salt dough: ½ cup salt, ½ cup water, 1 cup flour;
- Container for kneading dough;
- Glass bowl;
- Rolling pin;
- Large leaves;
- Vegetable oil;
- Acrylic paints in yellow, red, orange and brown.
Instructions:
Step 1. The first thing to do is go for a walk with the whole family and find at least two beautiful large leaves.
Step 2. Then knead the salt dough. To do this, simply mix all the ingredients and roll out the dough to about 6mm thick (no less), so that it is not too thick, but not too brittle.
Step 3: Place your leaves on the dough and run a rolling pin over it using light pressure.


Step 4: The next step is to cut out the shape around the leaf. Use a sharp knife and, of course, take this part of the work yourself.

Step 5. Remove the leaves. Invert the glass bowl and coat it with a thin layer of vegetable oil.

Step 6: Carefully lift the sheets and place them on the bowls.

Step 7. Place the bowls with the dough in the oven preheated to 250 degrees and leave them to bake for 2-3 hours.

Step 8: Remove your pieces from the oven and let them cool in the bowls for about 15 minutes. Then carefully lift the leaves and leave to cool completely.

Blanks
Step 9. Once the bowls have cooled, start painting. To do this, pour paints of each color into cups and let the children mix them themselves and paint the inside of the leaves first, and then the outside. Crafts made from salt dough are quite fragile, so you need to paint them carefully, without pressing. Wait for the paint to dry and, if desired, cover the bowls with a layer of PVA glue. It will give the craft a matte finish and make it a little stronger.

Painting the bowl
Leaf shapes may vary.

By the way, if you don't want to mess with salt dough, then you can replace it with soft plasticine. The photo below shows an example of such a craft.

Idea 6. Felt garland
Although felt is not natural material, crafts made from it turn out to be the most autumnal. Today we invite you to make a simple garland from felt leaves.

Materials:
- Several sheets of felt in fall colors;
- Leg-split;
- Scissors;
- Glue;
- Thick threads with a needle;
- Pencil.
Instructions:
Step 1: Download and print the leaf templates (see downloadable template below), then cut them out and outline them.
Step 2. Cut out the blanks.
Step 3. Sew the veins by hand using large stitches.
Step 4. Now, maintaining equal intervals, hang the leaves on the twine. To do this, wrap the tail of each leaf around the twine and secure with glue. If you wish, you can sew on the details. Woo-ala, the autumn felt garland is ready!

According to the principles of this simple master class you can create a variety of garlands with decorations in the form of acorns, pine cones, pumpkins, etc. The following selection of photos shows some examples of autumn felt garlands.

How to dry leaves and flowers
Method 1. This method is suitable if you want appliques or other non-voluminous crafts. Place leaves or flowers between the pages of the book at a distance of about 3 mm from each other and move them to other pages every day (also maintaining an interval of 3 mm). Within a week, the paper will absorb all the moisture from the plants, and you will be able to use them for creativity.
Method 2. If your craft does not involve the use of flat leaves, then you can dry them by simply collecting them in a bunch and hanging them upside down in a dry but ventilated area. At the same time, keep in mind that the leaves will lose their color completely in the sun, but will retain their color in the shade.
Method 3. This method is suitable for drying and preserving the color of leaves and cornflowers. Blot fresh, just picked leaves/cornflowers with a napkin if they are wet. Place each sheet between two layers of wax paper and place on top of the resulting “sandwich.” paper towel. Preheat your iron and make sure the steam setting is off. Using pressure, iron the paper towel for 2-5 minutes. Turn the sandwich over and pat it again through the paper towel, then carefully remove the wax paper.
- To prevent dried leaves and flowers from breaking, they must be dipped in a solution of water and PVA glue, diluted in a ratio of 4:1, and then left to dry.
LESSON SUMMARY A MUG OF MODELING FROM SALT DOUGH
ON THIS TOPIC:
"AUTUMN SOUVENIR"
Child Tatyana Alekseevna,
teacher of a class for children with mild mental retardation
GBS(K)OU for students, pupils with disabilities health comprehensive boarding schoolVIIIview of the village of Ilsky, Krasnodar Territory
Target: continue teaching students how to work with the test; develop manual skills, tactile sensations, visual perception; correct motor-motor memory, voluntary attention, imagination; help instill accuracy and perseverance.
Equipment:sound recording “Seasons” by P.I. Tchaikovsky, tape recorder, multimedia projector
Materials and tools:salt dough, modeling boards, stacks, rolling pins, leaf templates, plastic straws, hand wipes, water glasses, brushes, paints, glue, cards with safety rules.
PROGRESS OF THE CLASS
When guests arrive, the song “Autumn” is performed by students.
I.Organizing time.
Educator:Good afternoon, good hour!
I'm so glad to see you.
They looked at each other
And everyone sat down quietly.
II.Updating attention.
Educator:Hello, dear guys and distinguished guests!
We are very pleased to welcome you within the walls of our school. Today you are attending a salt dough modeling class, and we will be happy to show and teach you what we can do. First, let's get acquainted and introduce ourselves to each other /introduction of guests and children/
Educator:And now, I would like to ask: “Do you know what testoplasty is?”
Testoplasty is modeling from salt dough.
IN last years salt dough has become a very popular material for modeling. Although dough crafts are an ancient tradition, they also have a place in modern world, because now everything that is environmentally friendly and made with one’s own hands is especially valued.
Salt dough has ancient history. Since ancient times, people have baked not only bread from dough, but also decorative items. Initially, products made from it had a cult significance: figurines of deities, images of animals, and amulets were made from it.
The Slavs believed that animal figures made from dough would bring wealth and abundance to the house; they were sculpted in the hope of increasing the number of livestock. Dolls were made from dough for children, which also served as amulets.
In Germany and Scandinavia, it has long been customary to make Easter and Christmas souvenirs from salt dough. Various medallions, wreaths, rings and horseshoes were hung in window openings or attached to doors. It was believed that these decorations brought good luck and prosperity to the owners of the house.
Dough figures are made in Poland and the Czech Republic, Slovakia, Greece and Spain; even in distant Ecuador, craftsmen make crafts from brightly colored dough. As we can see, the geography of use of salt dough is wide and varied. Nowadays, dough crafts are purely decorative, but that doesn’t make them any less popular.
Educator:Today the guys and I will teach you how to work with salt dough and really hope that you will enjoy this lesson.
It is no coincidence that at the beginning of our meeting a wonderful song about autumn sounded. Because autumn is one of the most beautiful times of the year. Whatever shades you see in nature. Going to the forest, autumn takes on the brightest colors for its work. Birches and maples are covered with lemon yellow, aspen leaves resemble ripe apples, and mighty oaks are dressed in copper bronze.
Autumn festival in the forest,
And light and cheerful.
These are the decorations
Autumn is here.
Every leaf is golden
Little sun,
I'll put it in a basket
I'll put it on the bottom.
I take care of the leaves
Autumn continues.
I've been at home for a long time
The holiday doesn't end.
Educator:Dear guests! Today we invite you to make autumn souvenirs in order to preserve the beauty and charm of this unique time of year for as long as possible. /Product sample display/
Educator:
- What tools will we use to work with the dough? /children answer using past experience/
STACK –tool for sculpting soft materials/clay, plasticine, dough/.
ROLLING ROLL –tool for rolling out dough.
We will begin our work by making a leaf. To do this you need to use a template.
- What is a template?
Sample- This is a blank made of cardboard, of the required shape.
Who will tell us how to use the template in our work?
I suggest you choose the template that you like best, with the help of it you will give the shape to your product, /master class participants choose leaf templates as desired/
Repetition of the rules for working with the test and TB
/work with cards/
– Guys, we are learning to work in pairs, so now I will name who will work with whom.
Determination of pairs for work.
Before starting work, we must perform a hand massage.
Performing a finger massage. /Annex 1/
Now, look carefully, everyone, I will show you how to sculpt a leaf.
PRACTICAL PART
Show a presentation about the sequence of work.
Slide No. 1. Roll a piece of dough into a ball.
Slide number 2.Roll the ball into a flat cake 5 mm thick.

Slide No. 3. Place sheet-shaped templates on the rolled out dough.

Slide number 4.Trim the product along the contour of the template in a stack.

Slide number 5.Draw veins in a stack.

Slide No. 6. Place the finished product to dry.
Educator:Now you are ready to do the work yourself.
PERFORMING THE WORK OF MANUFACTURING A SHEET.
/The teacher helps MK participants in the process of making a souvenir/
Educator: Guys, let's rest a little and do some physical exercise.
FISMINUTKA /application No. 2/
Continued work.
Demonstration of the presentation “Modeling a ladybug”.
Slide No. 1. Roll a small piece of dough into a ball.

Slide number 2.Using your thumb and index finger, form the ladybug's head.

Slide number 3. Use a stack to outline the wings and head of the ladybug.

Slide No. 4. Using a juice straw, squeeze out dots on the ladybug's wings.

Slide number 5.Place the finished product to dry.
Educator:At this stage, our lesson could come to an end, since according to the rules for working with salt dough, the product must first be dried and then painted. But we could not deprive you of the opportunity to show your artistic ability and therefore prepared the dried products in advance.
Upon completion of work: cleaning the workplace.
Lesson results:
What did we do in our circle class today?
Dear guests and guys, did you like our lesson?
What did you like most?
Educator:Our meeting has come to an end, I will be very glad if working with salt dough gave you pleasure and you want to do it further. Wish you luck!
Now the moment of farewell has come,
My speech will be short.
I say to you, “Goodbye!”
Back with us, see you again!
Appendix No. 1
Hand massage.
Using circular movements with your right hand, massage the back of your left hand. Do the same on your right hand.
Using compacting movements from the base of the finger to the nail phalanx, massage each finger.
Clutching the wrist joint of the left hand, right hand rub it /2-3 twisting movements - “nettle”/.
Perform circular movements in the wrist and elbow joints of both hands.
Relax your hands with shaking movements.
Rub your palms together, let them feel the warmth of your hands.
Appendix No. 2
FISMINUTKA /relaxation for hands/
Hands need care
After all, they have a lot of work
It's hard to write all day long
And sculpt and draw.
/HAND JERKS IN FRONT OF THE CHEST/
Let's stand up right now
We will sit down eight times.
Five times slow and three
We have to sit down quickly.
/SIT-UPS, HANDS IN FRONT OF CHEST/
We reached up, then
Let's spread our arms wider
/PULLING, HANDS UP AND TO THE SIDE/
That's all. End of charging.
The boys are back at their desks.
/WALKING IN PLACE/
Nadezhda Tyrchenkova
Salt dough craft« Autumn bouquet»
1. Inspired by the works of Maamovites from salt dough, decided to do crafts myself. And since in our kindergarten "Rainbow" a competition was announced called "Paints autumn» It didn’t take long to think that this would happen.
2. For used dough: 300 g flour, 300 g salt, 0.75 cups
water, 2 tbsp. spoons of PVA glue.
3. On a plywood blank (you can use thick cardboard) put a thin layer test.

4. Using stacks of rolled out test prepared leaves different shapes. Apple and rowan berries rolled into balls test. I didn’t forget to make a hole on the apple for the twig.

5. I glued the parts with a wet brush.

6. To paint autumn were more varied added to bouquet of flowers.
7. I decided to make the frame from flagella too test.

8. The product air dried for two days. Then I started coloring. I used gouache first white, then all other colors, from yellow to brown.


9. Covered everything on top with colorless varnish.

10. The result is a picture like this.

Don't judge strictly, this is my first craft. The most important thing is that I liked working with salty test. I will definitely try to do something with the children.
Salt dough is a soft, flexible and convenient material for making crafts. Children really enjoy modeling with dough, as it is much easier to work with than plasticine. Let's look at how to prepare it and what kind of salt dough crafts you can make with your child.
Dough recipes
Making salt dough for crafts is easy. There are several recipes for preparing the mixture. Let's take a look at a few. Try each one and choose the one that is most convenient for you. You just need to keep the proportions correctly.
1. 500 g of premium flour must be mixed with 200 g of fine table salt. Then pour 200 ml of cold water into this mixture. Then you need to mix everything thoroughly. The material is ready, you can start making crafts on the theme "Autumn" from salt dough.
2. Pour a glass of fine salt into a bowl and add half a glass hot water. Having dissolved the salt in the water, gradually add a glass of flour in small portions. Mix everything thoroughly so that no lumps form. At the end, add a tablespoon of vegetable oil. When the mixture stops sticking to your hands, you need to put it in a bag and put it in a cool place for a couple of hours.
3. Add 500 g of flour to 200 ml of water and mix thoroughly. Then pour in 2 cups of PVA glue. After kneading, you will get a stable mass, from which crafts on the theme “Autumn” made from salt dough will be stored for a long time, they can be tinted and painted.
How to dry crafts?
After the craft is made, it needs to be dried. If you just leave it there room temperature, then it will not harden completely. There will be wet dough inside; over time, the product will become deformed and “float.” Yes, and you can’t paint such a craft.
In order for the product to become durable, it needs to be thoroughly dried throughout its entire thickness. To do this, you can use the oven. Drying time depends on the size of the “Autumn”-themed salt dough craft. If the dough is thin, then half an hour will be enough at a temperature of 100 degrees. If the product is thick and large, then you need to increase the time to an hour.
Salt dough hedgehog
To make such a hedgehog you will also need Pine cone, which will act as thorns. First, as in working with plasticine, you need to roll a round ball, from which the animal’s face is made by stretching. Roll a small piece into a ball and glue it to the place of the nose. The eyes are made by piercing holes with a sharp object. You can use a plasticine stack or just a pencil.
Then you need to roll out paws from four identical pieces. Assembling the hedgehog begins. The head clings to the bump from the front by pressing, and 4 paws from below. You can attach separately molded leaves or an apple to the hedgehog’s “thorns.”
Another hedgehog
This salt dough version of the hedgehog is the easiest. It can be done with three-year-old children. The animal's muzzle is pulled out from the rolled ball. The eyes and nose can be molded separately, or painted with black paint.

Hedgehog needles are made from small noodles, which are simply stuck into the upper part of the body. That's it, the hedgehog is ready!
Autumn vegetables
It is very easy to sculpt vegetables from salt dough. Before sculpting, you definitely need to have a conversation with your child, remember what vegetables he knows, where they grow, what color. Consider either the vegetables themselves or their image in the pictures.
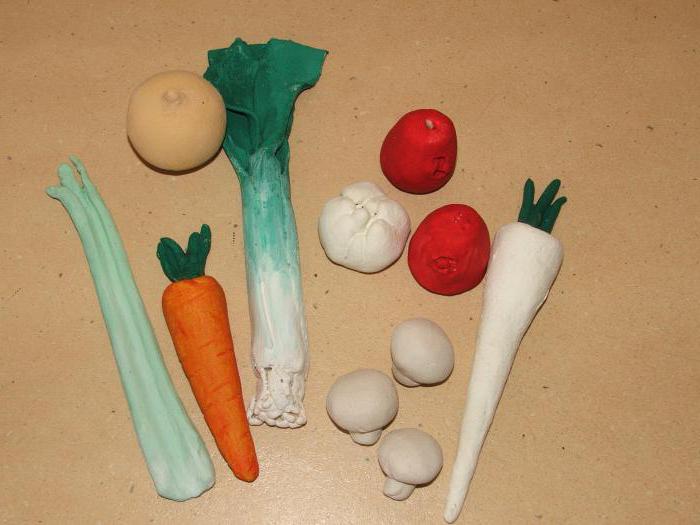
It is also advisable to repeat what shape these vegetables are and how best to sculpt them. Then the sculpting process itself begins. Turnips and beets are molded from a large ball by pulling the tail-spine down the center. If you wish, you can mold the tops separately and attach them together in a bunch on the flat side.
Parsley root and carrots are sculpted using the “sausage” method, then one side of the product is made thinner. Several branches are inserted into the middle from above.
The tomato is also made from a round piece. You need to attach a tail in the center at the top. The cucumber is rolled out into a “sausage”, rounding the ends.
After drying, the vegetables are painted.
Mushrooms
You can make mushrooms from salt dough as an autumn craft. First, you need to consider with your child what shape they come in. There are regular ones with a round and even cap. These are boletus, boletus, honey mushrooms, and boletus. For older children, you can suggest trying to make chanterelles or a colorful fly agaric.

After the mushrooms are ready and thoroughly dried, they need to be painted. To make the mushrooms bright and shiny, the finished product is coated with acrylic varnish.
Painting of products
There are two ways to color salt dough. After sculpting and drying, the finished product is simply painted acrylic paints or simple gouache. With kids preschool age this method is the best.
If you want to do interesting crafts to decorate the premises, you can buy food coloring and add it at the stage of kneading the dough. Then the color of the dough will be uniform, and the decor item will be bright.
It is easy to work with salt dough, since its structure is plastic and soft. Imagine and create for your own pleasure with the kids!