How to paint on nails step by step instructions. How to learn to paint on nails with gel polish, acrylic paints, a needle, design thin lines, patterns, curls
Painting on nails is extremely exciting process. However, to achieve high level mastery, a girl should prepare for the fact that she will have to constantly experiment, mastering new drawing techniques and materials that can be used to create them. And over time, each of you will be able to become a real master who, in creating a design, will focus exclusively on your own creativity and imagination. And our nail designs for beginners will help you achieve those same results. For greater convenience, we will also provide you with step by step diagrams their implementation.
Schemes of drawings with a needle
Beginners can draw on the nail using such improvised means as a needle, nail polish brush, tape or toothpick. You can also conduct experiments acrylic paints with a brush. Let's start with the first option - easy drawings with a needle.
To do this manicure you will need several varnishes of different shades and a regular needle. Please note that when choosing a color you should choose, if not contrasting, then as different shades as possible. Otherwise, the patterns on the nails will merge.
- Cover your nails with a clear polish to protect them from possible damage from needle handling.
- After it has completely dried, apply a varnish of the selected shade, which will serve as the base and set the overall tone of the manicure.
- Depending on which image you have chosen, place several dots or draw lines on the still wet varnish.
- Using a needle, make a pattern, carefully mixing the varnishes together or, conversely, drawing clear lines.
- After complete drying, cover the finished manicure with a base.


Using varnishes
Simple designs on nails for beginners can also be done with varnish, choosing, in addition to the base, a special product with a thin brush. True, this option has a significant drawback - a beginner may encounter some problems directly in the process of painting on nails.


After all, most products have a fairly long brush, which is not very convenient to work with without at least some skills. And in order not to constantly harm your nails with acetone, repeatedly washing off the designs and applying them again, it is better to practice on an artificial nail or even a piece of paper.
The step-by-step instructions for painting nails with this polish are extremely simple and unpretentious. You will simply need to dip the brush into a bottle of nail polish of the chosen color and apply the desired pattern. Don't forget to apply a base coat in a contrasting shade first.
The easiest way to use this method is to make drawings in the form of flowers, hearts or lines.


Tape drawings
Scotch tape is another universal tool that we use everywhere in the household. So it is not surprising that over time our women have found use for it in creating designs.
When starting to do a manicure using tape, prepare polishes of two different shades and a clear coat. Nail designs for beginners are performed step by step using the following technology:
- The first step is to apply the base coat.
- After it has completely dried, a stencil of the desired shape, cut from tape, is glued.
- Next, apply a varnish of a different shade and wait for it to dry completely.
- Finally, apply a transparent base.
What’s interesting is that girls prefer to do manicures in the “geometry” style this way. But for French in all its interpretations, this method may well be useful.


Painting with acrylic paints
Another popular method used to create simple but extremely beautiful patterns– painting with acrylic paints. This method of creating nail designs for beginners is no more difficult than painting with varnish. And for some it’s even easier and more convenient. And to make sure of this, we offer you schemes for creating a pattern with acrylic.
Manicure “Twigs”. Can be done with both yellow and green paints. Do it step by step in the following order:
- Apply any varnish, the desired “delicate” color.
- From the bottom to the top corner, paint two curved stripes (branches) with rich yellow acrylic paint.
- Use the same color to paint small leaves on each branch.
- Paint the middle of each leaf with a lighter shade of paint.
- Apply clear polish to seal the design on your nails.

"Floral" manicure:
- Cover the nail with a base shade (pearl color will be very useful).
- Using pink acrylic paint, paint the petals using the dot method, as shown in the figure.
- Using green paint you need to make leaves and small branches.
- Add a little white to the pink petals to add dimension to the design.
- Apply clear coat.


When creating drawings with acrylic paints, it is very important to use a transparent coating, which will not only level the surface, but also consolidate the result. Painting without a fixative will be very short-lived, since acrylic paints tend to be washed off with warm water.
Nail masterpieces of 2014
When creating nail designs for beginners, it is important to be guided not only by your preferences, but also by the advice of stylists. After all, your title as a beginner does not mean that your manicure should not match fashion trends in nail design in 2014. Moreover, new trends are very easy to implement.
So, a fashionable and simple design for 2014:
- Abstraction and geometry. Drawings can be made using tape, varnish and paints. Special attention It is worth paying attention to dots and drops located in any order.
- Romantic mood. If we talk about simple patterns, then in this case we can talk about hearts of all colors and sizes.
- Marble nail art 2014. This simple design is made by mixing two shades of polish directly on the nail using a toothpick.
To top it off, I would like to say about another fashionable trend in fashionable nail art - making drawings on one nail, for example, on ring finger. This trendy solution for 2014 will appeal to beginners, as they will not have to bother themselves with drawing the planned patterns ten times.


When a regular manicure gets boring and you want some variety on your nails, almost every girl runs to a manicure salon. A professional master will easily create any fantasy design on the nail plates, not forgetting to take a fairly large amount when calculating. How to make your wishes come true without cost? We'll talk about this in the article: we'll tell you how easy it is to make a design on your nails at home. For beginners, the photos will explain step by step the principle of drawing in manicure.
Drawings with a needle

Every girl can create the simplest images on her nails: for this you need to acquire with a thin needle or a toothpick. Basically, you can draw floral compositions with a needle, however, if you approach the manicure design thoroughly, can be picked up many beautiful images.
The general nuances of the needle pattern technique are described below:
- Apply main decorative coating, wait until dry.
- Cover the nail plates with colorless varnish so that the base for working with the needle is thick: this will prevent injury to the nails from the sharp tip of the tool.
- Select contrasting varnish and apply drops to the intended places on the nail plates.
- Let the varnish dry for a few seconds, then begin to carefully trace the design.
- Wait complete hardening composition, then cover the nails with a colorless finishing coat.
We will look at ideas for nail designs created by girls at home. We hope the photos will inspire you for creativity when creating your own manicure fantasy.

A wonderful summer manicure with watermelons is suitable for vacation or walking. Follow the instructions to complete the drawing correctly:
- Apply coating to your nail pink or red. This will be the pulp of a sweet berry. The subsequent appearance manicure: for this design, a matte finish would be ideal.
- Apply to the free edge of the nail light green varnish. It is not necessary to use stripes for French classic manicure– the watermelon rind can be drawn by hand.
- Wait until the layers completely dry, then separate them with white varnish: use a bottle with a special thin paint brush.
- Start striping the watermelon rind by applying longitudinal lines of dark green color. Give it a few seconds to dry, then carefully use a needle to make small zigzags along the edges of the stripes.
- Drop black varnish onto a sheet of paper: dip the tip of the needle into black varnish and apply seed dots in different places nail plate.
- After the watermelons have dried on the nails, cover the composition colorless varnish.
Black and white drawing

Another simple manicure, suitable for evening walks or a holiday. Executed neatly, black and white manicure looks feminine and elegant.
- Apply first white, then black coating to the nail plates. Try to get longitudinal stripes as smooth as possible.
- Place a drop of black polish on a piece of paper: dip the tip of the needle into the coloring compound and place dots on the white side of the nail in the intended order.
- Place a white drop of polish on a piece of paper and dipping tool there, draw branches on the black side.
- Apply colorless varnish for coating.
Red and white manicure

This manicure is a little more difficult to do: the perfect look is ensured by smooth and neat drawing with a needle.
- Paint your nails with a bright red color.
- Secure the cover transparent layer to prevent nail injury from the needle.
- Decorate your chosen nails with beautiful white shapes. To do this, make 3-5 small drops white at the top or bottom of the nail plate.
- Start drawing lines with a needle. Their thickness and bend depend only on your imagination.
Manicure can be done in any color scheme. You will find more ideas on red and white combination

A chic manicure is created by mixing sea colors: white, blue, light blue. This composition will give your hands fresh look and visually rejuvenate them. Make a drawing following the recommendations:
- Apply as the main background bright blue coating. Wait until completely dry.
- Place a few large and small drops of dark blue polish on the side of your nail plate. Wait a couple of seconds, then in the center of each drop add white color.
- After a second, start moving the needle along the white and blue drops, mixing them together and creating a bizarre wave-like pattern.
- Cover the finished composition colorless varnish.
Drawings using painting varnish

To help home craftsmen, household varnishes have long been invented for creating simple designs on nails. From regular varnishes drawings are distinguished by a wide palette of colors and thin brush, allowing you to display the most unimaginable curls. Technology drawing is simple:
- Apply contrasting color base
- Dip the brush into paint varnish of any color and display drawings.

The simplest design option that can easily diversify a boring manicure. Arrange points in any order, mix colors: after finishing creative play with nails, fix the result with clear varnish.

If you know how to draw, then there is nothing easier than creating on your nails mini scene from your favorite cartoon or draw individual characters. In the photo, all the drawings are made using painting varnish. Consider what to create neat manicure this varnish will not work the first time: apply several training on a piece of paper to test your capabilities.
Drawings on nails using tape

Truly great and powerful material. With its help, chic geometric designs on nails are created that cannot be distinguished from professional ones.
To get a quality manicure, read the technique before you start applying interesting shapes to the nail plates:
- Cover nails with base polish. Wait for it to dry completely. It is better if you return to manicure a couple of hours after applying the base.
- Prepare the necessary stencils from strips of adhesive tape in advance: you don’t have anything to do with creating the design shouldn't distract from the process.
- Paste the stencils in the places where the pattern is intended to be located.
- Paint areas free of adhesive tape. Remove the stencil after the varnish has completely dried, so as not to smudge the drawing.
- Cover your nails with a topcoat.

The manicure shown in the photo is one of the easiest options execution of a drawing with tape. Stock up on white, black and clear varnish for precise geometric designs:
- Cover your nails colorless varnish. Wait until the coating has completely hardened.
- Apply tape crosswise near the base. Apply white polish halfway up the nail. Wait for it to dry and remove the stencil.
- Apply a little tape like this below the first line. Livestock should not leave areas unpainted with white. Apply black polish.
- Cover the composition with clear varnish to remove blemishes and fixing the drawing.

A simple manicure that will take little time to complete. Cover your nail beds base color: After drying, use tape to create a triangle on the nail hole. Paint the stencil with a contrasting varnish and secure the composition.
Mother of pearl with purple triangles

A great everyday manicure can be created using as an example photo above. The combination of mother-of-pearl varnish with glossy purple triangles will emphasize the excellent taste of the wearer of the manicure and indicate the romance of nature. This kind of manicure recommended for everyday office work and evening walks.

Another manicure created using tape. Buy glitter polish to decorate the triangles.
Don't forget - any manicure with a pattern requires a final coat of colorless varnish.
Drawings with acrylic paints

Acrylic paints – universal remedy for painting on nails. It is used both in beauty salons by professional manicurists and by ordinary girls at home. Acrylic fits more comfortably on the nail plates, due to this performing compositions This composition is easier than painting varnish. Let's look at some great design ideas created by home craftswomen (more ideas on).
Gentle French

Easily and simply diversify the classic French manicure, if you have a palette of acrylic paints in your cosmetic bag. Follow simple instructions to create the most delicate design with lace nails:
- Execute classic french manicure on six fingers, leaving two fingers on each hand for drawing the lace. In our case, these are the middle and index fingers of both hands.
- Cover loose nails base varnish. It's better if it's transparent.
- Paint on your nails curls tying them with delicate lace. Acrylic paint should be snow-white.
- Cover your nails with clear polish.
This manicure is perfect for a wedding celebration and, at the same time, looks great in everyday wear.
By the way, a magnificent selection of monograms, as well as templates for drawing, are waiting for you on this

Oriental motifs never will not go out of fashion. Drawing smooth, beautiful lines and curls using a thin brush with acrylic paint will not be difficult, even if you have no drawing skills at all. Repeat the composition in the photo if you are going on vacation to exotic countries, or if you love bright and beautiful daily manicure.

Beautiful manicure with highlighted fingers, will make you turn around. The pleasant, non-intrusive color will become your favorite for a long time. Follow the instructions to create the same or similar design on your nail plates.
- Paint your nails turquoise color. Cover the highlighted nail plates with a white base.
- With light sweeping movements to the side, create diamonds of yellow and orange colors on a white base.
- Frame them in a turquoise frame using the same technique as for drawing the shapes.
- Cover with colorless finishing coat.

You can create a creative version with funny skulls with minimal drawing skills. Practice on paper before applying acrylic images to your nails.

Another holiday option worth trying for lovers nautical theme. Draw anchors, ship ropes and other attributes of sea life, while not forgetting to design everything in cheerful blue and white colors.

To draw beautiful compositions, buy tools that will help make your manicure more beautiful. Of course, you can do without them, using only a needle and tape, but what about development of creativity Can we talk about it if you don’t have a basic brush?
Read the information about what products you need to use to create small masterpieces on your nails:
- Sponges
Cosmetic sponges are useful for gradient manicure: they can be made in the form of thin brushes, or they can be regular, large, voluminous sponges. - Brushes
At your discretion, you can purchase brushes for nail art, which are presented in specialized stores in a large assortment. If you think the purchase is irrelevant, use old makeup brushes. Important condition– the bristles of brushes should be made of natural fiber. - Wooden stick
Such a tool must have a beveled edge. It is suitable for gluing rhinestones and adjusting sparkles. - Dots
Dots is a dotting brush that allows you to adjust the amount of paint applied to the nail plate. Using the tool, it is easy to mix different colors and apply dots that are an integral part of many designs. - Brush for drawing out small details.
An excellent tool with a tapering tip and natural bristles. With this brush you can draw small details in drawings, write words and even make shadow transitions. - Tint brush
A good tool with even bristles, allowing you to create high-quality transitions and halftones. - Strip brush
The range of brushes includes tools of various sizes and bristle lengths. Its use is due to the need to create thin stripes in the design.
Materials

A short excursion into the world of painting materials will leave you no choice - we have no doubt that you will be eager to create wonderful fantasy designs on your nails. To create use:
- Acrylic paints
- Foil
- Specialized kits for nail art
- Gouache
- Gel pens
Video material about the most the best materials for drawing will not leave you indifferent.
Of course, you can go to a salon and come out with an absolutely stunning design. However, what could be better than showing off to your friends your own manicure with a neat pattern on your nails? This is why we showed how to make nail art at home for beginners. The photo and step-by-step instructions should convince you to try your hand at developing your nail painting skills.
Nail design, especially if it is created with your own hands, is a great idea in terms of self-expression and creating an image. The simplest decoration method is simple nail designs. Making them is not at all difficult; there are many ideas that have already been invented before. But there will be even more of them if you use your own imagination. You should start from the very simple techniques, gradually improve your talent and capabilities.
Simple drawings for new masters
At first, not everything will be as smooth as we would like. It's because:
- Firstly– you are worried, afraid that you won’t succeed;
- Secondly– you haven’t gained experience and dexterity yet – it’s a matter of time and diligence;
- Thirdly– you probably don’t quite understand what you can use to draw with and how exactly it’s done.

If you follow the main rules, the self-learning process will be more effective:
- Before work, you need to remove the cuticle from the nail plate. A simple warm bath in which your hand is placed for 10 minutes will help with this. This way it will be easier to lag behind the nail.
- Using a wooden stick (or a toothpick) and nail clippers, cut off the rough dermis (skin) around the nail plate.
- Next you need to polish the nail plate. By the way, this should be done not only before applying a manicure, but also for prevention, at least once a month. Instead of polishing, if you don’t have a special nail file at hand, simply degreasing with nail polish remover will be sufficient.
- In principle, the marigolds are ready to be painted. But there is one caveat. Before painting, you should apply a base. The drawing fits more neatly on it, and the drawing process becomes easier. The manicure as a whole will look neater.
- After applying the base, wait approximately 20 minutes.
Now that’s all for sure, you can safely start drawing.

What tools and materials should be on hand
Before the drawing procedure, prepare materials and tools for work; their list and varieties will depend on what you plan to work with, what material you know how to use best, decide on the theme and color parameters.
Nail polishes
You will need the following in your work:
- clear nail polish;
- fortified;
- medicinal;
- varnish fixative;
- glitter;
- glitters;
- decorative powder;
- several different shades of varnish.

Tools
It is impossible to imagine drawing without tools, so everything will be listed below that may be useful in one case or another:
- stickers;
- ready-made stickers;
- template plates;
- brushes;
- needles;
- toothpicks;
- ordinary or decorative tape;
- foil;
- dots;
- acrylic paints.
The simplest drawing ideas for beginners
Having prepared your nails for work, you can apply a design on them using any tools, even handy ones - those that every girl absolutely has at home.
Working with a needle
Original and even simple drawings here and there can be created using a needle. How to use it:
- You don’t need to draw on your nail right away, try doing it on paper. Firstly, you will understand how it works, and secondly, this way you can choose the proportions as close as possible to your nail.
- Apply the base (transparent base) to the nail plate, wait until it dries completely. The base is always applied in 1 layer.
- After the first base layer has dried, you will need to apply another layer - the background layer. Choose the color of polish that will accent the nail, for example, white.
- There is no need to wait until the second layer dries. You can continue working right away.
- Somewhere in the middle of the plate, drop three small dots of, say, red varnish onto a white background, forming a triangle or alternately one after another along the nail.
- You can draw with a needle by immediately poking it into the middle of the highest point, stretching it to the bottom, and so on to all of them, one by one. The result will be an ornament like the one in the photo.
- You can drop, for example, the same white varnish into the center of a red drop, then when stretched, a white stripe on a red background will follow the needle.
- You can stretch the varnish from side to side, and then you get an unusual pattern.

The color palette in such simple drawings has no specific boundaries. The author himself decides what to combine with what.
You don't need to work on all your nails at once. Draw them in order from the very beginning to the victorious finish. Otherwise, you definitely won't succeed.
Painting with a brush
This drawing technology is a little more complicated, but with a great desire, any novice master will cope with this task.
Practice, for starters, using artificial nail plates - this will be a very good workout. If you don’t have them at hand, draw a nail on paper that is approximately the same size and shape as yours.
Drawing technology:
- First, as always, a base coat of clear or medicated varnish is applied to prepared nails.
- Leaves the nail to dry. In this technology, all layers must dry completely as they are applied.
- After the base has completely dried, apply the background layer. The color in this technique should be chosen so that it contrasts with the future painting. First, in one step, the brush is moved from the center towards the cuticle, then the left side of the plate is painted, then the right. If you notice, you should only get 3 strokes of the brush.
- Further work will require a very thin brush. Dab it into the varnish, be sure to remove the excess. And, as they used to do at school, start drawing an element of the pattern or the drawing itself.
- The final step should be the fastening procedure. That is, the nail is completely covered with colorless varnish, along with the design.
For clarity, here are photos of simple drawing ideas.

This technology uses a different number of colors. First, try drawing hearts, simple flowers, lines and other geometry. If you feel the strength to draw a more complex pattern, feel free to get down to business.
Simple painting on nails with acrylic paints
These paints are respected by professionals and those who know how to paint with them. Their peculiarity is that they do not spread during operation, are easy to apply, dry fairly quickly, and last a long time. In addition, they are not dangerous to human health. On sale:
- colorless;
- translucent;
- opaque (overlapping the previous layer);
- pasty.
Can be diluted with water without any problems. They mix easily with each other. After drying, you can safely apply another design on top of them without fear of damaging the original layer. The coating is breathable and looks very attractive and bright.

According to the drawing technique there are:
- Oily. It is used in paste and undiluted form. They are called that because they resemble paintings done with oil paints.
- Pasty. The consistency is similar to liquid dough. The composition is not diluted and is used in the form in which it was purchased. You can only add pigments to it if the idea of the drawing requires it. Paint in the form of thick strokes. When the paint dries, it looks similar to gouache painting.
- Watercolor. Water must first be mixed with the binder, only then watercolor is added. The drawing in its pure form is similar to a watercolor pattern. Characterized by high quality.
- Sliding. You can mix this composition with structural nail gel. The difficulty here is that it will be quite difficult for a novice master to predict the end result. But after a few trainings you can learn this too.
- Glazing. You need to work with this material carefully. All layers that will be applied must be very thin, almost invisible.

You can paint with any type of brush that you know how to work with. For training, it is enough to purchase 6 basic shades and white in order to correct any mistakes in time. To understand them in action, you must first draw a checkerboard-shaped field on paper.
For 6 colors you will need 6 squares of approximately 2x2 cm. Apply the purchased paints to this field one after another (alternately) - paint the entire square with one pigment, then draw them with horizontal lines of a different shade, and finally with vertical lines of a different color. You should end up with 36 colors.
Painting with a brush using acrylic paints
Paint a twig with acrylic paint:
- Choose a very light color for the background (then choose a dark color for the drawing) or vice versa. In our example, it is lilac.
- Draw curved lines yellow. Choose the location at your discretion, not necessarily exactly as shown in the photo.
- On this arc, draw leaf-shaped figures of the same tone using curved lines.
- Make the veins inside the leaves lighter.
- Secure the result with a transparent fixing layer.

If this drawing seems too easy for you, try recreating these simple ideas. In the first photo the drawing technique is depicted in pictures.

Learn to draw with dots
From the simplest drawings to very complex ornaments professionals draw with dots. The simplest techniques are a combination of dots, commas, rulers, and so on of different sizes. The tool needs to be soaked in paint or varnish and begin to paint with it as with a regular brush. During operation the quantity coloring agent decreases, this can be seen from the ingredients on the nail ornament, which makes the design more natural and realistic.

You can draw your nails with dots however you like. With it you can draw:
- flowers or animals;
- modify the traditional version of French manicure;
- It’s easy for them to create New Year’s motifs;
- personify the seasons on your nails;
- You can draw very stylish abstractions using dots.
Drawings using regular tape
Regular household tape can greatly help in creating nail designs. With its help you can do a lot different figures, drawings and even compositions. Geometry is the easiest to do - it is based on lines, and cutting them out with tape is very easy. The cut strips can be applied to the nail plate in any order or sequentially if you want to create a specific shape.
Techniques for working with tape:
- As in all previous cases, the nail is first prepared.
- The first layer is the base layer.
- After drying, apply the background - at your discretion.
- While the varnish is drying, cut a little thin stripes from tape (about 1 mm wide, thicker if you want it), the length should be greater than the size of the nail, so that later there will be no difficulties in removing the strips.
- If the background layer is dry, apply the tape sheets to the nail the way you want it.
It is very important that it is thoroughly high. Otherwise, when removing the strips, you may damage the background layer if it has not dried well.
- On top, cover the entire surface of the nail with varnish of a different shade or several - this is also your prerogative in choosing.
- Allow a few seconds for the polish to begin to dry, but not completely dry.
- Peel off the pasted strips and see what you got.
You can leave everything as it is, or you can further refine the drawing with a thin brush or dots. Adding sparkles, circles and other elements with a different color of varnish.

Today there are many types of decorative tape on sale; it can also be used to create drawings. Here there is no need to cut the strips yourself. It can also be used in terms of decoration. Glitter on nails always looks beautiful, and with decorative tape it looks excellent and unique.
Toothpick drawings
Simple but unique patterns on your nails can be made with a regular toothpick. It is an indispensable attribute of every home, always at hand, and can always help in creating a complete image. If you have already learned how to work with a needle, then there will be no problems with applying designs with a toothpick. The drawing technique and sequence are similar here, only the drawings are slightly different.

Other methods for creating simple nail designs
In addition to drawing with your own hands, you can use ready-made drawings - stickers, stencils, stockers, template plates.
Stickers
Choose a specific color for the base. Paint your nail plates with it.
Once completely dry, stick your chosen sticker on top. They come with an adhesive base.


There are also those that need to be placed in warm water before gluing. After 10 seconds, it is taken out, the figure is carefully grabbed with tweezers and transferred to the nail.

Another type of stickers
Today, women often make their own designs on their nails with a needle. This simple technique, which can be easily mastered in a short time. The most important thing is to put in the effort and practice drawing with a needle. Then you can get a beautiful manicure.
Nail art with a needle is an easy way to make your nails a real work of art. The technique is not at all complicated, but with its help you can paint real masterpieces on your nails. To do this you need to put in a little effort and be patient. With experience, drawing with a needle will turn out better and faster. A woman who has mastered this technique will always have a unique, exclusive and bright manicure.
Sometimes women replace the needle with a regular hairpin, or use an orange stick, or even a toothpick.
Drawings with a needle belong to the trend of nail art that is popular today. The science of decorating and decorating nails is very ancient. It was well known to the ancient Egyptians; for example, the legendary Queen Cleopatra used henna for this.
What is the technique of drawing pictures with a needle, its advantages and disadvantages
The design made with a needle on the nails is similar in technology to the marble and water methods, but working with a needle is easier and faster. The easiest, affordable option manicure is precisely needle-shaped.

After a woman has learned the simple and basic patterns of drawings on nails with a needle, she can begin to create her own designs and try to create her own patterns. She will already know the basic rules and be guided by the basic principles, therefore, it will not be any problem for her, turning on her fantasy and imagination, to make a fashionable and stylish needle manicure.
The main disadvantages of this needle method
In order for a drawing with a needle to turn out really beautiful, there must be a thick layer of varnish. The thicker the layer, the longer it takes for the varnish to dry, therefore, experts recommend immediately making a high-quality surface (base layer) so that drying proceeds faster.
- To resolve the issue for yourself beautiful manicure and don’t constantly go to the beauty salon, you can learn on your own
- Gel nail extensions at home will help you solve the problem of a beautiful manicure and not use the services of a salon, taken from.
Manicure options created with a needle
Needle drawings on short nails
Since the nails are short, a minimum of patterns will look good on them. Large and even 3D pictures and shapes on them are unacceptable, since they will spoil the entire image and appearance of a woman and look like “bad taste.”

It is very good to use thin needles when decorating short-cut nails - this way you can work as comfortably as possible.
Easy drawings: drawing techniques
The simplest pattern that can be depicted on nails is “polka dots”. This manicure is ideal for clothes designed in a retro style. You need to make a series of droplets using a needle, a pin (it has neatly rounded heads), or a dotter. A solid color is suitable for the base layer. You can use combinations of different shades to create a French manicure effect.
You can also depict stars, butterflies, leaves, twigs and flowers. It is enough to add a couple of drops of a different color to the base and very quickly, before the varnish has dried, add droplets necessary forms and combinations.

Often women then decorate the finished manicure with rhinestones, shiny stones, or fix the pictures with glitter polishes.
"Wet" technique
The essence of the “wet” technique is to mix the varnish from the base layer with the next layer of varnish, while the base layer must remain wet.
"Dry" technique
Unlike the “wet” version, with the “dry” technique you need to apply a varnish of a different color to the dried base layer. These can be either drops or other forms. The new varnish needs to be diluted, stretched over the entire nail plate, making a drawing and drawing a pattern.
Necessary equipment for applying designs on nails
What do you need to apply a design on your nails with a needle? Necessary equipment
To create simple designs on nails with a needle, a woman will need:
- several bottles of multi-colored fresh, liquid varnishes (you can take contrasting colors, for example, red and black, white and black) - they should not be thickened, it is advisable that they have the same manufacturer (then they will react well with each other when mixed, creating soft and smooth lines, intricate patterns);
- a sewing needle, or a special needle with a handle for manicure, or a wooden pencil along with a needle (you can even use a regular pin - it all depends on what tool the woman will be comfortable doing this with) to make the pattern more beautiful and thinner, you need to use the thinnest igloo – number ninety;
- corrector;
- a scrap or napkin for cleaning the needle from varnish after work;
- nail polish remover or acetone;
- top coating;
- base coat.
Step-by-step instructions for drawing on nails with a needle
A simple needle method of drawing a pattern
To begin with, a woman covers all her nails with a base coat; when it dries, you can apply the base layer - you need to drop another varnish several times onto its wet base. The droplets should be carefully stretched with a needle in one direction, drawing patterns in parallel (for example, circles and figure eights).

Can we do it differently?. Apply a base coat first, wait for the polish to dry, and apply one small drop of another polish onto it. This method is very similar to the previous one, but with the only difference - in the second case, the lines do not mix with the background varnish. Using this option, you can create a modest but elegant manicure. It won't be as bright as the first one, but it will still look stylish and original.
At the end of the work, the nails need to be covered with a fixing layer to fix the resulting pattern. As an option, use glitter varnish to create an interesting “shiny” effect.
- will strengthen your hair and make it healthy and beautiful!
- There are a number of skin problems that occur in girls of any age, one of them is spots on the face. Find out how to get rid of blackheads on your face once and for all, from.
Basic rules for applying designs on nails using needles: what you need to know and what it is advisable to remember
Before you start drawing a pattern on the nail plate, it must first be coated with a special product to protect against yellowing; in addition, this is a good preventive way to strengthen nails.
While working, a woman should hold the needle in her hand at a right angle (ninety degrees) - this way all the lines will automatically be smoother, even, soft, clear and accurate.
When working on a pattern, you need to remember that you cannot press too hard on your nails with a needle, as this can scratch and injure them. You need to be careful.

Another tip from the professionals is that all movements should be rounded and smooth. They should seem to describe a circle. If you make straight and sharp strokes, the image will be distorted - the picture will turn out sloppy, blurry.
When finishing drawing the next element in the work, a woman should clean the needle by removing the remaining accumulated varnish from its tip using a piece of cloth or a napkin. Cotton pad, it is not advisable to use a piece of cotton wool, because after them there will be fibers on the needle tip that will disturb the picture, creating unnecessary “micro-lines”.
Tips and tricks from experts on creating a beautiful and creative needle manicure
How to make a picture on a nail plate truly beautiful and magical? To do this, a woman must draw very quickly. The picture is made only on wet, not dried varnish. Once the polish starts to dry, the colors won't blend nicely.

Experts also advise using wide needles for large drops, and thin needles for small drops - with the help of them you can draw a thin and smooth line.
You should do nail art only in a well-lit place; it’s great if a table lamp is on while you work.
Be sure to have neat and well-groomed hands To create intricate patterns on your nails, your nails must be neatly trimmed and clean – this is a must. All hangnails and cuticles must first be removed and the shape of the nail adjusted.
If a right-handed woman does a manicure for herself, she needs to start working with her left hand (for a left-hander, on the contrary, with her right).
Any woman can learn to create original designs on her nails with a needle. This technique is so simple that with a little practice, a woman will soon create luxurious works of art on her nails, competing with professionals from beauty salons.
How to make designs on nails with a needle: video
There are many options for making designs on your nails with a needle, but usually you need to choose the one that suits your nail type. The videos will help you solve this problem.
If you want to create your own nail design, the easiest way is to use simple designs on your nails with a needle.
This technology is the simplest in the field of nail art, but at the same time it allows you to create a miniature masterpiece on your nails.
What does it take to be creative?
- Fresh liquid varnishes, preferably from the same manufacturer for ease of mixing. You can play with contrast and combine red or white colors, for example, with black. It is important that the varnish is not thick.
- A needle intended for manicure. However, you can get by with an ordinary sewing needle or pin; this should not cause any difficulties.
- corrector;
- cloth or napkin to remove remaining varnish from the needle;
- acetone;
- top coating;
- base coat.
"Wet" technique
To make a design using this technology, you need to apply a base layer of varnish and, making sure that it remains wet, paint the nail with the next color.
"Dry" technique
For novice craftsmen starting out for the first time, it would be better to try their hand at this needle technique. The difference is that you need to wait for the bottom layer to dry before applying the second one. The top (top) varnish is stretched with a needle over the entire surface of the nail, creating patterns.
Simple designs on nails with a needle, paired with your imagination, will help you create a unique nail design - a source of your pride and a magnet for admiring glances.
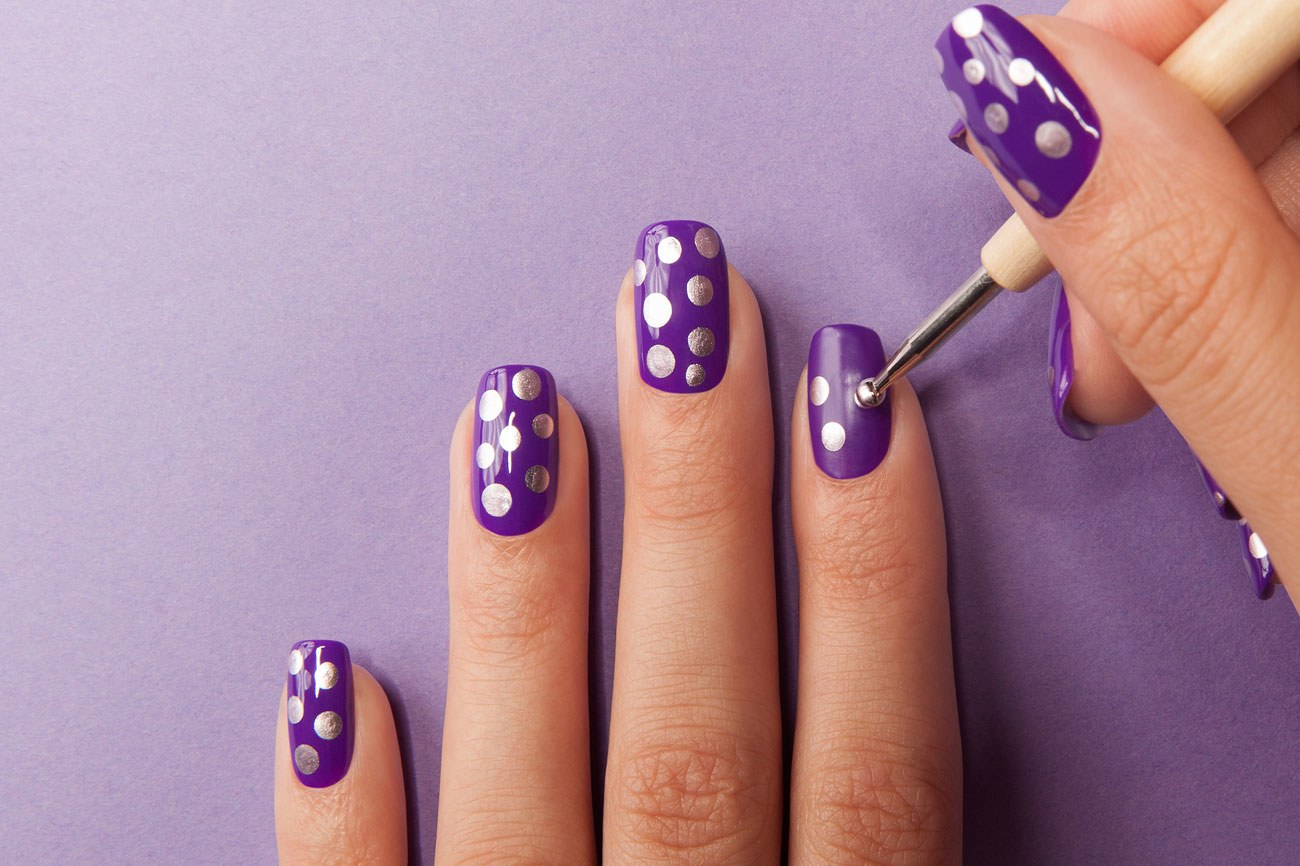
Video on how to make drawings with a needle
First of all, you need to apply a base coat to the nail plate. For the latter, you can use bright, matte or transparent nail polish. It is best to apply the varnish in two layers. The base varnish is chosen based on the intended design. Before you get started, you need to carefully consider the options and choose the most suitable one, which you will not find too complicated.


Drawings with a needle on nails (photo)
A very important note for those who are trying to paint on their nails with a needle for the first time: the design should be applied over wet varnish, while the base coat has not yet completely dried. To do this, use a needle to apply droplets of varnish that differs in color from the main one to the surface of the nail. The needle should lie comfortably between your fingers; its length does not matter. The thickness of the needle is selected based on the features of the intended design.


Designers have developed numerous simple designs on nails with a needle, but the technology for their implementation remains unchanged. Drops of varnish are applied to the undried base in the order necessary to create a specific pattern. Droplets can be placed around the perimeter, diagonally, in the middle or on the sides. After this, using a needle, we connect the drops together in the required order. Pressing the needle should be minimal.
Using a needle, they create various not very complex flowers, petals and twigs. In order for the design to be original and bright, it is necessary to use more varnishes of different colors in one design, preferably at least three. To make the drawings more expressive, their outline can be outlined with gel pens.


Manicure - drawings on nails with a needle

Drawings on short nails with a needle

Nails with gold or silver microglitters look quite interesting and festive. These nails will shine in daylight or lamp lighting. To do this, just apply a small amount of microglitter along the contour of the design and secure the masterpiece with transparent varnish. A final coating, the so-called top coating with a protective varnish, is desirable. This layer will preserve your creativity for a long time.


Schemes and sequence of execution of drawings with a needle
There are the most common designs for nail designs using a needle. To create a pattern based on one of them, you need to prepare varnishes of five different colors. The nail plate must be covered with a base and, without waiting for it to dry, apply many small multi-colored droplets in a chaotic manner.
After this, using a needle, you need to connect all the droplets together in any order. You can connect them in circles, diagonally or vertically. A similar pattern must be done on each nail. This way you will get a unique, creative nail design. After the polish has completely dried, you need to apply a transparent top sealer on top, which will keep the design on your nails for a week.

In fact, the simplest designs on nails with a needle can prompt you to create your own nail design. Don't be afraid to bring your wildest and wildest fantasies to life. You may not be able to create a masterpiece the first time, but don’t despair. The more practice you have, the more interesting and perfect the designs on your nails will become.


You can train not only on yourself, but also on your friends. The main thing is to try different designs and patterns and then you will be able to improve your skills in the field of manicure art.


How many women would like to boast of a neat and unusual manicure, catching admiring glances? And how many owners of graceful fingers can afford such luxury as the services of specialists or a trip to the salon? The ratio is too unfair.
And this is the reason why many representatives of the fair sex are forced to be content with little, covering their nails with an uninteresting and ordinary monochromatic layer of varnish. But what would all these ladies say if they learned that you can create beautiful and enviable nail art without being a professional in this field?

A popular opinion is that you need to be a great artist, train for months and pay for courses where you are supposed to teach an incomprehensible technique for painting nails. But this is just a misconception, and to make an attractive manicure, you only need desire, time and, of course, materials.
Surprise at how easy everything will come after the first glance at the nails you painted yourself, and immediately you will be completely bewildered: how could this be considered purely professional? Moreover, almost everyone has access to the Internet, and if you delve into the World Wide Web, you can study this art from A to Z.
The simplest drawing options
It is advisable to start with the simplest ones, gradually moving on to more and more complex ideas. Simple but correctly done work will look much better than usual plain manicure, and when you get better at it and your self-confidence strengthens, you can amaze those around you with new creations.
Here are two options for what every woman who decides to become a nail artist can paint on her nails at the beginning of her journey.

Flower. A dot is placed in the corner of the nail plate with a brush, then it is surrounded by five more dots in a circle. To complete the design, use a needle/pin to connect the center of the flower to the petals with a thin line while the varnish is still wet.

Star. Take a toothpick and make a decent blot in the middle of the nail. Its size should be such that there is enough varnish for several rays. You can create a star from several colors and add sparkles on top. Using a needle, lines from the blot are pulled in different directions without unnecessary pressure, forming a star.
Now all that remains is to admire the result!
THANK YOU FOR SHARING THIS ARTICLE ON SOCIAL NETWORKS
We also recommend
 Graphite hair color is a fashionable gray hair color for those in love with the extraordinary!
 Spanish phrases for tattoos
 Elos rejuvenation technology: what it is and how it can help
 Mobius strip - an amazing discovery
 Congratulations to parents on their son's birthday Congratulations on the birth of their 7 year old son
 Scenarios for themed parties