We make carnival masks with our own hands: paper templates for the best images. How to make a mask out of paper How to make a regular mask out of paper
An integral and most important accessory of a masquerade is a mask! You can create it with your own hands, and it will take very little time to create such a craft. In this master class we will make a mask from a material such as paper.
First you need to prepare all the tools and materials necessary for the work:
- colored paper high density or ordinary cardboard (base material);
- pencil or marker;
- scissors;
- stencil template;
- flying;
- glue stick;
- decor (colored feathers, a small rose made of satin ribbon and decorative stones).
It is better if the paper or cardboard used is not just plain, but with an interesting pattern. First, using a pencil and a template, we transfer the outline of the future mask to the back side of colored paper or cardboard.

Try to clearly draw all fold lines. Next, cut out the mask along the resulting contour.

Then carefully make holes for the eyes. This is what the preparation should look like!


On the right side of the mask there will be a small decor that will add originality to our accessory. We need to use glue to glue a small rose to the top of the craft.

Then attach some colored feathers.


Next, we decorate the surface of the mask with various colored stones. A drop of glue is applied to the back of the rhinestone, and then the decor is placed in a certain place. In the center of the craft, you need to attach an oval red stone.

On the left, at the top of the mask, glue lilac-colored droplet stones.


Do the same on the other side of the craft.


After that, glue round, red pebbles.


Complete them with small “droplets” of the same shade.


Add a couple more to the center decorative stones. This is what we got!


Now, to secure the mask, you need to attach tape to the side parts of the craft. First you need to fold it in half and then cut it in half. We got two ribbons of equal length.

Apply glue to the tip of each and attach them to the back of the mask.


On the front side, at the base of the ribbons, glue orange pebbles.


Leave the craft for several hours until the glue dries completely. Now the mask is ready!


If you are going to celebrate a holiday in an unusual way, be it New Year, party or birthday, then you can prepare a mask for yourself and maybe for other participants for this occasion.
Making a mask is not difficult, you just need to know a few simple rules and have the necessary materials with you.
You can find several not very complicated master classes on making masks here, including New Year's and Carnival masks, as well as masks for children and adults.
DIY carnival masks
You will need:
Scissors
Black fabric paint
Cling film
Template for a mask.
Glue (moment, superglue, fabric glue)

1. Prepare a mask template using paper and a marker or printer and place it on the table. Cover the template with cling film.

2. Prepare the tulle and cut a rectangle from it with dimensions of approximately 25 x 13 cm.

3. Start outlining the black part of the mask using fabric paint.

4. Let the paint dry and then carefully remove the tulle from the film.

5. Cut out the mask, including the holes for the eyes.

6. Prepare the ribbon and cut 2 pieces from it, each approximately 50 cm long.

7. Using glue, attach the ribbons to the mask. Let the glue dry.

You can make the ribbons shorter. The main thing is that you can tie them loosely.
How to make a cat mask

You will need:
Scissors
Lace trim
Satin ribbon
Small decorative feathers, if desired
1. Cut the lace trim so that you get two equal parts.
2. Connect the binding halves as shown in the image. This should be the main part of the mask. Secure in the middle with glue.
3. Cut off unnecessary parts to obtain the desired shape.
4. Glue the feathers so that they resemble cat ears.
5. Prepare satin ribbon, cut it into two equal halves and glue each part to the left and right ends of the mask.
How to make a Halloween mask

You will need:
Nylon mesh
Lace
Scissors
Super glue
Sticky aerosol

1. Prepare a mask template first.

2. Place 2 rectangles of nylon mesh and lace on the mask design (lace first, and mesh on top). Each rectangle measures approximately 25 x 13 cm.
3. Connect the fabrics together using adhesive spray. Place the workpiece under something heavy and wait a little.
4. Using scissors, cut out the mask, including the eye holes.

5. Prepare the tape, cut it in half and glue each half to the mask so that you can put it on.
DIY New Year's masks

You will need:
Artificial flowers
Sequins.

1. Cut out a mask from felt, after drawing it with a simple pencil. To make it easier to figure out where to cut the holes for the eyes, place the mask on your face and trace the approximate location with a pencil.

2. Separate the petals from the artificial flowers and glue them to the mask the way you like.


4. Glue or sew the tape to the back of the mask so it can be worn.


DIY paper mask

You will need:
Scissors
Stationery knife
Thread (preferably elastic) or a not very wide elastic band
Pencils/markers, etc.
Hole puncher, if desired

1. Prepare a sheet of thick paper or cardboard and fold it in half.
2. Using a utility knife, cut out holes for the eyes.

3. Using a hole punch or knife, make holes for attaching thread or elastic.
4. Decorate the mask to your taste. If it's an animal, you can draw a nose, whiskers, ears, etc.

How to make a carnival mask

You will need:
A sample mask (can be found in specialty stores) or cut a mask out of cardboard.
Multicolored feathers
Sequins
Super glue
Toothpick

1. Prepare a sample mask and think about how you want to decorate it.
2. To carefully glue the rhinestones, use glue and a toothpick - dip it in the glue and apply it to the mask. Glue rhinestones around the eye holes.

3. You can glue rhinestones on the top side of the eye hole and apply glitter on the bottom. To do this, apply glue to the bottom and carefully sprinkle glitter on it.

4. Also use glue to add colorful feathers. You choose how many feathers and where they will be placed yourself.

5. All that remains is to add an elastic band or tape to put the mask on and leave the glue to dry.

DIY cardboard mask

You will need:
Scissors
Leaves of different colors and sizes
Sticks, twigs, seeds, feathers, etc.

1. Cut out a mask from cardboard
2. Glue the leaves as shown in the image (or choose your own option) to make the mask look like an Indian attribute.
3. Start decorating the mask with various details to suit your taste, the main thing is not to overdo it and do everything symmetrically.
How to make a mask out of paper. Decorate with paper roses.

You will need:
A simple papier-mâché or plastic mask (without drawings or patterns), purchased in a store or you can cut it yourself from cardboard
Corrugated paper
Scissors
Feathers, optional

1. You need to cut approximately 25 strips corrugated paper. Their length can vary from 25 to 40 cm. Fold each strip in half.

2. To make a rose out of a paper strip, start rolling it as shown in the picture. As you curl the paper, turn the strip 180 degrees. To keep the flower in place, you can secure some places with glue.

If you want to know what other flowers can be made from paper, check out our articles:
3. Start gluing the roses to the mask. Add glue to the bottom of each flower.

4. If desired, you can add decorative feathers.


You can try using different colors and types of paper.
DIY masks for children. Animal noses.

You will need:
Cardboard packaging for eggs
Tassels
Rubber
Thread and needle
Thick paper
Scissors

1. Take the egg packaging and cut out the parts with indentations - they will play the role of noses, which then need to be decorated.
2. To be able to breathe through your nose, make several small holes in the workpiece - use a needle or nail.

3. Start decorating the cardboard nose in the colors of your favorite animal. Draw in some details such as nostrils, teeth, etc. Look in books or on the Internet to see what animals look like to better create a mask.
4. Prepare thick paper and cut out antennae from it. Glue them to the workpiece.
5. All that remains is to sew on the elastic so that the nose can be put on.
New Year's masks for children

You will need:
Mask pattern
Fabric (in this example the color is purple)
Lining fabric (thin fleece);
Lace (in this example the color is black)
Thread and needle
Scissors
Pins
Velvet ribbon
Decorations.

1. Prepare the main and lining fabrics and use a pattern to cut out the details of the mask.

2. If your lace has a seam on both sides, you need to trim the seam on one side.

3. Using pins, attach the lace to the sides of the mask (you need to do this from the wrong side), while making small folds.

4. Now you need to sew the lace to the main part and cut off the excess.


5. Insert the velvet ribbon under the lace and secure it with pins.

6. Sewing machine Sew the lining fabric to the main piece, as well as the eye holes.
7. Decorate the mask to your taste, for example, you can add a small spider or snowflake.

DIY masks (photo)


DIY Venetian masks


Paper masks are a very budget option. Paper is a material that is in the home arsenal. DIY masks will cheer you and your loved ones up. Such masks can be worn by both a child for an educational hour, and adults for a party, as well as for a photo shoot, birthday, etc.
How to make a paper mask - option 1
To create a dramatic mask depicting emotions, you need:
- colored cardboard;
- pencil;
- eraser;
- scissors;
- glue.
Subsequence:
- Step 1. Choose the colored cardboard you like. Draw an oval on the sheet. It depicts large eyes and a mouth. The future mask should cover the face completely. It is at this stage that we decide what emotion we want to see on the future mask. Having decided, we depict the required form eyes and mouth. The picture below shows the emotion of joy. Using scissors, cut out an oval.
- Step 2. Using scissors, cut out the eyes and mouth. For symmetry, fold the oval in half and begin cutting out the mouth, which represents a smile. Then cut out the eyes one by one.


- Step 3. The example shows two cut out masks that are opposite in emotions. Using this technology, you can easily create a huge number of masks depicting various emotions, such as joy, anger, embarrassment, fear, surprise, admiration, etc.

- Step 4. In order for the mask to take its final form, you need to glue a strip of cardboard or a stick that will serve as a holder. All visible lines that were drawn with a pencil must be erased with an eraser. That's it, the mask is ready!


How to make a paper mask - option 2
To create a cute kitten mask we will need:
- colored cardboard (white, black, pink);
- scissors;
- glue or double-sided tape;
- cord or elastic band.


- Step 1. On a sheet of black cardboard, draw a cat's face. We draw out the ears and cheeks.

- Step 2. Cut out the center for the ears from white cardboard; it is smaller than the ear itself. We also cut out a white muzzle for our mask. Using double-sided tape, glue the prepared parts. If you don't have tape, use glue.


- Step 3. Cut out a chic mustache from white cardboard, and a small nose from pink cardboard. Glue the prepared parts to the mask.


- Step 4. Using a pencil, draw out the eyes. Cut out the eyes using scissors.


- Step 5. To complete the creation of the mask, you need to make a mount. A cord or elastic band is best for this. The length of the lace is determined by measuring the head volume of the person for whom the mask is intended. Using scissors, make small holes on the sides of the mask. We pass the lace through them and tie a knot. That's it, the mask is ready!


With my own hands, for a short time, you can actually create a mask of various themes from paper. You can create a mask in different color scheme. With the participation of this attribute, you can create a special style and mood. Make your holiday or photo shoot with masks unforgettable.
Halloween masks and costumes, unusual, strange and frightening, are not only a tribute to tradition, but also a way to show your imagination by inventing and creating an original carnival image. How to do scary mask DIY for Halloween? In this article we list several simple methods.
Simple cardboard mask
How to make a scary mask with your own hands from cardboard? Most easy way- cut out a mask-glasses with slits for the eyes, and then paint or decorate. This is the best option for a children's masquerade look, for example, if a themed party is planned at school: a mask with glasses made of cardboard will not be too frightening or repulsive. In addition, you can do it together with your child. To do this you will need:
- Cardboard and colored paper.
- Glue.
- Markers or paints for coloring.
- Soft elastic or tape.
First of all, you need to choose an image for the future mask. A spider mask is perfect for Halloween, bat, pumpkins or a funny ghost - Casper. You can draw the mask template on cardboard yourself, or you can print it from the Internet. Then everything is simple: the cardboard template is carefully cut out, painted or decorated with elements made of colored paper. If desired, you can decorate the mask with sparkles, sequins, appliqués, etc. You will need to make holes on the sides through which the ribbon or elastic band will be threaded.

Volume mask made of cardboard
Making a regular goggle mask three-dimensional by adding parts from cardboard or papier-mâché to the product is another option for making a scary mask with your own hands (see photo below in the article). To do this you will need:
- Draw (print) and cut out templates for the mask and volumetric elements.
- Make papier-mâché parts, if any, in advance and dry well.
- Glue or staple all the parts of the mask, make side holes.
- Color the mask. If there are papier-mâché elements, they will need to be primed and dried again before painting.
- Thread a ribbon or elastic through the side holes.

Volumetric masks: what can they be made from?
An original voluminous mask that covers the face completely or only half looks truly impressive. Creating such a product will require patience and accuracy, and will take a little longer. How to make a scary mask of this type? There are several methods available.
- The most common and affordable technology making a three-dimensional mask - papier-mâché: gluing a product from pieces of paper.
- How else can you make a scary mask? Interesting option- a voluminous mask made of fabric shreds. This technology is similar to papier-mâché and allows you to show your imagination using fabric blanks of different textures and colors.
- The most modern, original, beautiful, but also the most expensive material for volumetric masks is plastic or polymer clay. The main condition for working with such material is strict adherence to the technology for creating the product described in the instructions.
Regardless of what material you plan to make a volumetric mask from, you will most likely have to start by making a base of plaster or plasticine.

Form-base for a mask
Why do you need a mask form? And is it possible to do without it? You can often find a description of the process of making a three-dimensional papier-mâché mask, which is made directly on the face. This method, of course, saves time, but making and drying the mask this way is not very convenient. Also, a plaster or plasticine mold can be replaced, for example, with a hockey mask or an inflated balloon.
You can make a more accurate base mold from plasticine: either sculpt the head of the character whose mask you plan to make, or make an anatomical cast of the face.
However, experienced craftsmen advise not to be lazy and make a plaster mold before making a scary mask. This base can be used several times; moreover, the plaster mold is suitable not only for working in the papier-mâché technique, but also for making plastic masks with subsequent heat treatment of the product. There are two ways to make a plaster mold:
- Make a face cast using cooking foil. Carefully pour plaster into the resulting form, avoiding deformation of the foil, and allow the plaster to harden. Remove the foil after drying.
- Another method is somewhat more complicated: make a plaster cast of the face. It will not be possible to make such a base mold yourself; you will need an assistant who will apply the plaster mass. The impression is made in the following order:
- First you need to remove your hair under a bathing cap, fix the shape of your eyebrows with gel or wipe with a damp piece of soap and spread your face well with a rich cream (baby or Vaseline will do). Next, cocktail tubes are inserted into the nostrils (the ends of the tubes need to be wrapped in gauze or cotton wool). This will allow you to breathe freely during the procedure.
- After all the preparations, all that remains is to sit comfortably on the floor, fixing your head with damp towels or absorbent cloth so that the plaster mass does not drip onto your clothes and onto the floor during application.
- The assistant should quickly apply a thin layer of plaster mass, starting from the middle of the face to the edge. Liquid plaster can be replaced from a pharmacy, then they must be applied by first cutting them into pieces and soaking them in warm water.
- Once the surface of the plaster mold has hardened, the assistant can carefully remove the impression. Finally, the shape needs to be aligned along the edges.

What materials are needed for a papier-mâché mask?
Papier-mâché, that is, modeling from “chewed paper,” is an accessible, convenient and inexpensive answer to the question “how to make a scary mask with your own hands.” To work with this technique you will need:
- Paper sheets. Regular unnecessary magazines, newspapers, advertising leaflets, paper napkins And so on.
- Adhesive agent. This could be PVA glue or wallpaper glue. But since the mask will come into contact with the skin of the face, it is best to prepare a paste from flour and water (at a ratio of 1:2).
- Heavy cream or butter to lubricate the base mold. This will allow you to easily remove the finished product from the mold in the future.

Step-by-step procedure for creating a papier-mâché mask
How to make a scary one The procedure is quite simple:
- A layer of lubricant is applied to the base mold - rich cream(Vaseline, vegetable oil).
- Paper sheets need to be torn into small strips and soaked in a container with paste; the thicker the paper, the longer.
- Paper strips are glued to the base layer by layer, gradually forming a mask. It is important to apply each subsequent layer evenly, without air bubbles or unevenness.
- During the sculpting process, the mask can be secured with one or two layers of bandage or strips soft fabric, laying them between layers of paper strips.
- Dry the mask for 2-3 days at room temperature. After drying, cut the side holes for the elastic (ribbon), align the slits for the eyes, nose, and mouth.
- The mask must be removed from the mold, primed and painted. To paint a paper mask, regular gouache or oil paints are suitable.
- If desired, the mask can be decorated with bright details (feathers, sequins, elements made of fabric, metal, etc.), thread an elastic band (ribbon) into the side slots.

Heat-treated plastic mask
Plastic, which hardens after heating at high temperatures, is a material very popular among people who are passionate about handicrafts. However, working with it requires strict adherence to technology and safety rules. For this reason, you should always start the process of creating a mask by reading the instructions on the packaging of the plastic. It is especially important to remember that the operating technology and processing temperature may differ for different types of this material. How to make a scary mask from polymer clay(plastics)? To create a mask from this material you will need:
- Set of colored plastic with instructions.
- Dishes and stack (knife) for work.
- Container with warm water.
- Oven (oven in a stove).
- Plaster mold for a mask.
- Decorative elements (optional).

Important! Thermoplastic utensils should not be used for food purposes. After use, the oven must be thoroughly rinsed with water and detergent.
Manufacturing from plastic is carried out in several stages:
- The plaster mold is lubricated with oil or rich cream.
- Pieces of material are softened according to the instructions on the package. For faster heating, it is often recommended to use warm water or the non-hot air of a regular hair dryer. Of these, a mask is applied to a plaster base.
- It is important to avoid getting dust, small debris, hair or threads on the softened plastic.
- When sculpting onto a mold, you must immediately cut out the nasal and eye holes of the mask. For a beautiful, tight fit of the mask to the face, you should try to create a smooth transition to the plaster form, eliminating the plastic mass in the eye area and along the edges of the mask.
- All cuts, including holes for the elastic (tape), must be made before the plastic completely hardens.
- If desired, the mask can be decorated immediately, before heat treatment, with heat-resistant parts made of metal, glass, stone and other things.
- Heat treatment is carried out in strict accordance with the instructions: a plaster mold with a molded mask is placed in the oven, preheated to the recommended baking temperature. The product is kept in the oven for the time specified by the manufacturer, after which the mask should gradually cool in the oven.
- Important! The oven temperature must be constantly monitored. All types of plastic can begin to melt and release toxic smoke if the temperature in the oven reaches 170-175˚C. If this happens, you need to immediately turn off the oven, open doors and windows for ventilation and leave the home until it has completely ventilated.
- Repeated heat treatment of plastic is allowed. After complete cooling, the mask can be supplemented with sculpted parts and baked again.
- The cooled product is carefully removed from the mold. The finished mask can be primed and painted, and decorative elements can be glued on.
Children's matinees, carnivals and holiday theme parties are not complete without masks. You can buy any ready-made accessory in the store, but it’s much more interesting to make a mask with your own hands from plain paper.
DIY paper mask - it's very simple
Round, rectangular, oval - paper masks can have any shape. The accessory can be very easily and simply made either according to your own design or using a ready-made template.
If you want to make a paper mask with your own hands, then first decide on its design; the choice depends not only on personal preferences, but also on the theme of the event for which the mask is being made.
Anyone can make beautiful and high-quality paper masks with their own hands; the process is quite simple. In order to make a holiday accessory, you will need paper, scissors and several elements for decoration, including colored paper and paints.
How to make a paper mask - the easiest option
The easiest way to make paper masks with your own hands is to work from a ready-made template; just choose one of the templates you like, print it and cut it out with scissors. The template is glued onto cardboard or laminated, holes are made along the edges and elastic bands are tied to hold the finished mask on the face. That's all - beautiful mask paper is ready, it took a few minutes to make!
Next, you should start decorating (if you print the drawing on a color printer, you can do without additional decoration). Paper masks are designed in different ways, using paints, felt-tip pens, beads, etc., it all depends on your imagination.
Ways to decorate paper masks
Paper masks can be decorated with paints, and it is better to use acrylic paints, including with the effect of sparkles, gilding or silver. Another option is special pearlescent gels that contain glitter.
When answering the question of how to make paper masks, you need to decide on the type of material. A good option- using whatman paper, firstly, it has sufficient density, so it holds its shape well; secondly, it is easy to cut and bend. In addition, whatman paper is convenient for drawing; the image fits perfectly on it and colored paper is glued to it. And in order to glue the parts together, you can use the most common office glue (or paste).
Make masks with your kids
This is very interesting and exciting process, so let your child create with you, and not just watch how you cut out and design the product. Collaborative creativity brings parents and children closer together and perfectly breaks up leisure time.
Together with your child, choose the mask you like and print it out. If you don’t have a printer, you can use the picture with the mask as an idea by drawing the mask yourself.
We also recommend
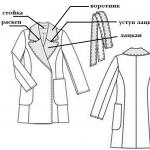 Collars, stoles, fur boas How to cut a fur collar for a coat
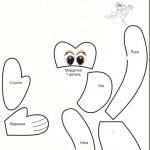 The best DIY monkey making tutorials on the internet!
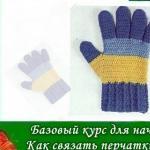 Openwork gloves made of white goat down
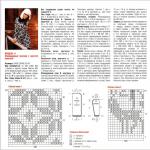 Jacquard knitting patterns Jacquard patterns a, b, c, e, and f
 We make beautiful crafts from satin ribbons
 Logical and entertaining problems (300 problems) Easy riddles for children 5 years old short