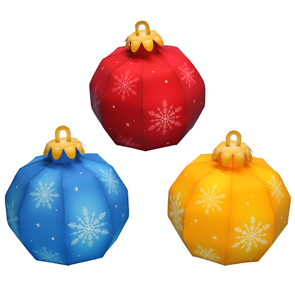
DIY paper Christmas ball step by step. DIY paper Christmas ball for the Christmas tree
This voluminous and bright ball is suitable for creating a festive ambiance for any festive event. For example, it can be a New Year's decoration, decorating a Christmas tree; several of these balls look beautiful in the form. The craft is not at all complicated, especially since the paper ball is presented step by step, with a detailed explanation and visual photographs.
What do you need for a voluminous paper ball?
- Colored paper. I took three colors - green, yellow and red. But you can, for brightness, take more, for example, 5, according to the number of segments on the side of the ball. Or vice versa, be original and take only 2 colors: black and white, white and blue, red and white. Consider the interior color when choosing.
- Scissors, glue stick, thread, compass, pencil.

Instead of a compass, I used a glass, and if you have a special composter, then that’s great; you can make an unlimited number of balls and decorate the entire room with a garland.
How to make a ball out of paper?
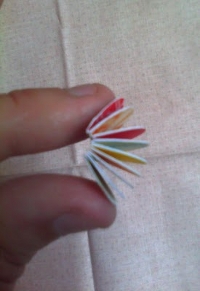
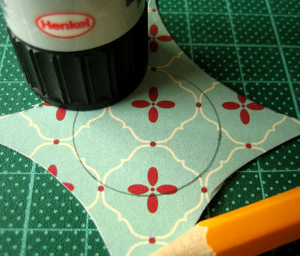
To make one paper ball you will need 20 circles. Their size depends on how big the ball is needed. I traced the top of the glass and ended up with a cute ball that can be hung on the Christmas tree.
Trace or draw several circles on colored paper with a compass, fold the paper several times and cut out 20 circles.

Each circle needs to be folded so that it forms an inner triangle and three sides, which we will subsequently glue to each other. To do this, first fold two sides of the circle.

Then fold the third one. You should try to make them the same, but if there are small errors, it’s not a big deal.

Thus you need to make 20 triangles. But, to make it convenient to take and glue them, after all the sides have already been determined, straighten the triangle.

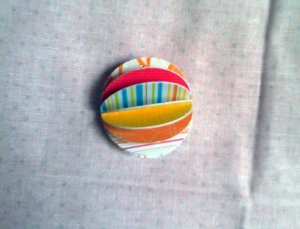
Take two folded circles and glue any sides together.


Continuing around the circle, glue all 5 and glue the first and last to complete the circle. You will get a paper piece like this, like a lid.

Make 2 of these caps. It will take 10 circles to create them.

And then we continue to glue the remaining 10 circles, but not in a circle, but straight. That is, each subsequent circle is glued not to the extreme side, completing the circle, but to each other, forming a straight paper piece. This is what 5 multi-colored circles look like.

And here all 10 circles are already glued.

We wrap the long piece with the sticking sides outward and glue the ends together. To make a ring.

Now we have all the components of the paper ball, all that remains is to put them together.

Glue one cap to the paper ring. You still need to glue in the area of the curved sides of the circles.

And thread the thread into the second cap. If the thread is thick enough, for example, twine, it is enough to make a knot at its tip. But if, like mine, it’s very thin, decorative, in addition to the knot, I also used tape, for reliability. Naturally, all these manipulations must be done in the inner part of the lid; only the thread should remain on the outer part.

Now all that remains is to glue this lid to the almost finished work and the bright ball of paper is ready step by step. If you need a garland of such balls, the thread or string must pass through the ball, that is, through both lids.


On the eve of the New Year, handmade children's items become especially popular. Craftswomen especially often create New Year's interior decor with their own hands - figurines, garlands, streamers, wreaths and, of course, New Year's toys.
Paper has always been and remains one of the simplest and most economical materials. Fortunately, today there is a sufficient selection of this goodness in stores for children's creativity. But few people know that for crafts you can use not only purchased colored paper, but also quite rarely used paper waste, for example, old magazines and books, music notebooks and ordinary office sheets for the printer.
Handicrafts also value crepe, packaging, velvet, corrugated and scrap paper, wallpaper remnants, toilet paper rolls, paper baking tins, disposable napkins and paper plates. You can’t even imagine what the imagination of a creative person is capable of and what masterpieces are created.


Paper ball for Christmas tree:

To make such a stunning three-dimensional ball for the Christmas tree, you will need the following materials and tools:
- Thick paper for 16 circles with a diameter of 6 cm;
- Scissors;
- Pencil;
- Glue stick;
- A sheet of paper as a template;
- Needle and thread.
From thick paper we cut out 16 circles with a diameter of 6 cm (you can use a glass as a template). Each circle must be folded in half, then in half again.
On a sheet of paper we draw 5 lines at the same distance from each other - 1.5 cm. We will lay out our blanks on this sheet to make it easier to glue. The middle line marks the middle of our circles. Lay out the first circle and apply glue between strips 1 and 2 and between strips 4 and 5. Glue another circle on top. Now we will glue the next circle in the middle. We alternate glue strips until we glue 8 circles - this is half the toy. Repeat the same for the next 8 laps.

To make it easier to thread the thread later, we pierce a hole with a thick needle, as shown in the figure. It is necessary to glue the two resulting blanks together - we do this using adhesive tape. Now we thread the thread and the paper Christmas tree toy is ready!
The next craft is a three-dimensional ball for decorating a Christmas tree, made from ordinary white office paper.

You can use any thick paper. The toy is created according to the following scheme (it may be a little difficult for children; adult help will be needed). You will also need glue and a hole punch:

Very simple three-dimensional Christmas tree decorations are made from cardboard and wrapping paper (colored). You can also use leftover wallpaper. Using a glass, cut out 4 blank circles from cardboard and paper. We glue the paper on top of the cardboard to make the parts denser. Glue all 4 circles together as shown in the picture. Before gluing the last circle, we attach a ribbon inside for hanging on the Christmas tree.

Paper muffin tins are excellent preparations for Christmas tree decorations. Just fold each mold 4 times and get one tier of Christmas tree - you need 3-4 of these. It would be good if the molds were of different colors. All that remains is to attach the ribbon on top - and the beautiful Christmas tree toy is ready!

Another idea for a New Year's paper toy is a Christmas tree from an old book (you can use a music notebook). The sheets are cut in a semicircle and folded like an accordion:

These simple Christmas decorations are made from strips of colored or wrapping paper:


You can make unusual Christmas tree balls from paper or cardboard by printing and cutting out several templates:

The elements are glued together in the shape of a “sun” - you will need two of them - in different colors. A circle is glued in the center. Then, placing both suns on top of each other, the ends of the rays are intertwined with each other - until the end, until you get a ball. From above, all ends are attached to each other and a circle is glued. All that remains is to secure the tape on which the ball will be held.

Very interesting paper toys for the Christmas tree are made from modular elements made using the origami technique. For this purpose, you can use thick printer paper, packaging cardboard or gift paper:

A simple Christmas tree decoration can also be made from a regular toilet roll. To work, you need several of these bushings, glue, scissors and decorative elements (sparkles, paints, beads, rhinestones). The bushings are slightly compressed and cut into oblong elements 1-1.5 cm wide. Then a flower is assembled from these elements and decorated as desired.
Neither bright balls from the supermarket, nor lights flashing in different colors, nor expensive designer kits for decorating Christmas trees can compare with homemade decorations.
Of course, such decorations from the supermarket will make your evergreen guest bright and modernly decorated, but they are unlikely to be able to carry the New Year’s mood as joyfully as home-made toys.
There are a lot of ways to make Christmas tree decorations, but the simplest, most attractive and not time-consuming are paper-made toys. To create them, you may need very little, improvised materials that are stored in every housewife. Stock up on a little patience and wings for a creative flight of fancy.
New Year's balls
What is the most common decoration on a Christmas tree? Of course, balls! You can always buy glass and plastic ones in the store, but we will try to make them from thick paper. This includes colored cardboard, old postcards and covers of unnecessary magazines. Balls made of colored cardboard, plain, will give the tree or room that you want to decorate a single style, and multi-colored balls will bring an atmosphere of celebration, magic and a winter fairy tale.
Before you sit down to make a new toy, prepare:
- thick paper;
- use old magazines, cardboards or candy boxes with bright designs;
- glue, PVA is best;
- scissors;
- a compass or any other object that you can trace to get an even circle.
Take your cardboard and draw twenty-one identical circles on it, then cut them out with scissors. Each circle must be folded as follows: bend the circle in half twice, on one side and the other, then straighten it, this will mark the center of the circle.
Fold only one side of it again, so that the edge of the circle is exactly in the intended center. Fold the two sides again, so you get a triangle. Cut out this triangle in one of the twenty circles; it will serve as a kind of stencil for the rest of the circles. All that remains for you is to place the triangle on the remaining circles, trace it and bend the edges of the circles outward along the contour.
Take the first ten circles and glue them into stripes, alternating: five down - five up. Glue the resulting strip into a ring, this will serve as the basis for the toy.
Divide the remaining ten into fives and glue them into a circle. By gluing them together, you will get two lids.
The top and bottom covers will need to be glued to the base in the same way. Consider a loop to hang the toy from.

Children can easily help you make such a New Year's toy: you will need scissors, colored paper, and packing ribbons.


See more:

Today you can find a huge number of different Christmas tree decorations on store shelves, so turning an ordinary Christmas tree into a real holiday beauty is not difficult. However, New Year is a special day! The day when the old year is left behind, and new adventures, new events, new victories lie ahead. But the old year did not pass without a trace, […]
A great idea for a Christmas tree decoration would be a miniature paper Christmas tree. You can make it from thick paper or old postcards, and you can hang your masterpiece on a regular thread.

By the way, if you don’t have a real tree, you can make your own magical New Year tree. For more ideas, see the article:

The New Year tree is, of course, the main attribute of the most important winter holiday. You won’t be able to do without the forest beauty, the atmosphere is not the same, and where will the kind grandfather put the gifts? It just so happens that people in the house decorate a Christmas tree for the New Year holidays: some people put up a live one, some prefer an artificial one, and some prefer a paper one. A paper Christmas tree can not only replace a Christmas tree [...]
Large volumetric snowflake
Snow is obviously the most important attribute of winter, and a snowflake is the main decoration of the house for the New Year. A snowflake can be cut out of paper and glued to the window, as is often done. What about voluminous snowflakes? Making it is as easy as cutting it out. To create it you will only need scissors, a stapler and, of course, paper.

Cut out 6 squares of the same size, fold each square diagonally, and then in half. Make parallel cuts along the folds with scissors. Unfold the squares, wrap the inner strips and fasten them together. The resulting petals are connected to each other with a stapler, although you can also use glue. Such a large snowflake can be sprinkled with sparkles or put together as a garland. You can decorate it with a window, a wall, or hang it under a chandelier.


What could be easier to decorate than large, voluminous paper candies? They are very simple to make, for example, from old foil or beautiful wallpaper left over from renovation. There will definitely be paper with a bright pattern. And to do this, you just need to measure out a small rectangle, twist it into a tube, and tie ribbons at the ends. If you are afraid that your toy will lose its shape, then by twisting it, you can put any unnecessary thing in the shape of a cylinder, for example, a cardboard cylinder from toilet paper, between the paper.

Toys with family photos
Some types of paper balls can be made using family photos. Such New Year's toys will be the most special, because the important and significant moments of the outgoing year will remain with you, and in the next New Year, the toy of memories will again remind you of pleasant moments. By the way, don’t forget about your pets, let them also remain on your memorable toy, because a dog, cat or even guinea pigs are also waiting for the New Year holidays!

Lanterns from childhood
What about flashlights? You must remember from childhood how to make paper lanterns. With a little imagination, you can easily come up with a new design for a simple flashlight. To diversify a very simple craft, you can decorate it with sparkles, make it from colored paper or printed paper, paint it with paints, and add new details. Everything is to your taste.


Paper angels for the Christmas tree
What about New Year's angels? You also remember how to make them, right? Angels can be made from gold paper or newspapers, painted or added glitter.


New Year's paper cones
What's a Christmas tree without pine cones? You can decorate the Christmas tree with ordinary pine cones from the forest, but you can make your own magical ones. There are several ways to make paper cones: it all depends on your preferences, availability of free time and patience. The simplest option is a cone made from old postcards.


You may be interested in:

New Year's holidays are approaching - time to give and receive gifts, decorate the Christmas tree and decorate the house. Perhaps we no longer believe in the good old man Santa Claus, we don’t expect gifts from him under the tree, but we definitely expect a miracle, especially on New Year’s Eve. A miracle is of course good, but the realities of life dictate their own rules to us. Job, […]


Lace garland
A magic lamp can be created from a simple glowing garland; all you need is paper and small scissors, with which you can easily cut out lace snowflakes. You can find patterns for snowflakes on the Internet or print them out so that you can cut out the figures around the office. You can put light bulbs from a garland into the holes cut out in the snowflakes; hanging such a garland on a window or on a Christmas tree will be very beautiful.

A little life hack: if you don’t have time to cut out lace snowflakes, or you can’t make them even and neat, buy lace napkins at the supermarket, this will reduce your work time, and store-bought napkins will look much neater. The garland will create a bright New Year's mood. Feel free to get to work!

See more ideas for garland:

New Year is the most favorite holiday, associated with miracles and magic. Celebrating the new year is characterized by folk festivals and joyful meetings. It is impossible not to love this time of year, when everything around is transformed, and every house or storefront becomes like the scenery of a fairy tale. Everyone wants to participate in this transformation, and therefore they try to decorate their homes […]
Cardboard Santa Claus
You can diversify the decoration of your home and Christmas tree with the help of snowflakes, flowers and lanterns, stars and balls, but what about the most important New Year's miracle - Santa Claus? Small cardboard Santas make a fun garland, especially if you add different facial expressions to the grandfathers.

To make the job easier, you can find stencils for making toys that you just need to cut and glue.

New Year's house on the Christmas tree
You can decorate the New Year tree with a paper house. This toy looks especially cool if you put an electric candle or a garland light bulb inside. Then the windows of the house will glow, as if someone lives in it. Making paper houses is very simple; you can do without a template. You will need paper or old postcards, scissors and glue.


Stars
You can decorate the Christmas tree with paper stars. They are made very simply, even kids can cope with this task, but they look very original!


A New Year or Christmas wreath is usually decorated with the front door or hung on the wall. But you can make a mini paper wreath that will look great on the Christmas tree as a toy.

The toys that you made for the holiday with your own hands are the key to a cozy holiday atmosphere. Happy New Year!
Help us improve: if you notice an error, select a fragment and click Ctrl+Enter.
Stunning, voluminous, and very easy to make Christmas tree toys with your own hands!DIY Christmas tree decorations. Christmas balls
1. DIY New Year's ball (option 1)
To make this New Year's decoration you will need colored paper, thin wire, a stapler, and glue. The ball you see in the photo above was made from paper of three different colors (pink, blue and cyan).
Work plan:
1. Take a small glass or glass (wine glass) and trace it on paper with a simple pencil 12 times. You should have 12 circles (4 circles of each color). Cut out the circles with scissors.

2. Fold each circle in half and stack them together as shown in the picture below. When making this Christmas ball we use three colors of paper (A,B and C). Place the mugs in a stack in the following sequence - ABBCCAABBCCA. If, when making a New Year's ball, you used paper of two colors (A and B), then in this case you would have to fold the circles in the following sequence - ABBAABBAABBA.

3. Fasten the paper circles together using thin wire, wrapping it around them along the fold line. Twist the ends of the wire together. If you don't have wire, you can fasten the circles together using a regular stapler.


4. Spread the circles and glue adjacent halves of the circles together. Each half must be connected to one adjacent at the top, and to the other at the bottom.

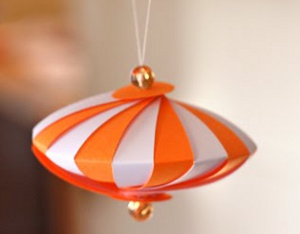
2. DIY Christmas balls (option 2)

Cut out three circles of the same size but different colors from colored cardboard or thick paper. In the first of them, cut a cross (Fig. a), in the second circle, make a horizontal cut in the middle and two cuts perpendicular to it in the direction from the circle to the center of the circle (Fig. b), and in the third - four cuts in the form of a cross, also along direction from the circle to the center (Fig. c). Pass circle “c” into circle “b”. In circle “a”, bend the corners formed as a result of its cut; you will get a square hole. Thread circles “b” and “c” into it, having previously folded them. Then bend the corners again (Fig. d). Attach a thread to the resulting ball.
3. Christmas balls made of paper (option 3)
From old postcards or colored paper you can make these cute Christmas tree decorations - New Year's balls.

It is not at all necessary to make a large, complex ball; you can make a small Christmas ball from fewer parts.


4. Making a New Year's ball (option 4)
A very easy to make New Year's paper ball. To make it, you will need colored paper and glue.

Work plan:
1. Cut out eight identical circles from paper of different colors. Although, in fact, the number of circles can be any, but not less than three.

2. Fold each circle in half, right side inward.

3. Glue the halves of the circles together as shown in the photo below. Glue is applied to the underside of the circle halves.

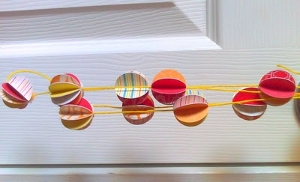
4. Before finally sealing the New Year's ball, thread a thick thread or ribbon through it. You can also make a wonderful Christmas tree garland from a large number of paper balls.
Note: this New Year's decoration can be made not only in the shape of a ball, but also in any other shape.
5. DIY New Year's ball (option 5)
To make these wonderful New Year's lanterns, you will need to cut colored paper into strips of the same length and width. The length and width of the strips depends on the size of the lantern you want to make. To make one paper lantern you will need an average of 14-16 strips of paper.

When making New Year's balls, you can use strips of paper of different colors and beads to decorate New Year's toys with your own hands.

If you bend the strips of paper in the middle, you will get this New Year's decoration.
6. How to make a New Year's ball (option 6)
We suggest you make this cute and easy-to-make New Year’s craft from old cards with your child.

1. Using a small glass or wine glass, draw and cut out eight identical circles.

2. Using another object with a round base but a smaller diameter, draw and cut out two small circles.
3. Fold each large circle in half, and then in half again. See photo below.

4. Glue four folded large circles onto one small circle, and the remaining four onto the other. As a result, you will have two halves of your future Christmas ball.
It is very IMPORTANT to correctly place the quarters of the large circles on the small circle. Try to carefully straighten the “pockets” of the folded circles and, before gluing, estimate the correctness of their location. In this case, focus on the very first photo, which shows a ready-made ball.

5. Now all you have to do is glue the two finished halves together and, when the glue dries, straighten all the pockets. The New Year's ball is ready!

7. DIY paper balls (option 7)
8. DIY thread ball (spider web balls)
Balls made from threads look very attractive and do not require any special skills or money. Many did them at school during labor lessons. And the use of these web balls is limitless: simply as a decorative element, as a lampshade, and as New Year’s toys. From several of these balls of thread you can make all kinds of toys: snowmen, birds, fish. In general, everything that is enough for your imagination. How to make a snowman from threads, see the link

Making balls from threads:
1. You will need: scissors, balloons, rich cream (vaseline), any yarn, PVA glue, bowl.
2. Dilute PVA glue with water, approximately 3:1.
3. Inflate the balloon to the desired size, give it a round shape, and tie it with thread.
4. Having unwinded the required amount of yarn, put it in a bowl and leave for 5 minutes.
5. Spread the ball with rich cream and wrap it with yarn, first leaving a large distance between the thread.
6. Gradually reduce the distance between the threads until the entire ball is wrapped in yarn and resembles a cocoon.
7. Cut the thread and glue it to the ball. Leave it to dry (at least for a day).
8. Gradually untying the balloon, carefully deflate it, and then remove it from the thread cocoon; We tie a rope to the top of the ball of thread for fastening.
9. The ball is ready!

When making a ball, you can use yarn (threads) of any color or paint it with any paint or glitter (spray). Especially for the New Year, you can decorate this thread ball with tinsel and stars. Hang small balls on the Christmas tree, decorate the room with large ones. Fantasize boldly!
If you are unable to wind glue-soaked thread onto a ball, you can wind dry thread and then thoroughly soak it in glue using a brush or sponge.
Instead of glue, you can use sugar syrup or starch paste. To prepare the paste, take 3 teaspoons of starch per glass of cold water, mix thoroughly and bring to a boil. Instead of thread, you can take thin copper wire and wind it around the ball in the same way.
9. DIY New Year's Eve. New Year decoration
Old Christmas tree balls can be updated by wrapping each one in a piece of pretty fabric and tying it with a ribbon.

Surely, while at a special event, you came across decorations in the form of various paper balls. They not only look impressive in the interior, but also, transforming the room, give it their own zest. Depending on the celebration or event, the color and texture of the paper is selected, from which it was decided to create these decorative elements. Our article is devoted to different types of paper balls, which you can make with your own hands thanks to our instructions.


How to make a paper pompom with your own hands from paper, master class
Corrugated paper is best suited for making paper pompoms. Its texture makes the pompom soft, and the density of the paper holds its shape for a long time.
To create a pompom, prepare the following:
- packaging of corrugated paper;
- nylon thread or piece of fishing line;
- scissors.
The first step is to cut the corrugated paper into rectangles measuring 25x50 cm. If you want to make small pom-poms, you should reduce the size of the rectangles. We cut 8 such sheets and stack them.
We fold the sheets accordion-wise according to their width.

Round off the ends with scissors.

Find the middle of the accordion and tighten it tightly with thread or fishing line.

Starting from the top sheet, separate each layer in turn, forming a ball.

After all the balls are separated, you can use the pompom as decoration.

Videos paper pompoms
Decoration with paper pompoms, photo


Honeycomb balls, photo


How to make honeycomb balls with your own hands from paper, step by step with photos
Honeycomb balls must be made from a pack of paper of the same texture. You should not combine plain colored paper and corrugated paper, as they will immediately lose their appearance. So, to create honeycomb-shaped balls, prepare 25 sheets of multi-colored A4 paper or cut corrugated paper measuring 21x29 cm into 25 pieces.
Step 1. On a white A4 sheet, draw stripes across its entire width at a distance of 3 cm from each other. It is advisable to alternate lines with two different colors (we have red and black).

Step 2. Place all the cut paper in piles. Take a plate with a diameter of 20 cm or draw a circle on paper using a compass with a diameter of 20 cm.

Step 3. Cut out the circles, fold them in half and cut them. This way we will get 50 semicircles.

Step 4. Apply the first semicircle to the stencil so that the lower ends meet the edge of the stencil, and then apply a thin layer of glue to the red lines of the stencil.

Step 5. Apply a semicircle and apply glue along the black lines. We continue the gluing process with all the sheets.

Step 6. After all the parts have been glued together, we also coat the top part with glue according to a similar pattern (if glue was applied below along the red line, then we coat it along the black line and vice versa).

Step 7. Unfold the ball and glue the top and bottom parts of the semicircles. To ensure that the parts adhere well to each other, we fasten the gluing points with a paper clip and wait until the glue dries.

Step 8. Remove the paper clips and the ball is ready.

How to make honeycomb balls with your own hands from postcards, master class
Honeycomb balls made from postcards can serve as both an element of interior decor and an original craft for decorating a Christmas tree. To create such a ball you will need any postcards, compass scissors and glue.


Decoration with honeycomb balloons, photo


Ribbed balls, photo


How to make ribbed paper balls with your own hands, master class
Even children can make ribbed paper balls. Therefore, if you decide to transform the interior, decorate the room for a significant event, involve your children, they will be happy to help you create ribbed balls, and we will tell you how this can be done.
1. Cut out 12 circles of the same diameter from paper. The larger the diameter of the circle you choose, the larger the ball you will end up with. For larger balls, use crepe paper as a material.

2. Fold each circle in half. Stepping back 1.5 cm from the fold line, apply a dot of glue to the edge of the circle and glue the circle in half. We do this action with each circle.

3. Place the resulting semicircles in a stack with the previously glued edges on one side. Glue the non-glued edges together, also applying a drop of glue to the edges of the circle, departing 1.5 cm from the fold line.

4. After the stack of semicircles has been glued together, at this stage of the work you can tie a thread or ribbon to the ball. To do this, the ball is pierced with an awl, after which a ribbon or thread is inserted into the hole. This will allow the ball to hang, and the ball itself will not lose its shape for a long time and will not fall apart. Next, a drop of glue is applied in the same way, the ends of the semicircles are brought together and glued.


DIY paper pompoms from napkins, step-by-step instructions with photos
Pompoms made from napkins look soft and airy. The balls themselves are not as large in size as, for example, those made from corrugated paper, but they are not inferior to them in appearance. To create such a ball, napkins of any density are suitable.

The napkin pompom is ready.

How to straighten paper pompom balls
In order for the pompom to have a beautiful appearance, each of the layers is opened separately. After the paper accordion has been tied with ribbon, one of the sides is stretched in length. The result is something like a fan.

Then the sheets are separated from this fan one by one towards the center of the accordion. You need to start separating the sheets from the outermost, holding the accordion well with your left hand.

Having fluffed one side, we perform all the same manipulations on the other side. This way you will get a fluffy, weightless pompom.

Honeycomb paper balls from Aliexpress
It’s not for nothing that honeycomb balls are also called Chinese balls, so their selection on the trading platform is incredibly wide. In the product category ““, where Chinese traders have placed their offers, there is a whole storehouse of balls of different sizes and colors.
If you want to use the ball several times, it is not recommended to remove the strips of tape; bring the edges together and secure them with a paper clip. When suspended, the paperclip will not be visible, and next time you will save significantly on decor.
Don’t be afraid, get creative, and you will create creative decor for all occasions with your own hands.
We also recommend
 How to do golden makeup
 Ultrasound of the mammary glands, when to do it and how many times?
 How to increase pensions for working and non-working pensioners: methods, step-by-step instructions Distribution of funded pension payments
 DIY paper Christmas ball for the Christmas tree
 Application from corrugated cardboard How to make corrugated cardboard by hand
 How to learn to write beautifully and make your handwriting perfect?