Master class, corrugated cardboard. Application from corrugated cardboard How to make corrugated cardboard by hand
Content
Crafts made from the simplest cardboard look no worse than expensive designer decor. It is not difficult to find the material in any home, and it is not too expensive in the store. So arm yourself with some material, scissors and glue and let's create stylish things. At the very bottom you will find a video master class and tips on working with cardboard.
Christmas tree decorations
Cardboard crafts for the New Year can be the simplest to make, but very cute for decorating your home or Christmas tree.
To create a Christmas tree decoration we will need:
- scissors;
- thick cardboard (you can use an electronics box);
- watercolor paints;
- brush;
- a simple pencil;
- twine;
- dry straw;
- beads/pearls/rhinestones;
- ribbons/bows.
First you need to decide what exactly you want to make from cardboard: a cookie man, a Christmas tree, a deer, a star, a snowflake. Now you need to draw the future craft either directly on the material, or first on a draft, and then transfer it to cardboard.
Now you need to cut out the blank, and then use paints and decor to give the Christmas tree a finished look. Let's see what might come out:

Next year is the year of the dog, so the New Year's figure has already been determined

Use twine to decorate a cardboard horse

And a few more toys based on dense material with twine:

Use gold spray paint:

Decorative Christmas tree
This is a decoration from the category of three-dimensional cardboard crafts for the New Year. Dense material acts as a base here, and for decoration you will need the following materials:
- twine;
- colored paper;
- beads;
- bows;
- Christmas tree beads;
- threads;
- paints.
Everything is elementary simple - you need to twist a cone from the base material, which will act as the basis for the Christmas tree. Use a glue gun to secure the decor to the cardboard.


Use colored twine to make this interesting Christmas tree.
By the way, you can use pasta, peas, nuts, beans and other materials to decorate a cardboard Christmas tree.

Cardboard deer
A beautiful and stylish craft in the form of a Christmas deer's head can be hung in the hallway or living room. For such a large cardboard craft for the New Year you will need:
- thick cardboard (box);
- tailor's scissors;
- paints;
- brush;
- fir branches;
- cones and other decor.
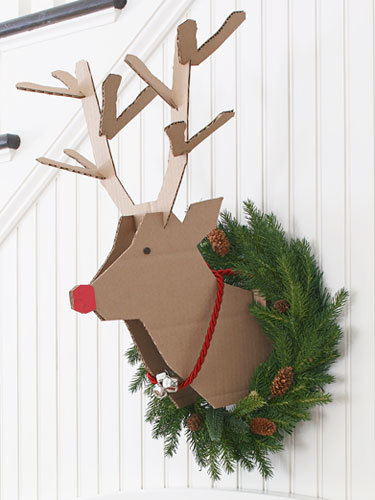
First you need to draw a template for the future deer: separately draw the head, antlers and the base for the wreath. Fold the box flat and attach the template to the fold. You should end up with the deer's nose being the connecting link between the two parts of the head.
Now draw the horns in the plane, which will then need to be inserted into the grooves of the head.
Connect the parts and, if necessary, glue them with glue. Now get to work on the wreath. From the same material you need to cut a medium-width “donut” onto which you will glue the fir branches. All that remains is to completely connect all the parts and find a place for the Christmas reindeer.
You can make a huge interior composition with a deer and a sleigh.

For such a composition you will need templates of parts, which you will then assemble together. Volumetric crafts made from cardboard for the New Year look very impressive.

Crafts made from corrugated cardboard
Corrugated cardboard itself is a very beautiful material and can be used to make original Christmas tree decorations. Use corrugated cardboard strips and create Snowmen, Santa Clauses, various animals, Christmas trees and other decorations:

Use glue, scissors and paints to bring your crafts to life:
Let's try to create a Christmas tree from corrugated material step by step. You can buy it at a specialized art store or use industrial cardboard.
First you need to cut the cardboard into strips of medium width, twist them into circles and secure with glue. Make enough circles to connect them into a Christmas tree: the bottom row will consist of 4-5 circles, and then in descending order.

And to make a bell like this, you need to take one long strip of red corrugated material and twist it into an oval. Then lightly squeeze the sides of the workpiece to give the desired shape. Now we make a bell mold from a separate strip and glue it to the oval. All that remains is to attach the bead and string.
Making decorations from white cardboard
What crafts can be made from white cardboard for the New Year? Use this material to create interesting “snowy” New Year’s decorations that can be placed on the windowsill.
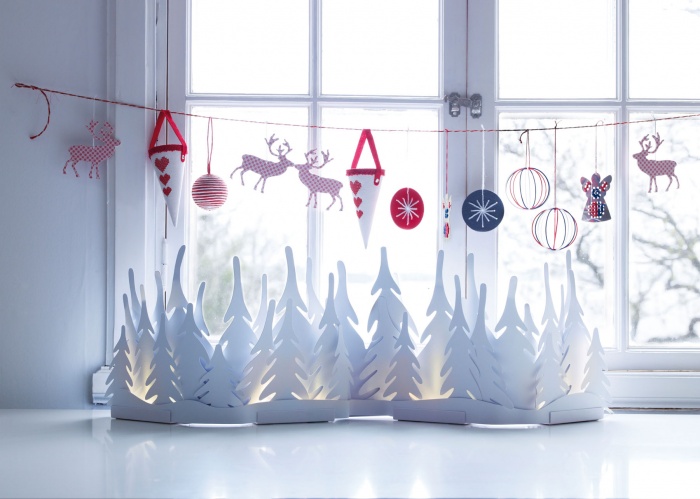
You need to cut out the Christmas trees according to the template and connect them together using a stapler. You can put a battery-powered garland in the middle and the New Year's mood will be ensured for the whole year. And with the help of a simple template you can create an entire New Year's town from white cardboard. Use nail scissors, PVA glue and a stapler to create a Christmas craft.

You don’t have to glue the houses together, but place them flat on the chest of drawers:

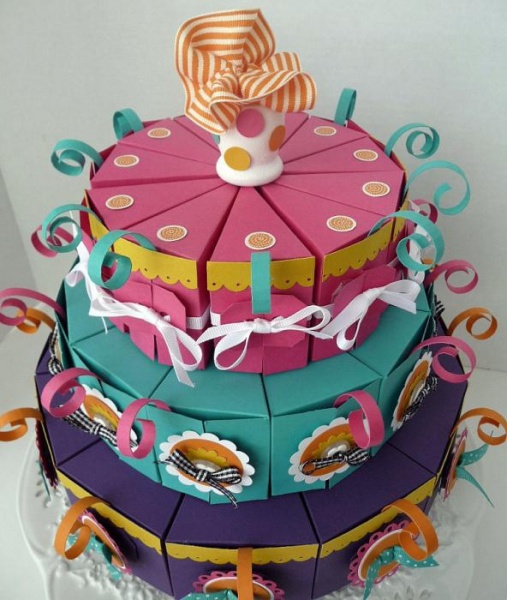
How to make a "cake"
You can give an original gift or make a “cake” with New Year’s predictions using this material. What you will need:
- thick cardboard;
- scissors;
- pattern;
- beads;
- ribbons;
- bows;
- colored cardboard or paper.
First you need to print the template:
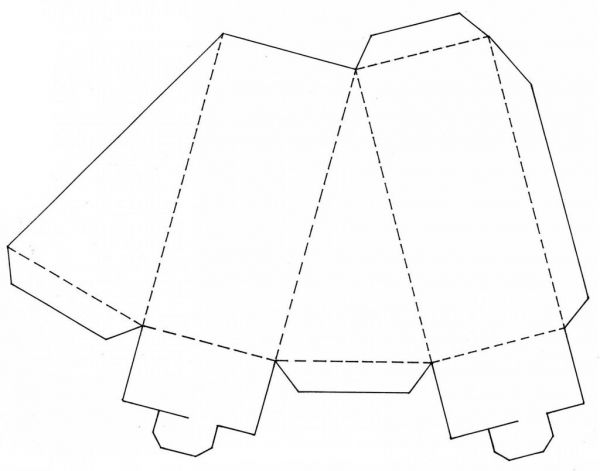
One template equals one slice of cake. The more such pieces there are, the larger the cake will be. You need to bend the part along the fold line and secure the part with “hooks”. The finished cake can be decorated with details using the quilling technique, beads, felt toys, and Christmas tree beads. In each of the pieces you can put a wish for the New Year.

This cake can be presented to children for New Year, with a small surprise in each piece.

You can make several tiers of cakes of different styles. The first tier will contain, for example, 6 large pieces, the next - 10 small ones, and the next - 12 very narrow ones.
At first glance, it seems that there should be no difficulties, but this material will be easy for you if you work with it correctly:
- use only sharp scissors or a stationery knife to ensure the edges of the cardboard are neat;
- use grooves and gaps to connect the parts. The grooves can be pre-lubricated with PVA glue so that the structure holds more tightly;
- Use a ballpoint pen that no longer writes to mark the fold lines. In this case, the cardboard will bend beautifully and not roughly;
- if you use colored cardboard, then select markers according to color so that you can paint over the folds of the product;
- Don’t give up handicraft if it doesn’t work out the first time. Start with something simple, see how cardboard behaves in your hands. And then take on more complex work.
We are sure that you will prepare very carefully for the New Year and create comfort and a fairy tale at home with the help of DIY crafts.
And as usual, at the end of the article we offer a video master class on creating interesting crafts. This time we're looking at a lesson on how to create a Christmas tree from corrugated material:
Post Views: 935
MARINA TSYBANOVA
IMG]/upload/blogs/26e822f27947fc7d062defd38a2d4204.jpg.jpg IMG]/upload/blogs/c0f5304cd86fa343c9b9f351ea6efc2f.jpg.jpg Paper and cardboard– the most common and easily processed materials. One of my kids' favorite activities is applique and design from corrugated cardboard. These activities develop perseverance in children and help them think creatively. I offer several simple samples. To applique it could have been done faster and easier; I give the children stencils and patterns. When working with children during artistic creativity, I put target: this is the development of sensory skills, fine motor skills of the hands, spatial imagination, technical and logical thinking, eye; ability to navigate various types of information. The development of sensory perception is facilitated by processing operations paper:
1. bending;
2. cutting;
3. skill of stenciling
4. sticking.
I think it is very important that during production appliqués the child gains confidence in his abilities, manual dexterity and flexibility in his fingers appear, and the accuracy of his work improves. Gradually, children develop such qualities as determination, perseverance, and the ability to complete the work they start.
Imagine and create! Develop your children!


Modern people sometimes simply don’t know what to do with corrugated cardboard. Most often, boxes and crates made of this material end up in the trash. But if you have a penchant for creativity, you can easily use it for various crafts - three-dimensional paintings, theatrical scenery, all kinds of boxes and chests. You can even make furniture from corrugated cardboard, and not just doll furniture.
Photo by Shutterstock
Decorations for puppet theater
For crafts of this kind, corrugated cardboard is even more suitable than regular cardboard. The manufacturing technology is approximately the same, but corrugated cardboard decorations will look voluminous, even if you are also making toys for the theater. You need: - corrugated cardboard; - shoemaker's knife or cardboard cutter; - ruler; - ballpoint pen; - scenery drawing; - colored paper; - PVA glue. Cut the box into separate sheets. Choose a suitable design and transfer it to cardboard. You need a picture that shows objects with clear contours and an animalistic amount of detail. If this is a house, then it consists of a square, a triangle and several rectangles. The tree must have a clearly defined trunk and crown. Transfer the outlines of the objects onto the cardboard and carefully cut out with a sharp knife. A knife with an oblique blade is preferable. It must be held strictly perpendicular to the plane of the sheet. Transfer the details of the drawing onto paper and cut out. Cover the cardboard blanks. For a glove theater you can peck on one side, for a toy theater - on both sides.
For theater toys, scenery should be on stands. The stand is a square or circle made of the same material with a hole cut in the middle into which an object is glued
Decorative panel
Corrugated cardboard is an amazing material for making three-dimensional paintings and panels. Cut out the background - a circle, oval, diamond or fantasy shape. Draw a sketch. For example, it could be a flower arrangement. It is important that every detail has a clear shape. The painting may consist of 2-3 layers. To do this, you need to make the appropriate number of blanks. The first represents the general outline of the composition. The next layer consists of individual fragments that should be closer to the viewer. It can be either continuous or consisting of separate parts. Finally, the third layer consists of small fragments: a design on a vase, a protruding wing of a bird, bows on a New Year’s wreath, etc. Masters of this genre make very sophisticated crafts, even using elements of quilling, that is, twisted parts. Fragments can be pasted over with colored paper, and then a multilayer composition can be made from them. Another option is to cover the craft with primer, and then with paint and varnish. You will get a one-color bas-relief.
There is hardly a house in which there is not corrugated cardboard. This popular industrial packaging material is perhaps the second most common after plastic. It usually consists of three layers: 2 smooth and one wavy. Recently, crafts made from this affordable material have become extremely common. And this is not surprising, because it is plastic, dense and cheap. You can use regular corrugated cardboard left over from boxes, cutting it into strips, or buy special colored cardboard.
At first glance, it may seem that the possibilities of such material are very limited. However, this is fundamentally wrong. We will tell you what crafts from corrugated cardboard you can make with your own hands together with children, and offer several interesting creative options for adults.
What will you need?
The main material for crafts is corrugated cardboard. It is best to cut it into strips of various (required) widths and lengths if the craft is planned to be voluminous. When you create an applique, first you need to make markings with a simple pencil. Accordingly, you need scissors and a stationery knife.

If the material is not painted, ordinary, then use paints (acrylic, gouache) and brushes. For complex crafts, corrugated cardboard and individual elements from it will need to be joined, so PVA glue or a glue gun is needed. In addition, stock up on ribbons, beads, colored paper, and a needle and thread. The main technique for working with corrugated cardboard is quilling, i.e. twisting strips into a spiral of varying density and then connecting individual elements into a composition, figures, etc.
New Year's toys
New Year's fireworks have gone off, the toys have been collected in a box, and in the yard the snow is about to begin to melt. And even though making Christmas tree decorations is not as relevant now as it was a couple of months ago, we still suggest adopting several interesting ideas. Save them, and next year you won’t have to worry about what to take to kindergarten or school. The main advantage of such toys is their lightness, but the disadvantage is that they cannot be used outdoors.

In just 10-15 minutes a Christmas tree can be made from corrugated cardboard, such as the one in the photo above. The amount of starting material depends on what size you will make the toy. Don't make the strip too wide. So, for a length of 50 cm, 3-4 cm will be enough. Carefully roll the strip of cardboard into a roll. Next, fasten it so that it does not unfold, and then stretch it into a cone. Make a smaller barrel from a roll. You can make Christmas tree decorations from leftover cardboard or use beads.

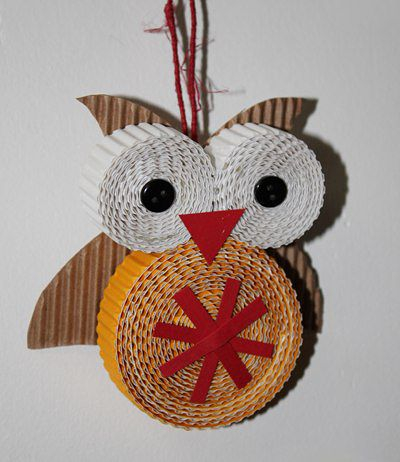
Or, for example, make a wreath like the one in the picture using a combined technique - applique and quilling. The main highlight of it is minimalism and simplicity of form: the fewer small details, the more stylish the result.
Cartoon characters
Corrugated paper and cardboard are very pliable and easy to use, but at the same time textured material. Working with him will be interesting not only for small children, but also for schoolchildren in the lower grades. To do this, you need to complicate the task. Try, for example, to make cartoon characters.

The picture above shows that the craft, among other things, can be adapted for storing small items, like a box. The system is the same. From one wide strip about 15 cm wide and 10 cm long, roll it up, fasten it, and glue the bottom. Then make the arms and legs in a similar way. Finally, roll the head - a strip of cardboard 1-1.5 cm wide and 20 cm long (focus on the diameter of the cylinder) into a roll and pull it out slightly. Glue the eye beads.

Or you can create a whole composition of figurines, like these charming and very popular minions in the photo.
How to make a photo frame from corrugated cardboard?
Cardboard, which has a high density and strength, can be easily used to make a photo frame with your own hands. You need to decide on the size, then cut out the base, and carefully attach the decor to it.

In this case, the photo frame is made in a marine style. Corrugated blue waves of cardboard are decorated with a palm tree, clouds and a boat. The craft is simple and original. You can easily change the photo in it, make a new frame with a different theme, or create an entire series. In the version for girls, sweets and fruits are used.
Food
Another popular theme for crafts is food. Corrugated cardboard will help you realize the most interesting and unexpected ideas. With your own hands, from a minimum amount of materials, you can create a table with the most exquisite dishes, unfortunately, inedible, but very beautiful. This idea can be used in various competitions, performances at school or kindergarten.

The simplest option is rolls. The craft will take a minimum amount of time. All you need is a few strips of multi-colored corrugated cardboard 1-1.5 cm wide and 5-6 cm long. This will be the filling. Roll them into rolls and fasten them together. Make a rice layer from a strip 1.5-2 cm wide and 10-15 cm long, cover it with one layer of black cardboard on top.

In order to create something more original, you will have to make some effort and show imagination. If you don’t have colored cardboard on hand, don’t worry, regular cardboard will do. The absence of color, as you can see, does not interfere with the quality of perception. The design in the photo, consisting of a stand for cakes and pastries on it, seems complicated only at first glance. In this case, the technique differs from quilling. The cardboard is rolled into a tube, and crumpled and cut pieces are laid on top in layers. Additional decor is created using thin strips of a wavy layer.
Caskets and boxes
As mentioned above, corrugated cardboard is initially a durable packaging material. However, it can be used in a more original context than just in the form of boxes. Colored cardboard makes original boxes for small items, stationery, etc.

They will be especially relevant for girls who are interested in such things. All you have to do is come up with the shape of the box, cut out its walls and bottom, fasten them together, and then add a lid. This is the main part of the work. Next, the decorating process begins - the most interesting and exciting.
Cardboard logs
Do you have a fireplace but no wood? Maybe we can make do with cardboard ones? This version of the craft is ideally suited for prop purposes (production, skits, etc.). A set of logs of various sizes and shapes is made quickly and simply. Take regular industrial cardboard from boxes. Cut it into strips of various lengths and widths and roll it into rolls, and then assemble it as shown in the picture.

Paint the top of the log with paint; the surface will be uneven and textured, very similar to real wood.
Castles and palaces made of cardboard
If your intentions are more serious and firm, and there are inexhaustible supplies of industrial cardboard around, then start building a castle or palace. You might then want to bring your dream of Big Ben to life in your child's room or the Eiffel Tower.

Start small and dream big. Use unpainted regular corrugated cardboard, and start adding color after the craft is completely ready. Sometimes you don’t even need to add anything, the natural color is good enough as is.
Painting "In the clearing". Master Class
Age: 13 years old.
Head: Chagan Ekaterina Alekseevna, teacher, MKU ASGO “Social rehabilitation center for minors”,Anzhero - Sudzhensk.
The process of creating paintings is very simple. The work involves corrugated cardboard, which can either be purchased ready-made or made by yourself from an ordinary cardboard box.
To work you will need:
Any flat solid base (fibreboard, chipboard, construction cardboard, etc.), wallpaper, corrugated cardboard, ruler, pencil, brush, gouache (black), “Master” glue (Moment glue is also suitable), scissors.
Progress:
1. Prepare the base. We cover it with wallpaper. It is advisable to use light-colored wallpaper in your work.
.jpg)
2. Apply the design to the base.
.jpg)
3. Color the drawing with gouache. Let's wait until it dries.
.jpg)
.jpg)
4. Prepare corrugated cardboard. We draw and cut strips 5 mm wide.
.jpg)
5. Carefully apply glue to the strips and glue them along the contour of the pattern.
.jpg)
6. For the frame, cut strips 1-1.5 cm and 2-2.5 cm wide. Glue them.
7. The work is ready! Now you can decorate your interior with it or give it as a gift.
.jpg)
.jpg)
.jpg)
Thank you for your attention.
We also recommend
 My husband texts girls: how to behave?
 Do you want to be right or happy?
 What to do if your wife leaves
 Modern children and their development
 How do men take revenge? Ways of revenge. How to live with an evil husband? What to do if a man is angry
 Causes of white spots on fingernails and methods of treatment