DIY application of flowers and leaves. Original crafts from leaves - techniques, tips, photo ideas
Autumn, fallen leaves crunch underfoot... What a pity for this yellow-red fading beauty, crumbling and trampled into the mud. Here is a birch leaf - gently yellow, jagged, here is an alder - ribbed, and here is a mountain ash - a family of long leaves on a thin stalk. Let's take them home and make beautiful autumn crafts and appliques. We will also need a piece of colored cardboard for the background and glue to glue the leaves.
How to make an applique of autumn leaves
Autumn leaves dried outside are not even and quite fragile, so first we’ll dry the leaves ourselves. We find freshly fallen, bright and beautiful, undamaged leaves, and put them between the sheets of some thick book. We put the book under a press (under something heavy). In a week or even earlier, the smooth autumn leaves for applique are ready; they can be easily glued to paper or cardboard with PVA glue.
Sequencing
A true artist sees living images in nature, so we can dream up our imaginations. Let’s lay out all our collected and dried wealth in front of us and see what it’s like. Take suitable leaves and place them on cardboard until you get a picture. There is no need to glue it yet, first just lay it out until you are happy with everything.
When the picture is perfect, you can glue it. We take one leaf at a time, remembering where it was, smear it on the back side, and glue it in place. If the application is multi-layered, first glue the lower leaves, then the top layer. The craft is ready! You can admire it!
But what if appliqué ideas just don’t come to mind, and the leaves only look like leaves, and not at all like bunnies and chanterelles? Then take advantage of our ideas.
Leaf craft ideas
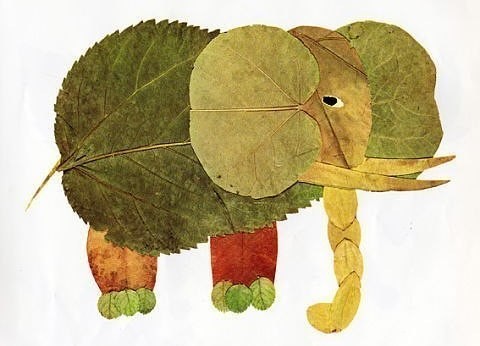
Applications with animals
Owl made of leaves:


Red cat


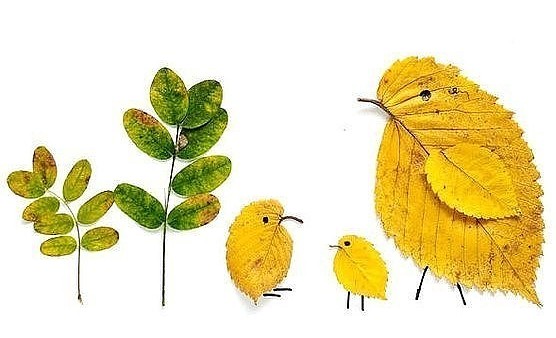
Bird with chicks:

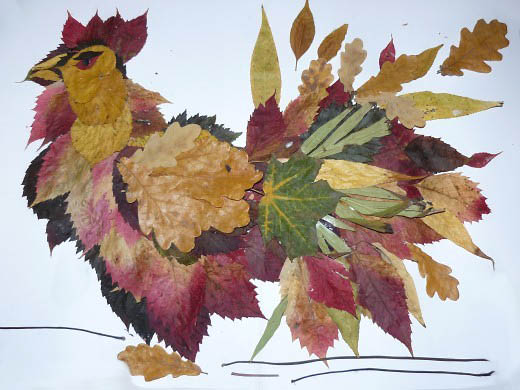
And even an eagle:

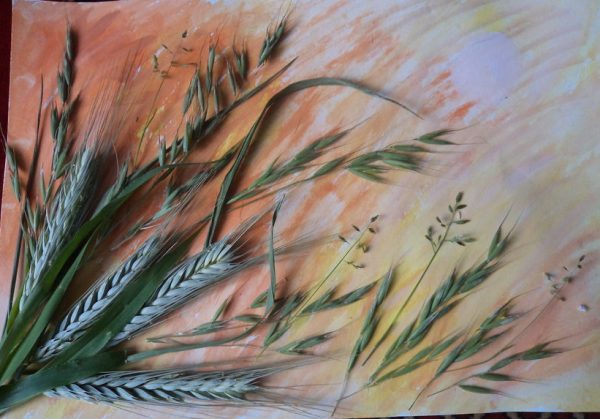
Landscapes of leaves
For a landscape, the background can be painted with watercolors.


Still lifes

Portraits


The finished application (if it is not voluminous) can be placed under a press so that after drying it remains flat. Store in a dry place, perhaps in a frame under glass.
Elena Viktorovna Dobryakova
“SQUIRREL” - application made from dry leaves
(phased implementation). Master class for parents and preschool children.
MOTTO:
“For the child, together with the child, based on the child’s capabilities.”
Target: Help parents organize a joint creative activity in family.
Tasks:
Create a positive emotional mood, try to bring parents and children closer together.
Develop the creative abilities of children and adults.
Organize a joint productive activity children, parents, teacher.
Involve parents in the creative process, enrich the relationship between parents and children with the experience of joint creative activity.
Establishing emotional contact between children and parents.
As V. A. Sukhomlinsky said: “The origins of children’s abilities and gifts are at their fingertips. From the fingers, figuratively speaking, come the finest threads-rivulets, which are fed by the source of creative thought. In other words, the more skill in a child’s hand, the smarter the child.”
As many teachers say, all children are talented. Therefore, it is necessary to notice and feel these talents in time and try to give children the opportunity to demonstrate them in practice as early as possible, in real life. Developing artistic and creative abilities with the help of adults, the child creates new works (drawing, applique).
At any age, in any conditions, you can bring creativity into your life, make it richer and more interesting. It's never too late (or too early) to pick up dry leaves, add a little imagination and create with your own hands something that will delight you for a long, long time.
“The best thing you can give a child is your time.”
I bring to your attention a master class for collaboration parents and preschool children of any age (from 3 to 7 years). Creating applications from dry leaves is an interesting and useful pastime with your child. He will learn to create new things. Years later, he will fondly remember the time spent with loving parents, and not with a soulless (and sometimes harmful to health) tablet or laptop, which parents often (judging by the conversations of children) give to their children so that they “don’t interfere.” Remember that life is a boomerang. Children will grow up quickly, and what they will remember from childhood: the warmth of time spent together or a soulless computer and the offensive words “leave me alone, go away, don’t bother me,” depends only on you.
So, let's begin our master class on application of dry leaves: "SQUIRREL".
We prepare the necessary MATERIAL for creativity:

Dry leaves for the body, tail, head, hind paw, two front paws (smaller) and a rowan leaf cut in half for the ears;
Cardboard of blue color for the background (it contrasts very nicely with the yellow-orange autumn foliage);
PVA glue in a tube with a thin spout (dry leaves are fragile and using adhesive glue or any other, applying it with a hard glue brush will not work, the leaf will crumble);
A small piece of white paper to cut out the “squirrel’s eye”;
Scissors;
Black marker to draw tassels on the ears, the pupil of the eye and the white of the nose;
PROGRESS:
1. Carefully take the piece of paper for the tail in your hands and apply PVA glue to it in a thin stream.

(along the edges and a little in the center. We glue the sheet a little to the right of the center of our background with a tilt to the right.

press with your palm and wait a little until the leaf sticks; do not press too hard (remember that dry leaves are VERY fragile);
2. Using the same principle, we glue the squirrel’s body, placing the sheet vertically in the center of our applique.

The “body” leaf slightly covers the “tail” leaf.
3. In the upper part of the “torso” (perpendicular to it) glue a sheet of “head”,

nose to the right;
4. At the top of the “head” we glue “ears”

from two halves of a rowan leaf;
5. Parallel to the “head”, only in the lower part of the “torso” (on the whip) we glue the “back leg of a squirrel”;

6. In the upper part of the “body” we add two smaller leaves, “front legs”, gluing them with a corner,


moving one leg slightly towards the center of the “torso”;
7. It remains to “revive our squirrel.” Cut out a circle from a small piece of white paper, draw a pupil with a marker - the eye is ready. Glue it in the upper left part of the “head”. We draw tassels on the “ears” and “nose”.

That’s it, our “squirrel” is ready.
I hope you enjoyed working with natural materials.
Create your own masterpieces - it's easy! For this you don’t need much: glue, scissors, cardboard FANTASY AND PAINTS UNDER YOUR FEET, which AUTUMN gives us!
Publications on the topic:
Master class for parents “The influence of fine motor skills of the hands on the development of speech in children of primary preschool age” Goal: to formulate parents’ ideas about the development of fine motor skills in young children preschool age; introduce parents.
Goal: development of artistic and creative abilities of children. Objectives: to develop children's creative abilities; -develop perseverance;
Master class for children and parents of senior preschool age “Christmas gingerbread cookies” Master class for children and parents of senior preschool age “Christmas gingerbread cookies” Goal: - developing interest in history and customs.
Master class for parents “Development of fine motor skills in preschool children” Goal: to show parents techniques and ways to develop fine motor skills in preschool children. Course of the master class: Hello dear ones.
Goal: to show parents techniques and ways to develop fine motor skills in preschool children. Objectives: 1) Show the importance of the work.
Master class for parents Development of fine motor skills in preschool children Topic: Development of fine motor skills in preschool children GOAL: Develop fine motor skills fingers due to finger gymnastics.
Goal: to demonstrate the effectiveness of using health-saving components in physical education and health activities. Good afternoon, dear ones.
Autumn is not only cloudy days and raindrops that constantly drum on the windows and roof, but also a time of bright colorful landscapes. During a normal walk. which takes place in a city park or public garden, it is easy to assemble a whole collection of materials of various sizes, shapes and colors (yellow, brown, green, red, orange), with the help of which craftswomen, and even children, create crafts from tree leaves with their own hands for gifts or home decoration, interior decoration, for school exhibitions, presentations for Teacher's Day or the autumn holiday.
Step-by-step instructions for crafts for children using tree leaves
The variety of forms, and along with them the stunning colors of autumn leaves, make it possible to create many compositions, ekibans, herbariums, appliqués and crafts. If we talk about subjects, birds, zodiac signs, fairy-tale creatures, animals, decorative elements and jewelry are considered popular. It is especially interesting to involve a child in such creativity, because creating masterpieces develops his imagination, creative potential. Use the following step by step instructions to teach your child to create interesting crafts with their own hands.
Volumetric applique Owl from birch leaves
To create an owl, birch leaves are best suited; they are small in size, have an even contour, due to which they easily fit into the drawing making it three-dimensional.
Necessary materials and tools:
- album sheet of white cardboard;
- stationery scissors;
- birch leaves;
- a simple pencil;
- black buttons or toy eyes;
- PVA glue;
- 1 sheet of white, black, red paper.
Step by step execution:
- To begin, draw on cardboard or print out the silhouette of the future owl.
- Next, carefully cut out the cardboard bird.
- Visually divide the owl into horizontal rows, apply glue to each one in turn and lay down the leaves. It is recommended to start gluing the sheets with bottom row, gradually rising to the very top until we have completely covered the entire owl. Lay the leaves overlapping each other.
- For the eyes, take white paper, cut out two circles, and glue them onto the owl with glue. We use black buttons as pupils, which need to be attached to the paper eyes with glue.
- We use red paper for the legs and beak, cut them out, and glue them to the owl with glue.
Autumn craft hedgehog made from pine cones and leaves
Not only leaves are used for crafts, other natural materials are also added to them - chestnuts, cones, acorns. Try making a funny hedgehog with your child. Necessary materials:
- Pine cones;
- plastic bottle(0.5 or 1 liter);
- stationery knife;
- a piece of thick cardboard;
- plasticine Brown
- glue "Moment";
- two bottle caps;
- black acrylic paints.

Progress:
- It is advisable to take a bottle of a dark color (brown or black); if this is not available, a transparent one will do, but then it must be completely painted with acrylic paints.
- We attach the bumps to the painted bottle using glue, starting from the back of the future hedgehog. Make sure that the cones are firmly fixed to the bottle. We cover the entire bottle with cones, except for the “face” and “tummy” of the future animal.
- When the hedgehog's body is ready, we move on to creating a nose - to do this, we paste the bottle cap with brown plasticine.
- For the eyes, we take two white bottle caps, in the center of which we draw pupils with acrylic paint.
- Glue the finished eyes to the muzzle with glue.
- The craft is almost ready, all that remains is to decorate it. To do this, spread the moss on a piece of cardboard and place the hedgehog on it.
- Place leaves and rowan berries on the back of the animal.
Composition of leaves Firebird
With the help of autumn leaves, children's fairy tales can come to life in original compositions. For example, we suggest trying to create a Firebird. Required materials and tools:
- a piece of white cardboard;
- yellow and black acrylic paints;
- PVA glue;
- red and green maple leaves;
- scissors;
- birch leaves;
- stems with ash leaves;
- stems with leaves of white acacia;
- birch leaves;
- a simple pencil;

Step by step execution:
- Draw a silhouette of the Firebird with a bushy tail on cardboard and cut it out. Paint the body of the bird up to the tail with yellow acrylic, and draw an eye in black. Wait until the paint dries.
- Then we start decorating the Firebird, starting from the bottom of the tail. Apply glue to a strip of cardboard tail and tightly attach the golden ash stems.
- In the next layer, a little higher, we glue a row of red maple leaves, 3rd row - green maple leaves, fourth - birch leaves, fifth - green maple, sixth - white acacia stems, seventh - birch leaves, the final row - red maple leaves.
- When the tail is ready, we begin to create the wing. Again we begin to attach the leaves with glue from the bottom row in the following sequence - ash stem, red Maple Leaf, green maple, birch leaf, red maple.
- The fabulous Firebird is ready!
Tree leaf mask
For children's party In the fall at kindergarten or school or a masquerade ball, make an original mask with your child. You will need:
- maple leaves of different sizes;
- cardboard;
- strong rope, ribbon or elastic band;
- stationery scissors;
- glue;

Step by step execution:
- Draw a blank for the mask on a cardboard sheet and cut it out along the contour.
- Make small cuts along the edges of the mask and tie a thread so that in the future the product will stay well on your head.
- Glue the cardboard blank with glue and leaves. Start attaching the large leaves around the edges first, and the small ones in the middle.
Vase of autumn leaves
Autumn leaves are used not only to make children's crafts, but also to decorate home interiors. We offer to make an original vase for sweets or fruits. Tools needed and materials:
- PVA glue;
- balloon;
- petrolatum;
- glue brush;
- scissors;
- Maple leaves.

Step by step execution:
- We inflate the ball to the required size, the more capacious the vase is needed, the larger the ball will be.
- To ensure that the leaves are well behind the ball, before work we lubricate it with Vaseline.
- For convenient work, we fix our ball in any container and begin to make a vase.
- Using a brush, generously coat each maple leaf with glue and apply one by one to the inflated ball.
- Lay out several layers of leaves.
- Once again, completely coat the almost finished product with glue and wait until it is completely dry (48-72 hours).
- Then deflate the balloon.
Photo frame
All children love to decorate the walls of their room with photographs or hand-drawn pictures. Help place favorite photo your child in an original handmade frame. Necessary materials:
- cardboard;
- glue;
- leaves;
- a simple pencil;
- scissors.

Step by step execution:
- Prepare a cardboard frame of the required size. Make the middle of the frame (where the photo will be) a little smaller than the photo.
- Before framing the frame, dip the leaves in hot water, they will become soft.
- Next, use PVA glue to glue the frame with leaves.
- Place the finished craft under a stack of heavy magazines or books. We are waiting for the frame to dry.
- We insert our favorite photo into our composition, securing it at the back with tape.
Applique Lion and fish on paper made from dry tree leaves
Colorful and bright applications are obtained if whole leaves are used for their preparation. Children love to create different animals and birds - a bunny, a fox, a horse, a cockerel, a cat, a dog, etc. We suggest making a funny lion cub and fish. Required materials for the lion:
- yellow linden leaves;
- black felt-tip pen or marker;
- ash seeds;
- horse chestnut fruits;
- PVA glue;
- dry pine twig;
- scissors;
- yellow colored paper;
- orange cardboard.
Step by step description:
- Print or draw a lion's head on yellow paper and cut it out.
- Glue the mane in a circle using glue in several rows with linden leaves.
- Use a black felt-tip pen to paint over the lion's nose and glue one chestnut to it with glue.
- We use needles from a dry pine twig as antennae for the lion.
- The tongue will replace the ash seed glued with glue.
- When the product dries, the craft will be ready.

Necessary materials for the fish:
- yellow linden leaves;
- PVA glue;
- brown quince leaves;
- marker;
- ash seeds;
- acorns;
- stationery scissors;
- blue colored paper.
Step by step description:
- Print the fish template on blue paper or draw it with a marker and cut it out with scissors.
- Cut a stalk from each linden leaf and use glue to attach them to the frame in the form of fish scales.
- Glue a few quince leaves onto the tail of the applique and decorate with ash seeds.
- Attach the acorn caps to the fish using glue along the line of the head. Your DIY tree leaves craft is ready!
How to dry leaves for crafts
Dry leaves are an excellent free raw material for various herbariums, applications, and crafts. In order for your crafts to last for a long time, you need to learn how to properly dry leaves. To do this, study these rules:
- Collect natural material only in dry weather.
- Choose leaf color yellow or green.
- pay attention to appearance leaves. The most suitable ones will be smooth, beautiful and clean, without damage or black spots.

There are several options for drying leaves. Let's look at each:
- Long-lasting and high-quality method (takes 14-30 days). Carefully level each leaf and place it between the pages of the notebook, which must be placed in a large thick book. Weigh the book on top with something heavy.
- Accelerated. If you didn’t have time to make the preparation, but you already need leaves for tomorrow, this method is the most suitable. Place the leaves between the newspapers and iron them with a warm iron 3-4 times. Then let the plants cool and repeat the procedure several more times. It is worth saying that when using this method, the plants become fragile and cannot be stored for a long time, the green leaves immediately darken, and the yellow ones remain bright.
- Alternative. Some craftswomen have gotten used to preparing leaves using a hair dryer. They claim that with this method the plants do not darken, but there is a chance that the leaves will curl into a tube.
Video tutorials: on creating crafts from tree leaves for children
Nature in autumn fascinates with its riot of colors, so children often bring bouquets of colorful leaves from their walks. Invite your child to make a craft from tree leaves with his own hands, because this is not only an interesting, exciting idea, but easy way introduce your child closer to nature, broaden his horizons, and teach him to develop his imagination. Creating such compositions is not difficult; use the following step-by-step instructions as an auxiliary video.
Panel of acorns and autumn leaves for elementary school
Master class on creating a butterfly and a mouse for kindergarten children
Craft - autumn bouquet of roses from maple leaves for schoolchildren
Beautiful pictures on cardboard for the holiday of autumn for kindergarten
DIY hedgehog in the grass made of leaves and flowers
Crafts from leaves, cones, chestnuts and acorns for activities with children
Photos of handmade crafts from tree leaves
Decorative elements from natural material. Such products will fill your home with a positive charge and favorable energy. To create a real masterpiece with autumn leaves, you will need patience, accuracy and imagination. For inspiration interesting ideas We recommend viewing a selection of photographic works made by boys and girls with their own hands under the guidance of adults.
Children's autumn applications from leaves: step-by-step master classes and ideas for children's creativity. Photos of children's applications. Video for kids.

Children's autumn applications from leaves
Hello, dear readers of “Native Path” and participants of our autumn week children's creativity! Today in this article we will continue the topic of autumn leaf applications.
You already know from previous articles on the site in the series about leaf applique:
- how to prepare leaves for application, what types of autumn leaf applications there are, technology for their production (see article).
- how to do appliques - portraits made of autumn leaves : portrait of the queen - autumn, the girl - autumn and girlfriends - autumn (article),
- how to do three-dimensional figure- a bird made of autumn leaves: .
- And today you will learn from this article - the third article in the series about appliqué from leaves - what other appliques from autumn leaves can be made with children and how you can decorate a greeting card with a children's autumn applique from leaves.
The idea is shared by Tatyana Panova, a participant in our children's crafts competition (city of Novomoskovsk, Tula region). Tatyana did all the work together with her daughter Varechka Panova (4 years 2 months). Tatyana is happy to share with you the joy of joint creativity:).
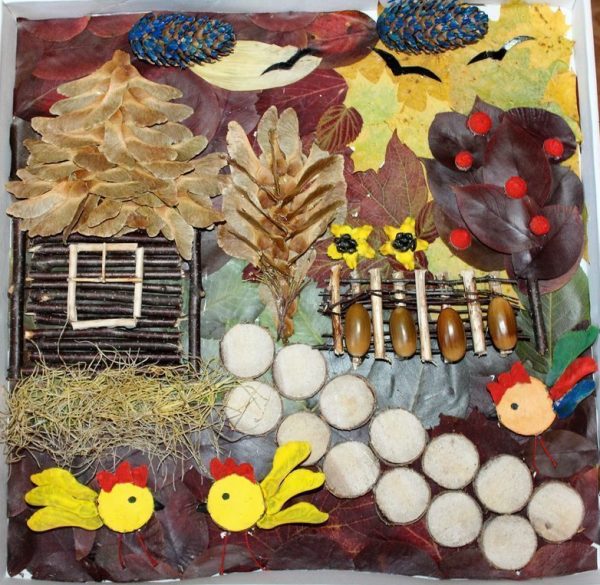
No. 1. Children's autumn applique of leaves: postcard “Autumn landscape”

How to make a children's applique “Autumn Landscape”
Step 1. Prepare the background of the postcard. The postcard is made on watercolor paper, which Varya toned with gouache (white + blue).
Step 2. Make a window in the card.
The window was cut out. We walked along the edge of the window with a blue foam brush. The result was the edging of an oval window.
Step 3. Make the “Forest” applique inside the card using PVA glue. Glue on the pre-dried leaves. How to dry leaves - in the previous article of this series
Step 4. Birds flying in the autumn sky. Mom painted birds in the sky. which fly to warm countries for the winter in the fall.


No. 2. Children's autumn applique from leaves “Birds”
Step 1. Collect leaves for the applique. Varya collected the leaf birds herself.
Step 2. Dry the leaves (how to do this, see the previous article in the series about leaf applique at the link above).
Step 3. Glue the leaves with PVA glue (it is sold in liter jars at a hardware store).
Step 4. Make leaves from Play-Doh plasticine.
How to make autumn leaves: mixed several autumn shades of plasticine, rolled it out and squeezed out the shape of a leaf with a mold.
Step 5. Draw a nest. 
No. 3. Children's autumn applications from leaves: hedgehog
The first version of the children's applique “Hedgehog”
Tatyana and Varenka took a picture of a Hedgehog without needles with them for a walk and collected leaves, attached them to the image and tried them on right on the street. Then at home they dried it in a book and decorated the hedgehog. This is what they did!

Another idea for making a “Hedgehog” applique was shared with us by Ovchinnikova Marina Viktorovna ( Krasnoyarsk region, Norilsk) and her son Timofey (5 years old, MADOU “Kindergarten No. 45 “Smile”). Marina and Timofey’s craft is called “Hedgehog with Autumn Leaves”
The second version of the children's autumn applique “Hedgehog with autumn leaves”
This is a large hedgehog applique or autumn panel that can be used to decorate a room.
Material: cardboard hedgehog, dry leaves and flowers, buttons.
How to make a hedgehog:
Step 1. Cut out the hedgehog’s body from cardboard, draw eyes and a nose.

Step 2: Choose the autumn leaves you like and glue them to the back of the hedgehog. We form needles on the hedgehog’s back from the corners of the leaves.

Step 3. Decorate our hedgehog with dried flowers and buttons. Glue them with PVA glue.

The application is ready!
No. 4. Children's autumn leaf applications: rainbow
This idea was shared at our Autumn Workshop competition by Svetlana Kuznetsova and her son Artemy (2 years 2 months).
You will need for the application:
- Autumn leaves
— Cardboard white or colored
— Gouache
- PVA glue
— Paint brush and glue brush
Step 1. Prepare autumn leaves - collect and dry. How to do this - in the previous article in the series about applications from leaves (the link is given above in this article),
Step 2. Paint the leaves with gouache in the colors of the rainbow and let dry. A child can do this.
Step 3. Glue the leaves onto the glue in the desired sequence of colors (“Every hunter wants to know where the pheasant lives”: red, orange, yellow, green, blue, indigo, violet).

No. 5. Children's autumn applique of leaves: panel “Girl Autumn”
The master class was shared by Olga Nikolaevna Tegaeva (Moscow region, Sergiev Posad district, Shemetovo village, MGBOU d/s No. 75 “Fairy Tale”). The application was made by Yaroslav Kucherikhin (4 years old).
To complete the application we will need:
- frame with glass,
- dried flowers and leaves,
- drawing or photo of a girl.
How to make an applique with children:
Step 1. Preparing the leaves.
The longest process is drying flowers and leaves. We dried it between magazine pages.
Step 2. Girl figurine - autumn.
Glue a picture of a girl of a size suitable for the frame onto the background. We form an outfit for Autumn from dry leaves and flowers.
We decorated the flower on Autumn's head with sequins.
Step 3. Place the finished autumn applique in a frame under glass. This is what Yaroslav did.

No. 6. Children's autumn applique of leaves: “View from the window”
This application was made and sent to our competition by Alexandra Albertovna Naumkina and her children: son Ivan (4 years old) and daughter Maria (1 year and 3 months) from Barnaul, Altai Territory.

How to make the “View from the Window” application with your children:
Step 1. First we make the background - draw the sky (Masha helped for 1 year and 3 months).
Step 2. Then we draw the birds in the sky (my mother did this).
Step 3. Cut out the window frame.
Step 4. Together with the children, we glue the “forest” - autumn leaves - at the bottom of the picture. Glue them with PVA glue.
Step 5. Glue a frame on top of the finished applique. And we put finished work under a thick book so that everything dries well and sticks evenly.
No. 7. Children's autumn applique: “It's me”
This craft was also sent to our Autumn Workshop competition by Alexandra Naumkina. She writes: “The craft is simple, but the children really like it. I took a photo of my son mobile phone, sent a photo to myself by email. I opened the email on my laptop and printed out the photo. My son cut out his silhouette and pasted it on White list paper. Then we glued some leaves. It seemed to us that there were few of them. Using a stationery knife, I cut out a stamp in the shape of a leaf from an elastic band. My son quickly put some leaves on our craft.”
This is the children's autumn applique with autumn leaves that Alexandra and Vanya created.

Children's autumn applique No. 8: sailboat
This children's autumn applique from leaves was made by Georgy Osolikhin (5 years 10 months), and his work was sent to our children's autumn crafts competition by Georgy's mother Marina Osolikhin.
The applique uses leaves and seeds (to place the sun in the sky).

Children's autumn leaf applique No. 9: butterfly
Other materials can be used in leaf applique, such as in this children's Butterfly applique. The application was made by German Osolikhin (3 years 11 months) with his mother. Herman’s mother, Marina Osolikhina, sent an application to our competition.

Here's another option autumn applique from leaves in the shape of a butterfly. This work was completed and sent to our autumn competition little Sofia (5 years old) and her mother Anna Shikhareva doing crafts. How to make such a butterfly:
You will need:
- A4 cardboard (base for applique),
- PVA glue,
- scissors,
— leaves for wings: 4 different types of leaves in pairs,
- an acorn hat for the head,
- 2 acorns for the body.
Progress of the application step by step:
Step 1. Glue two leaves of the same type onto the background as upper wings. Glue them below lower wings- 2 leaves of a different type.
Step 2. Glue two acorns in the middle between the leaves to make the body of a butterfly
Step 3. Glue the acorn cap on top of the body. This will be the butterfly's head. Using a black marker, draw butterfly eyes and a mouth on the head.
Step 4. Make mustaches. To do this, glue 2 petioles from the leaves.
Step 5. When the wings are dry, they can be decorated with smaller leaves and a different color. Now the application is ready!

Children's autumn applique from leaves No. 10: bun, rooster
These applications were completed by children from MBOU Secondary School No. 5 (secondary group No. 11 “Stargazers”), Tyumen Region, Yugorsk. A teacher sent an application to our autumn competition for children's crafts "Autumn Workshop" middle group Petushkova Lyubov Anatolyevna.


Children's autumn applique of leaves No. 11: autumn vase

This master class was sent to our competition of autumn children's crafts by Yulia Yuryevna Zainetdinova (Republic of Bashkortostan, Sterlitamak city. Municipal budget educational institution additional education children - Center for Extracurricular Activities "Nadezhda" of the urban district of Sterlitamak)
Children's age: 3-4 years.
Materials: fresh and dry autumn leaves (preferably in different colors), a sheet with an image of the outline of a vase, PVA glue, a brush and good mood!
Application technique:
Stage 1. “Dressing up the vase.”
We rub the dry leaves with our fingers (at the same time we train fine motor skills and tactile sensitivity), apply a layer of PVA glue to the outline of the vase and sprinkle with leaves. Here our vase is ready.
Stage 2. “Filling the vase.”
From the set fresh leaves Children choose the ones they like, then use a brush and glue to fill the vase, creating their own unique composition.
Examples of children's compositions are in the photo below (these are the works of children 3-4 years old).


Children's autumn applique No. 12: hedgehog under an autumn tree

Master class by Yulia Yurievna Zainetdinova from the Republic of Bashkortostan (Nadezhda Center for Extracurricular Activities of the Sterlitamak Urban District)
Children's age: 5-6 years.
Materials for application:
— autumn leaves are fresh and dry (preferably in different colors),
- rowan bunches,
- maple or ash seeds, so-called “helicopters” for hedgehog needles,
- a sheet with an image of the outline of a tree and a hedgehog,
- PVA glue,
- brush,
- plasticine
- and a good mood!
Appliqué technique for children: step-by-step description
Stage 1. “Dressing the tree in autumn attire”
From a set of leaves, children choose the ones they like, then use a brush and glue to “dress up” the tree.
Stage2. “Bring the hedgehog to life”
We roll plasticine balls and dress up the hedgehog, then we stick needles from “helicopters” into these balls.

Stage 3. “We decorate with rowan berries”
Stage4. "Autumn Land." Sprinkle the bottom of the picture with crushed dry leaves (see description of Yulia Yuryevna’s previous master class on this page).
Application of autumn leaves: idea No. 13. Flowers
You can make a pattern or mandala from autumn leaves. You will get original flowers. These are the flowers made by Sofia (5 years old) and her mother Anna Shikhareva.
How to make a flower mandala:
MANDALA “Flower” (bottom photo in the illustration)
You will need: A4 size cardboard, 4 pieces of different types of leaves (yellow and brown), pine needles, PVA glue, acorn hat.
How to make an application: First glue the leaves in a circle, alternating in color. Next, glue the acorn cap into the middle. Finally, decorate your pattern by gluing green pine needles onto it.
MANDALA “Autumn Eye” (top photo in the illustration).
It is done by analogy with the “Flower” mandala.
You will need: A4 size cardboard, PVA glue, two pairs (four pieces each) different types leaves: 4 yellow, 4 green, 4 smaller brown and 4 smaller green, an acorn cap and 4 sprigs of dry grass such as feather grass.
How to make an application: As in the previous work, you first need to glue leaves of contrasting colors, alternating them by color. Then glue an acorn cap into the middle of the flower. When the leaves are dry, glue smaller leaves of a different color on top, place two branches of feather grass and secure them at the top and bottom to form an “eye” shape.

Children's autumn applications from leaves: video for kids
And in conclusion, I would like to invite all little readers of “Native Path” and little artists to watch lesson on leaf applique at the fun “Shishkina School” my favorite TV channel for children “My Joy”.
Together with the mouse Shunya, children will learn how to make appliqué from leaves and learn how to make crafts.
Enjoy watching everyone!
You will find more ideas for autumn applications with children in the articles on the site:
Get a NEW FREE AUDIO COURSE WITH GAME APPLICATION
"Speech development from 0 to 7 years: what is important to know and what to do. Cheat sheet for parents"
Click on or on the course cover below to free subscription
Surely, in the fall, when the weather is warm and sunny, you and your child come home from a walk with an armful of colorful autumn leaves. This is an excellent interior decoration that can simply be placed in a vase. But it is also raw material for wonderful and interesting crafts. And children will be happy to come up with and bring to life some kind of picture - an applique of leaves.
In autumn there is a lot of not only sunshine, but also golden tints of leaves. It is from them that you can make wonderful autumn applications with your own hands. We invite you to engage in exciting creative activities with your children in your spare time. DIY applications made from autumn and bright leaves and herbs turn out to be truly cozy, beautiful, warm and, of course, original and unique.
In this tutorial I will show you how to make appliqués from autumn leaves with your own hands step by step photos. Such paintings will fit perfectly into any design and will decorate your home. Anyone can make an applique from leaves, the main thing here is not to rush. Before creating autumn applications, leaves and flowers must be dried, then the painting will last a long time.
Slowly and quietly, golden and crimson autumn boat leaves are falling from the trees, and it is so interesting to walk in the park at this time, collecting whole bouquets.


Autumn leaves - DIY applications
Painting “Girl under an umbrella” made of autumn leaves
In this master class we will make the application “Girl under an umbrella”.

- white cardboard;
- glue gun;
- PVA glue or pencil;
- black felt-tip pen;
- dry leaves of different colors;
- bark;
- scissors;
- dry blades of grass.
First we need to outline the silhouette of the girl under the umbrella. We draw it on white cardboard.

Now the silhouette needs to be completely painted over with black. And for this we will use a regular felt-tip pen. You can also use paint instead.

This concludes the work with the drawings, and then we will glue the autumn leaves and tree bark.
Let's make a tree on the side of the girl. And to begin with, we cut out a trunk and then several branches from the bark with scissors. You shouldn't make a lot of branches. Three or four will be enough.
Glue the trunk and branches near the girl. It is better to glue these parts with hot glue. Regular glue will not hold the bark. The base for the tree is also ready.

Now you need to take colorful leaves. They must be dried first. And we break these leaves into small parts. Let them be different sizes and colors. The more colorful the autumn leaves are, the better.
From these small parts we will form the crown. And here you need to use PVA glue or a pencil. Lubricate a small part with glue. And sprinkle it generously with our torn leaves.

Then we apply glue to the other part and do the same. That is, we glue the leaves until the crown of the tree becomes quite fluffy and lush. It is important that there are as few gaps as possible.

You need to glue blades of grass along the bottom. You can take small and thin elongated autumn leaves. Also, fluffy blades of grass that grow everywhere are perfect here. They can be glued with hot glue.

Further from the crown down on both sides of the tree you need to glue a few more leaves, which we shredded, so that it seems that the leaves are falling from the tree into the grass. There is no need to glue a lot of leaves so as not to clutter the application.

Using the same hot glue, you can make a couple of drops on the umbrella, as if it had been wet by rain.

The leaf applique is ready! It can be covered with glass, framed and hung on the wall.

Beautiful crafts from autumn leaves
Read here.
Application of autumn leaves “Sunny Leva”
This lesson is provided to help creative parents. Make an applique of leaves with the image of a lion. Since both the autumn leaves and the paper face itself look bright, you can call your experiment “Sunny Leva”. Thus, you won’t have to spend money on today’s expensive creative materials.

Materials for autumn crafts:
- dry autumn leaves;
- paper;
- PVA glue;
- yellow paper;
- black and red markers;
- eyes made of plastic or cut out of paper.
How to make an applique of autumn leaves step by step
Dry the leaves between the leaves of a magazine or under the pressure of books, then they will not wrinkle in the finished craft. Although freshly picked leaves will begin to curl over time, this will give the lion a fuller coat.

Glue the raw material in the center of the paper around the circumference. 2-3 sizing points are enough, let the resulting ring remain voluminous.

Using a black marker, draw the outline of a lion's face with a wide nose on yellow paper.

Select the black nose and paint the mouth red.

Cut the blank along the contour. Separately, make round ears with red centers. Attach eyes to the muzzle.

The ring of leaves previously pasted onto paper needs to be turned into the lush mane of the king of beasts. To do this, simply stick the yellow part in the center. Preliminarily focus on the size, cutting out the workpiece so that the head fits in the center of the hair.

A mustache for a cat breed can be made from cuttings of the same leaves that were used for the main craft. Glue them with a more reliable compound.

The bright sunny application of leaves is ready. Fallen autumn leaves from any tree are suitable for this craft.
DIY application “Autumn”
A picture of leaves is a very interesting and unusual craft. It turns out beautiful and bright. And in this master class we will make such a picture. You can decorate your home with it or even give it to someone.

To make an applique from leaves we will need:
- leaves;
- hot glue;
- white cardboard or sheet of paper;
- black felt-tip pen.
First we need to draw the silhouette of the girl. Our girl will hold a flower in her hand and blow on it like a dandelion.

And then color it in a little with a black felt-tip pen. There is no need to completely paint over this, since we will be making a dress and hair for her from autumn leaves.

For the dress we take reddish leaves and they should not be too large. It’s better to take ones that are a little elongated, but not too much.
We glue one such leaf with hot glue instead of a bodice. The tip of the leaf should point down. From this flower we will make a skirt or hem.


Now we glue another four or five of the same leaves along the bottom. They should peek out from under the first three leaves. Here it is Nice dress it turns out. Now we can move on to the hair.

For the girl's hair you need to take long yellow leaves. Willow leaves are perfect. First glue three leaves.

And then you can correct the hairstyle by gluing a couple more leaves to the places where there are gaps. Decorate your hair with a hairpin made of small red leaves. Here you can take a sprig of decorative barberry or any other suitable plant.

We will make a sleeve from a small leaf. You can take some kind of wavy leaf. This way the dress will look even more beautiful and festive.

From another such flower you need to tear off several petals. And we glue them as if a girl is blowing on a flower and the petals are flying from it. You shouldn't glue a lot of petals.

To make the picture brighter, you can make a frame for it from the same dried autumn leaves. Just glue them around the edges.

This is an applique made from flowers and leaves!

Read how to do it here.
DIY hedgehog made from leaves
Children's applications in the form of funny little animals can be made from autumn leaves; for example, this master class shows how to make a forest dweller, a hedgehog. The craft is completed quite quickly, so it is suitable for kindergarten or primary school. All children know what a hedgehog looks like. He is prickly, small and very cute. Most often we see only a small nose from under the thick thorns. Using leaves, you should show the outlines of this animal, then you will get a beautiful picture. We invite you to make this autumn craft with your children.

What you will need to model an autumn applique:
- dry herbarium;
- glue stick or PVA;
- paper;
- plastic eye;
- pink or black half bead.
How to make a hedgehog from leaves step by step
Prepare leaves and paper. One sheet used for modeling must be sharp, for example, linden, in order to make a muzzle out of it. The rest will go to the prickly back. This could be maple trees or the cover of any other tree.
If the herbarium is dry enough, handle it carefully so that the material does not crumble. It is very important to pay attention to the carved tips, because it is these protrusions that imitate spines. Remember that raw leaves will curl and become curly in a couple of days.

First glue the muzzle onto the paper and start gluing to the back of it the leaves intended for the prickly back.

Glue on as many leaves as you like. Be sure to keep the pointed nose on the outside.

Now glue a pink or black half-bead onto the sharp tip and add a doll’s eye. The hedgehog figurine is ready. Made from leaves.

You can complement your autumn applique with yellow and orange leaves cut out of paper using a figured hole punch or cut out by hand. Also, these leaves are easy to draw. With them, the application will sparkle with new colors.

The autumn picture is lively and fragrant, because the natural material exudes a subtle scent, and it is especially pleasant to hold it in your hands.
Children's applique - sun made of autumn leaves
The sun warms the earth, caresses us with its rays, revives everything around, it shines so brightly and cheerfully. And even in autumn it still pampers us with warm days. We invite you to make a cute and smiling sun from yellowed leaves and paper. The leaves will become warm rays, and the paper circle with eyes, nose and mouth will become a face.

To perform the autumn application, prepare:
- well-dried leaves of any size and shape;
- yellow paper;
- dark blue paper;
- white, orange and pink paper;
- glue;
- black and yellow pen with glitter.
How to make an applique of autumn leaves in the shape of a sun
Prepare the leaves - details for the rays of the sun. Since the rays must be sharp and long, it is better to use material that has fallen from willow or ash. But in general, all possible options will do.
It is better to dry the herbarium first so that the autumn leaves become even, subsequently they will not curl, wrinkle and will remain the same, in their original form.
Also, a dark blue background was used to complete the craft. It was chosen well because it looks like a rich autumn sky.

From prepared paper yellow color cut out a circle - this is the face of the sun, so warm, sweet and smiling. Make the eyes out of white paper in the form of rounds, and also cut out the mouth and nose from pink and orange paper. Select the dimensions of the workpieces in accordance with the size of the circle so that everything is proportional.

Glue the eyes, nose and mouth in the center. Draw the pupils with a pen - radiant and glowing. Use a yellow pen to draw freckles. Red spots appear on the faces of those whom the sun loves and kisses. But the sun itself, warm and dear, also has freckles. We will draw them with our pens.

Start gluing the leaf rays around the circumference, creating a lush border.

Fill one circle with dense autumn leaves. It is advisable to use parts of approximately the same length for the first layer. Now we see the dimensions of the central object.


We received a bright and warm autumn craft that will become an applique painting for interior decoration or for an exhibition. Such a product will definitely come in handy and will find its rightful place.

In the same way, figures of any animals can be made, for example, a hedgehog, an owl or a peacock.
Application of autumn leaves “Girl in the garden”
The autumn garden is always beautiful and bright. And I want to imprint it in my memory for a long time. Or you can make a beautiful autumn picture of leaves, which will remind you of the bright autumn for a long time. In this master class we will make a painting from leaves “Girl in the Garden”.

To make the picture we will need:
- paints (watercolor or gouache);
- brush;
- dry leaves;
- black felt-tip pen;
- petals of yellow and lilac flowers;
- yellow satin ribbon;
- glue;
- white cardboard.
We start with a couple of small bushes, which we will paint using paints and a leaf. Take a large leaf. And with a brush we paint it on one side with red paint.

Then we print it on the left side of the cardboard. And we’ll repeat this again, but make the second shrub yellow. And let's print it a little further into the red.

Let's draw the silhouette of a girl in a fluffy dress near these bushes. She should seem to be looking at the bush. It is best to draw with a pencil first so that you can erase unnecessary strokes and lines. And then circle the lady with a black felt-tip pen.

You only need to glue it on top, because we will also glue other leaves under the bottom. Any glue can be used. But hot glue holds the leaves better and stronger.

Take a small leaf with five petals. And we glue it on top of the skirt right at the very beginning.

Then we continue to form the bottom of the skirt. And for this we will take beautiful yellow flower petals. They should be large enough. For example, these could be petals from rudbeckia. We glue them to the bottom of the dress.


Take a thin yellow satin ribbon. You can take lilac color. And tie a bow. Glue it to the very top of the dress (skirt). Now the dress has become even more beautiful and festive. And it's completely ready.
Glue a leaf onto the girl's hairstyle. It should be wavy or needle-like. The hair was decorated.

And now let's complete the picture with a few drops of paint. First dip the brush in red and spray it onto the picture. And then dip it in yellow or green. Splashes can be made either a little or more. Whoever likes it.

The applique of autumn leaves “Girl in the Garden” is ready!
How to make a portrait from autumn leaves
You can make beautiful and varied paintings from leaves and flowers. Close-up portraits of girls look beautiful. In this master class we will make such a portrait. This painting is not difficult to complete. The main thing is to prepare leaves and flowers in advance, drying them with any in a convenient way. This can be done using a press and books, as well as an iron.

To make a portrait of a girl we will need:
- leaves of oak, birch, barberry and any small green and red leaves;
- Virginia aster (September) flowers;
- barberry berries;
- spruce needles;
- glue;
- black felt-tip pen;
- white cardboard.
First you need to draw the base of the girl’s portrait on white cardboard with a felt-tip pen. We draw all the main elements of the face: eyes, nose and lips. We also draw the neck and a smooth transition to the shoulder. The basis of the portrait is ready and now you can move on to working with the leaves.

And then we begin to design the face. You need to glue a small red or burgundy piece of paper onto your lips. You can take a barberry leaf or a leaf of any other plant. You can glue it using either hot glue or PVA.

Then we will make arrows on the eyes of the girl or shadow. And to do this you need to take an oblong leaf of any color. You can even take the green one. And glue the leaf to the eyes. We do not glue it onto the entire eyelid, but only along the bottom and slightly backing off from the beginning of the eye at the nose.

Cut off the ends of the spruce needles. And glue them on like eyelashes. It is enough to glue three eyelashes at the edge of one eye. We glue at approximately the same distance from each other.

Shaping the hair. And to do this, take a couple of large oak leaves and one small one. First we glue one leaf, then a little higher the second one. And we glue the smallest one on top. Thanks to the shape of oak leaves, the girl’s hair turns out wavy and voluminous.

And from a birch leaf we will make a crown. Glue the leaf to the head so that its sharp part is on top. This is what the crown will look like.

You can decorate the crown with three barberries or rowan berries. But you can leave it like that.

Along the bottom, where the neckline is, we glue small red leaves, as if outlining the dress.

Then we take the September cards and glue them a little on top of these leaves. This is how we decorated the girl’s dress. And it became more interesting and elegant. Instead of September flowers, you can also use other small flowers. See how to do it here.

The portrait of a girl made of autumn leaves and flowers is ready! The portrait can be framed and used to decorate your home.

A lush and elegant tree made of leaves looks like a real one. Try to find a few differences? This is difficult to do, because the raw materials for making the craft are real autumn leaves. Children have a clear idea of exactly what a tree looks like, and therefore they can easily make a more or less believable craft. All you need is a whole fan of fallen leaves that you collect on a walk, as well as reliable glue that will stick these leaves to the paper and to each other.
The leaves can be fresh or dried; this will not make the craft better or worse. If you make an application from fresh leaves, then you have a double opportunity to dry your wonderful tree in the future. You can put the applique under pressure for a couple of days. The leaves will dry and remain flat. Or just leave the painting in the air. During the process of drying and evaporation of moisture, the leaves will begin to curl, but this will make the tree even more beautiful, and the craft will be voluminous.

To make an interesting autumn application of leaves, prepare:
- a sheet of cardboard or thick paper of blue or light blue color;
- a fan of maple and other yellowed leaves (freshly picked or dried);
- dragon glue or another that will glue the leaves to the paper;
- brown corrugated paper(or crinkled fabric) to make the stem and scissors.
How to make an autumn tree applique
To the crafts exhibition in kindergarten You can easily make a similar craft. This is not a complex topiary that will take a lot of time, effort and materials, but just a flat applique. Every child can make such a beautiful tree.
The crown needs to be created from real yellowed or brown leaves, it is advisable to immediately come up with a way to attach them to cardboard. The simplest is to use reliable glue. The tree trunk should be rough. To imitate it, prepare corrugated paper or crinkled fabric.

Cut a wide tree trunk from a brown piece of corrugated paper, widening towards the bottom. Glue it at the base of the picture. Smooth out the paper. When the trunk is ready, proceed to modeling a lush crown.

Start gluing the leaves. It is better to move in a circle or place it in a fan shape. Gently drip with dragon glue or a glue gun, then press down on the leaf. There is no need to completely lubricate the entire back surface of the leaf, the main thing is that it sticks to the paper.

Make the first round layer, filling the ring very thickly with leaves. If you have natural material of different sizes, you can make the bottom layers larger, and then gradually reduce the size of the parts used.

Fill the crown completely without gaps. It will work out beautiful craft, which looks sunny and fresh.

Finish the craft with small details. For example, you can add helicopters - ash seeds - to the leaves, and also glue a few small details at the bottom, showing that in the fall the plants shed their clothes.

Unusual autumn craft prepared from living yellowed leaves.

Autumn applique “Girl in a dress made of leaves”
Autumn is the time for crafts made from natural materials. On the street you can find cones, acorns, colorful leaves, and even flowers. In this master class we will make beautiful applique from leaves in the form dancing girl in a lush and bright dress. Such an applique can become a real painting or postcard. The application is not difficult to do. The main thing is to select flowers and leaves and prepare them.

To make the application we will need:
- birch and elm leaves;
- cosmos and rudbeckia flower;
- black felt-tip pen;
- white sheet of paper;
- hot glue.
For this craft, leaves and flowers are prepared in advance. They need to be dried. There are two ways. The first is to iron it through the paper. And the second is to put it between the pages of books and press down. Leave it like this for several days.
First you need to draw the silhouette of a dancing girl. And you only need to draw the upper part of the body up to the waist. There is no point in drawing further, since the dress will be below.

Use a black felt-tip pen to completely paint over this silhouette. And this is what happens. This is the basis and guideline. Next we will work with leaves and flowers.

Now we move on to the formation of the girl’s flower-leaf dress. And we need to make the top. To do this, we tear off the core of the cosmos. And glue it with hot glue like a bodice (corset).


Glue three cosmos petals on top. It turns out to be such a beautiful skirt. And with that, the work with flowers is finished. Next we will glue only the leaves.

Let's take three elm leaves. And we will glue them not on top, but on the bottom of the yellow petals. This is how we made the dress widen due to the fact that the leaves are larger and wider than the flower petals.

Take three more elm leaves. And glue it from below under the previous three leaves. But here you need to glue it at a slight angle, as if the dress had a small train.

And we finish the whole dress with three birch leaves. After all, they are yellow and will go well with rudbeckia petals. We also glue them along the bottom of the dress. With this dress we are ready.
And all that remains is to glue the leaves as if a girl were scattering them while dancing. But since the leaves are too large for her, we will tear them into small pieces. And we will glue several of these scraps under each handle. This is such a beautiful and bright applique of autumn leaves and flowers!

September, October and even November are the best time to make fabulous appliqués from bright, fresh or dried autumn leaves. On the street we see a lot of natural materials that definitely need to be put to use, experimented with and created something new. See how to do it here.
Applications from autumn leaves
Autumn leaves - DIY crafts
See how to do it here.
We also recommend
 Congratulations to the godson from the godmother in prose Birthday wishes for the godson in your own words
 Social benefits and pensions – what will change?
 A letter from Santa Claus and a certificate of commendation Sounds like “The Snow Maiden’s Song”
 Beautiful wish statuses for Valentine's Day Gathering your thoughts
 Do-it-yourself rugs from old things - turning waste into income
 Summer crocheted hats with flowers - many patterns, ideas and designs