Simple yarn products. Crafts from threads
This section presents creative works made from threads using various styles: thread printing, applique from cut threads, crafts from pompoms.
Most of the crafts in the publications of the section are equipped with detailed descriptions their performances and are accompanied by colorful photographs. Not only kittens and children like to play with balls. You can make very beautiful figures from multi-colored yarn. These can be folklore motanka dolls; chickens, bullfinches and other birds; mobiles for seasonal interior decoration. Some of the thread crafts described in this section will serve as excellent toys for kids. And hundreds of options for creating applications from colored threads are suitable for creative activities, even with children early age. Also pay attention to thread crafts created for interior decoration.
Magic ways to use threads and yarn - at MAAM.
Contained in sections:Includes sections:
- Isothread. Schemes and works using the technique of thread graphics. Thread embroidery on cardboard
Showing publications 1-10 of 1418.
All sections | Crafts from threads. Pompoms, yarn, isothread, thread printing
Summary of a master class for parents dedicated to Mother's Day. "Applique from thread» Application from thread"Flowers for Mommy" Target: introduce parents to non-traditional applique-applique from thread. To teach how to use knowledge and skills in working with children at home...
 "Kitty"- applique from thread. Artistic work with children of different ages middle-senior group Loginova Larisa Evgenievna P.S.
: Introduce children to unconventional technology - nitcography. Learn to smear small areas of the image with glue and sprinkle them with finely chopped...
"Kitty"- applique from thread. Artistic work with children of different ages middle-senior group Loginova Larisa Evgenievna P.S.
: Introduce children to unconventional technology - nitcography. Learn to smear small areas of the image with glue and sprinkle them with finely chopped...
Crafts from threads. Pompoms, yarn, isothread, thread printing - Master class on making a bullfinch from threads
Publication “Master class on making a bullfinch from...”  For work we will need: Two blanks of black cardboard "Bullfinches", Threads for knitting black, red and gray, Scissors, Inspiration) Using a template taken from your favorite Internet networks, we cut out two bullfinch figures from black cardboard (be careful if you have...
 Image library "MAAM-pictures"
 Dear colleagues I present to your attention one of unconventional techniques drawing - "Nitkography". The word “thread printing” consists of two words: thread and graphics (from “grafo” - “I write”) - view visual arts, using as the main visual means...
Notes on non-traditional drawing with threads "Frosty patterns" in the senior group Drawing: " Frost patterns». Senior group. Goal: to introduce unconventional drawing techniques (thread painting) and design of works, to develop interest in visual arts. Program objectives: - Recall with children the main signs of winter. - Strengthen the drawing technique...
Work program for the Magic Needle circle›› (isothread technique) Explanatory note “MAGIC NEEDLE” (isothread technique) is a program additional education is based on an understanding of priority educational work aimed at developing perseverance, accuracy, patience, developing abstract thinking, ability...
Crafts from threads. Pompoms, yarn, isothread, thread printing - Lesson summary for making crafts from threads and paper rolls “Mouse Hat”
 Purpose: making a hat from threads. Objectives: - develop individual Creative skills, fantasy and imagination; - cultivate perseverance and accuracy. Materials and tools: Roll sleeve toilet paper 2. Scissors 3. Stationery knife 4. Knitting threads 5....
 Today I bring to your attention a master class on making another one of my Christmas trees, made from cardboard, knitting threads and waste material. Necessary materials and tools: a sheet of thick cardboard, a toilet paper roll, wire, masking tape...
Innovation project: nitcography in the preparatory group Project on innovative activities of teacher of group No. 14 Ramazanova E.S. on the topic: “Development fine motor skills children preschool age by using unconventional technology"Nitcography" PROJECT PASSPORT Type of project: creative. Project type: short-term. Author of the project:...
 The most favorite holiday of children and adults is approaching - New Year! In every house, a Christmas tree - a forest beauty - is installed and decorated. The children and I “drew” the “New Year’s Beauty” using thread. Master class on nitcography for children of senior preschool age “New Year...
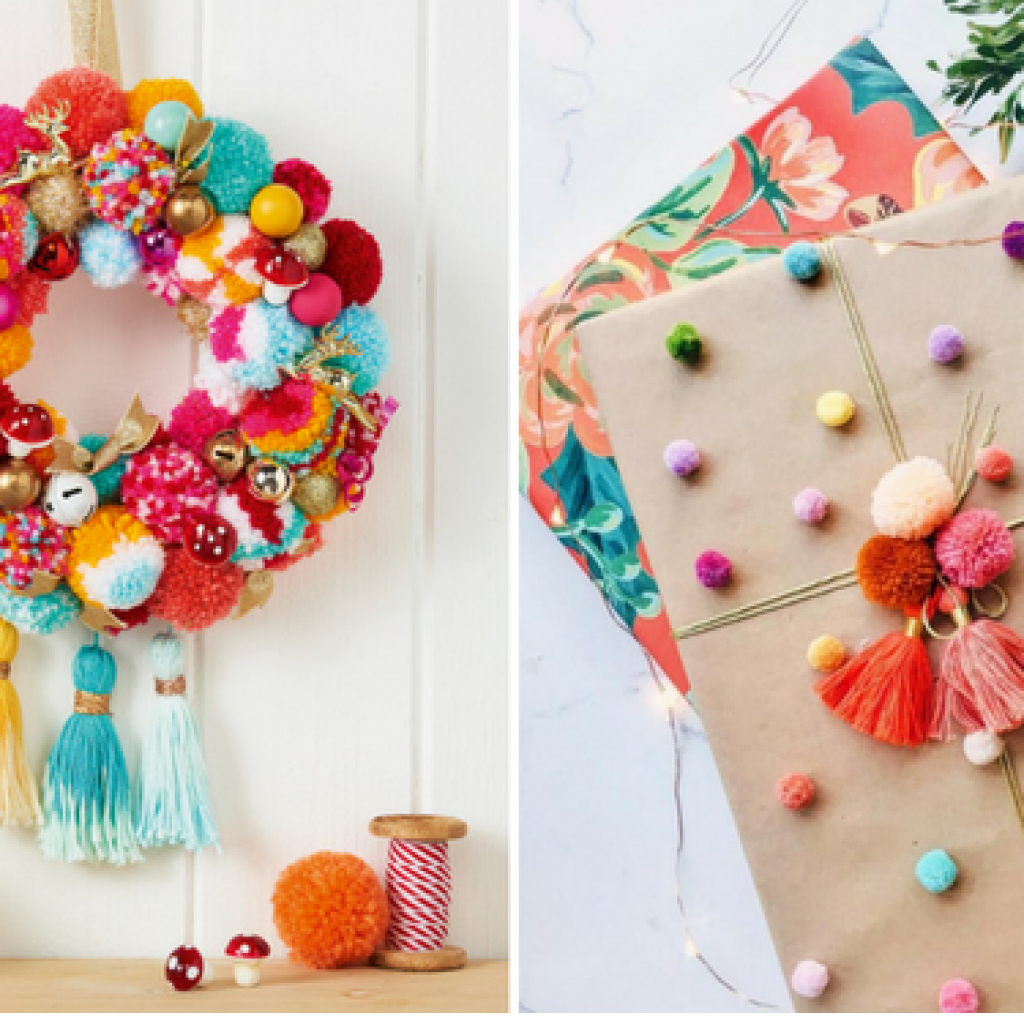
Compositions made from pompoms are very interesting. You can use any yarn for such crafts, either new or the remnants of old unraveled yarn; boucle, fleecy, and smooth will do. Pompoms always come out soft, fluffy, and funny. How do you like the possibility of thread writing? This original idea when real colored threads are used instead of pencils or paints. They are laid out on the glue in parallel or in pieces.
Many crafts can later be given to your family and friends as a nice souvenir for the holidays. Agree that a gift made by the hands of a child is the most expensive and touching. And the resulting fluffies can be used like real toys. The value of such a thing for a child will be much higher than the value of a toy bought in a store. After all, it took so much effort, time and patience to make it.
Oksana Andronova
Every child has toys. You can buy some in the store whatever: any size, color, from teddy bears to newfangled minions. But a toy made by mother or father’s hands has a special charm in the eyes of a child. I suggest making a bird from thread. Having mastered simple techniques, you can do it at home with your child. You can play with it, decorate the interior of your home, or give it as a gift.
So let's get to work.
We need three colors of yarn, seeds for the beak, beads for the eyes, 20x14 cardboard, newspaper and glue.
1. We wind yarn of one of the colors (your choice) on the long side of the rectangle. This will be the bird's head. We make about forty turns.

2. For the wings and hooters, choose a different color and wind the yarn on the short side of the cardboard.

3. Cross the yarn for the head and wings.


4. We tie the yarn for the breast in half.

5. From a sheet of newspaper, crumple a ball approximately five cm in diameter.

6. Wrap it with breast yarn.

7. We lay the crossed yarn on top, tie it at the bottom - this is the tail.

8. All that remains is to glue the beak made of seeds and eyes made of beads.

Publications on the topic:
Flowers made from threads are used to decorate clothes, hats, and bags. An applique of thread flowers can serve a good gift. For.
We will need: 1. Silicate glue 2. Sticker 3. Scissors 4. Cardboard 5. Any thread 6. Christmas tree decorations 1. First, we take cardboard.
Master Class " Christmas tree decoration“There is very little time left before the New Year, and I am already thinking about how I will decorate the Christmas tree. I would like to do...
In order to make such a hedgehog we need: PVA glue, wool threads, scissors, a white sheet of cardboard and a simple pencil. For.
Hello, dear guests of my page! Here comes the New Year. The New Year brought smiles and fun, especially for children. The guys got in.
One day Arisha and I were sitting at home and were bored. I don’t want to read, I don’t want to write, and I don’t want to play either. And I remembered how my grandmother taught me.
The method of tying threads into a bundle is used to make tassels, bows, berries, and figures of people. Flowers are made using the same method. I made it.
Creating crafts from threads with your own hands is not only simple and exciting, but also useful for order in the house.
Leftover yarn has been collected in baskets for years. sewing accessories or gathering dust in the far corners of closets. With a creative approach, unnecessary trash will be turned into cute and cute toys and gifts. There are many techniques that make it easy to get new things, decorative items, and jewelry from waste. Simple souvenirs made from yarn are quite feasible for little hands, so this is just the kind of hobby that can be shared with children.
Possibilities of thread needlework
Creating crafts from threads has been a women's hobby since ancient times. After a hard day of work, weavers and seamstresses made their own dolls for children from the yarn left over from work. Modern mothers have the opportunity to buy their children any industrial toys, but what a pleasure - joint creativity!
So, what can you make from yarn? The list is extensive:
- three-dimensional figurines of chickens and fluffy animals;
- thread paintings;
- vases and lampshades;
- flowers and much more.

What is needed for work
Each craft will require different tools and materials. But the main set looks like this:
- floss, iris, wool or cotton yarn;
- scissors;
- needle;
- PVA glue (for paintings, flowers, lampshades);
- glue gun (for animals);
- cardboard;
- soft wire.
Funny chickens and animals
Fluffy woolen threads left over from or knitted are an excellent material for making your own volumetric crafts from threads. The most successful ones are furry little animals and fluffy chickens.
Making such toys is easy and simple, because they consist entirely of pompoms. If you learn how to make fluffy pompoms, consider that most of the work is done, then all that remains is to arrange them into a figure and connect them together.

The technique for making pompoms is very simple. You can safely involve children in this work.
- Cut out circles from cardboard to the size of future pompoms. Make a hole in the middle of each circle.
- Place two circles next to each other. Thread a long piece of thread into a gypsy needle.
- Wrap the thread tightly around the folded cardboard, threading it through the center hole. The more threads you wind, the more magnificent the pompom will be.
- Carefully cut the resulting thread bagel along the entire circumference. Slightly spread the cardboard and tie the threads tightly in the middle with a pre-prepared piece.
- Remove the cardboard, straighten the finished pompom and, if necessary, trim it with scissors.

Now you can start creating! Connect two yellow pompoms with hot glue, glue a cardboard circle on the bottom for stability, and a beak and eyes on top. The chicken is ready! The same principle is used to make dogs, cats, frogs and other animals. For more complex toys, pompoms of different sizes are used and cut into shapes.
This technique makes nice rugs. If there is a lot of yarn left, try learning how to knit.

Pictures from scraps of yarn
If you have a lot of small colorful scraps that are too short for pom poms, try turning them into a real painting.
In addition to yarn, you only need scissors, cardboard and PVA glue. You can draw the picture yourself or print a ready-made template. Choose a simple image with large elements and two or three colors to make your work easier.
Stages of creating a panel from threads:
- On thick cardboard, draw the outlines of the future design. If you are using a ready-made template, simply glue it onto a cardboard base.
- Cut all the threads very finely with scissors. Arrange by color in separate boxes.
- Thickly coat with PVA glue those parts of the picture where yarn of the same color will be used.
- Sprinkle glue onto the cut yarn, press gently, shake off excess.
- Do the same with the remaining areas until the entire picture is filled with yarn. Finished work frame it.

Thread paintings with flowers, animals, and simple landscapes look good. Read more about creating different ones in our other publication. You can also create paintings from threads and nails.
Openwork masterpieces based on PVA glue
Fine cotton yarn makes excellent openwork crafts made from thread and glue. To make an air lampshade in the shape of a ball, you will need:
- a skein of not too thick cotton thread;
- PVA glue;
- balloon;
- scissors.

Sequence of work:
- Inflate the balloon and tie tightly.
- Lubricate its surface with PVA glue.
- Wrap the ball with threads in different directions, not too thickly, but without large holes.
- Leave the workpiece overnight for the glue to dry, then deflate the balloon.
- In the resulting sphere of thread, make a hole for the cartridge. Remember that for such a lampshade it is better to use economy bulbs, because they do not get very hot.

Such openwork balls can be used not only for lampshades, but also simply for interior decoration, baskets, toys. If you wrap a vase instead of a ball, you get another unusual thing. In this case, the dried thread blank is carefully cut in half, removed from the vase, and then glued together.

Magic flowers for decoration
The remains of floss or iris can be turned into flowers of extraordinary beauty. The principle of working on flowers is the same as with a lampshade or vase. If you want to make small buds, but don’t have a suitable container for winding threads at hand, just crumple a piece of newspaper into a ball and wrap it with tape.
Wrap the workpiece with yarn not completely, but only halfway. After the glue has dried, remove the resulting bell and cut out the petals with small scissors. Glue a thread along the edges of the petals to prevent them from fraying. If you stick pieces of colored wire along the leaves, you can give the flower a more natural shape.

Carefully thread a piece of soft wire through the flower and secure. This will be the stem. Lubricate it with glue and wrap it with thread to hide the wire. Combining different sizes and shades of openwork buds, you can put together an exquisite bouquet.
Let's complicate the task - flowers from floss and wire
This craft requires hard work and concentration. But the result will be simply magnificent. All you need for the job is thin copper wire, floss threads and a couple of beads.
Stages of creating a flower from threads with your own hands:
- First prepare the base for the petals. On thin knitting needle Wind the wires close together, forming a tight spiral. Carefully remove the spiral from the knitting needle, connect the opposite ends to form a petal blank and twist tightly.
- Start wrapping the petal. Pass each new turn of floss through a turn in the wire spiral. The threads should lie tightly, without gaps. When the petal is completely filled, draw the end of the thread through the center, forming a vein.
- Wrap all the pieces in this way. After this, twist 5-7 petals into a flower. Attach a bead in the center.

Step-by-step master classes on creating crafts
To make other masterpieces from yarn and other threads with your own hands, take a look at our master classes with step by step photos crafts. Thanks to detailed recommendations from experienced needlewomen, you will easily cope with the tasks and will definitely get a result no worse than in the photos of the craftswomen!


Everyone has at least once encountered a person wearing a bauble. This small wicker bracelet is a symbol of friendship and peace, and it is not without reason that it has a foreign name “Friendship bracelet”. The history of this simple but stylish decoration began among the Indians of North America, who gave ropes woven in a special way to their friends. It was believed that the longer the bauble is kept on the hand, the stronger the friendship between people. The decoration, not torn, but independently removed from the hand, symbolized the end friendly relations, and was one of the most powerful insults. The secret of how to weave baubles from threads was passed down from century to century, until in the early 60s of the last century these bracelets became one of the symbols of hippies and spread throughout the world.
In addition to friendship between people, baubles symbolize a person’s interests and passions. For those who know how to read the secrets of the threads of these cute bracelets, they will reveal a lot about their owners. The picture or pattern depicted and the color of the threads are both important. A widely known example is that if a guy and a girl have the same or very similar baubles on their hands, then these young people are a couple.

Gradually, the original meaning of exchanging baubles was lost, but they did not lose their popularity. These bracelets are a universal decoration and therefore now they can be seen not only on representatives of the hippie subculture or the hands of little needlewomen, but also on secular fashionistas and fashionistas. Baubles made from floss always add brightness and special color to an image.


The easiest way is to push the finished thread onto the wrong side of the product, leaving enough thread to later tie a knot.

We apply a thread of the same color to the tear site from the wrong side

And then we tie this thread with standard two knots.

From the wrong side, we tie the ended thread with the one that was just inserted.

The place where the threads join is hidden, and weaving can continue further.
CategoriesIf you have some yarn left over after knitting, I’m ready to tell you what DIY yarn crafts you can make from it. Almost all the works are simple, even a child can make them. To make others, the kids will need your help. I think such children's crafts will decorate the interior of your home, will be useful for toddlers for competitions and exhibitions, or will become great gifts friends, family.
DIY yarn pompom
I decided to start with 3 ways to make pompoms. They will be useful to us more than once in our future work. You can choose the option that seems most convenient to you.
Method 1. How to make a pompom from yarn with your own hands with a cardboard base
The most common way. For it we will need:
- Thick paper (2 sheets). You can use cardboard as a base material
- Compass
- Scissors
How to do: 
- Draw 2 circles on paper. External - according to the size of future pompoms. Internal - depends on how thick you want the balls to be (the narrower, the thicker), as well as on your desire (it is easier to work with a wide hole for children 5-7 years old).
- Cut out circles. We make a hole in them.
- We cut one side of the base so that we can wrap it with thread without any problems.
- Next, we wind the wool.
- We move 2 circles apart.
- Cutting the wool.
- We pass the thread between the circles and tie the wool.
We remove the base. Trim off the uneven edges.
Method 2. On the fork.
Plus – you don’t need to make a base. But the size of the balls will be small.

- We wind the thread around the four tines of the fork.
- Between the 2nd and 3rd teeth we thread a thread with which we tie the yarn.
- Remove from the fork.
- Cut the resulting loops of wool.
All that remains is to trim the edges.
How to make pompoms from yarn quickly
This is the easiest option pompom without cardboard base . Another plus is that you get a lot of blanks at once from which pompoms are made. The downside is that it’s difficult (but possible) to make very curvy ones.

That's all! Let's fluff up our “balls”.
DIY crafts from yarn and threads
I'll start with pom-poms, or rather I'll continue. How can they be applied? First of all, you can use it for decoration for the holidays:, New Year,.
These can be garlands of pompoms. By the way, remember? If you haven't seen it, check out the link. It turns out very festive and bright.
And today I found some more interesting ideas:

Here are the letters, wreaths, dandelions and pom-pom trees.


Rug made of pompoms

How do you like these fluffies? You won't find these on sale! And you can make any shape. Twist pom-poms to match your favorite TV series. Just really? You can use that one quick way forming pom-poms, when they wrap them around a chair and get a lot of pieces at once (wrote above).
To make a pompom rug with your own hands, you will need a mesh. It can be a rubberized mesh or mesh fabric, or maybe a construction one. I once did it not on a mesh, but on a towel, I simply glued pom-poms with hot glue. It was great too. The rug served for a long time until we moved).
And with a grid it’s much easier. See for yourself.

Here, in my opinion, is the construction grid.

Crafts from yarn and threads for children
Piggy magnet
When I saw this photo, I really liked the idea for its simplicity. True, it is assumed that this work is made of cord. But you can use thick yarn or, if you are making from leftovers thin wool, weave it into a braid/chain.

- Twist the chain into a spiral and glue it to the cardboard.
- Cut out ears and a nickel from felt. Glue them on the piggy’s “head”.
- Sew button eyes and beads onto the nickel.
- Attach the cardboard to the magnet.
But this is not the last piggy. I have another model.
Fluffy pig
And again you will need a pompom.

- Glue a nickel button to it.
- Eyes.
- Felt ears.
A bow will look beautiful. If it’s difficult for kids, you don’t have to do the paws. But for children 10-14 years old I can do such a task. We cut them out of felt and glue them.
Bunny - rabbit
This is the case when the work looks very cool, it seems so difficult to do. But it's actually simple.
The size of the bunny will depend on the size of the square.
Photos
Horse

Now it is already clear that this is the muzzle of a horse. Glue on the eyes. Ready!
Another version of the horse. You will need two piles of thread, tie it as in the picture.

All that remains is to make the tail and mane. You can also use a felt saddle.

Thread necklace
Dove and bullfinches made of threads
I will have several options: dove and bullfinch . Using their example, I will show how you can create other birds using different coat colors.
You can also make sparrows and chickens, just by changing the colors of the threads.
Detailed MK in our video.
And here are the bullfinches in the nest. The nest is also made of threads.
It is done according to the same scheme. We just need yarn of other colors:
- Black (back - wound along the length of the base);
- Gray (wings - wound along the width);
- Red (tummy - we wrap along the width of the base).
The thickness of all blanks is the same.
Titmouse master class
We will be mixing different strands of yarn! This is how we will decorate the birds.
We will need:


We make preparations: 
- We wrap burgundy wool on the wide side of the warp. Let's cut it.
- Yellow - we wrap it on the second cardboard. We cut it too.
- We wind white and blue together. Cut and tie in the middle.

Assembling the model:
We place burgundy and yellow bunches perpendicularly. Burgundy is at the bottom, yellow should be on top).
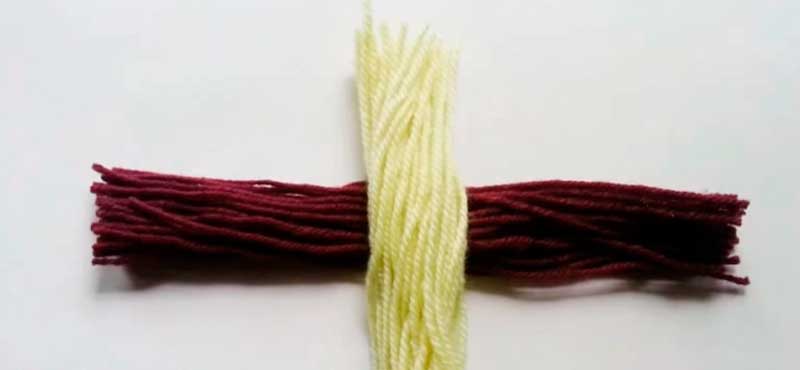
We bend the burgundy ones over the yellow ones.

We tie the burgundy ones with thread directly under the yellow bunch.
We bend the yellow ones at a right angle. We tie it with thread to match the color.

We place the workpiece so that there are blue threads at the bottom and our bundle at the top.

Inside the blue ones is a wad of paper.

We bend all the threads (we mask the paper between them). We tie it under the ball, leaving a tail.

Align the tail.

We form legs from wire.
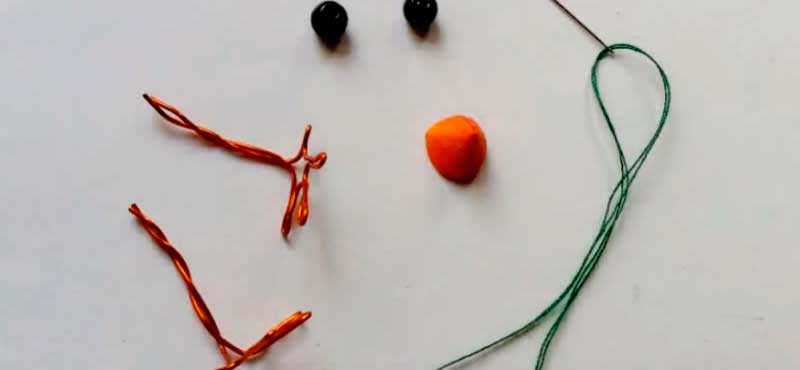
We insert the paws into the tummy.
Sew on the eyes.
Glue the beak.

Angry Birds made from pompoms
Red will be first. We wrap pink yarn around 3 fingers.
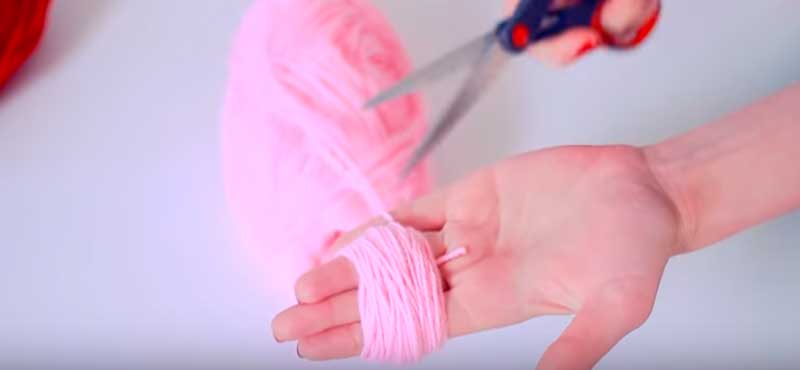
Red on top.

We remove it from our fingers while pulling out the thread with which we tie the pompom.

We tie and cut the threads.

We cut the pompom so as to obtain an ovaloid.

We make eyebrows and a beak from felt, eyes from white beads, and draw pupils with a marker. And don’t forget to slightly pull out the three threads on the head - the tuft, just by gently pulling the threads in the pompom.

For blue birds We do everything the same, only we take blue threads. don't forget to cut the pompom into an oval shape.

We wrap gray, black on top, make a pompom and cut it into a ball. We make the eyebrows, beak and forelock from felt and glue them with hot glue. Bead eyes and pupils are drawn with a marker. The only peculiarity is the fluff around the eyes. To do this, we glue gray threads onto the bead with rays like a snowflake.

For the pig you will need light green yarn and felt. We make a round pompom, maybe a little oval. Glue the nose out of felt (oval), draw dots with a marker. For the eyes you will need large beads, if not, you can take any color and paint it white, put the pupil on it with a marker. We do the eyebrows. Use tweezers to pull out the strings for the ears. And you're done!

For Chuck you need white and yellow threads. We first round the pompom, then cut it into a cone. Glue the beak, eyes.

Doll
As for me, even a simplified version, without decorations and details, is interesting. But more details:

- We wrap wool onto the base.
- We remove and bandage. Cut off the edges of the thread
- 2 cm below the dressing area, wrap it with thread and bandage it. This is how we formed the head.
- Once again we wrap the wool around the base (only in a smaller size).
- We knit this workpiece on both sides. These are hands.
- We pass our arms through the body, under the head. We tie it right under them.
Here, as for me, the doll is ready.
But you can make her a “face” from thin felt. Sew hair on top. And, if you divide the lower part of the yarn in half and tie each half, you will get a “boy”.
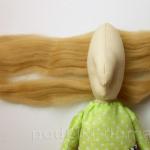
Doll
Such a doll can be not just a toy, but even decoration or a Christmas tree toy.
She's not all thread, just her hair. But I liked it so much that I couldn’t pass it up.

So, for the doll you will need tulle, which we wrap on 2 cardboard circles. Then we cut and tie. In general, we make a pompom from tulle.
Next, we cover the ball with beige knitwear, using an eye shadow palette we draw cheeks, eyes, and eyebrows. We draw eyelashes with a marker. Next we do the hairstyle. We wrap the yarn around our fingers, cut it and glue it onto the crown of the doll, so that the cut edge of the thread is a bang.
Take the second bundle of thread, tie it in the middle and glue it to the bottom of the head. We lift the hair up so that it completely covers the entire back of the head and collect it in a ponytail at the top of the head. We tie it with threads.

Glue the bow, decoration, and head to the body.

You can glue a thread - a loop - on the top of the head so that the doll can be hung if necessary.
Yarn jewelry
And look how easy it is to make tassel earrings.
dream Catcher
I blogged about how to make a giant dream catcher. It is incredibly beautiful and is a worthy decor for the most expensive designer interiors.

Snood scarf in 10 minutes
New very simple pattern from the beloved Alize Puffy. We knit a snood scarf from it without knitting needles or a hook, with our own hands, in just a couple of minutes.
Wonderful pattern and video from my favorite channel.
Knitted hat and also without knitting needles.
And a gorgeous blanket
Snowflake for the New Year

We can already make pom-poms. We'll need a fairly large ball to start with. 
We straighten the yarn.

First we divide into 2 halves, then in half. And then cut each part in half again. Then all 8 rays of the snowflake will be the same.

We bandage the rays, stepping back a little from the edge.
You can decorate a snowflake with beads, eyes, and embroidery.

Pillow
Do you love plush toys? I do! And I especially love to lie on them. You can make a fluffy pillowcase from leftover yarn. And it's easy to do. We wind 10-20 turns on our hand, depending on the thickness of the yarn. Remove from hand and bandage. Cut the threads. We get a skinny pompom. Now we comb it thoroughly and glue it to the base - a pillowcase using hot glue. Next, we’ll use a hair straightener and give our pillow a neat hairstyle. Ready!

Patterns, as you guessed, you can come up with yourself.
Thread dog
Do you love Yorkies? Or maybe your friend has such a dog.
Then you can give him such a magnet for the refrigerator.
Wreaths
We wrap yarn on a cardboard base and get an excellent basis for a wreath for any holiday. If you take yellow threads, you can make an Easter wreath.

Balls of thread
Here's how you can make a craft out of thread for Easter. We make a regular ball in the shape of an egg. We cut out the window and glue the decor.
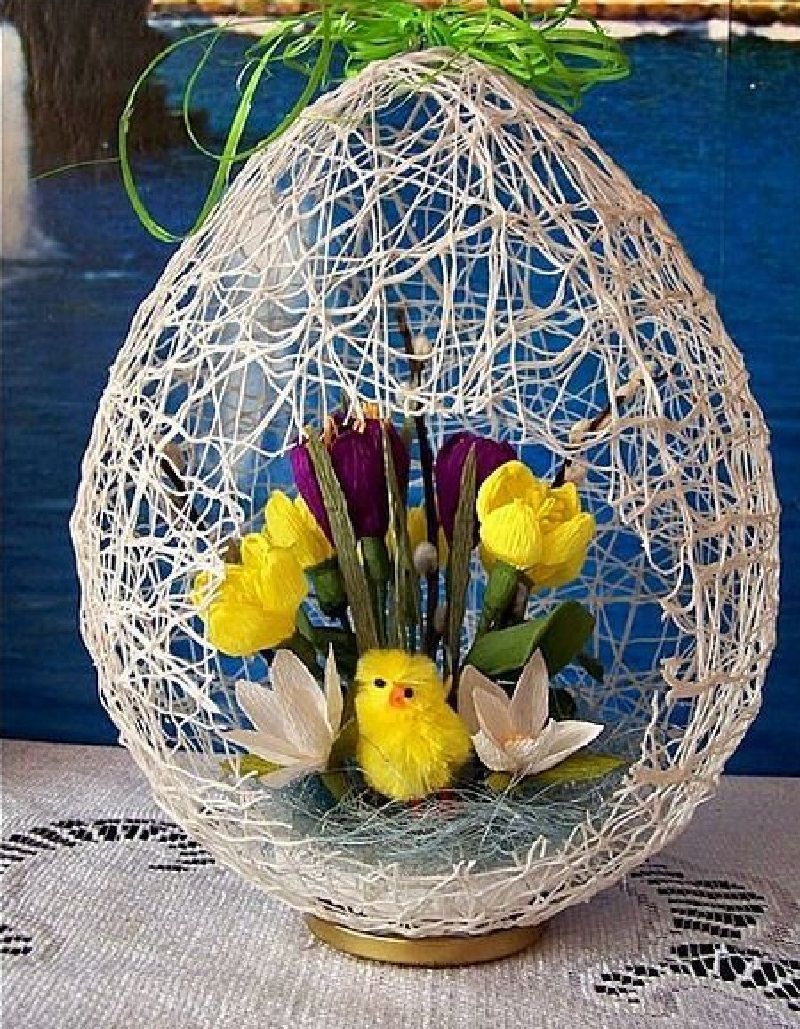
The second option is suitable if you have a foam base. We stick pins along the contour of the window, wrap the base with film and weave a web. As you guessed, it is not possible to remove it from such a mold if you make a full egg at once. Therefore, we make 2 halves and at the end we tie them around the perimeter.

Letters and numbers
Need birthday decor?

We make a base out of cardboard and decorate with threads, just wrap it around!

Here are other design options:


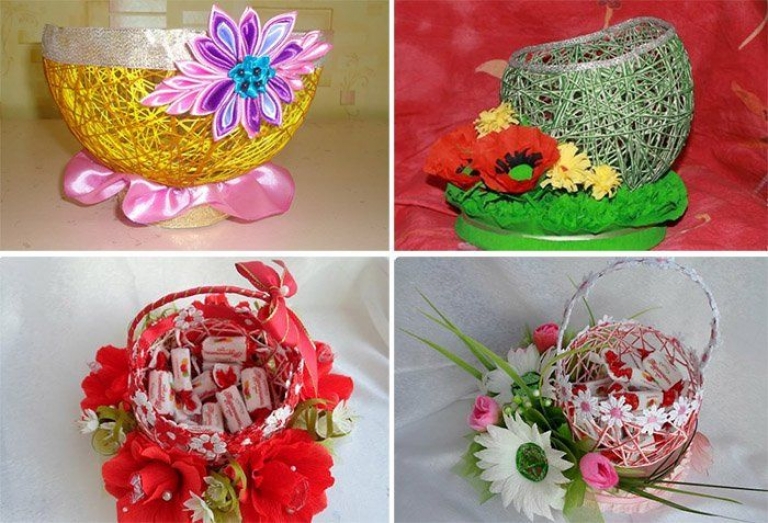
Candy bowls
Threads make excellent vases and candy bowls.
 Be sure to wrap the form in film or tape. We put the threads coated in PVA on the mold and let it harden.
Picture made of threads and nails
Recently, such paintings have become very popular.
The second option for a thread painting is gluing the threads with PVA glue. Very simple technique, and the result is beautiful!
20 ideas from the “Take and Do” channel
In the video you will find many more cool ideas. I especially like the thread feathers and earrings.
I look forward to your work! They will be the decoration of this page! Share your ideas and show off the models your kids have made!
And don't forget what you have every right give a link to my website on your social media pages! More readers will help create a great collection of work!
Well, we still have more than one visit to the creative workshop ahead, so sign up! Receive notifications about the release of new articles on current topics. I'm looking forward to seeing you!
We also recommend
 Good Baba Yaga from a plastic bottle and tights (MK) Make Baba Yaga with your own hands from
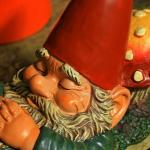 How to sew a gnome from an old sweater
 Congratulations on Labor Day, May 1st, funny
 Winter overalls for boys with zipper and warm fleece
 Women's shirt pattern step by step construction
 Crocheted cactus pincushion