How to make a pony out of plasticine: step-by-step instructions. How to make a pony from plasticine from the cartoon “Friendship is a Miracle”: characters from your favorite cartoon series with your own hands Pony from plasticine in 3D
Many girls will be interested in how to make a pony from “Friendship is Magic” from plasticine. Multi-colored ponies are known to several generations of children: the first figurines and dolls were produced back in 1983. They were followed by coloring books, educational games, short and full-length cartoons. The animated series “Friendship is a Miracle” is currently being broadcast and filmed.
The main characters of the animated series are colorful funny ponies from the My Little Pony franchise. Each of the heroes has its own color and unusually lush mane and tail. Some of the characters also have wings and a horn.
Let's make cartoons
Let's look at how to make characters from the cartoon "Friendship is Magic" step by step using the example of three heroes: Pinkie Pie, Apple Bloom and Rainbow Dash.
Pinkie Pie is the main character of the cartoon. To create a figurine you will need the following materials and tools:
- plasticine in pink, purple, white, black and blue colors;
- stacks;
- modeling board.

Progress:
- We make blanks for all parts of the body: we form nine balls from pink plasticine - four identical medium-sized ones (we roll them into cones), two large and three small;
- From purple plasticine we roll a large ball for the mane and tail, and from white, blue and black - small balls;

- We begin to sculpt the body: we extend one of the large pink balls, roll it up and attach a small ball, smooth it out, forming a neck;

- Smoothing, we glue the cones - legs - to the body (make sure they are at the same level);
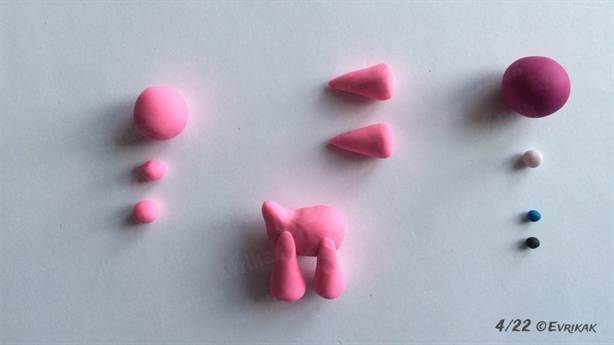
- We sculpt a head from the remaining pink balls: we lengthen the large ball, form a muzzle, from small ones we sculpt triangular ears and attach them to the sides of the head;

- We connect the head to the body and smooth out the seam;

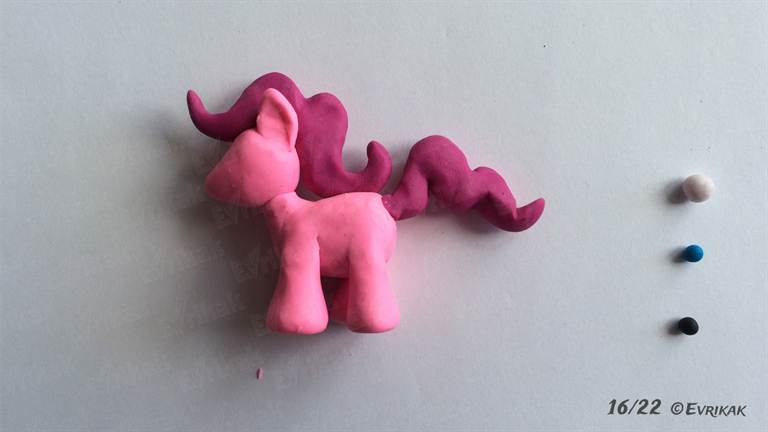
- We put the pony on its feet (the figure should not fall) and slightly bend the hind legs;

- We make a tail and a mane from purple plasticine: we divide the ball in half and from one part we form a wavy mane (the shape resembles a mustache), and from the second - a wavy tail (like the letter “M”);

- We attach the mane: one end should clasp the head, and the other should rest against the back;

- Attach the tail and smooth the seams;
- We make the eyes: we roll two cakes from white, blue and black plasticine and put them on top of each other;


- Glue the eyes and make a mouth with a stack.

Pony is ready!

Apple Bloom is a red and yellow pony. To create it you will need:
- red, yellow, black, brown and white plasticine;
- matches;
- tools;
- modeling board.

How to sculpt:
- Roll yellow plasticine (about 1/5 of the block) into a ball;

- Form a muzzle: pull the ball forward from below, extend the ears from above on the sides, make a stack of mouth and nostrils;

- Make eyes: form two identical cakes from white plasticine, glue slightly smaller cakes from brown plasticine on top, then even smaller cakes from black, add eyelashes from black sausages and highlights from small balls of white plasticine;

- Divide the remaining yellow plasticine into approximately two equal parts;
- Roll one part into a ball and stretch it into a cone;

- Bend the narrow end upward and insert a match into it for future fastening of the head;

- Divide the remaining plasticine into four equal parts and roll into balls;

- Make cones with a flat base from the balls;

- Attach the legs to the body and smooth them (for greater stability, you can stick matches into them);

- Attach the head;
- Roll several sausages out of red plasticine and make bangs and then a mane out of them;

- Make a fluffy tail from the remnants of red plasticine (twist and stretch at the ends) and attach to the pony (used as a support).


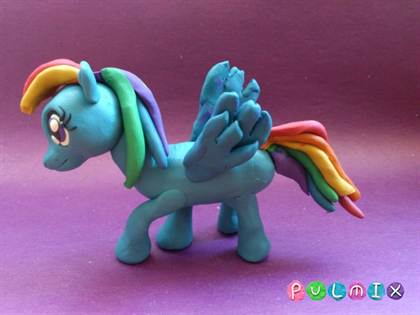
Rainbow Dash is a colorful character.
To create it, it is better to take a whole pack of colored plasticine with rainbow colors.

In addition, you will need:
- stacks;
- matches;
- modeling board.
How to sculpt:
- Making the head: roll two balls (large and smaller) from blue plasticine;

- We glue and smooth the balls so that we get an elongated muzzle, make a mouth and nostrils in a stack;

- For the eyes, we make a stack of notches and form cakes from balls of different sizes and colors (black, white, purple);

- We assemble the eyes in the following sequence: glue large black cakes into the recesses, white on top, then purple and black again;
- Decorate the eyes with white highlights and eyelashes;

- We make triangular ears from two small equal balls and attach them to the sides of the head;

- We make the body: roll a cone out of blue plasticine and wrap the end up;

- We make the legs: roll four equal balls, form them into cones and insert matches into three of them;

- We attach the legs to the body (we bend the front leg without a match and smooth it to the body);

- Attach the head;

- We make bangs, a tail and a mane: we roll up sausages of all the colors of the rainbow and collect them in rows in bunches;

- Attach the “hair” to the pony;

- We make wings from blue plasticine: roll four flat cakes (two large, two small), stretch them out, fold them together and process them with a stack;
- Attach the wings to the back;

- From pieces of red, yellow and orange plasticine, roll up a thin sausage and make a zipper, attach it to the side.

The winged pony is ready!
You can see how to make other ponies in a selection of videos.
Video on the topic of the article
Young children have new favorite characters - colorful magic ponies from the cartoon My Little Pony. Kind and funny, these animals fascinate everyone, so we suggest that you and your child try to make such a cute toy out of plasticine. Or maybe make several heroes at once?
For a trial lesson with children, we suggest making a small figurine that fits in the palm of your hand. It will require quite a bit of plasticine, the color of which you choose yourself - this is a cartoon creature, so experiment with paints. For the mane, it is recommended to choose a darker shade so that it does not merge with the body. You will also need quite a bit of white plasticine, which will go on the eyes, black - on the pupils. For small parts you need a knife (stack), and for the process itself you need a board. Or you can simply cover the table with oilcloth so that you don’t have to wash it for a long time and painfully.
- Pinch off a large piece from a block of plasticine, warm it and knead it in your hands until it becomes pliable. Roll into a sausage, the length of which is approximately 3-4 cm, and the thickness is 1.5-2 times less. If a very small child is involved in the process, you can make a larger toy, since small parts will be inconvenient for him to work with.
- Pull either end of this “sausage” slightly upward to form a neck for the animal. Be sure to maintain a narrowing towards its end, otherwise it will be difficult to smoothly align with the head later. Smooth the back with your finger, making the transition neat; do not place the neck itself vertically - let it go a little forward.
- Take another piece of plasticine, 2.5-3 times smaller in volume than on the body. Roll into a ball, first knead it, and slightly flatten it on one side. Placing 4 fingers on it and bringing them together, make a muzzle with a pulling motion. Don't deform it too much or it will look more like a duck's beak. Be sure to smooth out the “nose” with a vertical line.
- The ears can be pulled out from the same piece of plasticine that became the head, or they can be made from a separate material. They are triangular, small, rather thin, and stand straight up. Keep in mind that the ear should thicken towards the base and smoothly transition into the head, and not stand perpendicular to it.
- Take a new piece of plasticine of the same shade, knead it in your hands, divide it into 4 equal parts. Each of them needs to be rolled into a cone with a not too narrow top, but a thick and even base. These will be the legs of our pony. Using a stack or knife, the tip of each of them needs to be cut at a slight angle.
- On the opposite side at the bottom, place half a toothpick or make a depression: this will make it easier to connect the head and neck. Also insert half a toothpick into the pony's rump - the thin sausages that make up the tail are attached to it. The mane can be fixed without additional devices.
- Connect the torso, legs and head, paying special attention to the smooth transition of the plasticine mass in these areas. The figure should look solid and smooth. At the same stage, you can begin to completely design the muzzle: polishing all the lines, adding a “smile” with a brush or the tip of a knife, slanted eyes made of white plasticine and pupils made of black.
- Now only the mane and tail remain. To do this, you need to take strips of a brighter or darker color, roll up 3-5 thin straws of different shades, and combine them into a sheet. It’s good if among these shades there is also the main color of the body. Using a stack, cut the required length of the canvas, attach its end to the head and neck or to the croup of the figure, and adjust it with your fingers. The plasticine pony is ready!

If you don’t have enough shades, you can always make them yourself: mix a little blue and white with red - a soft pink will appear, and after adding black and blue, a rich purple will appear. Professionals assure: for home creativity, it is enough to buy a set of basic colors and be sure to have black and white bars - the child will not only develop fine motor skills, but will also gain artistic taste, knowledge of color, and the ability to create colors.
Using the technology described, you can make a figurine from almost any material that can be sculpted, but you cannot help but pay attention to one of its modifications. It is better for older children (middle school) to work with it, since sharp small parts are used for connection. This is very convenient if you want to fasten heavy pieces without extra effort.
- The tail and mane of a toy can be made not only from plasticine, but also from a more suitable soft material: for example, floss threads, which are first fluffed so that they lie more luxuriantly, and then inserted into the plasticine with a needle to secure them. For the tail, it is recommended to tie them into a panicle.
An animated educational series for children called “Friendship is a Miracle” tells about the adventures of miniature horses. Each of the horses has a bright color and fluffy mane. This article will present several master classes with detailed instructions, after reading which young needlewomen will be able to make a pony from the cartoon “Friendship is a Miracle” from plasticine.


Below is a selection of videos that will present methods for making the main and most famous cartoon characters from plasticine, and also needlewomen will show you their personal collections of plasticine miniature horses.
How to make a pony from plasticine: 1 way
In order to make one of the cute miniature horses from the cartoon "My Little Pony", you will need plasticine of several colors, namely: brown, orange, pink, white and green.
First, you need to sculpt the main components from brown plasticine: an oval-shaped body, a head and four legs. Then all the prepared parts must be connected and the joints carefully smoothed out. Then you should cut out thin strips from the orange color and make a pigtail out of them. It is advisable to put the twisted strips in the refrigerator for a while, then take them out and attach them to your head. You also need to make a hairpin from pink plasticine and attach it to the edge of the braid. Next, you need to make a hat out of pink, to do this you need to first form a ball, give it an oval shape, then you need to straighten the brim of the hat. After this, you should make two triangles out of brown, using a pencil you need to make indentations in the center, thereby creating ears for the future pony. Then you need to make an elongated nose and mouth, eyes. In the same way as the mane was done, the tail should also be done.


Method 2
In order to make another pony from the famous cartoon, you will need plasticine in pink, purple, white, black and blue, as well as matches or plastic tubes. Below we will describe the process of sculpting a pony step by step.
- First, you need to sculpt the main components of the pink color, namely: an oval-shaped body, a cone-shaped neck and a round head.
- Then the resulting parts must be carefully connected, smoothing the joints and pulling the front part of the pony's muzzle slightly forward.
- To make the craft stable, you can use either four matches, or cut a plastic tube into four parts, then cover each part with plasticine. Next, the legs need to be attached to the body, and to indicate the hooves, small sausages must be rolled out of purple plasticine and attached.
- After this, you need to make eyes from white and blue plasticine, make eyebrows from black plasticine, make a mouth from pink plasticine, and make ears from purple plasticine.
- In order to get a mane and tail, you need to form thin sausages out of purple and attach them in place of the mane and tail.


How to make a pony from plasticine: method 3
In order to make another cartoon character, you will need beige and pink plasticine, as well as a toothpick and a plastic knife. First, from beige plasticine, you need to roll a sausage about three centimeters long, one of the edges of which must be bent in order to mark the neck. Then you should form a ball from the same color and stretch it out a little on one side to form a muzzle. To make the ears, you will need two small pieces of plasticine, which must be shaped into a flattened circle. After this, all the prepared parts must be connected, the ears attached to the head, and the head attached to the body. Using a toothpick, you need to mark the lines of the nose and mouth. In order to get legs, you need to form four parts in the shape of a cone, cut the narrow parts diagonally using a plastic knife, and attach the legs to the body. Thin strips should be cut from pink plasticine and attached as a mane and tail. At the final stage, you need to make almond-shaped eyes, and the product is ready.
In their magical children's world, our little children have many favorite fairy-tale characters, whom they perhaps invented themselves, or fell in love with after watching some cartoon.

The heroine, the basis for our today's creativity, is the bright pony Applejack, from the cartoon “Little Pony”. You will say this character is for girls. But after watching our master class, you will be able to sculpt a thoroughbred horse for fighting in battles or for racing for your sons..
So, we will need the following materials:

Plasticine in the following colors:
Orange (we combine red with yellow), yellow, brown (mix black with red and white), red, green, black, white,
Stack, 2 toothpicks
So, let's begin:
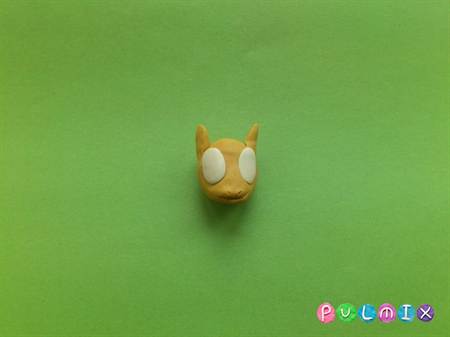
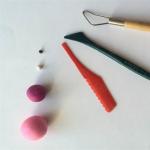
From orange plasticine we roll a larger, medium-sized ball for the muzzle, as well as two small balls for the ears. For the body we sculpt a large oval and four sausages for the legs

To make ears: press down small balls and form a triangle shape.
For the muzzle, connect the large ball to the middle one and smooth out the joints.

We divide the toothpicks and insert them where the body parts should be attached: the head and legs.

To make the eyes we need a little bit of white, green and black plasticine. Roll balls from the flowers listed and press them down a little. On the white circle we place a green circle that is slightly smaller in diameter, moving it to the outer corner of the eyes and we put a black circle in the center.


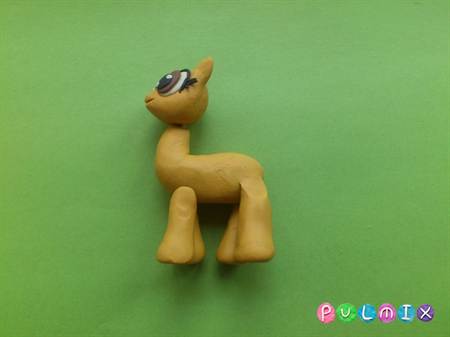
We form the body of the horse: we place the head and 4 legs on toothpicks and smooth out the joints of the parts (the left front leg is slightly raised).
Applejack's hairstyle is very simple: for this we roll three droplets of different sizes, a large droplet for the tail, a slightly smaller one for the mane, and a small one for the bangs and two small droplets to attach to the tail and mane.

Using a stack, we make cuts on the bangs and ends of the mane and tail.

Applejack decorates her hair with elastic bands that we make from thin red sausages.

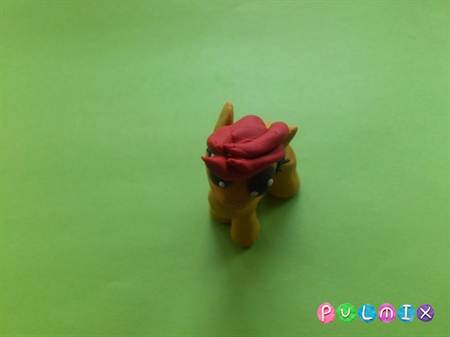
Also, our fashionista never parted with her cowboy hat: we twist two brown balls and press them with different forces, we make a cutout in the shape of a semi-arc on the brim of the hat, you can use a pen cap.


Before you mold a My Little Pony from plasticine, that is, one of the cute characters from the cartoon “Friendship is a Miracle!” “I would like to list the main characters of this so popular cartoon. As you understand, you can make any pony using analogues from our master class.
And if your child wants you to mold plasticine or help him make a rainbow pony, Fluttershy, Pinkie Pie or another pony, then you can do this easily and simply by completing the necessary elements that distinguish this pony from the rest. At the end of the article, after our plasticine MK, you will find pictures of all the heroines of this such an interesting cartoon for children. In the meantime, step-by-step instructions from our respected master.
To make a little surprise for a girl who is a fan of the cartoon, we will need plasticine of several colors. From it we will make a cute pony in a funny hat named Applejack.
Plasticine pony: master class
So, first we need to make an oval body, a head, and four legs.

We connect these parts and smooth out the joints.

We make many thin strips from light plasticine and braid them. For ease of use, you can put the strips in the refrigerator for a while. We fix the braid on the head and make an elastic band at the end of the braid.


After that, we make bangs from the same thin strips and carefully arrange them. Next you need to make a hat. It is an oval and a small ball in the middle. We straighten the brim of the hat on our finger, raising it in front and lowering it in the back.


In the same way as the mane, we make the tail. You don’t have to braid it, but simply twist it several times and also decorate it with an elastic band.
If you make a pony from self-hardening plasticine, you will get a wonderful toy that children will definitely appreciate.
The seven main heroines of the cartoon “Friendship is a Miracle!”
 | Pony Rainbow Dash |
 | Sparkle |
We also recommend
 Fruit bouquets
 Winter overalls for boys with zipper and warm fleece
 Women's shirt pattern step by step construction
 Crocheted cactus pincushion
 How to make a pony from plasticine from the cartoon “Friendship is a Miracle”: characters from your favorite cartoon series with your own hands Pony from plasticine in 3D
 Metals. The most ductile metal? What are the most malleable metals