Pattern of a women's denim shirt with long sleeves. Women's shirt pattern step by step construction
Hello.
In this article we will learn how to build a shirt design.
Shirt-cut clothing is primarily distinguished by the parameters and configuration of the armhole. The dimensions of the shirt armhole are larger than the armhole dimensions of the basic dress design, and the configuration of the shirt armhole is wider and deeper. Therefore, the details of the shirt pattern - the back and the front - also differ in their parameters and configuration.
There are two ways to construct a shirt design: use constructive modeling of the basic dress pattern, or use the developed methodology for constructing a shirt design. In this article we will look at the second option.
To create a shirt pattern we will need the following measurements:
Name of measurements and symbols | cm |
|---|---|
Half neck circumference (Ssh) | |
Half chest circumference (Сг) | 40,5 |
Half waist (St) | |
Half hip circumference (Sb) | 44,8 |
Back length to waist (Lts) | |
Chest Height (Vg) | |
Shoulder Length (Dp) | |
Product length (Di) |
In this cutting technique we will consider two shirt silhouettes: semi-adjacent And straight. The shirt has a semi-fitting silhouette and suggests the presence of chest and waist darts, while the product is quite loose and dynamic. The shirt has a straight silhouette and has no darts, and the product itself is looser. As a result, the cut of these two silhouettes differs not only in the allowances for a loose fit, but also in some construction structures. To create a shirt pattern with a straight and semi-fitting silhouette, we will use the following allowances for a loose fit:
The increase along the chest line between the design details is distributed as follows:
Let's prepare a blank sheet of paper, the length of which is 5-10 cm longer than the measurement of the length of the product.
Drawing grid
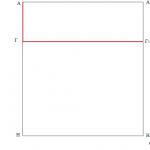
Product length and width. Stepping back 5 cm from the top edge of a sheet of paper, draw a rectangle AA 1 H 1 H, where sides AH and A 1 H 1 are equal to the measurement of the length of the product, and sides AA 1 and NN 1 are equal to the measurement of the half-circumference of the chest with an increase for a loose fit (AN = A 1 H 1 =Di=68cm; AA 1 =NN 1 =Cr+CO=40.5+5.5=46cm). note, in this example I used an increase for a semi-fitting silhouette; if you are drawing a straight silhouette, then do not forget to substitute the corresponding allowances for a loose fit into the formulas (see the table above).
Armhole depth. From point A downwards in a straight line we put aside 1/3 of the measurement of the half-circumference of the chest + CO (see the table of increases) and put point D (segment AG = 1/3Cr + CO = 40.5: 3 + 9 = 22.5 cm). From point G to the right we draw a horizontal line until it intersects with the segment A 1 H 1, denoting the intersection point as G 1.

Back width. From point G we set aside 1/3 of the measurement of the half-circumference of the chest + CO (see the table for the distribution of the increase along the chest line) and we get point G 2 (segment GG 2 = 1/3Cr + CO = 40.5: 3 + 3 cm = 16.5 cm) . From point G 2 upward we will construct a perpendicular to the intersection with side AA 1, we will denote the intersection point as P.

Armhole width. From G 2 to the right, we will set aside 1/4 of the half-chest girth measurement + CO (see the table for the distribution of the increase along the chest line) and mark the point G 3 (G 2 G 3 = 1/4Cr + CO = 40.5/4 + 0.5 = 10.6 cm). From point G 3 upward we draw a perpendicular to the intersection with side AA 1, and denote the intersection point as P 1.

Waistline. From point A downwards, take the measurement of the length of the back to the waist and place point T (AT=Dts=40cm). From point T we draw a horizontal line to the intersection with side A 1 H 1 and denote the point of intersection T 1.

Hip line. From point T downwards, put half the measurement of the length of the back to the waist and put point B (TB=1/2Dts=40:2=20cm). From point B we draw a horizontal line to the intersection with the segment A 1 H 1, mark the intersection point B 1.

Side line. Divide the segment G 2 G 3 in half, denote the intersection point G 4 (G 2 G 4 = G 4 G 3), and lower the perpendicular from this point to the intersection with the bottom lines, denote the intersection point H 2, and the intersection points with the waist lines and hips - T 2 and B 2.

Auxiliary armhole points. Let us divide the segments G 2 P and G 3 P 1 into three equal parts, denoting the lower division points as P 2 and P 3 (see figure).

Building the back
Back neck cut. From point A to the right, we will set aside 1/3 of the neck half-girth measurement + 0.5 cm (for all silhouettes) and get point A 2 (AA 2 = 1/3Сш+СО=15:3+0.5=5.5 cm). Up from point A 2 we will set aside 3 cm (for all silhouettes) and mark point A 3 (A 2 A 3 = 3 cm). Let's draw a smooth line for the neckline, keeping a right angle at point A.

Shoulder section of the back. From point P downwards we will set aside 3 cm (for all silhouettes) and place point P 4 (PP 4 = 3 cm). Now let’s connect points A 3 and P4, and on the resulting straight line from point A 3 we will set aside the measure of shoulder length + CO (see the table of increases) and put point P 5 (A 3 P 5 = Dp + CO = 13 + 1.5 = 14 .5cm).

Back armhole cut. Let's connect points P 2 and G 4 with a dotted line and divide this segment in half, and from the division point downward we will put 2 cm at a right angle and place point P 6.

Let's form a smooth concave line to cut the armhole, connecting points P 5, P 2, P 6 and G 4.

Back yoke. Let's put 8 cm down from point A and put point K (AK = 8 cm). From point K to the right we draw a horizontal line until it intersects with the back armhole line, and we denote the intersection point as K 1.

Down from point K 1 along the armhole line, set aside 1 cm and place point K 2 (K 1 K 2 = 1 cm). Connect point K 2 with a smooth line to the yoke line.

Constructing the front of a shirt with a straight silhouette
Shelf neck cut. From point G 1 up, we will set aside half the measurement of the half-circumference of the chest and place point P (G 1 P = 1/2Сг = 40.5:2 = 20.3 cm). From point P to the left we draw a horizontal line of arbitrary length.

Now from point P to the left and down we will set aside 1/3 of the neck half-girth measurement + 0.5 cm and mark points P 1 and P 2 (PP 1 = PP 2 = 1/3Сш+СО = 15:5 + 0.5 = 5.5 cm ). Let's connect points P 1 and P 2 with a dotted line, which we will divide in half and from point P through this division point we will set aside 1/3 of the measurements of the half-circumference of the neck + 0.5 cm and get point P 3 (PP 3 = 1/3Csh + CO = 15:5 +0.5=5.5cm).
Let's draw a smooth line to cut the neck through points P 1, P 3 and P 2, maintaining a right angle at point P 2.

Shoulder section of the shelf. Let's build an auxiliary line by connecting point P 1 with the upper dividing point of the segment PG 2 (see figure), on this line from point P 1 to the left we will set aside the measure of shoulder length + CO and place point P 7 (P 1 P 7 = Dp + CO =13+2=15cm). Please note that we are now considering the construction of the front of a shirt with a straight silhouette, so the increase in the formula corresponds to the increase for a straight silhouette.

Front armhole cut. Let's connect points P 3 and G 4 with a dotted line, divide this segment in half, lower a perpendicular of 2 cm from the division point and mark point P 8.

Let's draw a smooth line to cut the armhole, connecting points P 7, P 3, P 8 and G 4.

This completes the construction of a straight silhouette shirt.

Our pattern is ready!

Construction of a shirt front with a semi-adjacent silhouette
Shelf neck cut. From point G 1 up, we will set aside half the measurement of the half-circumference of the chest + 0.5 cm and place point P (G 1 P = 1/2Cr + CO = 40.5: 2 + 0.5 = 20.8 cm). From point P to the left we draw a horizontal line of arbitrary length.

Down and to the left of point P, set aside 1/3 of the neck half-girth measurement + 0.5 cm and mark points P 1 and P 2 (PP 1 = PP 2 = 1/3Csh + CO = 15:5 + 0.5 = 5.5 cm) . Let's connect points P 1 and P 2 with a dotted line, which we will divide in half and from point P through this division point we will set aside 1/3 of the half-girth of the neck measurement + 0.5 cm and get point P 3 (PP 3 = 13/Сш+СО=15:5 +0.5=5.5cm). Let's draw a smooth line to cut the neck through points P 1, P 3 and P 2, maintaining a right angle at point P 2.

Shoulder cut and chest dart. To the left of point P 1 we put 4 cm and put point B (P 1 B = 4 cm), down from point B we put 1 cm, we get point B 1 (BB 1 = 1 cm). Let's connect points P 1 and B 1.

Let's add the lengths of the segments PP 1 and P 1 B (5.5 + 4 = 9.5 cm), subtract 1 cm from this sum (9.5-1 = 8.5 cm), put the resulting value to the left of point G 1 and place point G 5 (G 1 G 5 = PP 1 + P 1 V-1 = 8.5 cm). Let's connect the points G 5 and B 1, the segment G 5 B 1 is the right side of the chest dart.

Now let's build an auxiliary line by connecting point B with the upper dividing point of the segment PG 2. Draw a vertical line upward from point G 4 until it intersects with the auxiliary line; we denote the intersection point as O.

To the right of point O, on the auxiliary line we plot the length of the shoulder with an increase for loose fit minus the length of the segment P 1 B and place point B 2 (OB 2 = Dp + SO-P 1 B = 13 + 1.5-4 = 10.5 cm) . Next, from point G 5 up through point B 2, we draw a segment whose length is equal to the right side of the dart and we get point B 3 (G 5 B 3 = G 5 B 1).

Down from point O we will set aside 3 cm and place point O 1 (OO 1 = 3 cm). Let's connect points O 1 and B 3 with a thin line.

From point B 3 to the left along a thin line, set aside the length of the shoulder with an increase for loose fit minus the length of the segment P 1 B and put point P 7 (B 3 P 7 = Dp + SO-P 1 B = 13 + 1.5-4 = 10 .5cm).

Front armhole cut. Let's connect points P 3 and G 4 with a dotted line, divide this segment in half, lower a perpendicular of 2 cm from the division point and mark point P 8. Let's draw a smooth line to cut the armhole, connecting points P 7, P 3, P 8 and G 4.

Calculation of the solution of darts along the waist line. From the width of the product, we subtract the measurement of the half-circumference of the waist with an increase for a loose fit (AA 1 - (St + CO) = 46 - (30 + 3) = 13 cm), the resulting result is the sum of the solution of all darts along the waist line, where
the size of the front dart opening = 0.25 of the total dart opening (13 x 0.25 = 3.3 cm),
side dart opening size = 0.45 of the total opening (13 x 0.45 = 5.8 cm),
back dart opening size = 0.3 of the total opening (13 x 0.3 = 3.9 cm).
Determining the width of a shirt along the hips. Now, from the measurement of the half-girth of the hips with an increase for a loose fit, we subtract the width of our product (Sb + SO-AA 1 = 44.8 + 4-46 = 2.8 cm), the resulting result is the amount of expansion of the product along the hip line.
Side cut. From point T 2 along the waist line to the right and left, we will set aside half of the side dart solution (we calculated its value a little higher) and mark the points that we will connect with straight lines to point G 4.

From point B 2 along the hip line to the right and left, we will set aside half the amount of expansion of the product along the hip line and put points that we will connect with smooth convex lines to the opening points of the side dart at the waist and extend these lines until they intersect with the bottom line.

Construction of a waist dart on the back. To the right of point T, set aside 1/3 of the neck half-girth measurement + 0.5 cm and place point T 3 (TT 3 = 1/3Сш+СО=15:3+0.5=5.5). From point T 3 to the right, we plot the value of the entire back dart opening and get point T 4 (T 3 T 4 = 3.9 cm).

We divide the segment T 3 T 4 in half, and through the division point we draw a perpendicular, not reaching 6 cm to the chest line, and 12 cm to the hip line, this perpendicular is the midline of the dart. Let's connect points 6 and 12 with the tuck solution points T 3 and T 4.

Clarification of the waist line and the bottom line of the shelf. From point T 1 we will set aside 1 cm downwards, connect the resulting point with the notch along the waist line along the side cut, maintaining a right angle at the point 1 cm. We will also set aside 1 cm down from point H 1 and connect it with a smooth line to the bottom line point along the side cut, while the angle at the 1 cm point should be straight.

Construction of a waist dart on a shelf. From the value of the segment G 1 G 5, subtract 1.5 cm, put the resulting value to the left of the 1 cm point along the new waist line and place point T 5 (1T 5 = G 1 G 5 -1.5 = 8.5-1.5 = 7 cm ). Let's connect points T 5 and G 5.

Along the new waist line to the left of point T 5, we will set aside the size of the front dart opening and place point T 6 (T 5 T 6 = 3.3 cm). Along the line G 5 T 5 down from the point G 5 we will set aside 6 cm, and connect the resulting point to T 6.

Divide the segment T 5 T 6 in half, and from the division point we lower the perpendicular, not reaching the waist line 12 cm. Now connect point 12 with points T 5 and T 6.

This completes the construction of the shirt.

If the shirt model has a button fastener, then the front must be extended along the neckline and hem line by the same distance - 1.5-2 cm and a new cut line for the front must be drawn. The resulting line is a half-skid line, and on the middle line there are buttons on one part of the shelf and buttonholes on the second part.
Fastener cuts can be processed in several ways:
Stitched strip ,

The width of which is twice the width of the half-skid, the length of the strip is equal to the length of the shelf along the half-skid line, while the upper cut of the strip repeats the cut of the neck of the shelf along the entire width of the strip.

One-piece plank ,

Its configuration is completed by extending the line of the bottom of the shelf by twice the width of the half-skid, and then a vertical straight line is drawn upward from the resulting point. The neck line on the bar is drawn symmetrically to the neck of the shelf relative to the half-skid line. When sewing a shirt with a one-piece placket, the placket itself is folded along the half-skid line to the wrong side of the product.

Supat clasp

It is a secret fastener; the buttons in such a fastener are hidden and are not visible from the front side of the product. The configuration of such a fastener is completed from a one-piece strip, extending the bottom line of the product to a length equal to twice the width of the strip. As a result, three widths of the strip are obtained along the bottom line; a vertical straight line is drawn upward from each width. The line of the neck of the fastener is drawn symmetrically relative to the line of the first strap. Along the half-skid line of the shirt, the fastener is bent to the wrong side, along the next vertical line the fastener is bent, and along the next vertical line the fastener is folded back to the wrong side and the cut line of the front (on the fastener) is stitched on the wrong side of the product. The fastener is built on only one part of the shelf, on which the buttonholes are located, and on the part with buttons only a one-piece placket is built.

Good afternoon
Today we have creating a pattern for a women's shirt. I'll show you the model right away:
As you can see, the model is quite simple, any beginner can build it and, of course, sew it! I will describe its features:
- straight cut;
- sleeves with slit and cuffs;
- stand collar;
- yoke on the back
- contrasting finish.
Everything is very simple :) Shall we get started?
And this is the rear view that I forgot to show...
BUILDING A PATTERN FOR A STRAIGHT FIT SHIRT
To start creating a pattern for a women's shirt, we need to open the drawing “pattern for the base of a dress” in the NanoCAD program.
We’ll talk about the stand-up collar a little lower, separately... Now let’s deal with the shelves and sleeves.
Work algorithm:
- set the length of the product (from the highest point of the shoulder along the middle of the back). This time I chose a random length, just above the hip line. As we did, we remove everything unnecessary below the new bottom line
- Let's build a yoke on the back. From the bottom point of the neck down along the line of the middle of the back 6 - 8 cm. Draw a perpendicular to the armhole of the sleeve. From the resulting point on the armhole down 1 cm and build a dart. By the way, in the video tutorial I forgot to separate the yoke from the shelf. But it’s not scary when you print it and cut it with scissors along the yoke line.
- Let's move on to a straight cut. How to do it? We simply remove the dart at the waist and draw a straight line from the armhole line to the hem line. That's all :)
- We're done with the back. Let's move on to the front. Here, make a straight cut in the same way. But leave the chest dart. You can't just delete it! Let's transfer it to the armhole of the sleeve and shorten it by 2 -2.5 cm. I have already described how to do this many times, so there will be no theory today. In the video I'll show you how to do it.
- did you move the groove? Great! Now let's turn our attention to the neck. Along the line of the middle front up (from the neck) 1 cm and build a new “arc”.
- Now we need a button placket. draw a line parallel to the line of the middle front at a distance of 2-3 cm. Then you will have a contrasting strip, and another strip 2-3 cm wide.
- The sleeve needs to be shortened to the width of the cuff. I took 4 cm, like :) Shorten and build a cuff the width of the bottom of the sleeve, the height of the cuff width * 2
- The construction of the cut on the sleeve and the edging for it is step by step in the video lesson below.
Here's an easy way to create a shirt pattern. I just love building things like this. There’s almost nothing you need to do here. One or two and you're done! But the result pleases me for a long time :)
HOW TO MAKE A STANDARD COLLAR ON A WOMEN'S SHIRT
To complete the construction of the women's shirt pattern, we need to construct a stand-up collar.
To do this, we need to know our neck circumference measurement. I think I talked about it in a video tutorial on taking measurements for women (should be in basic patterns). But let me remind you... Just remove the girth at the base of the neck. Nothing more is needed.
Construction of a stand-up collar: algorithm of actions.
- set a point anywhere. From it to the right we set aside ½ of the neck circumference, then up 3 cm and connect this point and the first point with a smooth arc.
- Let's size the back neckline using the "autosize" command. and set this value aside from our first point to the right and put a notch. This notch indicates the shoulder seam. It is needed so that you sew the collar correctly.
- up from the first point and the second point of the collar (end of the arc) the height of the collar. approximately 3-4 cm.
- Now you need to make the right line of the collar slightly inclined (it characterizes the line of the middle front). from its highest point to the left 1 cm and connect to the base.
- happened? now build an arc covering our collar.
The construction of the stand collar is complete! If something is not clear, go to the video lesson. Everything is shown there in great detail and clearly.
A white shirt is refreshing and looks elegant. It never goes out of style. Along with the little black dress, the classic women's shirt has the status of a cult item.
Ideally, it replicates a man's shirt and looks a little larger in size, which makes its owner look frail. A woman's shirt is usually made without darts, but options are possible: it can be more tight-fitting, with darts or reliefs, made of cambric, good quality cotton or silk. If you sew a women's shirt with your own hands from checkered fabric, you will get a cowboy shirt; if you sew a fabric with a large floral pattern, you will get a Hawaiian shirt.
What are the main details of the shirt?
This is a turn-down collar on a stand, a placket, a dropped armhole, closed seams, a double yoke and sleeves with cuffs and slits, like in a men's shirt. But in a women’s shirt, the straps may be narrower or wider than standard (for a men’s shirt it is 3 cm), the collars and cuffs are not so rigid, the buttons may already have two holes (it is believed that in men’s shirts buttons with only four holes for sewing are used) . Also, instead of sewing, women's shirts may have regular seams, processed with overlock and without stitching.Pattern:
Blouse-shirt. You will need: Blouse A. Cotton 1.80−1.80−1.85−1.85−2.10−2.10−2.10 m with a width…
Pattern:
A crinkled cambric shirt goes great with shorts. Size 34-42 You will need: Baptiste...
Burda catalog autumn-winter/2015/2016
Pattern:
Fitted denim shirt in a classic style. You will need: Shirt A, B and C. Cotton rub…
: Master Class
In order not to repeat ourselves and teach you something new, in the master class “How to sew a women’s shirt” the processing of some knots has been changed.As a basis for sewing a women's shirt with your own hands, we take the pattern of model 120 from:
Pattern:
A loose shirt-blouse with low armholes, as if borrowed from a men’s wardrobe, is…
With my size 38, I took the pattern one size smaller - 36 size. The shirt model turned out to be quite voluminous, especially in the shoulder girdle. It doesn’t matter which pattern you take, all shirts are sewn basically the same way.
You will need:
Shirt fabric - 1.5 m with a width of 140 cm;Non-woven fabric - 30 cm;
Buttons - 10 pcs.;
Tailor's scissors();
Bias tape for finishing;
Sewing thread and needle;
Tailor's Pins();
Tracing();
Pencil or felt-tip pen for marking ();
Ruler ()
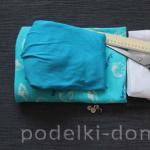
Step 1. Preparing a women's shirt pattern
I had to cut the pattern down to length.
Since the bottom of the shirt is figured, I placed a cross fold on the pattern above the hem line so as not to change it.

The sleeve is shortened in the middle of the sleeve, again in order not to change the hem line with markings, because the bottom of the sleeve is designed to match the length of the cuff.

Often the magazine gives a stitching bar. Whenever possible, I replace it with a one-piece one, this makes it much easier to process.

To do this, you need to glue the paper part of the strip to the part of the shelf and add another width to get a double strip (a strip with two folds). The second fold of the strip replaces the adhesive spacer, which, again, simplifies the work.
Step 2. Cut

We cut out the details of the shirt with equal allowances of 1.5 cm along all sections.
Important! The planks are cut out without allowances.
There are many small parts in the shirt that are strengthened by glue, so it is better to first mark on the fabric the location of these parts (stands, collars and cuffs), then cut out this piece of fabric and strengthen it with glue. And only then cut out all the small details from the glued fabric. This speeds up the work and makes the cut more accurate.In a women's shirt, all paired parts of the stand, collar and cuffs, along with allowances, need to be strengthened with thin adhesive.
G785 adhesive is perfect for these purposes, as well as H180 non-woven fabric and their analogues. The duplicating material should be thin and flexible, unlike a men's shirt.Then, using the glue, we mark all the allowances on small parts.
, read the website
Step 3. Processing the planks
The strips are processed first after cutting, even before the first fitting, because they do not in any way affect the fit of the product.
To do this, you need to peel off or bend the paper strip on the pattern and, using an iron, without breaking off the pattern, iron the strip twice onto the inside of the shelf, first on one part, then turn the shelves over and iron the strip on the other part. Pin the planks onto the shelf.

Then stitch the strips onto the shelf 1 mm from the fold (to the edge) and mark loops and buttons on them with an aqua marker. This is needed for fitting. The loops go along the bar and in the middle of it.
Don't forget that on the patterns in the magazine the stitch markings are for the smallest size! Keep this in mind when cutting the pattern.
Step 4

Place the fold along the back and stitch along the seam allowance. This will fix it. Baste the shirt for the first fitting. For her, it is enough to baste only one part of the yoke. The second yoke is sewn on after fitting. Try on the shirt and adjust it to fit your figure.
Step 5. Processing the yokes
In order to sew on the second yoke, you will have to unravel the basting on the sides after fitting.
Lay the shirt face up on the table.

Roll up the back piece onto the yoke with a tube.

Roll up the shelf parts onto the yoke.

Place the second yoke on top face down and pin with the bottom yoke. The twisted parts of the shelves and back remain inside, between the yokes.

Sew the details of the yokes. Trim allowances to 5-7 mm.

Turn out the yokes, pull the details of the shelves and back out through the neck.
Press the seams of the yoke. Topstitch them from the front side of the shirt, if necessary according to the model.
Step 6. Processing the collar

Place the collar pieces face to face, pin them together and stitch along the markings. Cut allowances in the corners up to 1 mm from the stitching and trim to 5 mm.

Iron the collar allowances onto the block.

Turn the collar inside out, iron without a transition edge and stitch along the edge.

Trim the bottom allowance on one part of the stand.

Edging the trimmed bottom edge. To do this, apply bias tape made of finishing fabric (I use tie silk) and stitch it onto the bottom edge of the stand 5-6 mm from the edge.

Wrap the cut of the stand with tape and iron it.
Place a stitch exactly in the stitching seam of the binding (immediately under the bias binding), grabbing the second cut of the binding from the inside.

Pin the stand without the trim face down onto the bottom collar. Align the cuts and the middles, check the symmetry of the ends of the stand by folding the collar in half with the stand pinned on.

From the side of the upper collar, place the edged stand face down.

Stitch the stands, grabbing the collar between them. Cut allowances in curves to 1 mm, in other areas to 7 mm.

Turn out the posts and iron them without the transition edge.
Important! Iron either the collar or the stand separately so that the collar does not lose its shape.

Draw a line for sewing the collar along the top stand.
Step 7. Sewing the collar

Mark the middle of the stand and the middle of the collar. Pin the collar into the neckline from the front side of the shirt, aligning the centers, ends of the collar and the placket, as well as the marks along the shoulder seams. Sew the collar into the neckline, stitching exactly along the marked line.

Cut out the seam allowances at the ends of the collar, press the seam allowances onto the stand.

Pin a second stand over the seam so that it overlaps the stitching.

Baste the stand so that the basting goes on one side along the edge of the bias tape, and on the other side into the stitching seam of the collar. It is better to leave pins in the corners of the collar for better fixation of the stand.

Place a stitch exactly on the edge of the binding. Finally iron the stand.
Step 8. Processing the figured bottom of the shirt
You can process the bottom of the shirt in the classic way by folding the seam allowances twice and stitching them. But my bottom of the shelves is much shorter than the bottom of the back, so it’s better to process it separately at the shelves and back.
Fold two shelves, check the symmetry of the bottom, trim it if uneven.
Fold the shelves with the back. Where the bottom roundings end, make notches of 5-7 mm along the allowances. This will be the end of the side seam.

Edge the bottom of the shelves and the back separately with bias tape (the same as the stand, you just need to fold the second cut of the tape). Bend the ends of the trim at the strips inward.
Step 9. Sleeve cuts

Cut the bottom of the sleeve according to the markings.

Use bias tape to edge the side of the cut that is closest to the sleeve seam.

Make a pattern for the cut strip. The width of the strap in the cut is 4 cm (finished 2 cm).
The length of the strap is 3 cm longer than the length of the cut. The top of the bar can be made either corner or straight.

Cut out the strips with 1 cm allowances.

Fold the planks in half lengthwise, stitch the top corner along the markings (3 cm above the cut).
Cut and trim allowances in the corners to 5 mm. At the end of the line, make a notch along the allowance.

Turn out the strips and iron them. Place a finishing stitch along the fold of the plank to the height of the cut.

From the front side of the sleeve, apply and stitch the placket to the second side of the cut. Notch the seam allowance above the stitching.

Press the seam allowance inside the placket and pin the second fold of the placket over the stitching seam.

Pin the strip over the cut and stitch along the cut along the edge and top corner.

This is what happened.
Step 10. Stitching in the sleeves

To the front side For the sleeves, sweep the piping allowances to a width of 5-6 mm and iron them.

Pin the sleeve into the armhole so that the armhole allowance does not protrude beyond the fold of the sleeve allowance.

Sew the sleeve into the armhole 6-7 mm from the fold of the sleeve allowance. Important! The stitching must be at the same distance from the fold of the allowance, otherwise the seam will not be even.

Press the seam allowances onto the armhole, pin and baste.

Stitch the armhole allowance exactly along the edge of the seam allowance fold.

View of the set-in sleeve from the face of the shirt.
Step 11. Side seams

Fold the side seam and sleeve seam allowances so that one allowance protrudes beyond the other by 6-7 mm, pin them together and stitch 6-7 mm from the smaller cut.
You can fold the allowances evenly, but then you will have to trim one allowance. The first method is simpler and faster.

Iron the protruding seam allowance to a smaller one.

Then lay out the front and back pieces, iron the seam allowances, then pin them onto the seam and stitch the sleeves and front pieces onto the pieces.

On the front side there is a seam with stitching. Covered seam with two lines on the inside.
Step 12. Processing the cuff

On the outer cuff, iron the hem allowance to the wrong side and stitch it 1 cm from the fold.

Place the cuff pieces face to face and stitch along the markings. Cut the allowances in the curves to 1 mm, the rest - to 5-6 mm from the stitching.

Iron the allowances on the block, like at the collar. Turn the cuff inside out and iron without the transition edge. Draw a sewing line for the cuff along the fold line of the outer part.

Stitch along the outer edge of the cuff, starting and ending at the bottom cross stitch!

Place folds along the bottom of the sleeve. From the front side, the folds of the folds look at the cut of the sleeve.

Place the cuff inside the sleeve from the wrong side! Sew the cuff according to the markings. Trim the seam allowances to a corner at the ends of the cuff.

Press seam allowance into cuff. Pin the folded edge of the cuff on the front side of the sleeve, overlapping the stitching line.

Stitch the cuff along the edge of the fold. It turns out that on the front side of the cuff there are two parallel finishing lines along the bottom.
Step 13. Loops

Punch the loops according to the markings, sew on the buttons. The loops on the bar go in the middle and along the bar, on the stand - along the stand, on the cuff - along the cuff and 5-7 mm from its short edge. The length of the loop is equal to the diameter of the button plus 2 mm.

Buttons are sewn on a thread stem.

Svetlana Khatskevich
Svetlana graduated from a university with a degree in Sewing Technological Engineer. She has been teaching sewing technology for over 20 years. He is a senior teacher at the AcademyBurda." We know Svetlana from her work on the site since its inception. She generously shares her knowledge and infects with her love of sewing.Sewing is creative, fun and educational. Welcome to this bright and interesting world!
Electronic pattern for a cut-off dress “waterfall + warehouses”
Vera Olkhovskaya
Sizes: 42-52
File format: PDF
Sewing difficulty level: medium
Sewing a dress of this style can be difficult for novice tailors, both due to the asymmetrical cut of the skirt and the need to calculate stock.
For sewing, you can only use thin, lightweight fabric from the silk or stretch range.
The set of patterns includes: a bodice pattern with a “waterfall” (“swing”) neckline and patterns for a PP and ZP skirt (Fig. 1).
The fabric consumption for a dress, depending on the choice of layout, is approximately
Bodice length + skirt length + 20 (40) cm.
The dress pattern was made according to numerous requests from members of Vera Olkhovskaya’s group "Cutting, sewing and free patterns". A photo of the model was also provided by members of this group.
How to cut and sew a dress with a “waterfall” (“swing”) collar and pleats
Particular attention should be paid to the choice of fabric for this dress: only thin, well-draped fabrics are suitable. The cutting for stretch and silk is different.
Let's start by cutting out a stretch dress. For convenience and saving fabric, it should be done in two steps (Fig. 2).
First let's cut out the skirt. Since the PP skirt is asymmetrical, we cut it in a spread, the PP skirt is symmetrical and when cutting it, the fabric is folded in half.
After the skirt, fold the fabric in half and cut out the bodice, applying the half-skirt of the shelf to the fold of the fabric.
Seam allowances depend on how the product is processed.
If you are going to sew your stretch dress with a knitted seam, then allowances are needed only at the bottom of the skirt for hemming and at the bottom of the bodice to clarify the line of connection between the bodice and the skirt.
The sprout of the back should be treated with a facing, which is cut out according to a pattern or part of the back (see video lesson on how to process the neckline with a facing or).
We process the “waterfall” (“swing”) itself with a seam with a roller stitch (rolled seam).
Warehouses are laid arbitrarily, but it should be taken into account that the length of the shoulder cut of the back must be equal to the length of the corresponding cut of the shelf after the warehouses or warehouses are laid.
For a skirt, it is important that the lengths of the waist sections of the PP on both sides of the half-skid are equal.
Cutting a dress made of silk fabric requires seam allowances. To the side, middle and shoulder we add 1 - 1.5 cm, sprout, neckline, armholes and waist section of the skirt - cut out beyond the outline line of the patterns. At the bottom of the skirt we add 1.5 - 2 cm, and at the bottom of the bodice - 3 cm to clarify the line of connection between the bodice and the skirt during fitting.
Classic blouse
Kuznetsova Nina
Since my daughter needed a blouse for everyday wear and in a short time, I took size 44 as a basis.
Stage 1
cutting and making changes to the pattern
When cutting, do not forget to place notches according to the marks on the pattern.
On pattern shelves made changes.
Women's shirt goes well with jeans, skirts, vests, trench coats and coats
.The length of the strap is 3 cm longer than the length of the cut. The top of the bar can be made either corner or straight.


Cut and trim allowances in the corners to 5 mm. At the end of the line, make a notch along the allowance.


This is what happened.
STEP 10. STITCHING THE SLEEVE

On the front side of the sleeve, sweep the edging allowances to a width of 5-6 mm and iron them.


The shirt, being an exclusively men's item of clothing, has today become an integral part of the women's wardrobe. The women's shirt goes well with jeans, skirts, vests, trench coats and coats.
A white shirt is refreshing and looks elegant. It never goes out of style. Along with the little black dress, the classic women's shirt has the status of a cult item.
Ideally, it replicates a man's shirt and looks a little larger in size, which makes its owner look frail. A woman's shirt is usually made without darts, but options are possible: it can be more tight-fitting, with darts or reliefs, made of cambric, good quality cotton or silk. If you sew a women's shirt with your own hands from checkered fabric, you will get a cowboy shirt; if you sew a fabric with a large floral pattern, you will get a Hawaiian shirt.
In order not to repeat ourselves and teach you something new, in the master class “How to sew a women’s shirt” the processing of some knots has been changed.
As a basis for sewing a women's shirt with your own hands, we take the pattern of model 120 from Burda 10/2016:


With my size 38, I took the pattern one size smaller - 36 size. The shirt model turned out to be quite voluminous, especially in the shoulder girdle. It doesn’t matter which pattern you take, all shirts are sewn basically the same way.
YOU WILL NEED:
Shirt fabric – 1.5 m with a width of 140 cm;
- Non-woven fabric – 30 cm;
- Buttons – 10 pcs.;
- Tailor's scissors;
- Bias tape for finishing;
- Threads and needle for sewing;
- Tailor's pins;
- Tracing paper;
- Pencil or felt-tip pen for marking;
- Ruler.
STEP 1. PREPARING A WOMEN'S SHIRT PATTERN
I had to cut the pattern down to length.

Since the bottom of the shirt is figured, I placed a cross fold on the pattern above the hem line so as not to change it.

The sleeve is shortened in the middle of the sleeve, again in order not to change the hem line with markings, because the bottom of the sleeve is designed to match the length of the cuff.

Often the magazine gives a stitching bar. Whenever possible, I replace it with a one-piece one, this makes it much easier to process.

To do this, you need to glue the paper part of the strip to the part of the shelf and add another width to get a double strip (a strip with two folds). The second fold of the strip replaces the adhesive spacer, which, again, simplifies the work.
STEP 2. OPENING

We cut out the details of the shirt with equal allowances of 1.5 cm along all cuts.
IMPORTANT! THE STRAPS ARE CUT WITHOUT MARRIAGES.
There are many small parts in the shirt that are strengthened by glue, so it is better to first mark on the fabric the location of these parts (stands, collars and cuffs), then cut out this piece of fabric and strengthen it with glue. And only then cut out all the small details from the glued fabric. This speeds up the work and makes the cut more accurate.
IN A WOMEN'S SHIRT, YOU NEED TO STRENGTHEN ALL THE PAIRED PARTS OF THE STAND, COLLAR AND CUFF WITH THIN GLUE, TOGETHER WITH THE ALLOWANCES.
G785 adhesive is perfect for these purposes, as well as H180 non-woven fabric and their analogues. The duplicating material should be thin and flexible, unlike a men's shirt.
Then, using the glue, we mark all the allowances on small parts.
STEP 3. PROCESSING THE SLANKS
The strips are processed first after cutting, even before the first fitting, because they do not in any way affect the fit of the product.

To do this, you need to peel off or bend the paper strip on the pattern and, using an iron, without breaking off the pattern, iron the strip twice onto the inside of the shelf, first on one part, then turn the shelves over and iron the strip on the other part. Pin the planks onto the shelf.

Then stitch the strips onto the shelf 1mm from the fold (to the edge) and mark loops and buttons on them with an aqua marker. This is needed for fitting. The loops go along the bar and in the middle of it.
DON'T FORGET THAT ON THE PATTERNS IN THE MAGAZINE THE LOOP MARKING IS FOR THE SMALLEST SIZE! PLEASE CONSIDER THIS WHEN REMOVING THE PATTERN.

Place the fold along the back and stitch along the seam allowance. This will fix it. Baste the shirt for the first fitting. For her, it is enough to baste only one part of the yoke. The second yoke is sewn on after fitting. Try on the shirt and adjust it to fit your figure.
STEP 5. PROCESSING THE YOKETTS
In order to sew on the second yoke, after trying it on, you will have to unravel the basting on the sides

Lay the shirt face up on the table.

Roll up the back piece onto the yoke with a tube.

Roll up the shelf parts onto the yoke.

Place the second yoke on top face down and pin with the bottom yoke. The twisted parts of the shelves and back remain inside, between the yokes.

Sew the details of the yokes. Trim allowances to 5-7 mm.

Turn out the yokes, pull the details of the shelves and back out through the neck.
Press the seams of the yoke. Topstitch them from the front side of the shirt, if necessary according to the model.
STEP 6. PROCESSING THE COLLAR

Place the collar pieces face to face, pin them together and stitch along the markings. Cut allowances in the corners up to 1 mm from the stitching and trim to 5 mm.

Iron the collar allowances onto the block.

Turn the collar inside out, iron without a transition edge and stitch along the edge.

Trim the bottom allowance on one part of the stand.

Edging the trimmed bottom edge. To do this, apply bias tape made of finishing fabric (I use tie silk) and stitch it onto the bottom edge of the stand 5-6 mm from the edge.

Wrap the cut of the stand with tape and iron it.
Place a stitch exactly in the stitching seam of the binding (immediately under the bias binding), grabbing the second cut of the binding from the inside.

Pin the stand without the trim face down onto the bottom collar. Align the cuts and the middles, check the symmetry of the ends of the stand by folding the collar in half with the stand pinned on.

From the side of the upper collar, place the edged stand face down.

Stitch the stands, grabbing the collar between them. Cut allowances in curves to 1 mm, in other areas to 7 mm.

Turn out the posts and iron them without the transition edge.
IMPORTANT! WE IRON EITHER THE COLLAR OR THE STAND SEPARATELY SO THAT THE COLLAR DOES NOT LOSE SHAPE.

Draw a line for sewing the collar along the top stand.
STEP 7. SETTING IN THE COLLAR

Mark the middle of the stand and the middle of the collar. Pin the collar into the neckline from the front side of the shirt, aligning the centers, ends of the collar and the placket, as well as the marks along the shoulder seams. Sew the collar into the neckline, stitching exactly along the marked line.

Cut out the seam allowances at the ends of the collar, press the seam allowances onto the stand.

Pin a second stand over the seam so that it overlaps the stitching.

Baste the stand so that the basting goes on one side along the edge of the bias tape, and on the other side into the stitching seam of the collar. It is better to leave pins in the corners of the collar for better fixation of the stand.

Place a stitch exactly on the edge of the binding. Finally iron the stand.
STEP 8. PROCESSING THE FIGURED BOTTOM OF THE SHIRT
You can process the bottom of the shirt in the classic way by folding the seam allowances twice and stitching them. But my bottom of the shelves is much shorter than the bottom of the back, so it’s better to process it separately at the shelves and back.

Fold two shelves, check the symmetry of the bottom, trim it if uneven.
Fold the shelves with the back. Where the bottom roundings end, make notches of 5-7 mm along the allowances. This will be the end of the side seam.

Edge the bottom of the shelves and the back separately with bias tape (the same as the stand, you just need to fold the second cut of the tape). Bend the ends of the trim at the strips inward.
STEP 9. SLEEVE CUTS

Cut the bottom of the sleeve according to the markings.

Use bias tape to edge the side of the cut that is closest to the sleeve seam.

Make a pattern for the cut strip. The width of the strap in the cut is 4 cm (finished 2 cm).
The length of the strap is 3 cm longer than the length of the cut. The top of the bar can be made either corner or straight.

Cut out the strips with 1 cm allowances.

Fold the planks in half lengthwise, stitch the top corner along the markings (3 cm above the cut).
Cut and trim allowances in the corners to 5 mm. At the end of the line, make a notch along the allowance.

Turn out the strips and iron them. Place a finishing stitch along the fold of the plank to the height of the cut.

From the front side of the sleeve, apply and stitch the placket to the second side of the cut. Notch the seam allowance above the stitching.

Press the seam allowance inside the placket and pin the second fold of the placket over the stitching seam.

Pin the strip over the cut and stitch along the cut along the edge and top corner.

This is what happened.
STEP 10. STITCHING THE SLEEVE

To the front side For the sleeves, sweep the seam allowances to a width of 5-6 mm and iron them.

Pin the sleeve into the armhole so that the armhole allowance does not protrude beyond the fold of the sleeve allowance.

Sew the sleeve into the armhole 6-7 mm from the fold of the sleeve allowance. Important! The stitching must be at the same distance from the fold of the allowance, otherwise the seam will not be even.

Press the seam allowances onto the armhole, pin and baste.

Stitch the armhole allowance exactly along the edge of the seam allowance fold.

View of the set-in sleeve from the face of the shirt.
STEP 11. SIDE SEAMS

Fold the side seam and sleeve seam allowances so that one allowance extends 6-7 mm beyond the other, pin them together and stitch 6-7 mm from the smaller cut.
You can fold the allowances evenly, but then you will have to trim one allowance. The first method is simpler and faster.

Iron the protruding seam allowance to a smaller one.

Then lay out the front and back pieces, iron the seam allowances, then pin them onto the seam and stitch the sleeves and front pieces onto the pieces.

On the front side there is a seam with stitching. Covered seam with two lines on the inside.
STEP 12. PROCESSING THE CUFF

On the outer cuff, iron the hem allowance to the wrong side and stitch it 1 cm from the fold.

Place the cuff pieces face to face and stitch along the markings. Cut the allowances in the curves to 1 mm, the rest - to 5-6 mm from the stitching.

Iron the allowances on the block, like at the collar. Turn the cuff inside out and iron without the transition edge. Draw a sewing line for the cuff along the fold line of the outer part.

Stitch along the outer edge of the cuff, starting and ending at the bottom cross stitch!

Place folds along the bottom of the sleeve. From the front side, the folds of the folds look at the cut of the sleeve.

Place the cuff inside the sleeve from the wrong side! Sew the cuff according to the markings. Trim the seam allowances to a corner at the ends of the cuff.

Press seam allowance into cuff. Pin the folded edge of the cuff on the front side of the sleeve, overlapping the stitching line.

Stitch the cuff along the edge of the fold. It turns out that on the front side of the cuff there are two parallel finishing lines along the bottom.
STEP 13. LOOPS

Punch the loops according to the markings, sew on the buttons. The loops on the bar go in the middle and along the bar, on the stand - along the stand, on the cuff - along the cuff and 5-7 mm from its short edge. The length of the loop is equal to the diameter of the button plus 2 mm. 
Buttons are sewn on a thread stem. 
Many people find sewing a shirt a rather difficult task. Of course, if you have never sewn anything like this before, it will be quite difficult to sew a shirt yourself. However, there is a way out, and it is this solution that we will talk about first.
Sample for pattern
How to sew a shirt? Let's say right away: making a pattern yourself is absolutely not necessary. Instead, you can simply copy the pattern from an already finished item. This method has one significant advantage over ready-made patterns published in various publications. The fact is that ready-made patterns do not take into account the features of the figure at all, so those who do not know how to customize a thing have to put up with some inconveniences. If we remove the pattern from the finished item, then here we can adjust all the parameters right as we remove the pattern. So, the first thing we need is a sample for the pattern. This can be either a women's shirt or blouse or a men's shirt. Now let's talk about how to correctly copy a pattern from a sample.
Women's shirt - pattern
Let's say we want to sew a women's shirt, but we only have a men's shirt as a sample. There's nothing wrong with that either. We take a pencil and a roll of paper (or, if there is no suitable one, we glue together several sheets of smaller format or, at worst, newspapers). Now we straighten the sample and apply to the paper the part of the shirt that we will re-take, and then secure it with pins. Please note that the size of the sheet on which we will draw the pattern must exceed the dimensions of the part itself by at least 10 cm on each side, so do not forget to leave this margin. It is best if you copy the pattern from a cut sample. Professionals also advise starting from the back, tracing the part to be drawn with dashed lines along the contour and pressing the seams. Measure the armhole of the sleeve especially carefully, since this is the main place where the parts of the product are connected. After you have traced the entire part, take out the paper, connect the strokes with a solid line and fold the paper with the pattern lengthwise and in half to check whether the pattern is symmetrical. As for the sleeves, you need to carefully re-shape the sleeve. The length of the sleeve cap should exactly match the length of the armhole. The only exception is if you want to sew pleated sleeves.
How to sew a shirt - adjusting the pattern
If you need to reduce the size, you can do the following: divide the pattern piece that needs to be reduced into three equal parts using horizontal or vertical lines. Along the lines we lay folds with a width of 0.5 to 1.5 cm. If you need to reduce the sleeve, then first of all you need to reduce the sleeve cap, and only then adjust the armhole - in accordance with the new size. Now we make the darts. To do this, put on underwear that fits your body well and hold the pattern to your body in front of the mirror. Now you need to mark the top of the chest. The horizontal dart can be started directly from this point, and the vertical dart can be started a couple of centimeters lower. We select the width of the dart experimentally, but do not forget to leave a few centimeters (at least three and no more than five) for a loose fit of the product. As for the sleeve, it is best to adjust its width after the sleeve is sewn into the armhole.
How to sew a shirt - cut it out
It is better to take the fabric for the shirt the same as on the sample from which we took the pattern, or with similar properties. Do not choose a material that is too dense and heavy or too thin, which stretches easily, since in these cases even a correctly made pattern does not guarantee a good fit of the shirt on your figure. For cutting, we will take a fabric 150 cm wide and one and a half to two meters long (including allowances for seams). We will also need interlining to glue the cuffs, collar and placket. If you don’t have interlining, it doesn’t matter; additionally cut out parts will also work, which you will need to put inside for rigidity during sewing. It is best to cut the collar separately, since it usually has a rigid stand. Although if you use, for example, flannel as a material, then you can cut the collar along with the rest of the details.
Tailoring a shirt
Now, in order to sew a shirt with our own hands, we just have to overcome the last stage - the actual sewing. If you have done everything correctly before, sewing will not seem particularly difficult to you. We start by sewing the darts, and then make straight stitches on the sides and shoulders of the product. Now we make a side seam on each sleeve and sew the cuffs to the sleeves. Next, we sew the sleeves along the edges into the armholes, and then sew on the placket. The collar is sewn on last. Pay special attention to the sewing of the collar: in order not to spoil the look, it must lie well. In order not to spoil the shirt, it is better to first sew the seams using “live” thread and try them on, and only then, if everything is satisfactory, sew them on a machine. It is first recommended to pin the sleeves and collar with pins, and the pins are stuck perpendicular to the seam - to avoid pulling the fabric. And the final touch is punching the loops and sewing buttons on the finished shirt. In the case of a women's model, the loops should be on the right side and the buttons on the left. That's all. Now let's try to sew a men's shirt, which will not seem particularly difficult to you if you have coped with the task of sewing a women's shirt.
How to sew a shirt for a man?
Some women want to learn how to sew a shirt themselves for the man they love. In general, the process of sewing a men's shirt is not much different from sewing a women's shirt. First, take a sample for the pattern. It’s best if it’s some old shirt that fits your man. Then you just need to accurately transfer the pattern onto the paper and then cut and sew the fabric accordingly. In the case when you need to make a correction, but your “model” is missing for some reason, or you want to make a surprise, you will have to sew by eye. I must say, it is still much easier than sewing a women's shirt - due to the characteristics of the figure. Otherwise the sewing procedure is the same. After we have finished transferring the pattern, we cut the fabric and start sewing in the same order: darts (if the shirt is fitted, if not, then it is not necessary), stitches on the sides and shoulders, side seams on the sleeves for sewing on the cuffs, the cuffs themselves , sleeves and finally the collar.
Examples of patterns
For those who for some reason do not want to create their own pattern, here are several sites where you can find good samples. Simple patterns for men's shirts (including a fitted version) can be found on this site. More photographs of the “production process” are presented on this site: “Pattern for a men’s shirt.” In order to find good examples of patterns for women's shirts, we recommend visiting this site: "Shirt pattern. Construction of a women's shirt." Here you will find samples of vest patterns: "Women's vest patterns". And for those who want to dive deeper into the topic, we can offer the following theoretical calculations on constructing your own pattern for women's and men's shirts: "Pattern for women's and men's shirts. Construction of a pattern." With the help of these samples, you can also easily understand how to stitch a shirt by yourself.
We also recommend
 Fruit bouquets
 Winter overalls for boys with zipper and warm fleece
 Women's shirt pattern step by step construction
 Crocheted cactus pincushion
 How to make a pony from plasticine from the cartoon “Friendship is a Miracle”: characters from your favorite cartoon series with your own hands Pony from plasticine in 3D
 Metals. The most ductile metal? What are the most malleable metals