Application "Mushrooms" from various materials. Application on the theme “Mushrooms” in the senior and middle groups Mushroom template for cutting
If you want to expand your child’s knowledge about the world around him, teach him to create. For example, the application “Mushrooms”, created different ways, will be an excellent cognitive creative process that teaches the child the basics artistic skill. In addition, it is easy to implement and does not require special material and time costs. It will be useful to perform each work using a different workpiece - a picture or photograph with one or another type of mushroom.
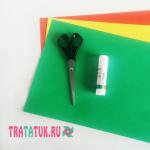
What will you need?
To perform the application in any way you need the following:
- Paper or cardboard for the base on which everything will be glued.
- Glue (PVA or pencil).
- Scissors.
- Mushroom template (outline or color picture, drawn or printed).
The remaining materials depend on which method you choose. In your work you can use colored or corrugated paper, napkins, cereals, plasticine and paints.

Application on the theme “Mushrooms” made from natural material
Very simple, but beautiful, you can make a craft from natural material - dry leaves. Freshly collected material must be dried with an iron or between the pages of an unnecessary book. The result will be a beautiful and original application. Mushrooms are made using this technique like this:
- Cut out a blank for the cap and stem from thin paper.
- Cover each piece with dry leaves of the desired shade.
- Glue all the elements into place.
- At the bottom of the base, make grass from thin leaves or dried blades of grass.
Mosaic of cereals
A very unusual, but original and natural application “Mushrooms” will be obtained if you use grains. Cereals can also be used for these purposes. A drawing of a porcini mushroom is suitable as a template. It will allow you to preserve the natural shades of the materials, although they can be painted. It is better to apply any shade after gluing. It is usually difficult to paint a loose mass.
To do this, work in the following sequence:

Using the same principle, you can lay out a pattern of watermelon and squash seeds.
Use crumpled paper
So that the child succeeds beautiful applique“Mushrooms”, it’s better to take ready-made templates. They must be printed and given to children. Even a child aged 3 years can make a craft using it. Work like this:


applique "Mushrooms"
To work in an organized group preschool age The option with paper is suitable. You can make a fly agaric, focusing on the fact that although this mushroom is beautiful, it is inedible. You can't put it in the basket. Rough plan The lesson might look like this:
- Read a poem to the children about autumn, forest, mushrooms.
- Let the children look at the toy mushrooms in the basket or their images.
- Tell us what you will do today. Read a poem about fly agaric or ask a riddle. Ask if you can take a fly agaric, if you need to break it, kick it, or crush it.
- Give children pre-prepared parts or paper with stencils for making them (depending on age).
- Cut out a red cap, a white leg, a small white rectangle for making a frill, and a green one for the grass.
- Glue the cap and stem onto the paper base.
- On a white rectangle, cut the fringe and tuck it in with your fingers, scissors or chopsticks.
- Do the same with the green weed blank.
- Glue the white fringe to the leg and the green fringe to the bottom of the leaf.
If children are tired, take a break or split the work into two parts. Next you need to make white spots on the cap. They can be done like this:
- Just stick on white circles made using a stencil or a hole punch.
- Make balls from cotton wool, napkins, thin paper.
- Made using quilling technique.

The third option is the most unusual and interesting. To work with this method, proceed like this:
- Cut several (5-6) strips of white paper. Give them to the children.
- Explain the technique they will use to make the spots.
- Show how to wind strips onto sticks.
- Let the kids make the blanks themselves, and then glue them to the cap of the mushroom they made earlier.
At the end of the lesson, it is worth organizing an exhibition of works and again emphasizing the fact that if they come across this beautiful mushroom in the forest, they need to avoid it. So, the “Mushrooms” applique can be made from various materials. Choose the one that suits you and interesting option in accordance with the age of the child and the convenience of working at home or in an organized group.
In the middle and senior group children can already do more complex crafts, and they will definitely be interested in applique "Mushrooms", the implementation of which allows you not only to engage in creativity, master working with various materials, but also have fun, solve riddles and play dynamic games. Like other activities in kindergarten, fine arts creativity takes place in game form so that children not only make something with their own hands, but also learn more about the surrounding nature and its phenomena.
Lesson: application “Mushrooms”
The teacher must prepare for the lesson in advance: draw up abstract "Mushrooms applique", prepare additional props for the lesson, materials that children will need for the creative process. During such classes, you can include educational themed cartoons and children's songs, this will help create the appropriate mood for work in the group.In the fall, the children will enjoy learning more about mushrooms, and applique on the theme “Mushrooms” will be an excellent workout for small continent hands and attention. As a rule, the first knowledge that children gain about mushrooms and berries is associated with a walk around autumn forest together with parents. While parents are engaged in a “quiet hunt,” the children enjoy watching mushrooms of various sizes and shapes hiding under a layer of pine needles and foliage. Preschoolers ask a lot of questions, and parents patiently answer them: showing what mushrooms can be collected and how to look for them. But parents also need to pay attention to safety precautions: firstly, you need to closely monitor the child so that a curious child does not decide to try the mushroom he found, does not lick his dirty fingers, so if you take your child with you to the forest, he should always be under under adult supervision. To make it interesting and fun, give him a basket and offer to collect pine cones, bright leaves, acorns, twigs and others in it. natural materials, which can then be useful for children's creativity.

Abstract: application “Mushrooms”
Lesson “Applique mushrooms”- this is not only creativity, but also an educational lesson for a child, which will allow him to learn more about various types mushrooms and the places where they live. To do this, the teacher needs to prepare pictures with colorful images.By performing this, the preschooler gains the first skills of composing a composition, and also masters the rules of working with various materials and textures.

First paper craft will introduce the middle group to basic skills in working with materials: children will cut ready-made forms into two parts, thereby learning to work carefully with scissors and cut in a straight line. When working with scissors, children must be attentive and careful; they should not be allowed to spin or run around the group. The teacher must show how to hold the instrument correctly in his hands.
Also, the teacher should draw the children’s attention to the fact that during the lesson the desk should be kept in order and encourage with approving words those preschoolers who perform all actions very carefully and accurately.

During such lessons, not only the imagination and creative skills of children develop, but also enrich lexicon and love and respect for environment, nature, forest.
Application "Mushrooms" in middle group performed on landscape sheets or sheets of cardboard if you use heavy materials (for example, various cereals). In advance, the teacher must prepare a sample of the mushroom, drawn on a sheet, and each child will also need a glue brush, a container of glue, scissors and napkins.
IN lesson notes on the application “Mushrooms” You should also introduce various thematic riddles that preschool children could easily guess.

Application "Mushrooms" in the middle group
Before being performed in the middle group applique “Mushrooms and berries”, it is necessary to conduct preliminary lessons with the children: tell them which mushrooms or berries are edible and which ones should not be eaten, while looking at the illustrations. It is important to show that such a craft can be made not only from paper, but also using plasticine, so a separate lesson should be devoted to modeling.Lesson summary on application topic “Mushrooms” includes a game part: for example, first you can ask children what they know about mushrooms, where they grow and how to look for them, who collects mushrooms and why. Preparing for creative process, you also need to ask about what parts the mushrooms consist of, because the children should know that they need to stick on a stem and a cap of different colors. You also need to tell the children that if you look at the hat from above, its shape is round, and if you look at it from the side, it will become a semicircle, and you must demonstrate the silhouettes of a mushroom. It is necessary to prepare several different templates so that preschoolers know what each mushroom has different shape, stem and cap size.

for home and kindergarten creativity, you can find it on the Internet and print it out, or you can cut it out from an old children’s coloring book, in which the child has already lost interest.
You can start the lesson with the game “Mushroom picker”: the teacher invites the children to play hide and seek with the mushroom picker, and as soon as the music stops playing, they must squat down so that the mushroom picker cannot find them and take them with them. And while the music is playing, children can jump and have fun.
The lesson should begin with a demonstration of the elements and an explanation of how we will use them to make paper applique “Mushrooms”. First you need to show the round blank from which the hat will be formed: you need to show how to fold it in half, paying attention to the fact that the edges should match after folding. The fold line must be carefully ironed with your fingers and now we have half a circle.
After the teacher bends the workpiece back, you need to pay attention to the children that now the strip marks the cut line, then you need to use scissors to cut the round figure along it. You need to cut a rectangular leg from a “square” blank, demonstrating the process with a detailed explanation.
When the two elements for are ready, you need to glue them to the paper base: stepping back a couple of centimeters from the bottom (here the kids will glue the grass in the future), you need to glue the leg, smearing the back side with a thin layer of PVA glue. Next, glue the cap, which should fit snugly to the leg.
When the parts are glued, use a napkin to remove excess glue. At the end, take a green strip 3 cm wide cut out of paper, cut it with “grass” and glue it along the bottom of the base so that the leg peeks out from the grass. This is the most simple craft that kids can do applique “Mushrooms” in the senior group already requires other, more complex and textured materials.

Mushroom applique for the senior group
Most interesting application on the theme “Mushrooms” for the senior group– this or buckwheat groats “Maslenok”. The elements of the mushroom figurine should be covered with cereal, for example, you need to draw an oil can on a sheet, then coat the cap with glue and sprinkle it with buckwheat, and sprinkle the glue-coated leg with rice or semolina. All you have to do is wait until the grains stick and the craft can be considered ready; in addition, it can be decorated with other elements: paper grass or the sun.
To make it look beautiful and neat applique "Mushrooms", templates You should definitely use it if you cannot draw the figure yourself. Not only the outline is drawn on the template, but also other elements, for example, white spots on the red cap of the fly agaric.
In order to perform “Fly Agaric” you can only use semolina, but you must first paint it. This material can be used in the future, creating the most original paintings: for example, a winter landscape or a summer meadow by a lake, using templates from coloring books as a basis.
Cereals can be painted in any color or shade using gouache paints and special technology. Of course, parents should take on this task, and then admire how original the application on the theme “Mushrooms” turned out in the older group.

To paint, the paint must be diluted in a mixture of alcohol and water, taken in equal proportions. Coloring is done in a plastic bowl; you will also need a fine sieve through which the finished cereal will be ground and a sheet of paper to dry it.
When diluting gouache with liquid, remember that the more water you add, the lighter the shade will be; this allows you to make several shades from one color and paint the cereal in them. For testing, dilute it like this: a spoonful of paint, two spoons of alcohol and two spoons of water. Measure carefully, using a spoon, and, continuing to stir, pour in the cereal in a thin stream so that there are no lumps. The finished mixture should only be moist, not wet, i.e. the amount of liquid should be less than semolina. You need to rub the cereal with your fingers so that the paint is evenly distributed: you can involve children in this process. Already during this process, the grains will begin to dry out and become crumbly. Then they are laid out in an even layer on a sheet of paper and left on the windowsill until completely dry. The material should be stored in glass jars, taken out as needed, because it can be used to make applique "Mushrooms" in the preparatory group.

Application "Mushrooms": templates
If you look in abstract "Mushroom application" senior group experienced teachers, you will find that in their classes they manage to combine work with different materials, which ensures additional development of the baby from an early age.
When you have the multi-colored semolina ready, you need to sprinkle it on the glue-smeared areas of the template: the leg and circles on the “Amanita” cap are white, and the cap itself is red, you can make additional details. When all the grains stick, you can turn the base over so that those that couldn’t stick fall off.

In kindergarten or junior school you can make another amazing craft using this technique - only this time the main material that will be glued to the base will be fabric.
Applique is a type of creativity that allows you to create patterns or paintings from pieces of paper, fabric, plant and other materials, glued or sewn onto a certain base. And for children such activities are also great opportunity develop intellectual and Creative skills and train fine motor skills.
That is why applications are so widely used in developmental activities for children of older and middle groups. kindergarten. In general, of course, such applications are being made already in the second younger group, however, from pre-prepared parts of the mushroom. But already in the preparatory group, quite complex work is already being done. This article will provide master classes on making mushroom appliqués for beginners.
For cutting, you can prepare a stencil specially downloaded from the Internet, and the prepared parts cut out from the stencil can be pasted onto the outline, which again can be downloaded on the Internet or drawn by hand. A basket of mushrooms made by kids looks very nice - while working, it will be useful to further study the names edible mushrooms, which may be in the basket.
The advantage of this type of creativity is opportunity create real works of art from scrap materials, and sometimes even from unnecessary things.
To develop the baby and replenish it horizon and volume knowledge about the world around him - it is very important to teach him to create something with his own hands. A suitable option in this case would be the application “ Mushrooms“- it is not difficult to implement and does not require a lot of time and materials.
This “Mushrooms” application for the middle group can be a fun activity that will develop your horizons well and perfectly train fine motor skills. To make this craft we will need:

This list materials can be supplemented at your discretion. You can use corrugated paper, cereals, plasticine, paints.
Mushroom template You can download it from the Internet and print it, or you can draw it yourself. This can be an outline image or a multi-colored picture.

Here are step-by-step instructions for performing the “mushrooms” appliqué in the middle group. To begin with, it is recommended to choose the simplest mushrooms in shape.

Using the obtained fungi you can make spots by drawing them with felt-tip pens or paints. You can glue small paper circles.
Gallery: application on the theme “Mushrooms” (25 photos)


Application "Mushrooms" made from natural materials
 Application "Mushrooms" in the senior group from natural materials - a somewhat more complex process, but very interesting and exciting. It is very easy to make an applique from dry leaves.
Collected leaves need to be leveled and dried with a warm iron. You can dry the leaves between the pages of the book. Such an application can turn out to be very original and bright. The sequence of actions in this case will be as follows:
- To begin with, blanks for legs and caps are cut out of thin paper according to a template.
- Each paper piece is covered with dry leaves, selected by color.
- All parts are glued to a cardboard base.
The lower part of the picture is decorated using dry blades of grass, twigs, and small leaves.
Making applications from cereals
 A very natural and original application on the theme “Mushrooms” can be made using cereals or grains. To make such a craft you will need a template. mushroom on white paper. However, it is absolutely not necessary to print out the finished template; you can simply draw it for your child. Such sample will allow you to save natural colors the materials you will use.
If necessary, you can use paints and give the applique any desired color.
However, it is better to postpone such coloring until the end of the work, because coloring bulk material is not the easiest task.
The sequence of making an applique from cereals can be as follows:

You can make an applique from pumpkin or watermelon sunflower seeds. To do this, the template is made on a cardboard base, the cap and leg are covered with a thin layer of plasticine. The seeds are carefully placed on the surface of the plasticine.
Crumpled paper applications
You can make an application using mint paper. To do this, print out the templates on white paper and distribute them to children. Next you need to do the following:

At the end of the work, the lower part of the composition is supplemented weed. To do this, take a strip of paper Green colour and cut it on one side with a fringe. The strip is glued to the mushrooms.
Application "Amanita"
An applique in the form can turn out to be very elegant and attractive and also gives scope for children’s imagination - after all, this beautiful mushroom can be created and decorated in the most incredible ways. To work, you can use the proposed template.

Below is step-by-step instruction one of the options for creating the “Fly Agaric” application:

 Now all that remains is to lubricate the lower part of the space under the fungi with glue and “grow” weed from tea or dry blades of grass.
In the same way, you can design the background of the application using decoys or other small cereals. All that remains is to let the application dry thoroughly and shake off the excess grain.
Our craft is ready!
What are there mushrooms? Edible and inedible, large and small, bright and barely noticeable. And we have grown up fabulous mushrooms - funny and mischievous.
Within theme week « Mushrooms and berries» The guys and I watched a wonderful cartoon "How mushrooms and peas fought» . The children liked the story, they were especially surprised that mushrooms in the fairy tale they were like little men - each had their own character: funny, boastful, important, etc. I wanted to extend the fairy tale a little and make it a little non-standard applique. Let our mushrooms will be with fun"faces"- we decided.
For work we needed: white cardboard, brown, yellow and green colored paper, printouts cheerful"persons" For mushrooms, printouts autumn leaves(you can also take real, dry ones - they didn’t fit us in size, they turned out to be too big, scissors, glue and a good mood.
To begin, cut out the blank for mushroom stem. The children wanted the fungus was definitely there, so the workpiece looks like this

The workpiece must be bent. Like this


Glue the top together. It turns out a leg for mushroom

Then we cut out the grass from green paper and glue it to the bottom of the leg.


Now let's move on to the hat. It consists of two parts


Cut it out cheerful“face”, autumn leaf and collect mushroom


The application is not complicated, but very well develops fine motor skills and the ability to cut along a contour.
Children are very tried!


Like this fun mushroom We have a family!

Thank you for your attention and good luck!
Publications on the topic:
Application with design elements in the junior group “Apple for little hedgehogs” Application with design elements for the junior group “Apple for little hedgehogs.” Purpose of the lesson: to play out the fairy tale situation - division.
During the applique class, the children and I made a centipede. “Guys, not an ordinary guest came to visit us, guess the riddle,” - “Who has.
Competitive game program for children of the senior group “Merry Calendar” Decor. A large calendar consisting of four multi-colored pages, each of which is an illustration of one of the seasons. As.
Abstract of GCD in the junior group application with design elements “Butterflies”. Objectives: To clarify children’s knowledge about insects - butterflies;
Lesson notes for preparatory group children. Application with drawing elements “Space flight” Abstract joint activities teacher with children in the educational direction “Artistic aesthetic development"(preparatory.
Summary of a modeling lesson “Cheerful Clown” for older children Main educational area: Artistic and aesthetic development. Integration educational areas: Cognitive development, socially.
Summary of a lesson on speech development with design elements in the senior group “Dispute between houses about who is most important” Tonight, I couldn't sleep. Outside the window, on the street, someone was loudly arguing and shouting. I decided to listen and find out what happened and with whom.
You can start a lesson with children with a riddle
He grew up in a birch forest.
Wears a hat on his foot.
The leaf stuck to it on top.
Did you find out? This is... (mushroom)
DIY application “Still life with mushrooms”
To complete the application you need to prepare:
Colored paper in the desired shades;
Cardboard for the applique base;
Scissors:
A napkin for wiping off excess glue
Step-by-step application process
1. Let's start with the simplest mushroom shape.
Take a rectangle of paper, fold it in half (vertically) and round two corners, then cut along the fold. We have two legs ready.
.jpg)
2. Cut out two mushroom caps. To do this, fold a square of paper in half, round the corners and cut the paper along the fold. Two hats are ready.
.jpg)
Glue the cap to the leg. The first pair of mushrooms is ready.
You can glue a circle onto the fungus or make a spot with a felt-tip pen.
.jpg)
3. Cut out a fox from paper.
Fold the rectangle in half and cut along the drawn outline.
.jpg)
4. Cut out the boletus.
We cut out the mushroom cap as in step 2. To cut out the stem, fold the rectangle in half and cut along the contour.
Glue the cap and stem together.
.jpg)
5. Let’s move on to making beautiful fly agarics.
We cut out the dome hat from a red square.
.jpg)
This shows the process of cutting a leg from a rectangle.
.jpg)
To cut out a skirt, fold a narrow rectangle in half (vertically) and cut off the corners. We cut the resulting trapezoid with scissors, but you don’t have to cut it.
.jpg)
Glue the leg with the skirt to the hat. The fly agaric is ready.
.jpg)
6. Cut out a few more mushrooms (we make oval caps for some mushrooms). We design a basket with long handle, lay out the silhouettes of our mushrooms and then glue them loosely.
You can use this template to make a basket
.jpg)
Our mushroom still life is ready.
.jpg)
We also recommend
 How to do golden makeup
 Ultrasound of the mammary glands, when to do it and how many times?
 How to increase pensions for working and non-working pensioners: methods, step-by-step instructions Distribution of funded pension payments
 DIY paper Christmas ball for the Christmas tree
 Application from corrugated cardboard How to make corrugated cardboard by hand
 How to learn to write beautifully and make your handwriting perfect?