Crafts on the theme of clothes, shoes, hats. Applique classes on the topic “Clothes and shoes” in the senior group
To develop the ability to be creative through application.
Strengthen the ability to cut along a silhouette (contour). Develop visual control of hand actions. Strengthen the skills of careful gluing and careful use of scissors. Develop the ability to decorate silhouettes with geometric pattern elements. Give each child the opportunity to show independence in choosing ways to decorate their work. Develop creative abilities.
Material:
dress and shirt templates, colored paper, sequins, scissors, pieces of fabric, glue, a simple pencil; letter, postal box.
1. A letter was brought to the group: “Hello children, Boris Borisovich is writing to you, I am the director of a new clothing store. Our store opens tomorrow, but we had a problem, all our tailors got sick, and the clothes were left unfinished. I ask you to help me, my clothes urgently need to be finished, I can’t cope without you, please help.”
Well, what can we do to help Boris Borisovich? What do we need to do for this?
This store has 2 departments: department women's clothing And men's clothing. How should we distribute? The one who will sew dresses sits at the first table, and the one who will sew shirts sits at the second table.
2. Independent work of children.
Children are given clothing silhouettes.
The director said that you can decorate your clothes as you wish, with any patterns. (Reinforcing with children the rules for using scissors).
Children trace the clothes according to the silhouette and cut them out along the contour. Decorate clothes according to plan. (Help children as needed).
Do you think we could help Boris Borisovich?
Well done, the clothes turned out beautiful.
And now we will put all the dresses and shirts in a parcel and send them to the store. The director will be very happy, and tomorrow he will be able to open the store, customers will come and buy such elegant clothes.
Abstract of the educational activity “Felt boots for rabbits”
I present to your attention my abstract directly educational activities, which can be used in drawing and appliqué classes by teachers of general development groups for children 4-5 years old in the middle group.
Target: create conditions for development creativity through productive activities.
Tasks:
1. Create conditions for the development of creative abilities
2. Contribute to the development of search activity of preschoolers
3. Form an idea of seasonal shoes
4. Contribute to the development of responsiveness and desire to help
Children are included in the group. There is crying. A toy bunny sits on a chair and cries: “Oh, it’s cold! Oh how cold it is! My paws are frozen and my bunnies will walk in the snow” (voice recording on a voice recorder)
Educator: guys, what happened, why is the bunny crying?
Children: paws are frozen
Educator: Why are your paws frozen?
Children: because it’s winter, it’s cold outside.
Educator: What do you need to avoid freezing outside in winter?
Children list.
Educator: What should we do, guys?
Children: We need to help Bunny. Find shoes.
Educator: Guys, somewhere I had a box with shoes in it. Help me find her.
Children are looking for a box.
There are 4 boxes with real shoes hidden in the group (only felt boots made of cardboard)
1 box – sandals
2 box – shoes
3 box – sneakers
4 box – felt boots (find the latest one)
When children find boxes, a conversation is held with the children. Why aren't sandals/sneakers/shoes suitable? Do they wear them in summer or winter? Are these shoes summer or winter? Can we give it to Bunny? Will your paws get cold?
Then the children find a box with felt boots.
Educator: What is this?
Children: felt boots.
Educator: When do they wear felt boots? Winter or summer?
Children: in winter
Educator: So what kind of shoes are these?
Children: winter.
Educator: can we give felt boots to the bunny? Will her paws get cold?
They give felt boots to Bunny.
Physical exercise.
Gray bunny sitting
Gray bunny sitting
And he wiggles his ears. (makes ears on his head with his hands and moves them)
Like this, like this
And he wiggles his ears. (2 lines 2 times)
It's cold for the bunny to sit
We need to warm our paws. (claps his hands)
Like this, like this
We need to warm up our paws..(2 lines 2 times)
It's cold for the bunny to stand
The bunny needs to jump. (jumps)
Like this, like this
The bunny needs to jump. (2 times)
Bunny crying again: “Guys, these felt boots are white and not at all elegant!” (record your voice on a voice recorder)
Educator: Guys, what should I do?
Children: We need to decorate our felt boots!
The guys come to the tables, where they are given a choice of tools for decoration. Application, drawing.
Children decorate felt boots with appliqué (figures and pictures), paint with felt-tip pens and pencils of their choice.
Children give beautiful decorated felt boots to Bunny.
Do you know the difference between a template and a stencil? Both of these words are foreign and, although the template is intended to be outlined along the outer contour, and the stencil is intended to be outlined along the inner contour, these words are perceived almost as synonyms. By the way, this also includes the “silhouette”. In general, we decided to applique “shoes” using a sample for tracing the contour. I drew examples of these (templates) on cardboard, mountains and mountains. Well, like these, for example:


These are just a few of those patterns. I made them large for you - click on the image and it will enlarge. But I myself believe that printing such pictures is translating the material. I simply cut cardboard into small pieces and drew everything by hand. And savings and training for me.
 For those students whose hands are weak and the skill of cutting along a contour needs training, I simply gave these blanks one at a time - the cardboard is thick and during the lesson they managed to get really good at just cutting out shoe silhouettes.
Those who also have problems with neat coloring painted and cut out.

And the rest of the students performed the “Shoes” appliqué.
In I already talked about how to make the right and left halves of a pair. But this year we somehow didn’t get around to such difficulties, we just traced according to the template. The goal is to train the skill of carefully working with a template and reproducing the details of the shoe structure.

The second half of the pair must, again, be painted, and correctly. I never tire of being amazed - half of the children automatically paint the second shoe or shoe a DIFFERENT color! Moreover, if you ask: would you go for a walk in one gray and one green shoe? - they laugh. (And coloring is welcome.)
But now we have colored all the pairs correctly and cut out these other halves from cardboard. It's time to glue the applique. Comrades, there are a lot of shoes, but the album sheet is not that big. How to place shoes as compactly as possible? Come up with your own solutions. Practice your wits.
............................................................................
IN kindergarten applique work is not only practical nature- children learn to work with their hands, but also theoretically, as kids learn interesting and important details about what surrounds them from birth. So it is with the topic “Clothes and Shoes”: little craftsmen not only create small copies of what they themselves are wearing, but also understand the subtleties of how to correctly combine colors and patterns in wardrobe items. Let's consider the important aspects of preparing and conducting a lesson on this topic in senior group.
The stage of preparation for conducting classes in the senior group
This is the most crucial time, since the success of the entire lesson depends on how well prepared and equipped the audience of “creators” is.
How do children help?
The older group is the age when yesterday’s kids are already “almost schoolchildren,” which means that one must put up with the mental characteristics of such an unstable category of those observed. It’s the same with classes: the little ones, more than getting the craft itself, at the end want to help the teacher prepare everything necessary materials and tools before class. At the same time, their range of skills related to application is already quite extensive, so the children can
- tear small pieces for mosaic appliqué;
- make plasticine blanks for costume parts;
- cut out large and not very large parts with scissors (if necessary, then symmetrically);
- to Work with natural materials(in this case we are talking about dry leaves);
- lay out sheets of paper with blanks for other group members;
- pour glue into small bowls, prepare brushes;
- distribute Additional materials for decorating paper clothes.
How to determine the size of the application?
The smaller the items of clothing and shoes, the more difficult it is to work with them. Therefore, the optimal size, for example, for a dress or coat would be ½ A4. But the base can be either A3 or A1 (this option is convenient if the appliqué is a collective one, for example, kids must create their own collection of clothes and demonstrate what came out of it on a common “podium”).
Materials
In the older group, children are already familiar with all the appliqué techniques. So there will be no restrictions on the material. The only “but”: if fabric is needed for a craft, then it is better to give these elements to children in a ready-made form, since the material usually “crumbles”, which causes inconvenience in work. Most good way creating appliques on a wardrobe theme is a combined technique when children work with several types of material. For example, paper, dry leaves for individual parts of clothing or for shoes, fabric for inserts of different textures and decorative elements. As for the latter, a wardrobe-themed craft is fertile ground for the use of finishing materials that are used in sewing. It can be
- rhinestones;
- sequins;
- braid;
- beads (flat for convenience);
- buttons (or confetti as buttons);
- beads;
- candy wrappers (for creating jackets or evening dresses);
- yarn (felt) for shoes, etc.
The classic base for applique is cardboard. By the way, in the older group its density may be higher, that is, the use of thick cardboard is allowed. Separately, it is worth mentioning the fabric backing. This is a rather complex option for making appliqué, but nevertheless possible: children receive a fabric base on which the contours of the clothing are applied. The little ones' task is to decorate it with buttons, rhinestones, braid, etc. But they attach these elements with glue. And yet, the most common is the applique, in which the item of clothing is completely cut out, representing a 3D craft.
Tools
If you use paper as a basis, then you can’t do without glue. This means that we need brushes that kids will use to dispense the connecting material. Please note that the glue in the stick - also very convenient for gluing - gives way to liquid PVA in the older group. With it, children learn to work carefully, as well as glue thin and small parts. Be sure to prepare wet wipes that children can use to wipe their fingers and excess from the base.
How to motivate guys?
Not only the result of the application, but also the mood with which the kids go home depends on the right attitude to work. So the teacher must competently and accurately introduce the little ones into creative activities. To do this, you can use several proven methods.
Poems
Work on speech development involves memorizing rhymes. And since we are talking about a lesson in a senior group, poems as a motivating beginning of the application are a very successful combination of work on implementation and developmental and educational goals.
- Grandma's hands Whose shirt is this - Blue polka dots? Grandma tried, she sewed for Alyoshenka! Whose sundress is this with White daisies? Grandma tried, she sewed for Natasha!
- The mother asked her son: - Lace up your shoe: One-two - to the right, One-two - to the left! “He doesn’t want to lace up,” Mitya thought about making an excuse. And to prove this, he began to knit knots: One-two - on the right, One-two - on the left.
- Here! The knots are preventing me from pulling through the laces! - The fox grandmother gives mittens to her three grandchildren. - This is for you for the winter, grandchildren,
two mittens. Take care, don’t lose, Count how many there are.
Puzzles
One of the fastest, most effective and favorite ways for kids to get into a working mood is to solve a couple of riddles.
- You enter through one door, but exit from three. You think that you have left, but in fact you have entered. (Shirt)
- If it rains, we don’t bother - We splash through the puddles briskly, The sun will shine - We have to stand under the coat rack. (Boots, galoshes)
- Houses for the fingers of Girls and boys. (Gloves)
- Black, not the earth, Fluffy, not the snow, Warm, not the stove. (Stove)
- I’ll cover any girl’s hair, I’ll cover any boy’s short haircuts. I am protection from the sun - that's what I was made for. (Panama)
Games
Despite the fact that the introductory part of a lesson in the form of a game is a rather controversial moment, since many methodologists rightly consider them to be a method that corrupts discipline, educators in practice still use this way to attract the attention of children. For example, the game “Mend Your Clothes”. Its goal is to teach children how to fold pieces of clothing cut into halves. Kids take wardrobe items cut into halves from a tray and put them together into whole clothes. Then they answer the adult’s questions (for example, “What did you collect?”, “What parts does your dress consist of?”, etc.).
Fairy tales
If the children in the group are too active, then a calm type of work will be suitable as a motivating start, which will help them concentrate. For example, listening to thematic fairy tales with a conversation on questions after.
- Why was the shirt upset?
- How did Sweater calm her down?
- Why was Sweater wise and calm?
| A tale about how clothes got offended Once upon a time there lived a boy, Andryusha. He really didn't like to dress. In the summer, grandma managed to cope with it, because Andryusha didn’t have to wear anything special, but with the onset of cold weather, difficult times began. “I don’t want it, I won’t, I won’t wear it...” Andryusha shouted and ran away from his grandmother. But one day this happened. Andryusha and his grandmother, as always, were going for a walk. “Put on tights,” granny begged. - I won’t! – Andryusha pushed away his grandmother’s hands. - Why? - Grandma was upset. “They are ugly,” Andryusha answered. – What kind of tights would you like? - I would... I would... I would like green ones, like the leaves on the trees. Here! – Andryusha blurted out and looked triumphantly at his grandmother. At that moment, the tights suddenly turned into two thin branches covered with thick green foliage. - Oh, what is this? – Andryusha was surprised. “Tights, just as you wanted,” answered the grandmother. The branches bent and loudly slapped the harmful Andryusha on the butt. “Oh, they’re fighting,” Andryusha got scared. - But you yourself wanted these! -What kind of sweater do you want? - I want it to be soft, like bird's feathers! - Andryusha answered. Suddenly the sweater flapped its sleeves and turned into a huge bird. The bird stretched out its neck and tried to pinch the naughty boy on the knee. “Oh, he’s pinching,” Andryusha got scared. “But you yourself wanted one,” answered the grandmother. – Will you wear overalls? - No. It has too many fasteners, I don't like putting my arms in the sleeves and my legs in the legs! I want it to be alive and put on me by itself! Once! And the overalls came to life, stomped its legs, flapped its sleeves and swung at Andryusha. “Oh, what is he doing?” Andryusha got scared. “But you yourself wanted one,” answered the grandmother. – Don’t you like boots either? - No, they have laces. I don't want to tie them. I want them to fit on my feet themselves, and there are no laces! At that moment, the laces, like two nimble snakes, jumped out of the shoes and crawled away somewhere. And the shoes themselves turned into two small dogs and, with their tongues dangling, began to jump at Andryusha, trying to bite him. “Oh, they bite,” Andryusha got scared. “But you yourself wanted these,” answered the grandmother. - Well, don’t you like the hat either? “No,” Andryusha answered stubbornly. - She’s bad, with a pom-pom! And I want her to have ears like a bear cub! Immediately the pom-pom jumped up like a ball and ran off after the laces. And the hat turned into an eared bear head, and how it roared: - Well, what else don’t you like, bad boy? Let's get dressed. Now all things are the way you wanted! “Grandma,” Andryusha cried. – I want my old things back. Unenchant them, please! - How can I break them if you made them like this? Only you can bring everything back. - Tights, sweater, overalls, boots, hat! - Andryusha shouted. – Please come back to me! Now I will always dress myself and won’t argue with grandma! Once! And the green branches turned into Andryushin’s blue tights. Two! And the angry bird folded itself into a neat sweater on the chair. Three! And the overalls obediently lay down next to him. Four! And from somewhere the laces came crawling, and the dogs stopped yapping and turned into Andryusha’s shoes. Five! A pom-pom jumped up like a colorful ball, jumped onto the bear's head, and it again became Andryusha's hat! - Hooray! – Andryusha was delighted. – Hello my dear things! How wonderful you turn out to be. Granny! Let's get dressed and go for a walk. I definitely have to tell my friends this magical story. |
Questions to the text:
- Why was it difficult for grandma with Andryusha?
- What happened to his things?
- Why did Andryusha want his clothes returned to him?
- How did the boy react to the fact that his sweater, tights, overalls, boots, and hat were returned to him?
Another example is the fairy tale in verse by Korney Chukovsky “The Miracle Tree”.
| Just like at our gate, a miracle tree grows. Miracle, miracle, miracle, wonderful miracle! Not leaves on it, Not flowers on it, But stockings and shoes, Like apples! Mom p O will go to the garden, Mom will pick shoes and boots from the tree. New shoes. Dad p O in the garden, Dad will rip Masha's gaiters from the tree, Zinka's boots, Ninka's stockings, And for Murochka these Tiny blue Knitted shoes And with pom-poms! What a tree, a wonderful tree! Hey you guys, Bare heels, Torn boots, Tattered boots. Who needs boots, run to the miracle tree! The bast shoes are ripe, the felt boots are ripe, why are you yawning, don’t you tear them off? Tear them up, you wretches! Rip, barefoot! You won’t have to show off your patched holes and bare heels again in the cold! |
Conversation
As already mentioned, conversation can be part of working on a fairy tale. But answering questions can also be an independent technique, when at the beginning of the lesson the teacher asks the little ones questions, which they answer either in chorus or individually. This technique also works on speech development. In addition, children learn to listen and hear other team members.
- What kind of clothes are there? (women's/men's, winter/summer, warm/light, etc.)
- Name the clothes by purpose (home, sports, holiday, children's, etc.)
- What parts are trousers made from? (two trouser legs and a belt)
- What kind of shoes are there? (men's/women's, winter/summer/spring/autumn, with heels/without heels, etc.)
Visibility
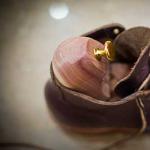
With any type of motivating start, you can’t do without visual materials. These can be pictures and photographs. If the application is dedicated to decorating clothes, for example, felt boots, then the photo should show examples of such work done by professional designers.
This is interesting. The world-famous Soviet-Russian fashion designer Vyacheslav Zaitsev began his career at a factory producing felt boots. And one day an aspiring clothing designer made a whole batch of multi-colored felt boots. At that moment, a delegation from France arrived at the factory, whose members were so impressed by the stunning shoes that they immediately agreed that they would take away the rainbow felt boots. This is how the international fame of Vyacheslav Zaitsev began, without whom it is now impossible to even imagine the global fashion industry.
If you plan to create outfits for a paper doll, then there should be pictures in which they are dressed, as well as examples of models of ready-made clothes without a mannequin doll.
Scheme for compiling lesson notes on the topic “Clothing and footwear”
Time for introductory and The final stage s are distributed depending on how complex the application is, with the minimum start and end timing being 5 minutes, and the maximum being 7 minutes
One of the fundamental points of successful work on an application is the correct distribution of time for all stages creative activity. A lesson in the senior group lasts 30 minutes, of which
- 5 minutes are allotted for introduction (motivation);
- to the main part (the application itself, as well as physical education, finger gymnastics) - 20 minutes;
- to the final stage (self-analysis, summing up, drawing up an exhibition finished works) - 5 minutes.
Example of a summary
Drawing up a lesson plan begins with formulating the goals and objectives of working on the application. We offer this version of the goal-setting component:
- learn to trace a template with small details along the contour;
- continue to work on developing the ability to symmetrically cut out parts along drawn lines and work with glue;
- develop the skill of creating a composition based on a model;
- expand knowledge about types of clothing, as well as national costume;
- cultivate respect for other people's work.
Lesson objectives:
- learn to complement clothing images with details (pockets, collar, etc.);
- intensify lexicon on the topic (pants legs, belt, pattern, wool, felt, etc.);
- develop fine motor skills, creative imagination and auditory perception;
- develop your own vision of the results of the creative process.
Shumkova Natalya “Summary of direct educational activities in the senior group “Miracle Valenki” (using ICT)” (fragment)
| <
…1. Introductory part. Organizational moment (2 min.). Children enter the hall. Greet guests. Teacher: – Guys, do you like to travel? (children's answers) – What can you use to travel? (children's answers) - Is it possible to walk? (children's answers) – I suggest you go to a magical, fairy-tale clearing... -Oh, guys, look: someone’s footprints? Whose tracks do you think these are? Let's see where they take us? Children follow in the footsteps of the teacher. The children go into the hall, there they find a felt boot lying in a “snowdrift”. Teacher: - Here is our magical clearing. Oh, guys, look what it is here in the snowdrift? (children's answers) – Which one of you guys has felt boots? Maybe some of you have lost it? (children's answers) - Then let's leave it here, suddenly the one who lost it will return (children's answers).
Listening to K.I. Chukovsky’s poem “The Miracle Tree” (5–7 min.).
The teacher offers to relax after work. |
Stages of working on the application
Before considering the schemes for working on crafts, it is necessary to stipulate that an applique on the theme of clothes and shoes can be “targeted”, that is, created for a paper doll (boy or girl). In this case, you should prepare the “addressee” in advance (cut it out, stick it on a thick base) so that the children can see the person for whom they are “sewing” the outfits. This can be 1–2 pupae per group or individual samples.
"Dress"
For this applique you will need a paper dress template and decorative elements for the fabric: sequins and braid.
Instructions:
- The teacher hands out sheets of paper to the kids on which the outline of the dress is drawn.
- Children cut out the blank.
- Try on decorative elements to the silhouette, noting the length of the parts. Please note that you need to start with the belt (or trim along the entire length) so that the kids get a general impression of proportion.
- Apply glue to the trim and glue it to the base.
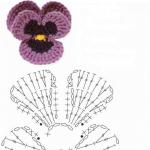
"Kokoshnik"
This is a mixed media appliqué: drawn elements - with paints, pencils - are combined with a collage.
Instructions:
- Children receive sheets of paper and a cardboard template of a kokoshnik (can be of different styles).
- Kids trace the outline and then cut out the base along it.
- After this, if necessary, the kids paint the workpiece with the desired color.
- While the base dries, cut out decorative flowers from pictures in the magazine. If children have basic quilling skills (rolling “circles”), then they can decorate with them. To do this, cut the paper desired color Using thin strips and using a thick rolling needle, we make an element.
- We place the decorative elements on the base and glue them.
- We complement the craft with sequins.
"Boots"
This is an example of a shoe themed applique. folk costume Tatarstan. But on this basis you can create any other model of shoes.
Instructions:
- Children cut out the outline of the boots. Please note that to obtain a relief contour - the effect of short hair - you can use children's nail scissors. In this case, the edge will turn out “with teeth”.
- Trace patterns of flowers and leaves on colored paper.
- These decorative elements are cut out.
- Glue them to the base.
"Hat"
Making this craft can be part of a discussion of the cartoon about the old woman Shapoklyak. Children are preparing a headdress for an elderly old woman.
Instructions:
- Children trace a cardboard template and cut out a hat blank.
- Place decorative elements on it (beads, sequins, beads for a flower, fabric bow).
- Glue the parts.
Photo gallery of finished works
Appliques using textiles look very unusual. For this applique, children are asked to cut out the last and heel separately, and then glue them together. Volumetric details as decoration require more time to manufacture. For an overlay applique, you can suggest decorating the base dress with white geometrically correct details
Photo gallery of templates
If during a lesson children are making clothes for paper dolls, then the little ones should definitely see the “owners” of the outfits in front of them. If children cut out outfits for dolls along the contour, then you should get very involved in small “hard-to-find” details. On New Year's Eve, the children are happy to decorate Santa's boot If During the lesson we use paper dolls, you can create a whole wardrobe of things for them
Video: “Dress” applique using origami technique
Video: Origami applique “Shirt”
Application in the senior group on the topic “Clothes and shoes” is fertile ground for teaching children to work with templates, cut out symmetrical parts, and also select decorative elements. Such a creative activity allows not only to develop the artistic abilities of children, but also forms aesthetic ideas about the sense of proportion in choosing a wardrobe, and also introduces them to the features national costume and folk crafts. That is why it is especially important to think about not only WHAT exactly to make from the wardrobe, but also HOW to do this craft, and also HOW to set up the kids for productive work.
O.I. Duplyakova
DECORATING CLOTHES FOR A DOLL
Izhmorsky
2011
Program content:
1. Teach children to cut a circle out of a square. Lay out the finished shapes on paper.
2.Reinforce the techniques of creating a composition and train children in neat gluing and the ability to cut along a curve with scissors.
3. To develop aesthetic perception, the ability to see and independently choose ways to decorate work.
Material:
Colored base in the shape of a dress; ready-made squares; glue; glue brush; stands for brushes; oilcloth; napkin.
Methodical techniques:
Motivation of activity; examination of the sample; show
Method of execution; exercise in gluing techniques; analysis of completed work.
Progress of the lesson:
Guys, what is your mood? (joyful, cheerful). Do you hear,
is someone crying? This is our Zina doll. What's happened? My friend Anya has Nice dress, but I don’t.
Guys, let's help Zina?
Our dress is unusual, it will be made of paper. Look how
can it be done? We will need squares, we will cut them
corners. I take scissors and cut off one corner, another, another, and another. It turns out to be a circle. See how many circles you get
elk are the polka dots for our dress.
Now I’ll put the finished peas on the dress. When everything is laid out, you can start gluing.
Look, I’m showing you: I’m turning the circle over with the colored side down onto the oilcloth. Now I take a brush, dip it in glue and spread it evenly on the circle. I take two smeared peas in a circle
fingers and apply it to the dress, gently press the napkin -
koy and lightly wipe off the excess glue.
So, what are you and I planning to do? (Dress, for Zina's doll).
What will we make it from? (From paper). What do we need for this?
(children’s answer). How will we do it? (In order - cut it out, arrange it,
stick it on). Result? (Nice dress).
Now let’s get up at the tables and cook. workplace. Let's take it, then
what are we going to do? (Oilcloth). Let's take what we're going to use to cut it out with? (Scissors). How do we carry scissors? (The blade is clamped in the fist). What else do we need to work? (Brush and napkin). I will arrange the glue myself. You can go and choose the dress you will decorate.
We go behind the chairs.
Now let’s get our fingers ready for work:
Visiting the big toe
They came straight to the house
Index and middle
Nameless and last
The little finger itself
Knocked on the threshold
Fingers together friends
They cannot live without each other.
Now your fingers are warmed up and ready to work, let's get started!
Let's start cutting out the polka dots for the dress. We cut off the corners of the squares, one by one. Now let's start arranging the polka dots
all over the dress: in the middle, along the edges to make it beautiful.
Happened? Then stick it on.
(Children work independently. I remind you that I help those who cannot cope on their own).
Zina, let's look at how the dresses turned out? (Beautiful dresses, I like them all. Now I will have not one, but many dresses. Thanks guys!)
Now let's lay them out on the table, let the glue dry thoroughly, and then give them to Zina.