Environmental assessment based on technology. Description of product manufacturing technology
The choice of manufacturing technology was not difficult for me. All the operations that will need to be performed during the manufacturing process of the product are well known to me. Technology manual processing I have already studied wood, so I can saw, cut, and perform decorative processing, and at a decent level.
In addition to the technologies listed above, I will need knowledge in decorative processing of materials.
Conclusion: it is necessary to perform only well-studied operations:
· sawing
· cutting
· gluing
· Working with a hand jigsaw
· Sanding
Selection of materials.
Before starting to develop the design of the product, I decided on the choice of material. The most technologically advanced, in my opinion, is pine.
Scots pine (lat. Pínus sylvéstris) is a plant, a widespread species of the genus Pine, of the Pine family (Pinaceae). IN natural conditions grows in Europe and Asia. The trunk is straight. The crown is highly raised, cone-shaped, and then rounded, wide, with horizontally located branches. A bend in the trunk can occur when a shoot is damaged by a wintering shoot moth butterfly from the family of leaf rollers (Tortricidae).
Scots pine wood is very resinous and durable; it is used in housing and hydraulic engineering construction, in carpentry and carpentry, for the manufacture of veneer and plywood.
Pine sawdust serves as raw material for the production of hydrolytic alcohol.
The high resin content of wood prevents the production of cellulose from it.
The roots, very flexible when fresh, become strong and elastic when dry; Various wicker utensils are made from them, for example, wicker vessels.
Economic assessment future product and its manufacturing technology.
Having considered everything that was presented above, we can make a preliminary economic and environmental assessment of the future product and its manufacturing technology.
The cost of the product will not be very high, since a minimum amount of materials will be used for its production. The main costs will be the purchase of NC 218 varnish. I will include the cost of 150 rubles in the preliminary calculation. All operations will take place indoors with natural light, so there will be no energy costs.
Total: The preliminary cost will be about 150 rubles.
Technical data sheet for manufacturing
The final version of the product.
As a result of my work, I got the product shown in the photo. (See Appendix) The organizer performs all its functions.
Aesthetic evaluation
I believe that my product will be useful because the main advantages of this product are artistic expressiveness and its intended use.
Economic and evaluation of the box (1 copy).
Material costs
Conclusion: The cost of manufacturing 1 unit was 9.3 rubles
To make the product I needed to purchase some materials. All costs for their purchase are reflected in the table. The cost of the product was 9.3 rubles. I did not include wages in the cost price, since the product was designed as a gift.
Final evaluation of the project.
In my work I decided problem designing and creating an organizer.
Target project has been achieved - the resulting product is presented in the annexes to the project.
Tasks, to achieve the goal, the following were decided:
1. A drawing of a rectangular organizer has been made.
2. Manufacturing technology has been developed.
3. Studied the decoupage technique.
3. Completed the job.
4. Increased knowledge in wood processing.
Completing this project has significantly expanded my knowledge of woodworking. I hope the knowledge I gained will be useful to me in my future life. In the process of working on my product, I mastered an algorithm for solving inventive problems, which will help me create new products.
The hypothesis has been proven, since as a result of my work I got a universal organizer that accommodates a wide variety of office supplies.
Coursework for the TKD course
On the topic :
Content.
|
p. |
|
|
Introduction |
3 |
|
Aesthetic assessment of product quality. |
4 |
|
Model No. 1 |
4 |
|
Model No. 2 |
9 |
|
Model No. 3 |
13 |
|
Model No. 4 |
17 |
|
Model No. 5 |
21 |
|
Conclusion. |
26 |
Introduction.
Aesthetic evaluation of products is carried out in order to identify the aesthetic value of the object being evaluated. It manifests itself in the form of a person’s aesthetic experiences, which are individual in nature and cannot be described in an exhaustive logical manner. However, the structure of aesthetic evaluation and its main components are identified and constructed in evaluation theory in accordance with the general logical model of evaluation. This model includes the following main components:
Object of assessment,
The subject conducting the assessment
Criteria (grounds) for evaluation,
Methods, procedures and outcome of the assessment.
However, this course work is designed for the simplest level of aesthetic appreciation. Therefore, in this work we will consider some of the aesthetic properties of a product from the standard list, which can be determined from a photograph of the product.
From here purpose course work is: aesthetic assessment of the product.
The product for which aesthetic evaluation will be carried out was taken DVD -player. To improve the quality of aesthetic evaluation, five models of players were taken, because... in comparison the difference is more noticeable.
As basic sample The Xoro HSD 310 model (model No. 1) was selected. This model is distinguished by its greatest compliance with modern requirements for this technology. All other models were compared with this model.
The following comparison criteria were chosen:
Artistic and figurative characteristics, originality, conformity with style, conformity with fashion, functional design conditionality, ergonomic conditionality, organization of volumetric-spatial structure, plasticity, orderliness and expressiveness of graphic elements, color and decorativeness, cleanliness of contours and connections, cleanliness of signs, clarity execution of brand marks.
For evaluation, a 100% system was chosen, where 100% corresponds to the base sample; if the product being compared is better than the base sample by any criterion, then a score greater than 100% is given.
Aesthetic assessment of the product.
Model No. 1. Basic.
Model 2005, DVD player Xoro HSD 310 with a built-in stereo decoder and playback of recordings in MPEG4 format, along with all other digital video and audio formats, is recommended for use in home theaters with a connection to a modern AV receiver. This model's NERO Digital codec support, in addition to support for all popular DivX codec versions, enables playback of high-quality MPEG4 recordings created using the Nero Recode 2 utility as part of the popular NERO 6 Reload software package. The presence of all major types of video outputs, including component video output with support for progressive scan, provides excellent image quality when connected to TVs of any screen size and video projectors. For connection to AV receivers with a built-in DD5.1/DTS multi-channel audio decoder, a multi-channel digital coaxial audio output is provided, and for connection to stereo amplifiers or TVs, an analog stereo output is provided. At an affordable price, the device has everything necessary to create the most modern home theater and provides outstanding multi-format versatility. 430x50x320 mm. 4 kg.
Download coursework:
First you need to draw a floor plan of the apartment with all the sockets, switches and junction boxes. The diagram will give a visual representation of the wiring layout and help count the number of wires, cables and sockets.
You can either draw the apartment plan yourself or take it from the apartment passport. In any case, you need to measure all the walls to be completely sure. After sketching the plan, you need to display all the wires, junction boxes, sockets and shield on it. The end result should be something like this.
Schematic diagram of indoor wiring:
Then we take 10 mm plywood and mark it according to predetermined overall dimensions. We cut with a jigsaw under the guidance of a teacher. We also cut out space for the door and window. We mark the places for the socket boxes and drill 3 holes D = 55 mm into the wood using a core drill. We mark the places for installing the piano hinges and install them, with the help of which our “room” layout will easily fold into a position convenient for carrying. We cover it with wallpaper, install socket boxes, mark the cable duct for installation, glue it to the walls on the back side so as not to spoil the aesthetics of the interior decoration. We lay electrical wires (of different sections for the lighting circuit 1.5 and for sockets 2.5). We install sockets, a two-pole switch, 16 ampere and 10 ampere circuit breakers for different electrical circuits, respectively. We mount the “ceiling” in the form of two perpendicular slats with installed electrics. cartridges imitating a two-arm chandelier.


The layout is ready.
Description of the final product
The product description was given above, and at this point a photo of the final version of the product is presented:
Preparation time
We made our model after the end of lessons, within 2 - 3 hours every day. A lot of time was also spent shopping around to find the right electrical parts at reasonable prices. I was familiar with plumbing and carpentry operations, but this was my first experience with residential wiring, so I spent a lot of time studying electrical installation operations. In total, the time to manufacture the product was about 30 hours.
Economic and environmental assessment of the finished product
All wood materials (plywood, piano hinges, slats) are environmentally friendly and safe. Electrical installation elements purchased in a store are certified and therefore environmentally friendly.
Economic calculation
Store Purchased Items:
Email socket 2 pcs. =70 x 2 =140 rub.
Email switch =80 rub.
Circuit breaker 16 A = 130 rub.
Circuit breaker 10 A = 120 rub.
Email cartridge 2 pcs. = 15 rub. x 2 = 30 rub.
Light bulb 2 pcs. = 20r. x 2 = 40 rub.
Box for circuit breakers = 50 rub.
Email wire 2.5 1m = 25 rub.
Email wire 1.5 1m = 18 rub.
Cable channel 1m = 20 rub.
Socket box 3 pcs. = 5r. x 3 = 15 rub.
Total: 668 rubles spent on the purchase of electrical parts.
We did not buy all other parts and made them from used material.
The future product should not harm the health of people using and manufacturing this product.
To ensure this condition, I will adhere to the following security criteria:
Buy materials only in specialized stores that have product quality certificates;
Use materials that are easy to clean;
Do not use toxic substances and technologies in the manufacture of the product;
Use materials and energy resources economically;
Calculate carefully Consumables, which will reduce waste and production costs to a minimum.
Assessment of manufacturing technology.
Selected technology - Sewing applique details with additional decorative elements (beads) allows you to:
· solve assigned design problems
· meet the time and money limits
· do the job without outside help
· implement the conceived idea in full, and this is the most important thing.
Organization of the workplace. Safety regulations.
Have the necessary materials on your workbench:
Sewing machine
· Electric iron
· Scissors
· Needles and pins in a pincushion
· Soap
· Pencil
· Tape measure
· Synthetic brush No. 3
· Oilcloth
· Tablet candle
Safety regulations:
1. Hair should be tucked under a headscarf.
2. Store the needle and pins in a needle case.
3. You cannot put sharp objects in your mouth.
4. Turn electrical appliances on and off dry
hands on the fork.
5. When working on a sewing machine, you must ensure that
no foreign objects or fingers got under the needle.
6. Do not lean close to moving parts of the machine.
7. When working with a manual needle, you must use
thimble.
8. When working with acrylic paints Place oilcloth under the fabric to prevent paint from leaking.
9. When melting sections of organza flower petals over a candle, be careful not to get burned.
Description of product manufacturing.
Routing.
| Work sequence | Work stage image | Equipment, tools, devices |
| 1) Cut out the base of the panel (2 pieces) from canvas, taking into account seam allowances (1.5 cm) | Soap, scissors, pins, measuring tape | |
| 2) On the front part of the panel, mark the flower stems with a soap and apply an outline with acrylic paints and crayons for painting on fabric. Secure the design using an iron through the paper. |
 | Soap, synthetic brush No. 3, oilcloth, iron |
| 3) Cut out details of flower petals from organza, whole flowers from felt and foamiran, proportional in size to the base of the panel, according to templates. Lightly stretch the flower petals from foamiran and give them a convex shape. |
  | Pencil, scissors, pins |
| 4) Cut out the details of the leaves from felt, proportional in size to the base of the panel, according to the templates. Using a felt-tip pen for painting on fabric, draw the veins of the leaves. | Pencil, pins, scissors | |
| 5) Melt sections of organza petals over a tablet candle and sew them together in 6-7 pieces. in the center into a flower (make such blanks, 2 pieces each, from white, yellow, beige and red organza) |
 | Candle tablet, needle, scissors |
| 6) Combine flowers from organza, foamiran, felt into volumetric flower and secure in the center with several beads (make 2 pieces of yellow, blue, orange, white) |
 | needle, scissors, pins |
| 7) Place and sew ready-made flowers using additional beads and leaves on the base |
 | Needle, pins, scissors |
| 8) Baste along short sections hinged hinges from yellow ribbon and orange color, 5 cm long. | Needle, pins, scissors | |
| 9) Carefully stitch the two panels of the panel together (seam width: 1.5 cm). Turn the product right side out, hem the open cut by hand using a blind stitch. Iron the turning edge. |
 | Sewing machine, needle, scissors, iron. |
| 10) The panel is ready. |
 |
Description of the final product
Decorative panel“A gift for good memory”, overall dimensions 85*165cm, made using the sew-on applique technique.
Volumetric flowers made of foamiran, felt and organza, white, yellow, blue and orange, are sewn onto a base of dark olive tarpaulin using yellow, white and blue beads.
Flower stems are drawn with acrylic paints, crayons, and felt-tip pens for painting on fabric.
The leaves of the flowers are made of white and green felt.
The panel is hung using hinged loops through which a wooden batten is threaded.
MBOU "Verkhnetoyemskaya Secondary School"
Project
Casket
Designer Budarin Kirill,
student of class 10B
Project manager A.V. Viktorov,
technology teacher
Verkhnyaya Toima
2015
Rationale…………………………………………………………………………………3
Search for information. Analysis of prototypes……………………………………………………..3
Analysis possible ideas. Choice optimal idea…………………………………………...4
Selection of manufacturing technology………………………………………………………………………………...4
Economic assessment of the future product and its manufacturing technology…………………..5
Environmental assessment of the future product and its manufacturing technology…………………...5
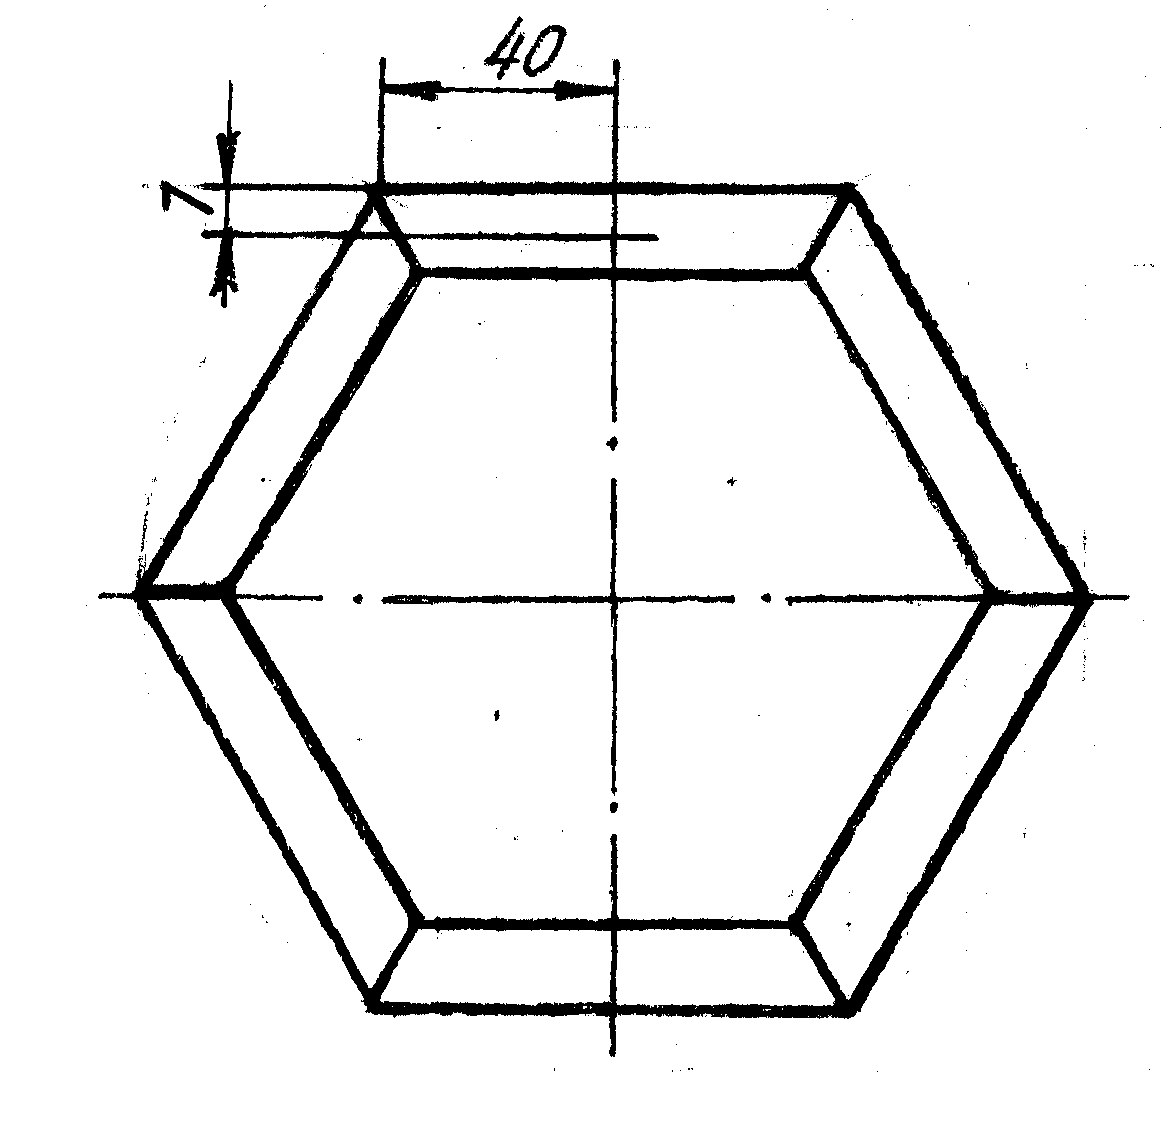
Drawing……………………………………………………………………………………………………………...6
Description of manufacturing technology………………………………………………………...7-9
Description of the final product………………………………………………………9
Environmental assessment of the finished product……………………………………………………….10
Economic assessment of the finished product………………………………………………………10
Determining the cost of materials used to manufacture the product………….12
Rationale
In her free time, my mother does needlework - bead embroidery. In sixth grade, I made her a bead box. And this year I decided to make a box for needles and threads.
I believe that every home should have a box, not only to store various small items, valuables and jewelry, but also to create beauty in the interior. Therefore, I consider my project topic to be relevant today. Handmade products allow you to express your individuality through the selection of texture and color of materials, as well as the design of the product.
Search for information. Prototype analysis
In order to save time, I did not go to the library, but turned to the Internet. Internet sites offer a variety of boxes. Here are some of them
Wooden box with hinged lid.
It will look more beautiful if you decorate it with painting.

A similar box with a lid on hinges made of wood.
The traditional shape is a rectangular parallelepiped.
The box is decorated with carvings, so it looks more impressive.

Cardboard box. The parts are fastened with threads.
Original form. This box will decorate any
needlewoman's rooms.
The main disadvantage is that the cardboard can tear.

Original box from plastic bottles. The lid is trimmed with braid. In the center of the lid original flower made of plastic.
A beautiful box made from household waste. Recycling problem is being solved
waste. Waste into income.
Conclusion: boxes can be made from various materials, various shapes, With various types finishing.
Analysis of possible ideas. Choosing the optimal idea
box with lid

box with lid and drawer

folding box with cells
geometric body
household item
(book, chair, chest of drawers)
fairy tale hero with a vessel
(bear with a box)
Number of department cells
three or more
Connection of body parts
tenon box
on screws or nails
Connection between body and bottom
on self-tapping screws
on nails
Cover fastening
box with hinged lid
box with removable lid
box with a lid that slides around an axis
Material
wood
plastic
opaque paint
Conclusion: Since I’m running out of time, I’ll choose a design - a box with a removable lid, shape - regular straight hexagonal prism, material - wood, finish - sawdust + opaque paint.
Choice of manufacturing technology
The manufacturing technology will consist of the following operations: marking, planing, sawing, processing of end surfaces, grinding, gluing, nailing, finishing.
I will connect the parts of the box body using an open insert tenon. I will connect the bottom to the body using nails. The inside will be decorated with velvet paper to give it a solemn effect. The outside is finished with sawdust to hide defects. Finishing with sawdust involves gluing sawdust layer by layer onto the surface with each layer first drying. Then varnish is applied and after drying, paint is applied.
Economic assessment of the future product and its manufacturing technology
(the cost of some analogues: from 200 rubles)
Availability necessary materials
Need to purchase materials
Availability necessary tools and devices for manufacturing the product
The need to purchase tools and devices for manufacturing the product
Environmental assessment of the future product and its manufacturing technology
Conclusion: technological process The manufacture of the box, its subsequent operation and disposal will not pose an environmental hazard to humans, their environment and nature.

Description of manufacturing technology
Lower body
Select a workpiece measuring 20x75x500 mm and plan it to dimensions 14x70x500 mm.

Process details
Assemble onto an open double tenon (we use exfoliated plywood veneer as a tenon)

Bottom of the lower body

Process part
Lower body, bottom of the lower body
Upper body
Select a workpiece measuring 20x35x500 mm and plan it to dimensions 14x30x500 mm.
Mark the workpiece along the length and cut, maintaining the marking lines
Process details
Assemble onto an open insert triple tenon (we use exfoliated plywood veneer as a tenon)

After the glue has dried, finish
Bottom of the upper body
Select a piece of three-layer plywood measuring 150x170 mm and mark it
Cut out, keeping the marking lines
Process part
Upper body, bottom of upper body
Connect the bottom to the body with nails
Finish the junction of the bottom and the body
Lid
Select a piece of seven-layer plywood measuring 150x170 mm and mark it
Cut out, maintaining the marking lines.
Process the ends, edges, sand the faces.
Assembly
Mark the centers of the holes on the housings and cover

Prick the centers of the holes and drill through holes with a diameter of 5 mm.
Drill a hole in the cover from the outside and a hole in the lower body from the bottom with a drill for the bolt head and nut
Assemble using an M4x110 bolt and an M4 nut
Finishing
Apply a thin layer of PVA glue to the outer surfaces.
Sprinkle the surfaces with fine sawdust in a thin layer.
After drying, repeat steps 28 and 29.
After drying, coat with varnish.
After drying, paint.
Finish the internal surfaces with velvet paper.
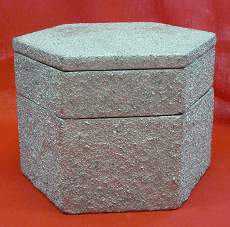
Description of the final product
The box is a regular straight hexagonal prism of two bodies with a lid rotating around an axis. Overall dimensions of the box are 117x140x160 mm.
The body of the box is made of wood. The body parts are connected using open plug-in tenons. The bottom is made of three-layer plywood. The bottom and body are connected using nails. The cover is made of seven-layer plywood. The cover and housings are connected using a bolted connection.
The decoration of the box is made with sawdust, followed by varnish and paint.

Economic assessment of the finished product
The cost of materials used to manufacture the product was 144 rubles 10 kopecks. Did not exceed 150 rubles (¾ of the market value of analogues). The cost can be reduced by making the bolt yourself, for example from a nail or wire.
And also if you use cheaper paint (for example, acrylic).
I believe that the price at which the box can be sold is no more than 300 rubles.
Environmental assessment of the finished product
My product does not have a harmful effect on human health and environment, as it is made from environmentally friendly safe material– wood and plywood.
"The World of Boxes and Caskets"
Do you like different boxes and boxes?
Do you store your jewelry in them?
Or maybe various little things for needlework?
We invite you to visit the world of a wide variety of boxes and caskets.
Perhaps you will find the one and only box for yourself
and want to buy it for yourself.
Come and choose
With. Verkhnyaya Toima, st. Kulizhskogo 20 b, school kiosk
Determining the cost of materials used to make the box (excluding electricity)
Name
details
or surgery
Material
blank,
assembly material
Price,
Unit measured
Unit cost
Size or Qty
Size, quantity per unit. change
Upper body
wood
9000 rubles
20x75x500 mm
Lower body
wood
9000 rubles
20x35x500 mm
Bottom of the upper body
three-layer plywood
210 rubles
Bottom of the lower body
three-layer plywood
210 rubles
seven-layer plywood
400 rubles
bolt M4x110
0.50 rubles
312.50 rubles
DEKORIX paint
130 rubles
The cost of materials used to manufacture the product was 144 rubles 10 kopecks
We also recommend
 Educational games for children of the fourth month of life
 How to make wartime hairstyles with your own hands What hairstyle can be done on May 9
 Daedra Quests (Final) House of Horrors - Molag Bal
 Solcoseryl facial ointment for wrinkles: how to use Solcoseryl in cosmetology
 What types of groups are there in kindergartens?
 A two-year-old baby does not speak: looking for reasons and developing speech Teaching a child to speak for 2 years