Knitted flowers: composition “Pansies. Crochet pansies
In the practice of many knitters, the need to make flowers often arises. They are used to decorate a wide variety of objects and things: from hats to kitchen curtains.
Crochet pansies occupy a special place in the list of flowers that can be made from yarn. Schemes for their implementation will be proposed in this article.
Feature of knitting flowers
The specific structure of these floral motifs does not provide for the presence of such a large number of petals, as, for example, a rose. Knitted ones consist of only five elements, but their interesting arrangement and colors turn them into the favorite decor of many craftswomen.
Even with little experience, you can master the principle of making them and get full-fledged crochet pansies. Knitting patterns for two color options are posted below. Both options suggest placing the petals in two layers. The first contains small elements, and the second contains larger ones.
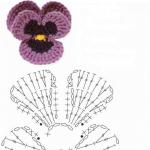
Making a dense flower
When we say that a flower is dense, we mean that its center is filled. That is, the end result will be solid (pansies). Diagrams illustrating the work process are below.

Operating procedure:
- Such a flower begins to be knitted from the center, by casting on six air loops (CH) and closing them into a ring.
- Then each petal is knitted separately from the others, but the thread should not be broken. The first row of the petal consists of two or three single crochets (SC). The difference in the number of RLS determines the width of the petal. In nature, flowers are far from ideally shaped, so you can take liberties and not adhere to strict standards. The transition from the end of one element to the beginning of another can be done using connecting posts or RLS.
- The second row of the petal begins with two lifting loops, then the fabric is turned and double crochets (Dc) and double crochets (C2H) are knitted into the newly connected RLS according to the pattern.
- The third row completes the production of the petal. It includes C2H, CCH, half-columns (PLS) and air loops. Their combination allows you to form a rounded edge.
- For the second layer of petals, you should knit a chain of 4 VPs. Its beginning and end are on the wrong side of the first layer.
- Large petals are knitted by threading C2H under this arch. The procedure is similar to making the petals of the previous layer.
openwork flower
There is a second method by which pansies are crocheted (diagrams and step-by-step photographs are below).

The result is a looser and more delicate flower.

But its advantage is ease of manufacture:
- Getting started - a ring of six VPs.
- To knit the petals of the first layer, you need to make three arches of six VPs, each of which is sequentially attached to the initial ring.
- Next, all the petals are knitted in one row. The order of operation of one element: SBN, PLS, 5СН, PLS, SBN. All other petals are performed in the same way.
- A thread of a different color is attached to the initial ring from the wrong side, that is, behind the first layer.
- Knit a chain of six VPs and fix them in the same cell.
- Using 3 VP, move to the next cell of the initial circle and here also knit an arch of 6 VP.
- The petals of the second layer consist of the same set of columns as the elements of the first.
Edge processing
The finished flower can be tied with a “crawfish step”. This will give some unevenness to the petals, which will help them resemble real flowers.
Also, the binding can be one row of RLS, thanks to which the petals will be slightly pulled together and twisted inward.
A voluminous yellow center is tied into the center of the flower when it is completely ready.
Color distribution when knitting pansies
The best option for maintaining the authenticity of products is to use a color scheme that is as close as possible to the natural colors of pansies.
Therefore, we crochet pansies (the diagrams do not indicate this) with several types of yarn. It is better to make the middle darker than the rest of the elements. The color of the thread can be changed according to the planned color distribution or other techniques can be used.
A good way to achieve a smooth color transition is to use. Typically, such a thread is dyed in different shades of the same color, which is great for crocheting pansies (any pattern will do).
The middle can be given a different color or shade by making a few stitches with a different thread.

Thus, you can be sure that such a skill is useful for making floral decor. Pansies (you can choose any diagrams and descriptions) look good in combination with knitted green leaves. They are usually arranged in random order, without maintaining symmetry.
Crocheted pansy flowers can be used to decorate various items of clothing and interior design. A bouquet of pansies, made with your own hands and placed in a vase, will look nice; you can also imitate a flower bed. Hand-made bouquets will fit perfectly into the interior, will please the eye, and lift your spirits.
Learn to crochet beautiful pansies in a step-by-step tutorial
Notations used in the article:
- air loop - V/P,
- Half-column - P/ST,
- half double crochet - P/ST with 1/N,
- connecting post - conn. Art.,
- single crochet - st. B/N,
- double crochet - st. 1/N,
- double crochet - st. 2/N,
- double crochet - st. 3/N.
This flower is knitted quite simply; a detailed description is given below; you will need threads of 3 colors and a working tool - a hook.

- Tie a sliding loop with a thread of 1 color, then knit 2 V/P and knit 3 tbsp inside the sliding loop. 1/N, 2 V/P, st. B/N, 2 V/P, 3 tbsp. 1/N, 2 V/P, st. B/N, 2 V/P, 3 tbsp. 1/N, 2 V/P, st. B/N, 2 V/P, 3 tbsp. 1/N, 2 V/P, st. B/N. It turns out 4 small petals.
- We knit 2 V/P then 5 tbsp. 1/N in a sliding loop then 2 V/P and st. B/N. Then we tighten the sliding loop. It turns out a flower with 5 petals. 4 identical leaves and one larger one. We cut off the thread.
- We knit the next row in a different color. Insert the working tool into the top of the art. 1/N, at the beginning of the petal, grab the thread and pull out the loop, then knit 2 V/P and knit a st in the same loop. 1/N. Then knit 2 tbsp. 1/N, in each loop of the petal. Then 3 V/P and in art. B/N knit a connecting st., again 3 V/P and 2 tbsp. 1/N in each petal loop. Knit all the petals in this way. We finish row 3 V/P and connect. Art. to the top of the station Cut 1/N thread.
- Let's change the color again. We thread the working tool into the top of the first stitch. S/N of the largest petal and make a loop. We knit 2 V/P and knit a st in the same column. 1/N, and then 2 tbsp. 1/N in each petal loop. When all the loops on the leaf are knitted, 3 V/P and st. B/N in the center of the flower, 3 V/P. We knit the next petal 2 P/S with 1/N in each loop. Next 3 V/P, art. B/N in the center of the product, 3 V/P. 3 and 4 leaves knit 2 tbsp. 1/N in each stitch. Between the leaves, knit the same 3 V/P, art. B/N to the center, 3 V/P. We knit 5 petals in 1 loop, knit P/ST with 1/N and remove the loop from the hook, thread it into the last column of the second petal, pick up the dropped loop and pull it through the one on the working tool, then continue to tie the fifth leaf 2 P/ST with 1/N in each, after all the loops are knitted 3 V/P and at the top of the st. B/N knit connection Art. We cut and hide the thread, straighten the petals and we get a very beautiful inflorescence.
You can also make various compositions from violet flowers, use them to decorate sweaters, blankets, bedspreads, napkins, and create Irish lace. Collect bouquets and put them in a vase or make a composition in a pot.
Trying to make a simple flower in a pot
We offer you a small master class on making a composition from plants; for it you will need: ready-made violets of different colors, leaves, wire, floral tape or thread, a pot (ready-made or homemade) and more material for filling the pot.

Let's consider one option for putting together a composition; if you want to change something, feel free to do it, because the main advisor in this matter is imagination, and everyone has their own.
The blanks can be knitted using any pattern suggested below, or any other pattern you like.
Let's start collecting flora gifts from the middle. First you need to prepare the core. It can be a bead, beads placed on a wire, or a crocheted middle; you can knit it according to the following pattern: close 4 V/P in a circle, knit 6 - 8 tbsp into it. B/N (as much as will go in), and 2 tbsp. B/N in each column of the previous row. Fasten the thread and hide it. Thread the wire from the wrong side and secure it by twisting it in one turn.

Insert the core into the central hole of the inflorescence, then put on the sepal, but thread the wire not into the center, but on both sides, slightly away from the middle (you can tie the sepal according to the pattern of a regular flower). Twist the wire and wrap it with floral tape or thread, wrapping 2 leaves per stem as you wrap it.
You can take a ready-made pot, or make it yourself. To do this, take a plastic bottle and cut off the bottom to the height required for the pot.
Then we knit a cover st. from dark (blue, brown) yarn. B/N to hide a bottle in it. When the height is knitted, you need to insert our workpiece into it and knit another 2 - 3 rows on top, reducing the number of loops in each to hide the edge.
Pour plaster into the pot and insert flowers into it, you can twist them into a bouquet or stick them individually to imitate a flower bed. After the plaster has set, straighten the composition.
Patterns for knitting violets:

Video on the topic of the article
In the video below you can see which knitting methods are still used by needlewomen.
Knitted pansy flowers. Master class on making a flower arrangement. Crochet flower patterns
This arrangement of crocheted flowers was made as a gift for a kindergarten teacher in connection with her retirement.
There are 17 flowers in the basket - just like the children in the group. There are no identical flowers here, they all differ in color, shape and “age” - in general, everything is just like in life.
To crochet a flower, we will need:
- 50 gr. green cotton yarn (Gjestal Baby Bomull, 50 g = 170 m, color 835);
- 50 gr. brown cotton yarn (Gjestal Bomull Sport, 50 g = 100 m, color 375);
- a small amount of cotton yarn of various colors;
- yellow and white floss threads;
- hook No. 2;
- green wire (for stems 1 mm thick, for leaves - 0.8 mm)
- basket;
- Styrofoam;
- tools (sharp knife or scalpel, wire cutters, pliers).
Symbols used in diagrams:
Knitting description:
We collect the petals into a flower and embroider the center with yellow or white thread.
3. Place the flowers on the wire, bend and secure the end of the wire inside the flower using thin-nosed pliers, put on the cup and sew it to the flower.
5. We tie the base with a brown thread: first you need to tie a square to the size of the upper part of the base, and then move on to tying the side edges. When switching to tying edges, knit the first row behind the back walls of the loops of the previous row. In each subsequent row, make decreases in the corners of the base.
Knitted pansy flowers. Master class on making a flower arrangement. Crochet flower patterns
This arrangement of crocheted flowers was made as a gift for a kindergarten teacher in connection with her retirement.
There are 17 flowers in the basket - just like the children in the group. There are no identical flowers here, they all differ in color, shape and “age” - in general, everything is just like in life.
To crochet flowers we will need:
- 50 gr. green cotton yarn (Gjestal Baby Bomull, 50 g = 170 m, color 835);
- 50 gr. brown cotton yarn (Gjestal Bomull Sport, 50 g = 100 m, color 375);
- a small amount of cotton yarn of various colors;
- yellow and white floss threads;
- hook No. 2;
- green wire (for stems 1 mm thick, for leaves - 0.8 mm)
- basket;
- Styrofoam;
- tools (sharp knife or scalpel, wire cutters, pliers).
Symbols used in diagrams:

Knitting description:
1. Knitting flowers:
 Each pansy flower consists of 5 petals: 3 internal and 2 external. We knit the inner petals according to pattern 1, and the outer petals according to pattern 2.


We collect the petals into a flower and embroider the center with yellow or white thread.
 Adviсe: 1. To make the flowers look more realistic, select the thread colors for each flower based on photographs of real pansies.
2. For the effect of velvety pansies, tie the petals in a crayfish step;
3. Knit some flowers, slightly changing patterns 1 and 2.
For example, some pansies have a lower inner petal that is larger than the inner side petals. To knit such a flower, knit 3 tbsp in the first row of one of the petals. b/n, and 3-4 tbsp. s/n, then knit similarly to the pattern;
To make wider outer petals, knit 4 sc in the 1st row of pattern 2 instead of 3 sc.
 4. For greater realism, add unbloomed flowers to the composition.
So, for example, for flower 1, knit only 2 inner petals according to pattern 1. Tie the third petal separately, twist it, insert it between the first two petals and sew.
For flower 2: inner petals - as for flower 1, plus tie 2 more outer petals and sew.
2. We knit leaves and cups:
 We knit cups 1 according to pattern 3. They need to be knitted as many as there are flowers in the composition.
Leaves 2, 4 and 5 are placed on the stem of the flower and used in the interior of the composition. We knit leaves 5 in the same way as cups 1, increasing the number of air loops in each petal to 8.
We knit leaves 2 and 4 as follows: 2 ch. close in a circle, knit 5-6 tbsp in the first row. b/n, and in the second row - 3-4 sheets according to scheme 4.
Leaves 3 are mounted on a wire. They are best used on the outer edge, because... they can be given any desired shape. We knit them according to pattern 5.


3. Place the flowers on the wire, bend and secure the end of the wire inside the flower using thin-nosed pliers, put on the cup and sew it to the flower.

Advice: use the threads that tie the leaves together for stitching. Just unravel the thread into several thinner ones.
 We wire the outer leaves so that the wire passes through the center of the leaf, bend the end of the wire and secure it.
4. Cut out the base for the composition from foam plastic to the size of the basket.

5. We tie the base with a brown thread: first you need to tie a square to the size of the upper part of the base, and then move on to tying the side edges. When switching to tying edges, knit the first row behind the back walls of the loops of the previous row. In each subsequent row, make decreases in the corners of the base.

6. Place flowers and leaves

7. Cut the ends of the wire and bend them inward, sticking them into the foam

8. We knit a square to the size of the bottom of the base and connect the top and bottom parts of the base cover, tying them with single crochets. 
Place the composition in the basket.
The composition "Pansies" is ready!

Additional photos:

 Presentation of a gift

 Close-up composition

 Second version of the composition, knitted to order