Cross-stitched New Year's pictures. New Year's cross stitch - many patterns and ideas
With each new year, new technologies and ideas for decorating a home or office space arise, as well as ideas for original, one-of-a-kind gifts given at Christmas or on the eve of the most important night.
Various products decorated with embroidery are becoming increasingly popular in this vein. New Year's embroidery in 2017 can be used to create:
- room decor elements,
- Christmas tree decorations,
- wall panels,
- greeting cards,
- household items.
Embroidery in the design of the front door
The vast majority of representatives of European countries traditionally decorate in a special way on the eve of Christmas. front door to the house. As a rule, for these purposes, such a popular type of decoration in the mentioned countries as an embroidered miniature in the shape of a flag is widely used.
Similar flags can be different sizes, individual or combined with colorful twine in the form of a garland placed on the surface of the door.
For this variety New Year's decor often used enough simple diagram cross stitch, which both adults and children can recreate.

New Year's embroidery, a long-used cross stitch technique, looks very harmonious on Christmas flags.

The most popular motifs on such a product can be called New Year's embroidery patterns 2017, depicting
- Christmas tree decorated with toys,
- placed under it in anticipation New Year's Eve numerous intriguingly packaged gifts,
- The main hero of the occasion is Father Frost.


The Christmas boot is an essential attribute of the New Year
 Another no less magnificent New Year's tradition, which is revered by Western European peoples, is the indispensable placement of a Christmas boot on the mantelpiece, chest of drawers or closet door, where Santa Claus, who visits the house at night, puts gifts stored for the children.
A boot decorated with cross stitch will create a special atmosphere in the room and an exceptionally positive mood for all household members.
You can make a boot in this way yourself if a person is familiar with the skills of cutting, sewing and cross-stitch. For those who want to definitely have such a decoration in their home, but are not experienced in the art of sewing, specialized stores offer ready-made kits for creating a boot, including everything you need:
- product pattern,
- embroidery pattern,
- threads to recreate the pattern in the required shades.

Most often, the images on the patterns proposed for embroidering a Christmas boot are
- funny snowman,
- a bear circling his forest possessions,
- reindeer harnessed to Santa Claus's sleigh,
- traditional Christmas tree decorations or sweets,
- christmas goose,
- folk ornaments.


Exclusive Christmas tree decorations
Perhaps the main decoration of any home before the New Year strives to enter its doors is the Christmas tree. Almost everyone wants to turn a coniferous tree into a true beauty by transforming it original jewelry. In addition to the standard wide range toys presented on store shelves from various manufacturers, as unusual design Christmas tree, it is recommended to use manufactured with my own hands decorations using cross stitch technique.

There is a wide range of fantasy cross stitch patterns that can be used to decorate a unique Christmas tree ball.


Such Christmas tree decorations can be either single-layer or double-sided, consisting of two halves, representing a harmoniously created winter miniature.

How to independently make such an example of a real masterpiece in the field New Year's decorations, will demonstrate the master class presented below.

To make an embroidered miniature of the mentioned variety, the following materials and equipment are required:
- a special plastic canvas for cross stitch, thanks to which you can subsequently cut out the outline of a product of any configuration that is not subject to deformation;
- multi-colored floss or silk threads directly for embroidery according to the appropriate pattern;
- needle for this type of embroidery;
- scissors for working with plastic canvas.
The process of working on this version of Christmas tree decoration consists of several stages:
- First of all, taking the selected plastic canvas as a basis, embroider the first blank.
- The next step is the reproduction of the extreme seam, which is called backstitch, used mainly in embroidery to indicate its boundaries, a kind of edging.
- Using the technology described in the previous paragraphs, a second template is created according to the scheme proposed for the product.
- The last stage is the actual assembly of the product from the finished two halves. For this purpose, a stitching technique is used, usually used when assembling such a type of decorative and applied art as biscornu. This technology does not involve piercing fabric or plastic canvas with a needle during assembly. The needle alternately captures the stitches of the backstitch seam reproduced along the edge of each part.
A finished embroidered miniature or made in original technology The Christmas ball can be attached to a pine branch, adding a loop at the top, or presented in a festively decorated package to loved ones or friends.

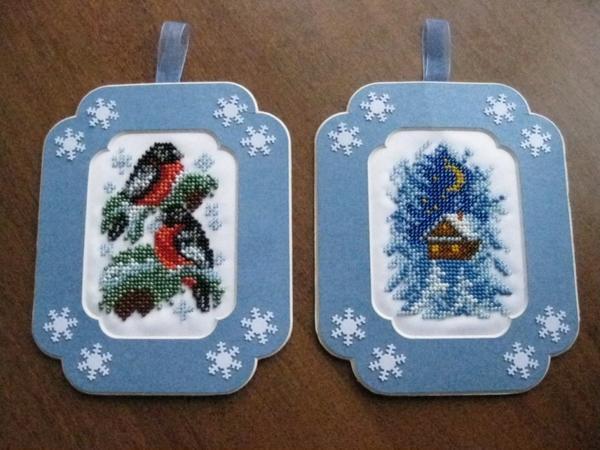
Embroidery on Happy New Year cards
For those planning to celebrate the New Year with a large and noisy circle of relatives or bosom friends, we offer an original variation of a memorable gift that can be given to everyone on this occasion. We are talking about New Year's cards made using embroidery techniques that can please family and friends and leave an unforgettable impression.

To create the proposed souvenirs, you can use new replicated embroidery patterns for the New Year 2017.

Such New Year's embroidery will not take much time for a needlewoman who knows a lot about it and will become a pleasant surprise for each of the guests invited to the house, or a member of a friendly company in which a skillful donor will become a member.
Considering such an important nuance that New Year's embroidery of this type made using silk threads or floss in bright colors, its manufacturer does not need to waste time and Additional materials to decorate it with ribbons, bows or other small decor. It will be enough just to write on the inside of the original postcard nice words sincere congratulations Happy New Year.
Panel with New Year's motifs

Larger than a postcard shape New Year's gift can be a panel of different sizes decorated with winter patterns. Often round, oval or rectangular shapes are used to make such a product.

Quite often, for embroidery of this kind, a traditional ornament is used, monochrome or made in contrasting red and black colors, characteristic mainly of Slavic embroidery.

Considering the fact that 2017 will be the year of the Fire Rooster, the most relevant theme of the described panel will be the image of this particular symbol of the coming year.
Of course, in this case, it is most appropriate to embroider the image with red threads.


Needlewomen planning to make it are recommended to perform embroidery in the following sequence:
- Start working from the center of the product to avoid frequent subsequent contact with the embroidery threads.
- First of all, embroider the elements of the panel in dark shades and only after that proceed to recreating the fragments indicated in the diagram with light colors. In this case, you can be absolutely sure that the light threads will not get dirty during the work process and will not rub due to frequent touching of the edges of the palm.
Interior items with New Year's embroidery

Another equally common gift for any holiday, of which New Year is no exception, are various cute objects and trinkets that complement the interior of the room. These include
- sofa cushions of different configurations,
- textile hearts that can be filled with aromatic herbs,
- perfectly decorating kitchen shelves and tables,
- table napkins.
Usually for the manufacture of such household items in New Year's style recommend choosing fabrics pastel colors, among which white, blue, and lavender shades predominate, in order to fully convey the symbolism of winter and the New Year.
To decorate this version of a New Year's gift, it is not necessary to use the cross stitch technique. It would also be appropriate to reproduce a needle or floral pattern, satin stitch embroidery, supplement the listed technologies with decor from several small beads, seed beads, tiny plastic bells or Christmas bows.
The variety of variations and embroidery patterns will be an excellent help for making an exclusive gift that expresses sincere feelings its donor, who invested a piece of his soul into the creation of such a New Year's souvenir in order to give festive mood and enjoy your work.
I did a lot large selection ideas for New Year's embroidery. I won't just give you embroidery patterns... and do with them what you want. NO - I will make you want to make real New Year's masterpieces as gifts for friends and family. I will make you want to touch the spirit of a magical holiday.
It is believed that handicrafts with New Year's motifs attract happiness into the house in the New Year.
Do you need happiness? - Take it.
WHAT will we embroider today?
- We will decorate with embroidery New Year cards- in two at once CROSS and WEB techniques…
- I will give you a lot of diagrams so that you can do it yourself Christmas tree TOYS embroidered with threads floss using cross stitch technique...
- Also, New Year's embroidery theme will decorate BALLS for the Christmas tree…
- And we will do it with our own hands gift CASES for tablets and smartphones...as a gift for New Year.
- We will also embroider New Year's motifs on NAPKINS… on TOWELS or tablecloths…
- and create entire embroidered pictures with deer, Santa Claus and snowmen on PILLOWS.
And also we have an article - with a NEW TECHNIQUE for New Year's embroidery (not cross stitch...) -
There you will find the most simple techniques embroidery for young children. Ideal topics for activities in clubs and in lower grades during labor lessons.
So...let's get started. Everything promised is in order.
New Year's CROSS STITCH on Christmas tree decorations.
The toys turn out to be light (with padding polyester inside), bright (rich colors of floss threads) and kind (mother’s hands and love).
Now I will tell you all the techniques for creating such toys - step by step.


THE ESSENCE OF THE WORK is simple...
- We insert a canvas into the hoop - large enough to fit the entire intended design.
To know which piece of canvas we need, we must calculate the size of future embroidery.
One cell on the diagram is equal to two holes on the canvas.
Now counting the holes of the canvas in width and length. There should be 2 times more of them than the cells in the diagram.
If there are 2 times more of them than the cells in the diagram, it means that our cross stitch will fit on the canvas.
- Making cross stitch...
- We cut the canvas around the embroidery... not along the very edge, but slightly backing away from the edge - this will be the front wall of our toy. From any fabric we cut out a piece of the same shape (this will be back wall toys…)
- Sew the front and back parts of the toy together. You need to sew by attaching the front and back pieces with the FRONT SIDE OUT... We sew along the seam, around all the edges - BUT LEAVE a hole through which we will turn our toy right side out.
- They turned the sewn toy inside out and filled it with cotton wool (or padding polyester)… and sewed up the hole through which they turned it inside out. We sewed a loop to hang the toy on the Christmas tree.
Here are small patterns for such embroidery... They are just for small toys.

Or cross-stitched Christmas tree decorations may not necessarily be PLUGGY - they can be FLAT…
They can be pulled on a cardboard frame and... or insert into a small frame for embroidery(round or star-shaped). You can even do embroidery on a piece of thick leather (as in the left photo below).

For such New Year's embroidery you need small patterns... the smaller the better...
Here's what I found for you on this topic...

Embroidery of ROUND Christmas toys for the Christmas tree.
Or you can do it REALLY simply. Place a glass on the canvas- circle it pencil in a circle... And the resulting circle on the outline is FILLED any pattern of crosses...You will receive a round drawing of a New Year's ball...

This round embroidery design can be left on the canvas... and inserted into a frame... decorated with a bow and a spruce branch...
Or (as in the photo below) cut along the contour and sew Christmas decorations(using the same technique as I described above).
That is, we cross-stitch two such pancake circles.
We cut them out - put them facing each other - and sew their edges.
To keep the circles perfectly round shape– you can insert a cardboard circle between them...
and add a little padding polyester or cotton wool for plumpness.
And also... I found this one embroidery pattern for ROUND DONUTS. Now it would look very good on our crit embroidered Christmas balls… And what…? Nice New Year's donuts - hanging on the Christmas tree. I think it's very charming...
The scheme is not very good good quality pictures (as you can see)... But in this scheme, ACCURACY IS NOT IMPORTANT... you decide how exactly the cream glaze should flow down the donut... and where colored candied fruits should stick out.
That is, such embroidery can be done without any scheme.
And here are options for a similar idea, but all with embroidery using the SMOOTH technique ...with elements of bead embroidery and suture...

AND ALSO... YOU CAN MAKE A DECOR FOR A BALL. Cut out circles from canvas with New Year's embroidery - you can attach to New Year's ball (or a foam ball) - and sew pancake circles between themselves- so that the ball remained inside between embroidery pancakes. Like in the photo below.

Or you can decorate balls with embroidery - complement them with decorations made of satin ribbons - using the Artichoke technique... this is when the tape is cut into pieces of 3 cm... the edges of the piece are bent into a triangle... and these tape triangles are pinned to foam ball... with alternating checkerboard pattern... like in fish scales. There are many master classes on the Artichoke technique on the Internet - search and you will find.

COVERS FOR tablets – with New Year's embroidery.
Or you can sew such a case from fabric (New Year's case for a tablet or smartphone). It's simple - you just need to sew an embroidered design cut from canvas to the front part.

That is…
- Cut from fabric 2 rectangle a (front part and back part of the cover). It’s better to take fabric that is red... and dense so that it holds its shape).
- Making a New Year's Eve cross stitch on canvas(the size of the embroidery must match the size of the cover.
- Cut out the New Year's embroidery and sew it to the front part of the front part.
- We fold both parts together- to each other - right sides facing in. We sew on three sides (we stitch along the edges) ... And we do not sew the fourth side, but we process the edges - we bend it to the wrong side (1 cm edge) and we sew around this neck of our cover ...
- Turn the cover inside out... and you're done.
- You can also sew on it if you wish. ribbon with bell... it can be sewn directly inside the seam... that is, slipped between the front and back pieces - even BEFORE sewing them together.
And here are the embroidery patterns for the New Year's cover. These small diagrams are suitable for SMARTPHONE cases.

For TABLETS needed New Year's schemes larger format... At the very top of this article - I have highlighted a paragraph about HOW to calculate the size of the future embroidery... to make sure whether it will be too large... or too small - for our future tablet case.


New Year's embroidery on GIFT BAGS.
It is better to pack sweet gifts (candies and other little things) for the New Year in bags self made... cross-stitching of such bear cubs is done very fast. You can make one bag in one evening. We sat down by the TV, turned on the movie... and drove off. By the end of the film everything will be ready.

I didn’t find these bears for you... But these cute New Year’s bears turned up in the vastness of the bourgeois internet. They are perfect for our New Year's theme.
CARDS with embroidery for the New Year.
There are two interesting options embroidery –
- one classic CROSS...
- another original SPIDER WEB…
CROSS STITCH on a postcard looks magical if applied SLOTS technique. That is, glue the canvas with cross stitch on the INNER side New Year's cards. And on the FRONT side of the postcard itself, make slot(so that the embroidery is visible. We glue the embroidery to the back side of the first sheet... and leave the second sheet of the inner spread of the card blank in order to write a New Year's wish.

If you don’t want to make slits... you can simply stick on the embroidery - it’s better not with glue (it can leave whitish spots on the embroidery) but with DOUBLE-SIDED duct tape... this is done very simply.
HOW TO Glue EMBROIDERY onto the front side of a postcard with duct tape (double-sided).
We apply the cut out part of the embroidery to the desired place on the card... trace it lightly with a pencil...
We cover this entire area (inside the pencil frame) with double-sided tape...(cut as much as necessary and glue it)
Then we peel off the protective film from the tape... and evenly apply our embroidery to the sticky side....
The edges of the canvas embroidery can be left as a fringe... or you can cover it with braid or delicate lace...
Here's more... I give it to you enlarged embroidery on a postcard - the diagram of a tree... a bird... and Christmas tree decorations is very clearly visible on it.

And here is the technique of embroidery with a SPIDER WEB on a postcard- very fast in execution... But a little slow in concept (needs preparatory work). Although in general you will get the result faster than with cross stitch. Now I will tell you how we will act...


Master class on New Year's WEB embroidery using a postcard...
draw a sketch of what we plan to depict on a piece of paper.
Then decide WHERE WE WILL HAVE the puncture points... mark them with a felt-tip pen on our draft sketch.
And from these points on the paper, draw rays-threads with a pencil... That is, use a pencil to plan out how the threads can diverge from the puncture holes - and what the resulting drawing will be... When we like our web DRAWN on the draft, we can already take on the unscrewing itself.
We attach our draft sketch. And use a pin directly through the sketch to replace the puncture points on the postcard. You can immediately press and pierce - right through the esky and the postcard underneath. For convenient piercing, it is better to put something soft under everything - for example, a diaper folded in 4 times (or a thin towel).
CHILDREN'S EMBROIDERY - on a New Year's card.
And also... if you have children... they will really like this idea of decorating a New Year’s card with a cross...
We make many, many holes... and draw crosses between them... Thick wool thread thread it into a thick needle... it will be comfortable for the child to hold in his hand... And let him repeat the drawn crosses... make a pattern...

NAPKINS – with New Year's embroidery.
I really like these napkins in the photo below because they are MONOCHROME... that is, the pattern on them is made in ONE COLOR... it turns out very elegant. And by the way - economical, no need to buy a bunch of threads of different colors.

In this photo you can clearly see the SCHEMET of the pattern... it’s easy to redraw it on your paper with Christmas trees... A candle is a rectangle with an uneven edge... a candle flame is a column of a wick and several columns around it like a halo....
Gifts are cubes... and the pattern of bows is very clearly visible...
The Christmas tree is a triangle with some rows of embroidery missing...
As you can see, everything is very simple... And I also found a couple of diagrams for you too with a monochrome New Year's pattern.


AND ALSO... you can embroider not small New Year's napkins... And LONG NAPKIN on festive table... For a beautiful New Year's table setting.
Here it is especially for those who caught fire with this great idea- I give Cross-stitch patterns of snowflakes.

By the way... you can draw such patterns yourself on checkered paper... These are snowflakes... everything is simple here... draw identical sets of black and white cells– to the north\south\west\east – and the embroidery pattern is ready.


TOWEL - with a chain made of a New Year's cross pattern.
A great idea for a DIY gift - we buy a white cheap Polonet... take canvas... embroider a chain of several repeating patterns on the canvas... cut out this ribbon with embroidery from the canvas... and sew the ribbon with embroidery to the edge of the towel... decorate everything with lace (we buy lace... or knit with a hook, if you know how).
Great! Is it true?

If you decide to embroider a LONG RIBBON to decorate a kitchen towel...
Then you need small repeating motifs...
You can embroider a ribbon for a towel - in the form of a chain of small Christmas trees like this.

Or in the form New Year's toys ... and you can come up with a design for such toys yourself... by analogy with what you see in the picture below... THE SAME OUTLINES... but with a different pattern (whatever you like).

Or one of the chains of patterns suggested in the diagram below... They are also great for embroidering the border of a towel or a New Year's tablecloth for a festive table: bells... bags... candy canes... Christmas trees...


Below I found more diagrams small New Year's patterns for cross stitch: angel, bell, deer, snowman, Christmas tree. You can alternate them... or choose one motif and repeat it over and over again... along the entire towel border.
We continue to consider textile products with New Year's patterns for cross stitch.
And here you are new idea for a gift with embroidery.
NEW YEAR'S PILLOWS embroidered with a cross - as a gift.
I specifically give f from these bright pillows in full size , so that you can copy the diagram for yourself with your eyes... It is clearly visible in these photographs... you don’t even need to draw anything in the cells... Print it out on a color printer and embroider for your health.

By the way, I calculated...
Deer pillow pattern height 70 cells (respectively the width too)
If we buy a canvas with a larger cell size, we will get a larger pillow...
If you buy a smaller canvas, the pillow will come out smaller.
And accordingly, with threads the same principle: for canvas with large size cells - you need to push a thicker bunch of floss threads into the needle.
Reindeer... snowmen... and of course Santa Claus... What bright and juicy pillows they turn out... And so New Year's... Every New Year it will be so nice to take them out from the top shelf and place them in their rightful place for the season at the head of the sofa.


In addition to the photo I decided to find large sekhmas somewhere else... suitable for embroidering pillows with a New Year theme...
Well... and I found these for you... dug up...
This is what the entire pattern for the pillow looks like...
To make it clearer, I divided the diagram into parts and enlarged it... 

And here big diagram Santa Claus.

And here's an even bigger one Christmas tree diagram cross. She a little less than 70 cells... but you can add a pattern around the edges and your embroidered pillow will be larger.
And if you want to QUICKLY embroider a pillow... and not waste a lot of thread... then here you go SIMPLE SCHEME...with a minimum amount of work. Even a child can do such work... there are no long rows... and painful hours of painstaking work. Wonderful scheme New Year tree with candles - for beginners and impatient ones.

Here are some ideas for embroidery on New Year's Eve. Your embroidery can decorate christmas tree … walls of your home... lie on sofas in the form of pillows... decorate tables in the form of napkins... .
For the hardworking - a bright light burns through life, for the lazy - a dim candle
NEW YEAR'S CROSS STITCH - many patterns and ideas.
visibility 7453 views
 Hello, dear needlewomen. I am sure that many of you know how and love to cross stitch. But even if the one came here, who has never embroidered before, then let him under no circumstances leave - there will be detailed instructions for him here. In this article I will tell you how to create a festive atmosphere in your house.
Also in this article you will find 28 New Year's cross stitch patterns. I have specially placed many embroidery patterns in small format - this will give your child the opportunity to take part in preparing for the holiday. A little embroidery will not have time to tire the baby and will bring a lot of joy and satisfaction during these pre-holiday days.
It just so happens that we celebrate the New Year in cold and not sunny times, and it is at this time that the soul craves comfort, warmth, and a warming holiday atmosphere. And of course everyone wants this to last as long as possible. No problem - the sooner we create a New Year's atmosphere in the house, the longer these holidays will last for us.
New Year's cross stitch is the most quick way creating elements of home New Year's decor. This New Year's embroidery can be placed in decorative frames-stands. You can cross-stitch Christmas wreaths and decorate room doors with them. Christmas wreaths will be discussed in a separate article.

Why not remove the usual oilcloth from the dining table and lay out a tablecloth with New Year's motifs. A kitchen towels with cute snowmen, funny deer and Santa Claus. Let New Year's embroidery decorate your kitchen.
In Western countries they really like to decorate walls and doors with something like flags, like this:

This New Year's embroidery does not require additional purchase of frames; it can be hung on a piece of beautifully curved wire, a coat hanger, or on a small stick (a tube from under a roll of fax paper is ideal - bring it from work).
And in our article “” we told you how to decorate a Christmas tree with hand-embroidered toys. The New Year's embroidery patterns from this article will also help you in decorating the New Year's tree.
Preparing for embroidery.
You have 2 ways to start:
The first way is to go to the store and buy a ready-made embroidery kit. It includes a cross stitch pattern, canvas, threads, needles, and sometimes a hoop. But most often you have to buy the hoop separately. This way is quick, since you don’t have to select the threads according to the colors for the pattern yourself.)
The second way is to choose a pattern (see the patterns just below in this same article) - go to the store and pick up threads the right colors, hoop, canvas and needles.
Thread selection. The best threads floss DMC, Anchor, Madeira. These threads are the strongest. With them, your embroidery will retain its aesthetic appearance even after several washes. To be sure that the thread does not fade, you can wash it in warm water and blot it with a white cloth; if there is no mark left on the fabric, everything is fine. You can also fix the color by rinsing a skein of thread in a solution of vinegar and water (3 tablespoons of vinegar, 9 tablespoons of water) and rinsing under the tap.
How to cross stitch.
- We disconnect the floss thread in 4 additions.
- Thread the canvas into the hoop.
- We sit comfortably in front of your computer monitor with the diagram shown and embroider. (Internet traffic does not increase, even if you sit on this page of our website all day and embroider - I checked it personally. Traffic is only accrued when you move from one article to another, and if you have only one article constantly open on your monitor, this It's OK.)
In order not to explain in words where to stick the needle in and out, I give below a diagram for embroidering a snowman. And right below it shows:
- How to do a line stitch (this is when we need to trace the contours of our embroidered design) (Fig. 1)
- How to make a series of crosses at once (Fig. 2, 3)
- Initial fastening of the thread (Fig. 4)
- An incomplete cross stitch with threads of different colors (Fig. 5) is when, according to the pattern, you need to embroider not a whole cross, but only one half of it. And then, when half of the cross should be embroidered in one color, and the second half in a different color.

That's actually all the wisdom. Very simple and fast.
By the way, I did my first cross-stitch work without any outline, by eye, on a piece of ordinary linen fabric. And sometimes she used floss threads, sometimes sewing threads, and even thin knitting woolen threads. Time was scarce; you couldn’t find floss threads so easily, especially in my small town. And what do you think - it turned out to be a luxurious canvas with sunflowers.
So go for it. Let New Year's embroidery fill your home with warmth and festive comfort.
New Year's embroidery patterns.


Cross stitch patterns and paintings add atmosphere home comfort to any home. If you want to pleasantly surprise your family and guests, then New Year's embroidery on napkins, tablecloths or any other woven household items is what you need. Below you will find many patterns for New Year's embroidery, as well as detailed instructions to work. It doesn’t matter how much experience you have in embroidery: if you follow the rules, you will definitely come to success.
On the eve of the New Year, you want to decorate not only the Christmas tree, but the whole house. There are lots of ways to do this; One of these methods is embroidery. New Year's embroidery can be different in shape, size, as well as its level of functionality. Why do many people do embroidery on New Year theme?
Traditionally, New Year's embroidery is used in the following types of products:
- New Year's paintings on the wall;
- scrapbooking for cards or albums;
- dinner napkins;
- tablecloth decoration;
- Christmas decorations;
- miniatures for the front door;
- New Year's wall boots;
- Christmas costumes.

The list will continue with your imagination. Cross stitch can transform any product.
For New Year's crafts, you can purchase an embroidery kit, but you can use patterns that can be downloaded for free for personal purposes.
Cross stitch patterns: New Year miniatures for home decoration
New Year's miniatures are a special trend in handicrafts that came to us from European countries. There it is customary to decorate the house not only inside, but also outside! For this purpose, miniatures are embroidered, which look like small flags with a New Year's design.
Nowadays, miniatures are sometimes called simply small-sized items with embroidery. Such products are widely used for home decoration.
Why you should try embroidering a New Year's miniature:
- Small cute schemes are available for anyone to carry out.
- You can make several home decorations in just one day.
- Charming miniatures will captivate family and guests with their simplicity and beauty.
- This mini-size monochrome embroidery pattern is so easy to make that you can entrust the work to older children.
Cross stitch pattern for New Year's toys: biscornu
Biscornu is a small three-dimensional thing embroidered with a cross. Biscornu is used as a pincushion, decoration-trinket, and can also be used as a New Year's toy. Everything you need to make biscorn Christmas decorations- this is thematic embroidery and a small loop.
Interesting ideas and patterns for biscornu cross stitch are presented in our material:.
How to make a New Year's biscorn toy with your own hands:
- You are taking square diagram in New Year's style. You can embroider only 1 side, or you can make 2 identical drawings; there is also the option of making different pictures on both sides of the future toy. It depends only on your hard work and imagination.
- Embroider both squares of canvas, leaving 4-6 squares for allowances. Your picture must contain an edge seam.
- Next, 2 squares are sewn together. The peculiarity of biscornu is that when sewing, the fabric is not pierced.
- Pass the needle with a knot into the corner of 1 square at the junction of the edge seams, then thread the needle into the edge seam stitch of 2 squares, which is located in the middle of one of the sides. This way the corner of the first square will be sewn to the middle of the side of the second.
- Next, continue stitching, threading the needle from stitch to stitch. This technique is responsible for the unusual angular shape of the biscornu.
- Leave the last space for stuffing the toy. For stuffing, use padding polyester or holofiber.
- Sew the toy until the end.
- Sew on a beautiful loop. The toy is ready!

If you don’t want to make 2 embroideries for biscornu, but don’t want to leave the second square empty either, then on the second square you can only make a frame pattern, which won’t take much time, but will give the toy a complete look.
Cross stitch: New Year's cards and more
How to please your loved ones new year holidays? The tradition of giving cards has been maintained for many decades. All this time, postcard fashion has been changing and transforming. Today, the scrapbooking direction has opened up new opportunities for us to create original, designer cards that are filled with feelings, work and warmth. Postcards using handmade cross stitch will certainly take their rightful place in the homes and hearts of your loved ones.
How to design a postcard with cross stitch:
- Make a small embroidery that you would like to see on the product. Leave a small allowance around the edges.
- Cut out the cardboard. One part is solid with a fold, and the second part is used as an overlay on the front side of the postcard. The second part should have a cut out part for embroidery. Cut carefully using a utility knife.
- Glue the canvas to the main part using double tape.
- Glue the overlay to the main part.
- Fill the card good wishes!

This simple scheme will allow you to make a pleasant surprise with your own hands.
To make the design look as attractive as possible, add to the embroidery satin ribbons, beads, buttons or any other decorative elements suitable for the theme of the celebration.
The whole family makes small New Year's cross stitches
Small embroideries are very convenient both in execution and in application. Even a child can do small embroidery, so the whole family is suitable for this type of work. Carry out one of New Year's Eve for embroidery cute New Year pictures with the whole family - this is a great idea that will unite family members, give a feeling of calm, happiness, and also some wonderful works that will delight you long years and bring back memories of a wonderful family evening.
What kind of pictures are suitable for small works in which New Year’s motifs appear:
- Father Frost;
- snowman;
- teddy bear;
- bunny;
- Christmas boot;
- balls for decorating the Christmas tree;
- decorated Christmas tree;
- image of the symbol of the coming year;
- Christmas deer;
- pattern in New Year's colors;
- decorated mittens;
- New Year's landscapes;
- Russian and English alphabets in Christmas decoration.
pay attention to best schemes cross stitch in “Winter” style: .

Of course, the options listed should not limit your imagination at all. But if you don’t know what kind of picture you can embroider, then you can use these fairly common patterns.
For the smallest needlewomen and needlewomen, you should choose monochrome designs.
The most beautiful cross patterns: Santa Claus
Santa Claus is one of the traditional themes for New Year's embroidery. Santa Claus is good for both small products and large paintings or napkins. Santa Claus can be depicted either alone or with a sleigh, deer and other heroes of Christmas symbols.
Be careful: In most embroidery patterns, Father Frost's sheepskin coat is indicated in red. But the red sheepskin coat is part of the image of overseas Santa Claus. If the nationality of your hero in the picture matters to you, then take blue threads to embroider a sheepskin coat.

Where is the best place to place an image of Santa Claus:
- Christmas tree decoration. You can embroider a small image New Year's grandfather on the front side of the New Year's toy. Don't forget to make high-quality stuffing so that Santa Claus does not become deformed.
- Decorative pillow. Best gift for friends and family!
- Miniature flag. Let Santa Claus greet the guests.
- Napkins and tablecloths. Make your New Year's holiday table even more New Year's!
- Embroidery for a gift card or album. Another option for a New Year's gift.
New Year's boots: cross stitch patterns
The New Year's boot is part of a Western Christmas tradition that has become popular in Russia. Initially, the boot was hung over the fireplace on Christmas night so that Santa would put gifts inside. Over time, the tradition changed: the boot became a symbol of Christmas and New Year. The traditional red color was replaced by various patterns, New Year's symbols and other delights in the spirit of the winter holiday.
Embroidery patterns for New Year's boots can be divided into 2 groups:
- Schemes that allow you to imitate a real boot. Such patterns involve cutting the canvas along the edge of the embroidery.
- Patterns for embroidering an image of a New Year's boot or several. Such schemes allow you to create a picture or a square blank for another product. The New Year's element is depicted in the form of a picture.
- Patterns for embroidery on a real boot. Using these patterns you can decorate Christmas boots with a cross.

Home decoration New Year's boots, embroidered with a cross – this is fresh and original idea. This gift will be a wonderful souvenir in any home.
New Year's cross stitch: patterns 2016-2017
2016 is the year of the monkey. The symbolism of the monkey was widely used in handicrafts and the production of New Year's decorations in the past year. The coming year will be surrounded by the symbolism of the rooster.
What are the rules for the image? New Year's symbols it is important to observe:
- For the rooster to have New Year's mood, choose designs where the bird is depicted surrounded by other Christmas elements.
- Use diagrams of numbers and letters to complement the picture of the cockerel with the phrase “Happy New Year 2017” or something similar.
Use your imagination to bring the Christmas rooster into the Christmas spirit. A detailed diagrams will allow you to bring to life ideas about creating fun thematic embroidery.
Cross-stitched New Year's socks (video)
When adding a phrase to a picture, you will need fonts for embroidering letters or numbers. You will find font options for embroidering phrases in the following material: .
If the New Year is coming soon, but there is no gift, then cross stitch patterns will definitely save the situation! Christmas and New Year are the main ones family holidays that need to be filled with warmth and comfort. Holiday theme should come through in the design of the space where the New Year's celebration gathers. It doesn’t matter what exactly becomes the object of your efforts: a tablecloth, napkins, or simple toys-balls for the Christmas tree, embroidery will fill the house with the love of the hostess and the Christmas mood. So we embroider Christmas pictures according to patterns with diligence and hard work!
New Year's cross stitch patterns (photo)


We also recommend
 Decorating a foam ball with sequins
 Crafts from dry leaves: applications “Fish” Crafts from leaves fish
 How to properly knit booties for newborns: diagrams and descriptions
 Good Baba Yaga from a plastic bottle and tights (MK) Make Baba Yaga with your own hands from
 How to sew a gnome from an old sweater
 Congratulations on Labor Day, May 1st, funny