"leaf fish" Crafts from dry leaves: applications “Fish” Crafts from leaves fish

 My daughter Katya, wearing this wreath, became the “Queen of Autumn” in 2007!
In my deep conviction, our education, starting from Soviet times, has been built on the following principle:
“If you didn’t complete the teacher’s assignment as a child, you will still do it when you help your child” :-).
So, dear mothers, since we met on this page, it means your child has been given the task of bringing an autumn craft. Did you guess right?
I have no doubt that you will now breathe a sigh of relief! I've collected a bunch of ideas, and your fall leaf craft will definitely delight your teacher! 🙂
In order not to confuse the entire experience of mankind in this matter, I tried to combine collages and applications that were similar in meaning.
Let's begin!
Portrait of autumn leaves

 I didn't find many examples of people using natural materials, but there are enough for inspiration. The face can be glued together from several fragments and an oval of the desired shape can be cut out.
For a hairstyle or a hat, we choose coarser plants. You can use spikelets or stems of dried herbs.

Here are some more very cute characters with “mood.” Mommies. Don't try to find the right shape of leaves. To make the head, simply cut out a circle or oval from any sheet of paper. If you don't have dried narrow blades of grass for your hair, cut a large leaf into thin strips.
I also found babies for them, though not from leaves, but from acorns. To make them quickly, you will need a glue gun and a permanent marker. The scarf can be made from scraps of felt or any other bright fabric. Incomparable kids!

Birds-butterflies-animals
This is the most common type of autumn creativity. We make cute animals and insects from dry leaves of different colors and shapes. The hardest part to find is leaves in contrasting colors, as almost everything turns yellowish-brown once they dry out.
To have a choice, dry not only autumn ones, but also green leaves too, then the color palette will be much wider and you will definitely get something from this. By the way, dry rose petals look great on a peacock's tail, take note:


Here are simple and expressive birds. By the way, leaves with small flaws look quite harmonious; there are always many unexpected spots in the plumage of birds. a couple of lines with a pen, and the beak becomes like a beak. Chickens are made in a minute, you can make a whole brood.

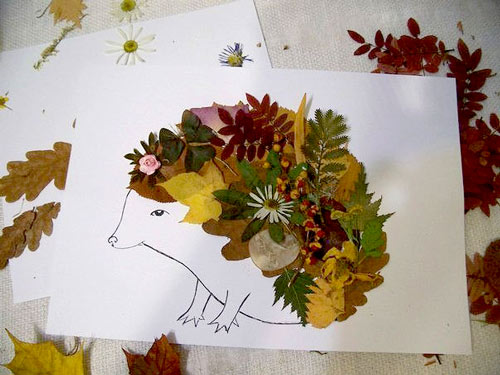
Impossibly handsome... He bit off an apple :-). This collage is made using colored cardboard pieces. My version of the hedgehog is on the right in the frame. We also sprinkled semolina porridge on PVA glue here and there. I hope the teacher likes it...

Here is another option for those who can draw these simple drawings. Draw the lion's head and fish large - on the entire landscape sheet. Cardboard is preferable. The rest is clear from the illustration!


Information for educators and teachers! , there is a lot of useful and accessible stuff there!
 More from ash seeds...
Here's our latest craft. This is a beautiful owl in a frame of autumn leaves. Leaves were glued onto a sheet of A3 cardboard around the perimeter with an overlap using PVA. They didn’t try very hard, because then the excess was cut off along the edge, and another sheet was glued to the inside with an owl applique made from ash seeds, so there’s no need to try too hard along the line. Our beak is made from half an acorn. I think it's good...
From these seeds you can come up with a lot of interesting things (application) - roofs of houses, a field of dry grass, animal skin or bird feathers. The work is long and painstaking, but if you did not have time to collect and dry the leaves, there is a way out. They tore it from the tree and immediately glued it on.
Here are some more examples for inspiration.

A mosaic of dried leaves and flowers can be used to complement the design. This looks very nice:


Dry leaf hairstyle
In these pictures of their leaves, lips, eyes and even eyelashes are cut out, but the face can simply be drawn, without laying out thin twigs, but we make a mop of hair not just from individual leaves, but from whole twigs with dry leaves. The fact that they are dried not in one plane, but in volume, gives our work a special charm. Well, what a beauty... I found it on my favorite social networks and decided to post it here so that the idea wouldn’t get lost.

Cutting figures from fallen leaves
I highlighted these collages separately because autumn leaves are used a little differently - they are just material for cutting out simple shapes and letters. This needs to be done BEFORE the sheet dries, otherwise it will crumble . First we cut it out, then dry it in the usual way in an old book or between sheets of newspaper. This way you can cut out entire words and phrases.
To ensure that the letters are neat, print them on a printer of the desired size.
Now we put copy paper on the autumn sheet, with your printout on top. We outline so that the drawing remains on the yellow sheet. All that's left to do is cut!
This way you can make not only letters of the alphabet, but also simple silhouettes (animals, houses, clouds).


Interesting examples of paintings from autumn leaves:
Thuja twigs are used here, and the desired shape for the applique is cut out of dry leaves. For the house you will need thin dry twigs, but you can also assemble them from matches.


You can get an idea from this picture. The woman's profile is simply drawn, but the leaves in her hair could be not paper ones, but real ones ! Is it difficult to find them in different sizes and shapes to make such a beauty?
Here are some cute owls. A silhouette is cut out of paper, then we glue the leaves, as shown in the figure, and at the end of the work, we trim all the protruding excess along the contour of the cardboard blank. We make the eyes from paper of a contrasting color. 
Multicolored collages
Autumn leaves are so beautiful on their own that they look great framed and without any plot. Look how beautiful it is! The first layer is dark leaves, then put the contrasting and most beautiful ones, so you will feel the volume. Everything is framed.
I also liked the idea: on a collage of leaves we put a sheet of thick cardboard, in which a letter or a simple figure is cut out with a stationery knife.


Another unusual technique, which for some reason is called "iris folding"
, I discovered on the “Country of Masters” website. A detailed master class is here: http://stranamasterov.ru/node/99098

Photo frame
For the autumn exhibition, you can make frames for photographs and for the design of essays and poems on the theme of autumn. Here are the options I found. In my opinion, it is very simple and effective. 
Interior decoration
Crafts made from autumn leaves can be very romantic.
To get such a tree, you need to dry the leaves in advance, and then reattach them to a beautiful branch with transparent adhesive tape.


We work with a hammer...
Unusual technique. I saw it on an American website, translation and . The idea is that fallen leaves are placed between watercolor paper and a napkin and carefully tapped over the entire surface with a hammer so that the coloring pigment remains on the paper.


Roses from autumn leaves - master class
Crafts from dry leaves - This is a great gift for friends, family and loved ones.
Working on such crafts is an interesting pastime and useful leisure time. Why useful? Yes, because by doing it, the child develops imagination, fantasy, learns to work with natural materials, studies colors, shapes and sizes. In addition, the baby develops hand coordination andfine motor skills.
And how interesting it is to choose beautiful leaves and flowers from the whole variety in order to dry them later. After all, sometimes you really want to preserve for a long time some masterpiece created by nature.
And kids love it very much
watch how simple leaves turn into funny little animals, insects and birds.
How interesting it is to select leaves that are suitable in shape and color for various elements appliqués , for example, for the torso, head, legs, etc.
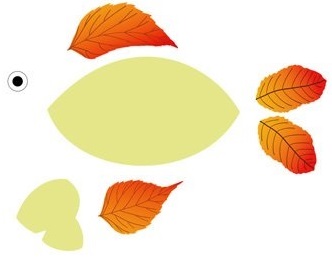
See how you can make fish from dry leaves.
Leaves of ash, birch and poplar are well suited for work.
In addition, to create an application you will need:
- glue;
- cardboard;
- scissors;
- felt-tip pens;
- a simple pencil;
- tweezers (they are very convenient for working with dried leaves).Technology for making “Fish” appliques from dry leaves:
1. Draw an outline of the fish on thick cardboard.
2. Mark the place where the eye will be.
3. Using white and black colored paper, cut out and glue an eye to the fish (you can draw it with felt-tip pens).4. Draw a mouth for the fish.
5. Create a tail. To do this, you need to take two large dry leaves and glue them so that the bottom leaf slightly overlaps the top one.
6. Then, from two sheets of suitable shape, glue on the fins (on top and bottom of the fish).
7. Next you need to design the scales. To do this, select and set aside small leaves. And then, stepping back a little from the eye, stick on their first column, in order, from top to bottom. Each subsequent leaf should slightly cover the previous one.
8. Stepping lightly on the first row of scales, glue the second, and then the rest, until you have covered the entire fish with small leaves.
9. Stepping back a little from the eye, add another fin.
That's it, the first application is ready. Using this technique, you can also make a New Year’s “Fish” toy from dry leaves. To do this, you need to cut out the outline of the fish from cardboard and paste it with dry leaves according to the principle described above. To hang a fish on a Christmas tree, pierce a hole with a needle and thread a thread through it. This is an interesting New Year's toy that can be made from dry leaves. And most importantly, it will be safe for the child and made with your own hands.
If you have collected and dried larger leaves, then the fish can be made differently: instead of scales, choose one leaf that is suitable in shape, and decorate the tail, fins and mouth with interestingly selected colored leaves.
Application of autumn leaves: owl, fish, cockerel. Types of leaf applications. Ideas for children's creativity.
Leaf applique: cockerel
The cockerel can be made in the same way as the owl.
Cockerel execution sequence
— Draw the outline of the cockerel on a piece of paper.
— We prepare the leaves: we collect them, dry them, iron them through newspaper.
— Apply PVA glue to the drawing with a brush. And glue the leaves.
— We finish drawing the paws and eyes with a felt-tip pen.
This is what Danil Timofeev, a student of 2nd grade A, got - such a wonderful cockerel! Danil studies at the Birsk correctional school - a boarding school of the 5th type.
Leaf applique: fish
The “Fish” application made from leaves is made using the same technology.
Step 1. First, draw the outline of the fish on a thick sheet of paper.
Step 2. Prepare the leaves.
Step 3. Apply PVA glue to the drawing and glue the leaves.
This fish was made by Egor Saisanov, a student of class 2 A of the Birsk correctional school - boarding school of the 5th type (Republic of Bashkortostan).
Leaf applique with children: collection of ideas
In this 3-minute video you will get many ideas for leaf appliques with children:
- butterfly made of leaves,
- cat, hedgehog, bunny, elephant, fox, elk made of leaves,
- masks made of autumn leaves,
- a variety of birds - applications,
- little men.
And another video with a collection of ideas as a source of inspiration. How to make a helicopter, a rocket, a snail, a hedgehog with mushrooms, an owl, a fish, a spider using the leaf applique technique.
Application of autumn leaves: how best to prepare the leaves
The application can be made from freshly collected leaves or from dried leaves.
The first way to prepare leaves for application . As children, we all collected leaves and put them in books. Remember this? This is one of the ways to dry leaves, which can then be used for application. In order not to accidentally stain the book, we cover each sheet on both sides with a regular paper napkin. If you have old unnecessary magazines, then dry them directly in them! The disadvantage of this method is that it takes time to dry the sheet.
The second way to prepare leaves for application. Or you can specially dry the leaves under an iron. This is a very fast way. We place our autumn leaf on a large sheet of paper, on top of it - another sheet of paper (newspaper) and dry it - iron the sheet with an iron. Then lift the top sheet of newspaper or paper, allowing the sheet to cool.
Design of the finished application from leaves: Place the finished picture under a press (heavy book) for 1-3 days. Then we place it in a frame (you can make it from colored cardboard or a candy box).
You will learn how to make a three-dimensional figure from autumn leaves using the appliqué method from the article.
You will find more interesting autumn crafts for children in the articles on the site:
— Paper applique
Have you already collected and dried colorful leaves? Yes? Well done! And we also stocked up on a variety of foliage, three full large books - you remember, right? Now let's make crafts from autumn leaves!
Today I invite you to make with us an applique of leaves on a marine theme. Red and gold fish made from leaves will greatly enliven a cloudy autumn day, reminding you of sunny days, summer and the sea!
There are two options for your choice of applique from fish leaves: for kids - fish from whole leaves, and for older children the task is more difficult - Goldfish from leaves - scales!
We need:
- yellow and red dry leaves, similar in shape to the scales or body, fins and tail of a fish;
- PVA glue;
- colored cardboard (blue, cyan, green, violet, aquamarine - all sea colors);
- black felt-tip pen.How to make leaf crafts for children:
First, we’ll put the fish figures on cardboard without glue, just to see how it turns out and whether all the “spare parts” fit. Maybe the fin is too big, or the tail needs to be replaced with another, more suitable leaf.
If everything is in order, grease the leaves on the back side with glue (it’s more convenient to use glue with a brush) and carefully, so as not to smear the cardboard with glue, glue it to the base, forming the silhouette of a fish.
Let's wait until the leaves stick and draw lips and eyes for the fish with a felt-tip pen. Although you can do more elaborate work and cut out small details from the leaves - eyes from yellow ones, sponges from red ones, and also glue them on.
Another interesting and beautiful version of the Fish applique. Take a lot of birch leaves - they are amazingly golden! And several red oblong leaves for the tail and fins.
We assemble the applique by gluing leaf scales on top of each other according to the tile principle.
Walking through the autumn park and breathing fresh air, you can pick up a lot of fallen leaves of various sizes and colors. This is an amazing natural material for crafts! Bouquets, compositions of dried flowers, paintings and even an aquarium! Yes, leaves make bright and beautiful fish and plants. To create a man-made reservoir, you will also need other natural materials, namely shells, which can be collected near a river or sea. It is interesting when several techniques are combined in one work, for example, leaf applique and trimming, as in the proposed work. Let's get started!We will need:
Cardboard box;
- leaves and twigs of evergreen trees;
- shells and pebbles;
- corrugated paper;
- ballpoint pen refill;
- cardboard;
- threads with a needle;
- glue;
- paints;
- scissors.
How to make a craft from leaves “Aquarium” with your own hands
For such a craft made from natural materials, a cookie box is suitable; you can buy it in stores that sell confectionery products. We paint the box blue and its lower part yellow.
Let's start making fish from leaves. It is easier to work with fresh, just collected leaves; they do not break and have a brighter and more juicy color. Dried leaves are not so bright and sometimes very brittle, so glue should be applied to them very carefully and carefully glued without pressing too hard, it is better to take a napkin and lightly press down the leaf with it. So, for the first fish we will need one round-shaped leaf for the body, 3 small leaves for the fins and 2 medium-sized leaves for the tail.
It is recommended to first place all the parts on the box in order to remember the places where they need to be glued; to be sure, it does not hurt to mark them with a pencil. So, we know the location, we glue two fins that will be under the body.
Glue a leaf-body on top of the fins.
Glue the 3rd fin and one leaf-tail.
Going a little onto the first leaf-tail, we glue the second part of the tail.
Fish in nature come in different sizes and types. We will also select leaves of different sizes and shapes. If you can’t find something suitable, you can take a large leaf and cut out the required shape from it.
We experiment with the sizes and shapes of the tail and body. By making a small cutout, you can create an open mouth for the fish.
As you know, there are algae in any body of water. Let's start making them from corrugated paper, for which we cut it into squares measuring 1*1 cm. We take the used paste from the pen, insert it with the blunt end into the middle of the square and, as it were, hug the rod with paper, so we get a trim.
I like to use liquid nails when working with the trimming method, because they glue well and do not soak the paper. So, we take the rod with the trim, dip it in glue and place it on the cardboard, take out the rod, what remains is the trim. We make algae of any shape, preferably wavy.
Branches of evergreen trees (thuja, juniper, etc.) are well suited for algae, since they have a branched shape. Glue a few branches.
We collect all kinds of shells, pebbles, empty snail “houses” and glue them to the bottom of the box. We also glue twigs of thuja or juniper to some shells, so the algae will be at different levels.
Draw several fish of any shape on cardboard.
We decorate them using the trimming method, then attach the resulting fish to the box using a thread and a needle.
If there are (or can be made) octopuses or fish from beads, then we also place them on shells, this will enliven our aquarium, which we successfully made!
By the way, you can glue fragments of shells to the outside of the box, so the craft will look more original. I wish you creative success!
Irina Nagibina
Сhudesenka.ruWe also recommend
Decorating a foam ball with sequins
Crafts from dry leaves: applications “Fish” Crafts from leaves fish
How to properly knit booties for newborns: diagrams and descriptions
Good Baba Yaga from a plastic bottle and tights (MK) Make Baba Yaga with your own hands from
How to sew a gnome from an old sweater
Congratulations on Labor Day, May 1st, funny