Techniques for creating images using paper art technique. Antique silver using paper art technique
You may be surprised, but new types of needlework appear in the world every year. To create something truly new and original, you need to have a rich imagination and enormous talent, and most importantly remember simple truth- everything ingenious is simple. Several years ago, craftswoman Tatyana Sorokina created small miracle out of nothing, inventing new technology decorating objects with flagella from ordinary paper napkins. Paper art, and this is the name given to this unusual activity, immediately won the hearts of many needlewomen. Why don’t you get acquainted with this interesting technique, since everyone can find a couple of napkins and glue at home? So let's conduct a master class on paper art together!
The finished works will not leave anyone indifferent: it’s hard to believe that such masterpieces are made from simple paper flagella.
Learning the original paper art technique: master class for beginners
Regardless of what you are going to decorate, you need to stock up on the following materials:
- paper napkins (single-layer or multi-layer);
- PVA glue;
- scissors;
- brushes of different thicknesses, foam sponge, wet wipes.
- Cut paper napkins into straight stripes about 1.5 cm wide. If multi-layer napkins are used, they should be divided into separate layers.
- Place the strips in a container of water for a few seconds until they become wet and slightly swollen.
- Holding the strip with one hand, twist a tight flagellum with the other. It should not have thickenings or loose areas. If you can’t make a high-quality flagellum from a wet napkin, you can try making one from a dry one by moistening your fingers with water.
- To make a long flagellum, you need to connect the ends of several strips overlapping, and carefully seal the joints with your fingers when twisting.
You don’t have to separate the multilayer napkin into separate layers and make flagella from 2-3 layers of paper. In this case, workpieces of greater thickness will be obtained.
It should be remembered that during operation the flagella must remain plastic, so dried workpieces must be moistened with water.
Let's look at step-by-step bottle decoration using paper art technique
To begin with, we suggest you try your hand at decorating a three-dimensional object – a glass bottle. In addition to the basic materials, you will need the following:
- bottle or other glass container;
- paints (gouache of different colors and bronze acrylic paint);
- glossy acrylic varnish;
- additional decor: curly pasta, millet.
First, the bottle must be washed inside and out, removing any remaining labels and glue, and dried thoroughly. Immediately before decorating, it would be useful to degrease its outer surface with alcohol or acetone.
Using PVA, you need to prime the part of the bottle where you plan to apply the bronze background. The glue should be applied in several layers with intermediate drying; excess should be removed with a napkin. Then using foam sponge Apply bronze acrylic paint to the primed area and let it dry thoroughly.
Decoration.After the background is prepared, we begin decorating. In our case, long and short flagella from napkins, star pasta and millet grains are used as decoration.
To begin, apply PVA glue with a brush strictly along the contour of the background and glue the napkin blank. It is necessary to ensure that the flagellum is securely glued over the entire surface, for which it should be pressed tightly with a brush dipped in glue.
Similarly, we lay out a simple pattern of flagella, pasta and millet at your discretion. It is convenient to spread the wheat grains using thin tweezers or a toothpick moistened with water. Then the decorative elements must be additionally fixed by applying several layers of PVA glue on top.
Bottle coloring.Prepare the paint by mixing black gouache with a small amount of red and green. Add glossy acrylic varnish in a 1:1 ratio. If necessary, dilute the resulting mixture with water. Using a sponge, apply paint to the part of the bottle to be decorated using a foam sponge in several layers.
Then the surface is lightly tinted acrylic paint bronze color using a sponge and coated with two layers glossy varnish. It is better to use a brush to apply varnish.
The paper art bottle is ready!
Decorating a chest using paper art technique:
Various containers decorated using the paper art technique look very beautiful. Let's try to decorate a box, box or small chest.
In addition to the materials listed above, we will need:
- the base of the chest (in our master class we use a pre-glued cardboard box, but you can use a ready-made box);
- keraplast (a clay-like modeling mass that hardens in air);
- acrylic paint black and gold.
Using PVA glue, you need to cover the entire surface of the chest with toilet paper cut into pieces. When gluing, the paper must be slightly stretched to prevent the formation of air bubbles. Then you should once again coat the box with glue diluted with water on top of the paper and let it dry.
Decoration.Using ceraplast, you need to decorate the lid of the chest: mold flowers and leaves and carefully glue them in random order using PVA glue. Veins on the leaves can be made using a needle or toothpick.
The legs, edges and corners of the future chest are designed in a similar way. We decorate the rest of the surface using pre-prepared flagella from paper napkins, using glue to lay out patterns from them and press them tightly over the entire surface.
Coloring.Using a wide brush, apply black acrylic paint in several layers, and after it has completely dried, lightly shade the convex parts of the pattern with gold using a foam sponge.

If desired, decorate the inside of the chest (glue a mirror to the lid, make a fabric lining).
Another successful example of using this unusual technology– making a decorative plate.
To make such an interior decoration, you will need a small earthenware plate with a diameter of about 20 cm, with or without a pattern. The surface must be primed with glue in advance. Using pre-prepared flagella and PVA glue, a random pattern is laid out. Additional decor - halves of peas - are best planted with Titan glue.

After the glue has dried, the outside and inside of the plate must be painted with several layers of black acrylic paint, and then the decorated surface should be lightly decorated with gold or bronze paint.

Video on the topic of the article
For those who have already mastered the basics of paper art technique, we invite you to try your hand at making other products using the video master classes below.
The paper art napkin technique is a relatively young, but already very popular handicraft. The literal translation of paper art is paper art.
But the end result is three-dimensional images in which it is difficult to guess the nature of the origin. Paper art is capable of visually imitating and combining complex and expensive modern design techniques: embossing, wood carving, forging, embroidery, sculpting. At the same time, the basic material is almost always at hand. These are ordinary paper napkins - table or cosmetic.
A Brief History of Napkin Crafts
The basis of needlework is decor with napkins, but there is nothing to do with it. The same as with sculpting from. Napkins are rolled into flagella, which are then used to create decor on a hard surface.
“Napkin plastic”, invented by her in 2006, immediately thundered at the International Festival children's creativity. The presented works of the master and her students won an honorable first place and the Grand Prix of the competition. In 2014, the first book-guide on studying technology was published with the author’s title “Pape Art” having already been changed.
Those who wanted to find out what paper art is and try new creativity were immediately found. Needlewomen quickly mastered fashionable needlework and began to add their own developments to it.
Benefits of a new hobby
It's always good to try something new and perhaps find yourself in some hobby. The paper art technique can interest both beginners and experienced craftsmen.
Napkin crafts are interesting and quite simple; even a child can master the art of paper art under the supervision of a mentor. This great opportunity express your mood and your own understanding of beauty in creative crafts. And the results of the work done often not only decorate the room, but are also used in everyday life.

Crafts using the paper art technique are the transformation of absolutely unnecessary things into chic interior details or even practical things that are unique in their beauty.
For example, a piece of cardboard box can create a three-dimensional painting. A box of candy or small household appliances will turn into an antique box, a glass jug and glasses - into a rare table service. Lovingly decorated plates or bottles will perfectly complement your kitchen design.
World fame, ease of execution and beauty of the finished products are the main factors for the constant growth of fans and those who simply want to try making paper art decor with their own hands.
How to learn the technique of napkin decoration
Paper art does not limit the imagination of the master; it allows you to shape the volume and texture of the product, add additional elements in the form of shells, coins, beads or molded clay parts. The essence of paper art is the edging of drawings or laying out details from self-twisted napkin threads of various colors, sizes and densities.

Craft materials
Creating “masterpieces” in the paper art style with your own hands is not only interesting, but also very profitable, the costs are minimal. The first stage of work is preparing the necessary materials and aids. For creativity you will need:
- paper napkins;
- glue;
- scissors;
- small container with water;
- waffle towel;
- multi-colored paints;
- toothpicks and tweezers;
- clear nail polish;
- item for decoration.
Napkins are suitable for ordinary kitchen, cosmetic, multi-layer, white or colored ones. You can even use toilet paper.
To work with paper elements For paper art you will need PVA glue, the more the better. To glue additional parts made of plastic or iron, use “Superglue” or “Moment”.

A waffle towel is optional. It depends on what technique for making napkin threads you choose, and how much finished material is required.
Professionals prefer aerosol paints; they fit perfectly on any surface and look very good. But if you need to make a motley multi-colored craft, or a child is doing the work, it is better to use gouache or acrylic paints.

Tweezers will be needed to carefully moisten the napkins before twisting, and toothpicks are a godsend for aligning the position of the thread after gluing.
Preparing for decoration
Get to know the technique using the example of decorating an antique glass bottle.
Any idea or plan should begin with a thorough cleaning of the item for decoration. Remove all labels from the surface, wash and dry the bottle you are going to give as a gift. new life».
Standard white napkins need to be torn into small squares about 4 cm wide and tightly covered with them on the lower half of the bottle, starting from the bottom. To do this, apply a thick layer of PVA glue to the glass. When the paper is dry, do the same with the top part, right up to the neck.
Coat the pasted model with another layer of PVA and leave to dry thoroughly. This step will provide texture to the glass surface and simplify further work.
While the glue dries, start preparing the main material - napkin threads. You can use standard white napkins, which you always have on hand, because the product will be painted later. You should cut strips about 1.5 cm wide and then form flagella from them.

How to make flagella from napkins
There are several ways to form flagella:
- According to the method famous master paper art by Tatyana Sorokina, use tweezers to grab a strip of paper, dip it in a container of water, and twist the rope with your hands.
- You can constantly wet your hands in water and use wet palms to form a thread from dry wipes.
- If you need a lot of material for creativity, and time is short, use the so-called “cunning” method. Dissolve half a teaspoon of glue in 100 ml of water, lay a waffle towel on your thigh, and a napkin soaked in the solution on it, sharply move your palm to your knee.

If the laces dry out, moisten them with water before gluing. Balls, squares and other shapes for the composition are made from ready-made threads. From a damp and pliable thread you can twist the most intricate pattern. And if it breaks, you shouldn’t throw it in the trash; any length can be useful.
How to decorate a craft
Transfer the stencil design to the dried surface of the future souvenir with a simple pencil or draw the pattern yourself. You can trust your own imagination and intuition and lay out abstract patterns in the process directly with thread.
To glue the thread parts, coat the back side with the same PVA glue, lightly press and form patterns, adjusting the direction with a toothpick, doing this again and again.
If you want to improve your paper art style, you can add details in the form of small shells, coins, dry leaves or flowers using superglue.

When the stage of decorating the souvenir is completely completed, you can once again carefully coat the entire surface of the pattern with PVA for reliability. You should wait until the glue is completely dry.
Time to start painting. As an option, black will do acrylic paint to cover the entire surface of the bottle, including the smallest depressions and protrusions. Paint with a brush and leave until completely dry. Using a sponge or sponge, carefully work the decorative raised elements with gold or bronze color, in some places making light, barely noticeable strokes on the black base.
Once the paint is completely dry, cover the entire perimeter of the souvenir with colorless varnish. It will finally secure the decor and provide a glossy effect to the product.
It is not at all necessary to use only empty containers; the same miracles can be done with a closed, filled bottle, turning it into a creative gift for a friend or employee.

Step-by-step master classes
Having mastered the original and fairly simple to perform paper art technique, you will be able to create unique masterpieces with your own hands, turning ordinary interior items made of glass, metal or wood into real works of art.
Step-by-step lessons will help you learn how to make masterpieces using the paper art technique with your own hands.

Even a child preschool age This can be done if he gets a little help and is offered to use available blanks in the form of drawings - stencils or napkin threads.
Truly original and unique products made from napkins, imitating forged, carved or woven decorations, will ideally complement the interior of your favorite room and will undoubtedly become the best gifts for your family and friends.
Sunday, May 06, 2012 22:36 + to quote book
PAPER-ART, paper art or paper art, which is translated from in English means PAPER ART.
Author's technique of Tatyana Sorokina "Pape art". Master Class.
We clean the glass bottle of the shape you need from the cellophane stickers; you don’t have to remove the paper ones. We cut toilet paper or napkins into small strips and cover the entire surface of the bottle, stretching the paper a little and covering it well with PVA glue.

We start pasting from the bottom. Half is pasted over - let the glue dry, and then paste over the top half. Cover the bottle covered with paper again with liquid PVA glue and let it dry thoroughly.

This is what a bottle prepared for work should look like. On this primer you can draw a sketch of the future pattern.

We make the pattern from ceraplast, plastic or any other self-hardening material, possibly from salt dough. Glue it onto the bottle with PVA glue.

Now our modeling should dry well. Keraplast takes 24 hours to dry.

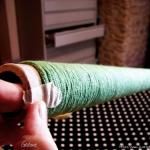
Fold a three-layer or two-layer paper napkin and cut it into equal strips, 1-1.5 cm wide.
We disassemble the strips, each should have three or two layers left. In this case, the color of the napkin is not important, it will stain.

Holding the strip by one end, lower it into the water and immediately remove it. Don't hold it for long, it will get wet.

We roll the strip between our palms, twisting it into a thread. If the strip breaks, divide it into short pieces. You will still divide it into parts for decoration. You can also roll it onto cloth napkin, the threads will be denser and thinner. If the napkin strips still tear, try wetting your hands instead of them.

This is how many threads come out of one napkin. One napkin was enough for this bottle.
Threads can also be twisted from dense toilet paper, and from cosmetic or kitchen paper napkins...

Now we begin to decorate our bottle. You can twist napkin threads into spirals, petals, or whatever your imagination tells you. Glue the pattern with PVA glue. Make a pattern with wet threads, if they are dry, moisten them, scroll again and make patterns.


Now my bottle is decorated and now it needs to be covered again with liquid PVA glue and allowed to dry well.

Now we take acrylic gold (silver, copper, whatever you want), just like my bottle will be gold. Stir the gold and apply a thin layer to the bottle with a piece of foam rubber, as if wiping it.

This is how it turns out after one paint job, I like it even better, but I ordered a gold one...
This means that after the first layer of gold has dried, we apply another layer.

And now we have the finished product. If you don’t need to pour water into it, then it’s ready for dried flowers.
But, if you want it to serve as a flower vase, you still need to cover it with 2-3 layers of colorless yacht varnish.

This is what the bottom of my bottle looks like.

We ask everyone who takes MK to their favorites and then shows it on their blogs or does their work using this technique - indicate the name of the technique and the author, give an ACTIVE LINK to my master class.
I went through different sites and saw many posts with my MK already posted, but not everywhere they are signed correctly...
I don’t want to quarrel with anyone, but I won’t share the authorship either. Sorry.
Here I took a photo of the keraplast packaging. It comes in white and terracotta. Sold in art salons (for example, in any stationery store). This is a self-hardening clay, very easy to work with.
Different companies that produce it spell the name differently: KERAPLAST, KERMOPLAST, KERAMOPLAST, but it’s all one material.

ADDITION: After my MK about paper art, you had a lot of questions. Like any master, for almost six years, I have become accustomed to my work and have mastered the manufacturing process almost to the point of automatism, so I can make omissions in explaining the process without attaching importance to them... but these little things are important to you! Now I will try to answer at least your basic questions about paper art.
I have been modeling on products made of kerplast (kermoplast) for the last three years, this new material. It is good because it dries quickly and does not get wet from dampness. The best quality is Portuguese or Spanish. After drying, a product made of keroplast (especially made in Poland) may have cracks... Don't worry, they can be easily removed. Dilute a piece of ceraplast with warm water until it becomes creamy and use a brush to “paint over” all the cracks (if they are too large, then several times), unevenness in the dried product can be corrected with sandpaper (zero).
Before Keraplast, I did volume for paper art salt dough(with baking and self-hardening, with glue additives), papier-mâché, plastic, I even made my own composition: washed clay, PVA glue and toilet paper (by the way - very good!), but all these compositions have their drawbacks... because and so far I’ve settled on keroplast. But you can try on any of them...
There was a question about preliminary priming for patterns - is it always necessary? It all depends on what you are doing paper art on, on what surface... All threads from napkins are glued with PVA glue or any other water based, they and the background underneath them should absorb the glue, if your background absorbs the glue, then you don’t need to prime it, it will hold the pattern anyway, and if it doesn’t absorb it, then it’s better to glue it, as I showed in MK.
Now about bottles “for liquids”. Paper art is still PAPER ART and it doesn’t really like liquids...But there is a way out. First: do not decorate the neck of the bottle with threads, add, for example, dot painting or simply leave it empty; second: coat the finished product with epoxy glue instead of varnish.
Now about napkins... I wrote in MK that three-layer napkins are needed so that it will be easier for you to immediately learn how to twist threads from them. Of course, I use ANY NAPKINS AND ANY TOILET PAPER, especially in making paintings. Plain gray toilet paper works very well as a background for a composition, looks like a canvas, napkins gray“too noble” for canvas... On the first page of my blog is the work “Ipomoea” on canvas made of toilet paper. The often grayish, muted tones of single-ply technical paper napkins are simply irreplaceable in color palette paintings...And one more thing...you and I live in different cities and even countries, the napkins that I use may not be available for sale, so try working with any paper, such as napkins, and you will find what you need material.
About the twisting of threads. I showed the method of twisting in the palms, because I use it myself and am comfortable with it, but there are other ways... The most common among my students is twisting threads on fabric, you can wet a napkin and twist it on a dry cloth, or you can wet it yourself fabric, and twist the napkin dry, the thread turns out thinner and denser (I use it myself when napkins are too loose or need thin threads), the method of torsion is not important ( newspaper tubes they also twist everything in their own way), the main thing is that the threads themselves turn out.

![]()
| Categories: | |
We invite you to try your hand at a new interesting experiment - the paper art technique; a master class from experienced needlewomen will help you better master the new art. Paper art (English: “paper art”) is a relatively young author’s technique, invented in 2006 by the talented craftswoman Tatyana Sorokina. This is the decoration of objects using flagella from paper napkins, imitating embossed items, wood carving and other more expensive techniques. This technique is also called “napkin forging.”
Ease of execution and availability of materials for a short time spread this art throughout the world. Without possessing any special artistic skills, with the help of paper art, needlewomen create works that stun the imagination.
Creating threads
The most important thing in paper art is to be able to prepare a thread from three-layer napkins. To do this, we stock up on two-layer or three-layer napkins and start making threads:
- cut strips 1-1.5 cm wide from a napkin;

- you need to put them in water and take them out immediately so that they do not get wet;

- roll the strip into a thread or thin flagellum. If the thread breaks, it's not a big deal. The work uses threads different lengths. You can also roll strips onto fabric. The thread will be denser and smoother;

- To prevent the flagellum from tearing, you can try moistening your hands in water, not the strips;
- Toilet paper is also suitable for rolling flagella.
This is shown very clearly in the video below:
In addition to paper flagella, you can use in paper art anything that can be used in decoration. Small pebbles, shells, salt dough figures, dried flowers and tree leaves. For original pattern They even use shaped pasta - bows, letters, curls. The main thing is to be sure to coat each part thoroughly with glue before securing it. The glue used is PVA or any other water-based glue.

The highest quality from Portugal or Spain. Polish keraplast may crack after drying, but this is easily fixable. Dilute a small piece to a thick sour cream and carefully paint over all the cracks with a brush. You can do this several times until the cracks disappear completely. You can level the surface using #0 sandpaper.
The paper art technique is perfectly combined with other types of creativity. Decoupage masters actively use paper flagella in creating their products to add volume to the composition.

From simple to complex
A short training session is offered for beginning creators:
- Prepare paper threads;
- Draw any shape on thick paper or cardboard and try to lay it out with napkin threads, gluing them with PVA glue;
- First make an outline, then fill the entire surface of the figure. Then the three-dimensional image will be smooth.
The next step is to make a picture for the children's room using paper art technique.
- Transfer the plot from a children's coloring book onto cardboard or plywood. You need to choose a plot that has a minimum of small details;
- Lay it out in flagella, starting from the outline;
- Color it in required colors. After the painting has dried, you can coat it with varnish and frame it.

Beautiful patterns can be created from twine. It does not require special preparation and is easy to use. Even without painting the finished product, it looks great. You can verify this by looking at the photo:

You can move on to the next stage of the paper art technique.
Talisman for wealth
This talisman - a money bottle - will not be out of place in any home. In addition to attracting wealth to your home, it will decorate any interior.


Materials:
- original bottle shape;
- paper towels;
- glue gun;
- black and bronze acrylic paints;
- synthetic brush;
- coins;
- metal zipper;
- PVA glue;
- foam sponge;
- matte varnish (water-based).

Use a glue gun to glue coins onto the bottle. Glue them together, closer to each other, to create the impression of abundance. Glue a zipper on top of the coins.

Then you need to dilute the PVA glue with water 1: 1, to a liquid consistency, but so that it does not lose its adhesive properties.
We cut paper towels into pieces of the required size and soak them in the adhesive solution. Squeeze lightly.
We wrap them around the bottle randomly, imitating fabric. We decorate the neck with paper flagella.
You can create real magic with your own hands thanks to Tatyana Sorokina’s signature paper art decoration technique.
Well, isn’t it magic - using table napkins, PVA glue and gouache to transform glass, plastic and even cardboard into antique copper, noble silver or antique bronze?!
Very interesting idea I looked at Natashkin from the Country of Masters for partial decoration of the surface of the product using the paper art technique. Natashkin’s daughter Alevtina is the author of exquisite wine glasses framed using the paper art technique.
I've been wanting to do something like this for a long time. Therefore, today I present my version of a craft, partially decorated using Tatyana Sorokina’s original paper art technique:
Master class on decorating a bottle using paper art technique
This is a glass bottle in the shape of a decanter:

And I'm going to make a "bronze" frame for this decanter.
To decorate a bottle using paper art technique I will need:
- table napkin
- PVA glue
- scissors
- bronze acrylic paint
- piece of foam rubber
- bamboo skewer
- millet cereal
- curly pasta in the shape of stars
- gouache (red, black, green)
- brushes (with synthetic bristles - for PVA glue, with natural bristles - for varnish)
- glossy acrylic varnish
- wet sanitary napkins
Important note: high-quality PVA glue is required for this work. I use the same PVA glue and acrylic varnish as for decoupage work.
1. Preparing the bottle surface for paper art
Before I start decorating using the paper art technique, I degrease the surface of the bottle and remove any remaining glue from the labels using wet sanitary napkins.
Since only part of the surface of the bottle will be decorated with paper art, I will not cover the decanter with a napkin, as is usually done. Otherwise, glued napkins and other decor will be visible from the inside of the bottle through the glass.
I cover with PVA glue the part of the surface of the bottle where it is supposed to make a “bronze” frame using the paper art technique.

I apply several layers of PVA with intermediate drying to prepare the base for laying out paper art patterns. I remove excess glue that spreads beyond the boundaries of the future “bronze” frame of the bottle with a damp cloth.
After the PVA glue has completely dried, I cover the primed part of the bottle with bronze acrylic paint using a sponge made from a piece of foam rubber.

Thus, from the inside, the frame of the decanter will have a “bronze” appearance.
2. Patterns using paper art technique
To create a pattern using the paper art technique, I use double flagella from napkins, millet cereals and curly star pasta.
To make a double flagellum from a napkin, first I make a long single flagellum. The process of making a single napkin flagellum is described in detail in a master class on decorating a can of coffee using the paper art technique.
To make a long single flagellum, in the process of twisting, I connect several napkin strips, overlapping the ends of the strips one on top of the other.

I additionally seal the junction of the napkin strips in the flagellum with my fingers so that the paper art flagellum has the same thickness along its entire length.
Having rolled up a single tourniquet of four strips of napkin, I twist its ends in opposite directions, while keeping the tourniquet taut. This procedure is similar to the process of making twisted cord.
After the napkin tourniquet is rolled up as far as it will go, I hold the tourniquet in the middle with one hand, and with the other hand I connect its ends together, and the tourniquet is twisted.

I coat the borders of the “bronze” frame for a bottle with PVA glue using the paper art technique

and glue a double flagellum folded from a napkin before it has time to dry.
To create paper art patterns, napkin flagella must be wet. If the finished tissue rope has already dried out, it must be slightly moistened with water so that the tissue rope becomes plastic again

To ensure that the flagellum sticks tightly to the surface of the bottle, you can additionally press it with a brush dipped in PVA.
To create paper art patterns, not only traditional napkin flagella and ceraplast elements are used, as I did when creating a box using the paper art technique from a cardboard box. All kinds of sewing accessories (locks, buttons, rivets), as well as cereals, are also suitable for decorating crafts.
Therefore, as a complement to the napkin flagella, I lay out patterns of millet cereals and curly star pasta. To do this, I first draw pattern elements on the surface of the bottle with PVA glue, and then lay out the millet and pasta stars using a bamboo skewer.

I also use a napkin cord to decorate the lower part of the bottle frame.
In addition, I lay out identical patterns of flagella and cereals on each side of the decanter.


It is very important to fix the paper art patterns well. I cover the decor glued to the surface of the bottle using paper art technique with PVA glue. I apply several thin layers of glue so as not to fill the relief elements of the pattern. I dry each layer of PVA.

If pasta sticks to the primed surface of the bottle immediately and almost tightly, then millet groats lag behind quite easily. That is why I pay the most attention to areas with pasted millet. In these places I apply 4-5 layers of PVA.
And now the paper art patterns are laid out and securely fixed. Before proceeding to the next stage of work, I dry the bottle for 12 hours.
3. Painting a bottle using paper art technique
In order for the finished frame for a glass bottle to look like bronze, the surface with paper art patterns must be painted.
I mix red, green and black gouache. At the same time, I am very reminiscent of the cartoon character Vrednyuga, who mixed bright multi-colored paints to make mud. But in the end I get a mixture that, in my opinion, is very similar in color to antique bronze that has darkened over time.
I add glossy acrylic varnish to the gouache in a 1:1 ratio. The composition, as usual, turns out to be too thick, so I dilute it with a small amount of water to the consistency of acrylic paint.
I apply the resulting paint to the surface of the bottle frame using a piece of foam rubber.

I cover the frame with several layers of paint with intermediate drying. Special attention I pay attention to places with a relief pattern. It is very important that all decorative elements are well painted.
4. Bottle tinting using paper art technique
When the paint has dried, I tint the surface of the bottle frame with bronze acrylic paint.
To do this, I put a little paint on a foam sponge, make several impressions on paper with the sponge, and then, without pressing, wipe the surface of the bottle with patterns using the paper art technique with the sponge.

5. Fixation of work using paper art technique
I fix the work using the paper art technique with glossy acrylic varnish. I cover the bottle with two layers of varnish. I dry each layer of acrylic varnish for 3 hours.

After the last layer of varnish has dried, I use a damp cloth to remove excess paint, glue and varnish along the edges of the “bronze” frame of the bottle. Now you can admire the finished craft using the paper art technique.
These are the details of the paper art patterns on the surface of the decanter and on the top of the stopper:

And this is the bottle itself, decorated using paper art technique:

In my opinion, the combination of glass and “antique bronze” looks very noble. Is not it?
Create simple miracles with your own hands with HobbyMama!
We also recommend
 New Year's goat costume for children
 DIY crafts for the New Year for school, kindergarten: diagrams, ideas, photos
 Methodological development in the German language on the topic "fashion"
 Material well-being Material need and material well-being
 Crocheting the edge: “crawfish step”, “picot” and “openwork” patterns
 Magical and healing properties of marcasite Who is suitable according to their zodiac sign: compatibility in astrology