New Year's applique made of threads on paper. Thread applique technology lesson
The technique of drawing with threads is called threadography. Drawing with threads is the same as drawing with a felt-tip pen, only the line needs to be glued to the base.

We take a very thick sheet of cardboard or, even better, a sheet of fiberboard and put a drawing of our future cat on it.
We select threads. We attach special importance color scheme future work. You can use any thread: leftover yarn for knitting is quite suitable, acrylic thread bright colors will fit very well, floss in several folds will also work, the main thing is that the threads are approximately the same thickness.
For beginners, you should not use threads with a non-smooth structure. Threads that are too shaggy or curly can produce wonderful effects, but are more difficult to work with.

When the threads are selected, take glue, scissors and a toothpick - this will be our simple tool.
I use construction glue for gluing foam baseboards.
You can use any polymer waterproof glue, there are many types, and I advise you to choose less odorous ones.
If you are making pussy with small children, you should carefully read the instructions about ventilating the room on the bottle of glue you choose.
We spread the glue on the line on the cardboard; to spread the glue in a thin layer, use a toothpick or any thin stick. A brush is not suitable for this. In the future, it is convenient to spread glue with a stick into hard-to-reach places between the glued threads.
Glue the thread onto the wet glue. We press it gradually with our fingers, laying it out according to the pattern. We cut off the end of the thread with scissors after gluing it to the place where a sharp, impossible turn of the thread is required, or when a different color is needed.

First we glue along the contour of the large pattern, then we fill the space inside. And for small parts, on the contrary, first inside, then along the contour.

We glue the threads as tightly as possible to each other so that there are no gaps left, then your work will be of high quality and beautiful.

When we glue a cat part, we are absolutely sure that it will be exactly the color we decided. But if after the sticker we definitely decided that it should be a different color, and this color does not suit it at all, then we thank the creators of multi-layer thick cardboard or fiberboard, which we took as a basis.

Let's see how I made the red tongue orange in the middle. Using a paper knife, I cut along the desired contour the surface whose color I want to change, and tear it off from work along with the top layer of paper. And in this place I glue threads of a different desired color. In this work, therefore, I changed not only the color of the tongue, but also the color of the pussy's muzzle. This operation can be repeated several times until the cardboard layer becomes completely thin.

Our glue sticks tightly, holds well, and won’t come off without the top layer of paper. But even with further use of the work, you can vacuum it, wash it with a damp sponge and soap, and not be afraid that the threads will fly off.

When making the edge of the work, you should not trim each thread separately. This won't save much material. You can extend the threads beyond the boundaries of the work, and then cut them immediately with a whole line. These shaggy edges of our work are easily hidden in a frame under a baguette.

And finally, a little secret: if finished work steam with an iron through a wet rag or gauze, then the threads will press against each other and look smoother.
Good luck with your creativity!
Http://elleplatz.ya.ru/replies.xml?item_no=5386
Which of the girls has not dreamed of embodying the image of a little lady with their own hands? This can be done not only through drawing, but also using. In this case, we will look at how you can create the look of a girl from thread appliqué on cardboard for kindergarten or school. And then the little needlewoman will be able not only to admire her creation, but also to do different hairstyles!
We will need this material:
1. Craft felt 20x24;
2. Woolen threads (pink and lemon);
3. Pink cardboard 15x21;
4. Lilac cardboard 23x21;
5. Satin ribbon;
6. Scissors;
7. Pencil;
8. Felt pen (color optional);
9. PVA glue;
10. Ruler.

Let's get started:
1. Take flesh-colored felt. We put it on lilac cardboard. We outline the head and neck of the girl (let's call her Mashenka) with a slight movement of the pencil. We take into account where her head will be located approximately.

2. Cut off the base.

3. We can leave the cut out figure as is, or we can divide the head and neck separately, thus conditionally defining the outline.

4. Use serifs to determine the location of the figure.

5. Apply PVA glue to the head.

6. Then on the neck.

7. Carefully apply glue in the center of the sheet.

8. After this, take the pink cardboard and place it below the neck. We are tentatively planning a dress for Mashenka.

9. Cut along the contour.

10. Apply PVA glue on the back side and glue it 2 mm below the neck (also marking the outline).

11.Now let's move on to the hair. In this case, we are interested in bangs. We wrap woolen threads around our fingers (not too tightly). Then we cut it.

12. Divide the cut threads into 2 more parts.

13. We do the same with pink threads (in smaller quantities).

14. We will need approximately the same amount of thread for the bangs.

15. Attach each hair (thread) to PVA glue. It is better to do this in small sections.

16. After all the lemon-colored hair is glued, add a little pink. Our Mashenka should be not only beautiful, but also fashionable. In addition, children often like to combine several colors.

17. Then we wrap threads around the elbow to long curls. We divide it into two parts.

18. First fasten the left, then the right part. While one of the sides dries, we make earrings for the girl from loops of pink thread. We do the same with the collar.

19. Let the hair dry a little, after which we proceed to the second layer.

20. Draw Mashenka’s face with a felt-tip pen.

21. Straighten your hair. If desired, add to long hair pink threads.

22. Now we tie the ponytails and make bows.

Our fashionista is ready and can be safely placed in a frame. In addition, she will be able to do her hair every day - both ponytails and braids!


Crafts using the thread appliqué technique look original, the techniques for working with it are simple and provide endless opportunities for creative self-expression.
Making appliqués from threads is an interesting, exciting, accessible and useful process.
The child develops Creative skills, perseverance, patience, imaginative thinking, fine motor skills.
It must be remembered that the first acquaintance with this technique should begin with simple ideas, regardless of the age of the child. Also at the initial stage it is worth helping and guiding the child and be sure to encourage and praise.
To make an applique from threads you will need:
1. PVA glue;
2. Balls of colored threads;
3. Glue brush;
4. Scissors;
5. Cardboard with a sketch.
Making appliqués from threads:
1. It is necessary to carefully work out every detail of the sketch.
2. If necessary, then decorate the outline of the pattern with black threads (not a mandatory step).
3. Cut the threads desired color of a size that would correspond to the idea of this application, and also correspond to the age and skills of the child.
For example, if a child is 4 years old and this is his first acquaintance with thread applique, then you need to choose an idea in which the threads are not too small. If the child is a schoolchild and has experience working with thread appliques, then you can grind the threads into fluff and carefully apply them to the applique with tweezers.
4. It is necessary to lay out the prepared threads on the drawing, previously generously lubricated with PVA glue. Moreover, the entire drawing is not immediately smeared with glue, but only those places on which work is being carried out in this moment. The work is done from top to bottom.
5. Having filled the space of the entire drawing, the work needs to dry.


Thread paintings - exciting DIY art
If you want to make something bright and unusual with your own hands or spend quality time with your child, then why not try creating paintings from threads - this is a very exciting and fun creativity that requires very little: patience, imagination and a few tools.
In general, drawing with threads is called “threadography” and several have already been invented the most interesting ways creating a panel of such a plan. We will look at the main types, each of which is based on threads, and the rest of the tools differ.
A step-by-step simple master class of each method will help you do original gift to family or friends. Creating paintings from threads is not boring, but on the contrary, it is very exciting, you can’t wait to see the end result, but haste is main enemy creativity. And if you are a very impatient person, then this type of needlework is perfect for training endurance. 


Types of thread paintings

You can make a thread painting using any of the following methods:
- applique from threads (yarn scraps different lengths or scraps, crocheted in pigtails);
- iso-thread using nails and threads (a contour of nails is nailed to the base board, to which threads are attached, hooking them on the opposite nails, and not the ones next to them);
- applique made of finely chopped threads;
- panel embroidered with threads;
- embroidery using isothread technique on cardboard.
Next, using specific examples, we will tell you how to make a picture using each of these methods and you will see that everything is not as complicated as it might seem at first.
This activity perfectly develops the imagination of both children and adults, and hand-made paintings will decorate any interior or serve as unique gifts.
Applique made from threads of different lengths

“Drawing with threads is no more difficult than drawing with felt-tip pens,” say experienced needlewomen. However, this is not quite true. For a yarn painting you will need many varieties:
- dense base (preferably not cardboard, but a sheet of fiberboard);
- frame for a future painting;
- multi-colored yarn;
- PVA glue (or a bottle of other durable glue);
- brush or cotton swabs;
- a simple pencil;
- scissors.
First, a future image is drawn on the base with a pencil (for the first time, choose something simpler, for example a kolobok).
We select thread colors for this sketch. Acrylic ones look best, as they are very bright and beautiful, but everything else is good too: leftover yarn, floss, etc. What is important is the uniform thickness of the threads and the non-smooth structure. It will also be difficult for beginners to work with shaggy or curly threads; although they give an interesting effect, they are more difficult to handle.
Then we move the glue and scissors closer and begin to create our first thread painting. 
Using glue and a brush ( cotton swab) draw a line along the contour of the pattern and, pressing the thread with your fingers, lay out the thread (or a braid of yarn). After the entire contour is glued with threads, we begin to lay them inside and outside, changing the colors and length of the threads. We begin to glue small details from the inside of the drawn outline.
The threads should be pressed very tightly against each other to avoid voids, otherwise the work will not look beautiful or of good quality.
Having finished pasting over the image, we leave it to dry. And then the finished painting can be steamed with an iron through a wet cloth so that the threads lie more evenly.
At the end we are already thinking about the frame. It’s not difficult to make it yourself; a master class for a simple frame can easily be found on our website.
And the painting, by the way, can be safely vacuumed in the future, without fear that the work will spoil.
How to make a picture from threads and nails


Pictures from threads and nails are created without glue and this is no longer painting with threads; here you will need completely different tools:
- base (any wooden sheet, wall or cork board);
- threads of any colors;
- scissors;
- carnations;
- hammer.

Cork boards are lightweight, and you won’t need a hammer, but if you don’t have any, you can nail nails onto any wooden surface that can be pre-painted in some way. It is also better to take care in advance about how the picture will then be attached to the wall.
Now we draw with our own hands any image or word on the base and nail it along the contour of the carnations and pull the threads on them.
At the very beginning, we secure the thread by tying it with a strong knot on the first nail. Next, with a little tension, we attach the thread to the next studs in a chaotic order or according to a pattern invented by ourselves. As you can see, everything is simple, and the process itself is so captivating that you don’t want to stop.
If you want to make the picture multi-colored, you can use threads of different colors. You can first make a long multi-colored thread out of them. Or you can move from color to color, tying knots as in the beginning.
The result is a very beautiful and original panel made of threads.
Video: DIY paintings made from threads and nails
Applique made from finely cut threads
For this application, the threads are cut very finely, literally into fractions of millimeters in length. This material produces truly gorgeous paintings that, at a short distance, cannot be distinguished from those painted in oil. However, the preparation and the process of creating such images requires a lot of patience and a lot of time. But this kind of drawing can also be done with children: adults prepare materials for work, and the child selects colors and attaches scraps with glue. 
The length of the threads is important here - the smaller they are cut, the better the pattern will be. You can distribute the cut pieces into bags or boxes. To make it convenient to take them and sprinkle them in the desired place.
Next, carefully press the threads with your fingers to the base. Having applied the main colors in this way (the background of the sky above, for example, and the green field below), we let the work dry well, this will take several hours. When the threads are completely dry, you can remove excess threads (not stuck) by simply “brushing” them off with a brush that you use to clean clothes.
Next, we continue gluing all other areas and again wait until it dries. Afterwards, you can try to apply flowers and trees to the already dead field. Hut, etc. corresponding shades. And let the work dry again.
That's all - the panel is ready.
This technique is considered not just applique - it is real drawing. Some people paint with sand, others with thread.
And here, too, it is not necessary to have the ability of an artist; it is enough to draw a finished picture or print it on a printer, using it later as a basis.
Video: drawing with cut threads
Pictures embroidered with threads
Embroidering pictures is also not difficult, if you don’t take too complex patterns to begin with. The methods here are also different: satin stitch, cross stitch, half cross stitch, etc. Most often, to acquire skills, it is better to use a ready-made kit, where you will find everything you need. But if you don’t have the kit, but want to try it right away, then we’ll prepare the following tools:
- multi-colored threads;
- needles depending on the thickness of the thread used;
- the base on which you will embroider;
- decorative elements of the finished painting (beads, ribbons, etc.).

Painting embroidered with satin stitch Think about what you want to depict: any plot, landscape, portrait, animal or children's cartoon characters.
You can choose any picture or photo you like. By using modern technologies you can easily find a way to turn a picture into an embroidery pattern. Using specialized programs, you can create a diagram yourself or use graph paper with colored pencils.
And choosing colors will not be entirely easy, because you need to ensure that the shades are without strong contrast for the greatest harmony. If the colors are chosen correctly, the panel will turn out interesting and beautiful.
Then we decide on the background, because They are usually embroidered on a special fabric, such as canvas, which has different mesh sizes and colors. Many people try to draw a tree on their own, for example, and embroider it without any diagrams.
For embroidering portraits from photographs the best way Small stitches are suitable, so the work will look neater.
Embroidery on cardboard using isothread technique

Embroidery on cardboard is a special technique when the embroidery is reproduced not on the material, but on cardboard, which is also called thread graphics or thread design. Paintings created using this technique are very popular due to the ease of execution and interesting appearance. People often teach how to make such a panel from threads back in the kindergarten, because it is an accessible and exciting activity for every child.
To embroider with isothread on cardboard you will need:
- the basis;
- scissors;
- an awl and a regular needle;
- floss threads, regular spool or silk;
- a simple pencil;
- ruler;
- compass.
For paintings decorated with isothread, colored cardboard or thick velvet paper is usually used. Based on this, they draw a diagram or translate the picture they like (it’s useful for beginners to master geometric figures: circles, triangles, diamonds, rectangles, etc. You can try simple compositions from corners and circles - a Christmas tree, a flower or a snowman).
When embroidering with isothread, it is important to follow three rules:

We'll show you a master class on how to work with a triangle. Draw a triangle on the back side of the cardboard and mark holes with an awl at an equal distance from each other (preferably on the front side of the base). The points should be numbered (there must be an even number) as follows: from bottom to top from 1 to 10, then from the top again from 1 to 10. That is, at the base of the triangle we get the number 1 on the left, 10 on the right. And we begin to embroider.
Having tied a knot on the needle, we pass the needle through the right number 10 and lead it to the top 10. We thread the needle and thread that came out in the top 10 into the 9 next to it and lead it to the 9 below, and so we go through all the numbers: from 8 to 8, from 7 to 7, from 6 to 6, etc.
The image, accordingly, is obtained on cardboard from the front side.
You should embroider the panel carefully and smoothly - you don’t need to pull the thread too hard, otherwise the cardboard or it will tear. 
It is better to choose threads that are not matte, but with a shimmer - they look more interesting, and if there are several threads, then they should be twisted, otherwise the embroidery on cardboard will not look neat.
Remember, it doesn’t matter that your panel embroidery doesn’t always turn out perfect, what’s important is that this activity brings pleasure to you and your child. And if you do needlework with interest, then the paintings will turn out beautiful and original.
With your own hands you can create works of art that will add a cozy and warm atmosphere to your home.
And as a gift to friends or family, thread paintings are a great idea.
An applique of threads on wood, fabric or embroidery on cardboard always surprises others, because the paintings look very chic. It’s great that everyone can make something elegant with their own hands and there is no need to master drawing here - all you need is your desire!
If you are thinking about the question of what new and interesting things to do for your little craftsman, then we suggest you try to master this type of art, such as thread applique for children. Working on such pictures is very reminiscent of a regular appliqué made from paper or cereal, only in this case the result is more lively and interesting. To better understand the technique of this creativity, we have prepared for your attention several simple master classes on thread applique.
How to make an applique from threads?
Application "sun"
To get acquainted, it is best to start with the simplest - cut appliqués wool threads.
Materials:
- colored cardboard;
- colored balls and skeins of different woolen threads (if desired, of course, you can use not only wool);
- glue in pencil;
- scissors.
Let's get to work.
 Working with a contour
Another interesting activity for your child can be working on the outline. This will help make any ordinary pencil drawing brighter and more interesting, in our case tulips. At first glance, what could be difficult? But it turns out that not all children know how to draw a line evenly and accurately. And this work is precisely aimed at developing such skills in the child.

Twisted thread applique
This type of work differs from the previous ones in that here the thread seems to replace a felt-tip pen - you don’t need to cut it, you need to lay out one whole part from it alone. And so with each color. As an example, we give you a very bright and funny ladybug, sitting on a flower, made using the technique of twisted threads.
 Snail applique
If the child is already confidently posting simple pictures, then it’s time to move on to working on complex masterpieces. For example, try making a “snail” applique from twisted threads. The whole secret of this work is that before gluing the thread onto the cardboard, it must be wound around a pencil. After this, very carefully remove the wound posts and glue them to the drawing. To make the snail brighter, you can take different threads for each circle of the shell. Imagine with your child and come up with the environment in which the snail is: walking in a meadow, or sitting on a flower and basking in the warm rays of the sun.
 "Floral" applications
By combining the techniques described above, you can create a lot of original work. You can really get creative with making flower appliqués out of threads. To help your inspiration awaken, we provide, as clear example, a couple of works with depicted flowers.
As you already understand, working with thread helps develop finger motor skills, imagination and coordinates your child’s movements. And besides, this is a very exciting and interesting activity that will add to the collection of works of your little genius.
We also recommend
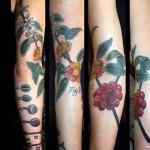 Sketches of tattoos with meaning and their meaning Detailed tattoos
 My husband went to live with his parents and wants to file for divorce
 The best qualities of a man for harmony in marriage and not only A decent guy - what is he like?
 Greek hairstyle: modern options for different hair lengths Greek hairstyles for thin medium hair
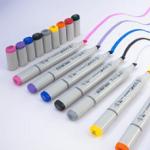 Easy to remove marker stains!
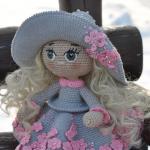 MK: three-dimensional face for a doll