Silhouette of a girl in a quilling dress. Quilling for beginners: patterns with detailed descriptions
I promised to do a Master Class. Honestly, in my opinion, there cannot be a complete master class in its classical sense in contour quilling, so I decided to lay out the stages of work, and also share little tricks along the way. I warn you that I am self-taught, so some methods, quite possibly, are not making it easier, but complicating the work to achieve a better result. That's your business)
So let's get started. For any work in contour quilling you need a base. If you draw and have a rich imagination, then there will be no problems - you can draw the desired image yourself. However, quilling requires a special imagination; you need to think through a lot at once, because changes cannot always be made as you work. It is for this reason that it is still easier to search for the desired picture on the Internet. For this work, I found this picture. I worked on an A3 sheet of paper and from the very beginning it was clear that the whole girl would not fit on this format, because the paper is somewhat thicker than ordinary lines. Plus, it will be impossible to completely replicate the girl, because there are details that cannot be expressed in quilling. And you should never completely repeat the source code - this way you will put yourself in a box and be disappointed when something doesn’t fit as well as in the source code. Therefore, in this case, from the source, I decided to take only the contour of the face (I tried to repeat it as much as possible), as well as the very idea of the hairstyle.
![]()
Of course, we should start with the face. To roughly calculate its location on paper, you need to calculate its location on the source, abstracting from the hairstyle itself. I didn’t print the image because I have an iPad and I just opened it on it. It's better to print it out. This step is perhaps the most difficult. It is necessary to bend the strip as accurately as possible so that it lies as needed even without the base paper. And here are some little tricks (see next photo). As a matter of principle, I do not use a special quilling tool or its homemade equivalent. The reason is simple: when the tip of the paper is placed in the hole of the tool (or the slot, if it is made by hand), then this tip bends and this is unsightly. To make the curls perfect, I give the paper a curve either with a needle (if small curls are needed) or with a brush - it is just the right size and can be used to make curls and bends of absolutely any shape. This is very simple to do - you just need to put the strip on your hand - on your palm or finger, run a brush or needle along the strip until the desired bends are formed. In this way, you can create absolutely any bends, for example, make the tip very curved, then take a larger radius, and then again a smaller one. The bending radius will depend on the pressing force. Plus, the bend shape can always be edited.
![]()
This is how it's done
![]()
After the strip has acquired the desired shape, glue it onto the paper. By the way, I do not use glue, but decoupage varnish. When I first purchased everything for quilling, I accidentally took varnish instead of glue, so I had to use it. When the jar ran out, I wondered what glue to buy. And believe it or not, absolutely everything I tried turned out worse than this varnish. It has a milky matte color, but is almost invisible at work and holds up quite well. I buy it at Leonardo stores.
![]()
But let's get back to our work. I would also like to spend some time on the face: in this case, the curves of the face are too small and unusual, so doing both the nose and lips in one strip would be very difficult, if not impossible, so I decided to take several strips. So, in my opinion, it turned out even better. By the way, another little trick, perhaps. many have already reached it, but I’ll mention it anyway. When gluing the strip onto the paper, it is better to hold it with eyebrow tweezers, the ones made in the form of scissors.
![]()
Next tip. Sometimes you take a long strip. And if everything is clear with one part of it, then how to glue the second is still unknown. For example here. Look: the neck strip on the right is quite long. And if that part of it that forms the neck has its place in advance - it is absolutely clear how to glue it, then with its upper part - the bend with a circle, nothing is still clear. You can now glue it as you like, and then during the process you discover that you glued it unsuccessfully and inconveniently, that according to the plan it would have been better to glue it, for example, to the left, but it’s too late and nothing can be done. Therefore, in this case, I glued only the part with the neck, and left the bend unglued.
![]()
Now I can glue it the way I need it at any time.
![]()
This is the next stage. What else would I like to say - a needle is generally an irreplaceable thing in quilling. In addition to helping with curls, it has another useful function. When you apply glue to the edge of a strip, you should always remove as much excess as possible before gluing it. However, even in this case, after gluing, it happens that small droplets remain in some areas. They will be visible on the finished work, so as soon as the glue has set a little and you no longer need to hold the strip with your hands (for me the varnish sets in a second or two), I take a needle and use it to remove all the excess glue. As a result of these manipulations, the strips are perfectly glued.
![]()
Well, a couple more intermediate stages, just so you can see how I worked.
![]()
At first I tried to make the main outline, but I didn’t have enough patience until the end, so in order not to get bored without finishing the main outline, I started filling in the already created one.
![]()
Here, in fact, are the parts from which the work is made. Everything except the circle was made with a needle.
![]()
And finally, the finished work! I did this particular job for a very long time - 5 days. Despite the fact that at this time I hardly study. The difficulty was in coming up with a hairstyle - it was hard to fill in the patterns so that it would look beautiful.
Good day to all!
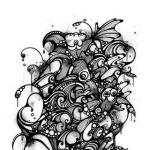
Some may remember the paint splatters done in contour quilling
I promised to do a Master Class. Honestly, in my opinion, there cannot be a complete master class in its classical sense in contour quilling, so I decided to lay out the stages of work, and also share little tricks along the way. I warn you that I am self-taught, so some methods, quite possibly, are not making it easier, but complicating the work to achieve a better result. That's your business)
So let's get started. For any work in contour quilling you need a base. If you draw and have a rich imagination, then there will be no problems - you can draw the desired image yourself. However, quilling requires a special imagination; you need to think through a lot at once, because changes cannot always be made as you work. It is for this reason that it is still easier to search for the desired picture on the Internet. For this work, I found this picture. I worked on an A3 sheet of paper and from the very beginning it was clear that the whole girl would not fit on this format, because the paper is somewhat thicker than ordinary lines. Plus, it will be impossible to completely replicate the girl, because there are details that cannot be expressed in quilling. And you should never completely repeat the source code - this way you will put yourself in a box and be disappointed when something doesn’t fit as well as in the source code. Therefore, in this case, from the source, I decided to take only the contour of the face (I tried to repeat it as much as possible), as well as the very idea of the hairstyle.

Of course, we should start with the face. To roughly calculate its location on paper, you need to calculate its location on the source, abstracting from the hairstyle itself. I didn’t print the image because I have an iPad and I just opened it on it. It's better to print it out. This step is perhaps the most difficult. It is necessary to bend the strip as accurately as possible so that it lies as needed even without the base paper. And here are some little tricks (see next photo). As a matter of principle, I do not use a special quilling tool or its homemade equivalent. The reason is simple: when the tip of the paper is placed in the hole of the tool (or the slot, if it is made by hand), then this tip bends and this is unsightly. To make the curls perfect, I give the paper a curve either with a needle (if small curls are needed) or with a brush - it is just the right size and can be used to make curls and bends of absolutely any shape. This is very simple to do - you just need to put the strip on your hand - on your palm or finger, run a brush or needle along the strip until the desired bends are formed. In this way, you can create absolutely any bends, for example, make the tip very curved, then take a larger radius, and then again a smaller one. The bending radius will depend on the pressing force. Plus, the bend shape can always be edited.

This is how it's done

After the strip has acquired the desired shape, glue it onto the paper. By the way, I do not use glue, but decoupage varnish. When I first purchased everything for quilling, I accidentally took varnish instead of glue, so I had to use it. When the jar ran out, I wondered what glue to buy. And believe it or not, absolutely everything I tried turned out worse than this varnish. It has a milky matte color, but is almost invisible at work and holds up quite well. I buy it at Leonardo stores.

But let's get back to our work. I would also like to spend some time on the face: in this case, the curves of the face are too small and unusual, so doing both the nose and lips in one strip would be very difficult, if not impossible, so I decided to take several strips. So, in my opinion, it turned out even better. By the way, another little trick, perhaps. many have already reached it, but I’ll mention it anyway. When gluing the strip onto the paper, it is better to hold it with eyebrow tweezers, the ones made in the form of scissors.

Next tip. Sometimes you take a long strip. And if everything is clear with one part of it, then how to glue the second is still unknown. For example here. Look: the neck strip on the right is quite long. And if that part of it that forms the neck has its place in advance - it is absolutely clear how to glue it, then with its upper part - the bend with a circle, nothing is still clear. You can now glue it as you like, and then during the process you discover that you glued it unsuccessfully and inconveniently, that according to the plan it would have been better to glue it, for example, to the left, but it’s too late and nothing can be done. Therefore, in this case, I glued only the part with the neck, and left the bend unglued.

Now I can glue it the way I need it at any time.

This is the next stage. What else would I like to say - a needle is generally an irreplaceable thing in quilling. In addition to helping with curls, it has another useful function. When you apply glue to the edge of a strip, you should always remove as much excess as possible before gluing it. However, even in this case, after gluing, it happens that small droplets remain in some areas. They will be visible on the finished work, so as soon as the glue has set a little and you no longer need to hold the strip with your hands (for me the varnish sets in a second or two), I take a needle and use it to remove all the excess glue. As a result of these manipulations, the strips are perfectly glued.

Well, a couple more intermediate stages, just so you can see how I worked.

At first I tried to make the main outline, but I didn’t have enough patience until the end, so in order not to get bored without finishing the main outline, I started filling in the already created one.

Here, in fact, are the parts from which the work is made. Everything except the circle was made with a needle.

And finally, the finished work! I did this particular job for a very long time - 5 days. Despite the fact that at this time I hardly study. The difficulty was in coming up with a hairstyle - it was hard to fill in the patterns so that it would look beautiful.

Quilling is a fun activity. Cards, paintings, beautiful jewelry, 3D models, toys and many other original things are created from paper strips. Postcards are the most common area of application of the quilling technique. Today I want to tell you how to use quilling strips in an unusual form - silhouette quilling.
Materials:
- quilling paper (black and yellow) - 2mm, pink and green - 4mm,


For the rose leaves, make two loose spirals of 2mm wide paper and give them a drop shape. Glue the leaves to the rose, and glue the rose in the girl's hair


5. Now you can start assembling the postcard. Cut out the silhouette with a rectangle. From gold crepe paper, cut out a rectangle larger than the silhouette. Glue the silhouette to the corrugated paper. Glue this blank to the base of the postcard. Write on it with a white marker.

Using this technique, you can create beautiful cards and paintings for any holiday and for interior decoration.
There are many ways to please yourself and your loved ones by making crafts with your own hands. One of them is to make a picture using the quilling technique, as experienced needlewomen advise. Of course, to master the basic techniques of this applied art, it will take a lot of time and a fair amount of perseverance. But the result will exceed all expectations! With patience, you will understand how to work with quilling and be able to create beautiful compositions.
Quilling - the art of paper rolling
Quilling is the art of paper rolling, that is, making flat or three-dimensional compositions from long and narrow strips of paper twisted into spirals. The finished spirals are given different shapes. This is how modules are obtained from which works are created - paintings, postcards, albums, frames, figurines, etc. The art of paper rolling arose at the end of the 14th century in Western Europe. It is believed that quilling was invented by monks. By trimming the gilded edges of the books, they wound them onto the tips of bird feathers (hence the name, since quill in English means “bird feather”) and thus created an imitation of a golden miniature.

In the 15th - 16th centuries, paper rolling was considered an art; in the 19th century, it was considered a ladies' pastime (and almost the only handicraft worthy of noble ladies). In the 20th century, interest in the quilling technique faded, and only at the end of the century the art of paper rolling again entered the lives of creative lovers.
The Korean school of quilling techniques differs from the European one. European works, as a rule, consist of a small number of parts; they are laconic, reminiscent of mosaics, and decorate postcards and frames. Eastern masters create complex works that are more like masterpieces of jewelry. The finest volumetric “lace” is woven from hundreds of small parts.
Another manufacturing technique that deserves special attention is contour quilling. Works using this technique are also created from long narrow strips that are placed on the edge. Due to the use of the same material, this technique of working with paper is also called quilling, but due to the fact that the stripes are placed on the edge, the pattern is contoured. The products look more vibrant and realistic. And “mixed” works look especially good, where both quilling techniques are used - regular and contour.
Quilling technique for beginners: what tools and materials are needed for work
Before you start quilling, you need to know what you need for the job. Next, you will learn what tools and materials beginners need for the quilling technique.

Paper. Quilling uses long paper strips, which come in widths of 3 mm, 5 mm, 7 mm, 10 mm and 1.5 cm. You can cut the desired strips yourself with scissors. There are also special desktop machines for cutting paper into strips for quilling. But it is necessary to take into account that the quilling strips are the same color on all sides, i.e. not only on the wide side, but also on the edge side, while ordinary colored paper, if cut, often gives a white edge color.
The strips come in different densities, metallized, with glitter, etc. Which stripes to choose depends solely on your imagination and the future painting.
Stripes can be purchased in one color or with transitional tones in one set. There are sets of different colors. As a rule, the length of all strips is about 30 cm (length of AA sheet). If necessary, you can make the strips shorter by cutting them, or longer by gluing several strips together.

Pen. Typically, this tool is simply called a “quilling tool.” It comes in metal and wood, double-sided, single, only with a fork and a ball. What is it?
In essence, it is a handle, at the end of it there is a fork, into the slot of which a strip of paper is inserted and twisted. The fork comes in different heights: 3 mm, 5 mm, 10 mm, 1.5 cm, i.e. corresponds to the same parameters as paper. It is best to have several tools in stock, for example, 5 mm will work for 3 mm and 5 mm, and 1.5 cm will work for 10 mm and 1.5 cm. These can be two different tools or one tool with two tips.
You can even make do with improvised means - use a toothpick, a needle or a match. You can make the tool yourself: take a needle with a large eye, bite off the small tip of the eye (you get a fork), and stick the needle itself into a cork or wooden handle.

Diameter template. When talking about quilling tools and materials, we must not forget about templates. This is a regular ruler with circles of different diameters. It is convenient to use it to create elements of the same size: having twisted the desired spiral, you place it in a circle of the required diameter, and measure all the rest along the same circle.
As a rule, in our stores they sell rulers only with circles, but if you want to delve deeper into this type of creativity, I recommend that you look at foreign websites for rulers, which will contain templates of all geometric shapes.

Tweezers. There are tweezers with different noses, the most popular is with an angled nose, i.e., with the nose pointing down. But you can also use stationery tweezers (if you don’t have one, you can take tweezers from a manicure set). Tweezers are used not only to lay out the finished modules during assembly, but also to firmly press the tip of the paper strip against the spiral when gluing.

Glue. PVA is best, but a good glue stick, craft glue, or clear glue will also work. The most important thing is to apply very little glue so that the paper does not deform.
What additional tools are needed for quilling? Every year, a new collection of tools is added to improve the quality of your work while reducing costs. There are various templates for making flowers, snowflakes and other objects, a machine for creating corrugated strips, a quilling coach (a tool for making even spirals), “combs” for creating looped quilling, etc. Quilling paintings consist of small parts called “modules”. Modules come in different forms. They are always created according to the same principle: first the roll is twisted, after which it “unfolds” slightly, and the tip is sealed. Such a part is called a “spiral”, and modules are created from the spiral by applying different pressure on it.
Various elements of quilling: technique for performing basic modules for creating compositions
Various elements are used to work in the quilling technique.

Tight spiral - twist the ribbon and glue the tip without removing the spiral from the needle so that the ribbon does not unwind.

Donut - Before making this one of the basic elements of quilling, twist a tight spiral, slightly loosen and untwist the inner part so that an empty space is created.

Donut with a spiral - twist a tight spiral, slightly loosen so that there is more paper at the edges, but do not unravel completely.

Tight oval - take a pen or pencil, wrap a strip of paper around it and glue the tip. As a result, you will end up with a bagel with a large hole. Then press lightly with your fingers on both sides, giving the module an oval shape. Free spiral - twist the tape, loosen it a little to the desired volume and glue the tip.

A drop is one of the basic elements of quilling. Make a loose spiral and compress it on one side, giving it a teardrop shape.

Petal - make a drop quilling module and lightly pinch the rounded tip. You can pinch at different levels, thereby changing the shape of the petal. Curved Drop (Paisley) - There are two ways to make this module. The first is to make a drop, and then bend it in the desired direction. The second, and more accurate, way is to bend and create a drop at the same time. Then the paper will fold evenly and neatly.

Eye - make a loose spiral, then pinch on both sides at the same time, trying to maintain symmetry.

Curved petal - make a free spiral, press lightly, giving the workpiece an oval shape, then pinch and bend first on one side, then on the other. When making this element using the quilling technique, do not forget that you need to bend it in different directions - one side down, the other up.

Bird's foot - make a loose spiral, squeeze the triangle. Fold two corners towards the third and press firmly.

Flower (or circle with a notch) - make a free spiral and, holding the workpiece with your fingers, press it on one side with a pen or pencil.

Lily of the valley - make a “flower” module and curl the ends outward using an awl or the base of a quilling tool.
How to make basic geometric elements using quilling technique

Square - make an “eye” module, place it between the thumb and forefinger so that the corners are clearly under the fingertips. Now squeeze the module and release. You have four equally spaced corners and can form a square.

Triangle - Make a loose spiral and squeeze it in three places to make a triangle.

Semicircle - make a loose spiral, lightly press it with your fingers, giving it a slight oval shape. Now pinch the “sharp” parts of the oval and lower it down slightly.

Arrow 1 - make an “eye” module, then secure one corner between two fingers, and press the other corner so that you get a sharp triangle. Release and you will see that you have formed four corners that resemble an arrow.

Arrow 2 - make a loose spiral, compress it into a triangle. Press the two corners together to create an arrow.

Star - pinch five times at an equal distance.
Open quilling elements are those used to create a composition that do not need to be glued together, i.e. close. They are created by twisting the tape in one direction or the other.
Below you will learn about the step-by-step quilling technique when performing various applications.
How to make a “Lavender” craft using the quilling technique: step-by-step work
The most common form of quilling is floral motifs of varying complexity. The following is a description of creating a simple version using the quilling technique, which will allow you to understand all the basics of creating, constructing and combining elements.
To make the “Lavender” applique using the quilling technique you will need:
- paper base
- strips for quilling division and lilac (you can take 2 lilac colors - one for flowers and the other for a bow)
- template line
- PVA glue
- quill tool
- glue brush

First, we twist spirals from one strip, unravel them equally using a ruler with a template, glue the tail and lightly squeeze it, turning it into an oval. Such modules must be made at the rate of 9 pieces per flower.

Making the stems. To do this, glue 2-3 green strips so that they are better visible, spread glue on the edge and place the strip with glue on the paper. Do not glue the bottom of the strip yet.

Assemble the finished parts.

Now we make leaves. To do this, twist a spiral of 2 strips and give it a “Curved Petal” shape.

Let's move on to creating the bow. First, let's make the ribbons. They are made in the same way as leaves, i.e. have a “Curved Petal” shape. It is enough to take 1 lilac spiral.

Now, when working with paper using the quilling technique, we make the bow itself. We twist a spiral from two strips, unravel it and squeeze it so that we get a shape similar to a heart.

We add new modules to the already glued ones.

To finish creating the bow, cut small strips of the same color as the bow itself and simply glue them between the stem and the bow. Arrange the ends of the stems as you like and secure them with glue.
Below we describe step by step how to make a picture “Owl” using the quilling technique.
How to make a picture “Owl” using the quilling technique: step-by-step description

Creating such work is technically just as easy, but requires more time, because... There are much more details.

You can prepare a sketch in advance, you can improvise, letting your imagination run wild when drawing the details of this cute owl.

To create the “Owl” composition using the quilling technique you will need:
- base paper of at least A4 size
- quilling stripes: burgundy, dark blue, black, two types of gray, as well as a little white, beige and green for the eyes
- PBA glue
- quilling tool
- tassel
- template line

Let's start with the eyes. To do this, take half a black stripe, half a white stripe, one whole green stripe, one brown stripe and half a dark blue stripe. Twist everything into a tight spiral.

Using two burgundy stripes and one blue, twist the spiral, unravel it, glue the tip and make a crescent module. Two such parts need to be prepared.

Using 1 blue and 1 black stripe, make a curved petal module. You also need two of these parts.

Using 1 burgundy and half a blue stripe, make a teardrop module.

We assemble the modules to form the face of an owl.

We make two small triangles each from one black stripe.

We substitute them to the formed face.

We make many “petal 2” modules from burgundy stripes. One strip is enough to create a module.

We substitute ready-made modules, forming the body of an owl.

Now we create many spirals using gray, blue, black colors.

Since these are future feathers, they need to be made in different sizes - from larger to smaller.

The large feather will consist of one whole gray, one whole blue and one whole black stripe.


We assemble wings from ready-made modules. If you used two types of gray stripes, alternate them with each other.

We use the same principle to make the inner feathers. They can be any color and size.

We decorate the spaces between the feathers with small tight spirals.

Making the tail. To do this, it is necessary to make feathers of different lengths - from longer to shorter.

To make the tail beautiful and different from the wings, we will decorate the feathers with tight spirals.

Glue a tight spiral to the finished feather and cover the entire part with an additional dark blue or black stripe.

To give the owl a more complete look, make two banana-shaped modules and one complex module with a triangular edge.

To do this, use the instructions for creating a semicircle and pinch one side to create a corner.

We substitute the finished modules for our owl. “Bananas” will frame the wings, another detail will complete the bird’s head. The picture is ready.

The next section of the article describes how to make the “Delicate Flowers” quilling craft.
How to make a composition “Flowers” from paper using the quilling technique
To make a “Flowers” craft from paper using the quilling technique, you will need:
- A4 size base paper
- quilling paper yellow, cream, pink, green in several shades
- template line
- PVA glue
- glue sealant or hot gun
- quilling tool

We will do this work with elements of contour quilling - two hearts in the center will be made using this technique.

To do this, take 10 pink strips and glue them together, gluing each subsequent strip slightly lower than the previous one.

Then we twist the resulting strip and release it.

Glue the edge of the resulting curl. From two such parts we form a heart.

Let's move on to creating flowers. Flowers are created from individual petals. From two cream and two yellow stripes, twist a spiral and unravel it.

Then squeeze the piece slightly and wrap it around something round, like a pencil. Pinch the edges and pinch the center to create a sharper petal shape.

Glue the ends of the petal together and secure with a clothespin.

For each flower you need to make 6 such petals.

Now we will make simple small flowers. Tight spirals will be the center of the flower.

Spirals of two stripes will become the core of large flowers, and spirals of one strip will become the core of small flowers.

After making the right amount of details for the flowers, also make a lot of paisley modules to create greenery around the flowers.

Now we begin collecting the work. First we glue the hearts.

In order to make the flowers more voluminous, it is necessary to secure the petals at an angle.

To do this, you need to use a glue gun or glue sealant.

This glue not only sticks the petal to the base paper, but also creates a cushion that lifts the petal.

Step by step we glue the flowers.

Then we frame them with green modules.

To create volume, glue some modules on top of each other.

Use tight strands to further decorate your work.

The next section of the article will be devoted to how to make a “Firebird” product step by step using the quilling technique.
How to use the quilling technique: the “Firebird” product
It is better to create more complex works with a prepared sketch. Draw what you want. There is no need to draw every module and all the colors; it is enough to determine the general color scheme and those modules that are important for conveying your idea. Here's another idea using the quilling technique.
For the “Firebird” product using the quilling technique you will need:
- base paper no less than A3
- quilling paper
- quilling tool
- PVA glue
- needles or comb for quilling

We will create not only single-color contour modules, but also rainbow ones. To do this, several strips of different colors are glued together. We can mix as many colors as we want, in any order. It can be a smooth transition from yellow to red, then when twisted, this gradient will go from the center outward. Or it can be contrasting colors, then one color will frame the other.
We twist loose spirals of different sizes and colors.
Then we give them the desired shapes: drops, paisley, semicircles, petals, arrows, tight spirals.

It is better to assemble some elements separately.
Now we will make beautiful curved lines, the same method is used in contour quilling. Choose the colors you want to make a curl from and glue the strips on top of each other at the tip. The more stripes, the more “lush” curl you will get.

Then twist into a spiral, but not tightly, so that the strips do not touch when wrapping.
Remove the spiral from the tool and loosen it slightly.

Now we glue the strips one by one, from bottom to top, each time slightly loosening the tension of the strip to create space.
In this way we create the number of curls we need in different sizes, colors and shapes.

There is a technique in quilling called “quilling with a comb.” The name speaks for itself - the elements here are created by winding paper in different ways onto the combs of a flat comb. We will not go deep into this method, we will only master the simplest way to create a module using this technique, and for this we do not necessarily need a comb! After all, we are making a fairly large object; in our case, there is no point in winding strips around a comb. Using needles and foam, we will create our own “comb” on a large scale.

Glue together several strips. Carefully wrap the resulting long strip around the needles, making sure to pinch at the base. This is necessary not only for convenience, but also in order to create the correct shape. If you don't pinch, the strip will start to loosen the tension and you won't get the shape.

Having completely wound the strip, glue the tip, and also drip a drop of glue at the base so that all rows stick.
Using this technique, we create the required number of elements of different colors and sizes. Please note that the arrangement of the needles can be changed each time, or you can leave it the same.
Having made the main part of the elements, we assemble our bird, but do not glue it.

Some details can be emphasized favorably by combining them with each other: for example, so that the bird’s body does not merge with the wing and tail, it can be covered with a contrasting stripe.
Now the assembled parts can be glued. Strive to glue the parts tightly together, then the picture will look more openwork, and the background will be barely noticeable.
To fill the resulting voids, it is not necessary to manufacture new modules. It will be enough to make tight spirals of different colors and sizes. They will not only fill the space, but also visually enrich and complicate the design.

After assembling and gluing the bird, you can think about what will surround it.
But don’t overdo it, our bird itself turned out to be very bright, rich in elements, so it will be enough to make a small green twig and a small bud.
Below we describe how to make a “Vase” craft from paper using the quilling technique.
DIY “Vase” craft using quilling technique

Creating figures from quilling modules is, on the one hand, a very easy task, but on the other, it is extremely difficult.

But the whole difficulty lies only in fastening the parts and their correct fixation.

To make a “Vase” craft with your own hands using the quilling technique, you will need:
- quilling paper of any colors
- PVA glue
- adhesive sealant
- quilling tool


First we create the bottom of the vase. To do this, we twist a large tight spiral and paste it with small tight spirals.

We cover the glued spirals with yellow stripes.


If the vase is straight and does not expand upward, then it is enough to evenly glue the finished modules tier by tier.

If you need to give it a bending shape, use adhesive sealant.


Drop it onto the edge of the module using the same principle as in the master class on creating delicate flowers, and fix it in the desired position.


While the sealant is drying to prevent the modules from slipping, place something that will hold the parts in place.

Make as many tiers as you like.

In this case, you can use modules of different shapes.


Crafts using quilling are an interesting and educational activity not only for children, but also for adults. With this type of creativity, using only paper and glue, you can create amazing cards and three-dimensional toys.
For this work, paper 3 or 5 mm wide is suitable. The wider it is, the denser and better it will hold its shape, but it will be more difficult to glue. With this paper, large parts are more accessible.
To make a postcard using the quilling technique you will need:
- 1. White base for the card.
- 2. Quilling paper – dark blue and milky colors.
- 3. Paper rolling tool.
- 4. Glue.
- 5. Medium thickness brush.
- 6. Scissors.

Next, you need to manually draw the silhouette of a girl on the postcard. Or, take a picture, for example, from the Internet, cut it out and paste it. We will mainly need its upper part, since the bottom of the dress will be narrower from quilling strips.

The sketch of the future dress can also be thought out in advance or drawn schematically directly on the postcard. The drawing should be barely visible so that it can be erased later.
Shapes called “month”, “eye”, “leaf”, as well as paper curls of various combinations will be our main elements.
How to make such figures?
So, the basis is various types of spirals, tighter or looser, but always with a well-fixed end. The month is a folded free spiral, which also has flattened corners, while the main part is convex on one side and concave on the other. To make something like an eye, you need to twist a spiral out of paper and squeeze it from two opposite corners, making them sharper. And the leaf is derived from the eye, only the ends need to be moved in different directions. You will get a slight bend.
It is advisable to apply the glue to the side of the strips so that it is not noticeable on the finished card.

We start with the neckline area, from where we will continue with the skirt of the dress. We will need 4 figures - 2 “eyes” and 2 “leaves”. Glue it as shown in the image.

Using large open spirals, we will divide the dress into several parts and gradually fill each one in order with smaller spirals. The skirt should be full, so experiment with elements and add new ones.


Now we need to make about 30 elements already known to us - “eyes” and “leaves” - of different sizes. We use them to fill the remaining free space. Where they should be depends entirely on personal preference.


A line of milky paper. We finish decorating the dress with small roses. Let's take a quilling tool and make two or three tight turns around it. Then we will bend the strip at a right angle downwards. We repeat these steps, periodically securing with glue. The volume of the rose will depend on the frequency of folding of the strip of paper and its length. It is preferable to use at least a quarter of a standard quilling strip per flower. To prevent the rose from falling apart, it is necessary to secure the remaining end of the strip to the lower part of the center of the flower. The inside can also be glued.
We also recommend
 Quilling for beginners: patterns with detailed descriptions
 A story about Christmas in Great Britain
 Fountain “Friendship of the Peoples of the USSR Fountain with golden statues in a circle
 Test yourself: how well do you know your partner?
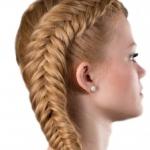 Fishtail braid and its weaving pattern
 Graphite hair color is a fashionable gray hair color for those in love with the extraordinary!