How to crochet the edges of a sweater. Crocheting the edge: “crawfish step”, “picot” and “openwork” patterns
How to make fringe quickly and easily
This decoration can be useful for decorating interior items - curtains, tablecloths, lampshades...
In addition, fringe can also be used in small handicrafts - making toys, clothes for dolls and other interesting things.
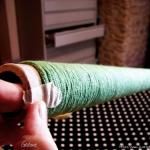
To quickly create fringe, we will need: yarn of the desired color and composition, a cardboard roll (you can glue toilet rolls together), fabric tape (rolled adhesive tape is also great), scissors and thread.
We will use a sewing machine for stitching.
The diameter of the cardboard cylinder will determine how long the fringe threads will be. If the cylinder reaches 5 cm in diameter, then the length of the threads will be approximately 7-8 cm. 

So, we secure the tip of the yarn - glue it with a bandage to the edge of the roll. We begin to wind the threads around the roll. We do this without tightening the yarn, otherwise it will be difficult to remove it from the cylinder. Having wound the threads to the second end of the roll, cut off the yarn and fix its tip - attach it to the cardboard. Now we cut the patch to the required length and glue it along the entire length of the roll across the threads.
As you know, details can ruin or save any thing. A product knitted using a variety of techniques will have a complete look if it is complemented with a binding that matches the style. A hook is an indispensable tool when decorating the original edge of a knitted blouse, dress, napkin or tablecloth. Crochet patterns are so varied that they allow you to decorate not only the finished item, but also to hide flaws that often happen when making the edge of the placket, the bottom and other details of a knitted product. In addition to interestingly finishing the edge, crochet patterns are used for elegant finishing of knitting cuffs, collars, tying necks and knitting borders for interior items.
A useful cheat sheet for beginning craftswomen:
Finishing the edge with crochet “Crawfish step”
The most common type of edge finishing that does not require special attention when performing it. The “crawfish step” finish is compact, prevents the edge of the product from stretching and is very suitable for warm clothes.
1. First make one straight row or round row using regular single crochets, inserting a hook around each stitch or below a chain stitch.
2. Without turning the work, knit in a “crawfish step”: insert the hook into the 2nd loop and pull the thread, yarn over and bind off both loops.
3. Continue this way until the end of the row, cut the thread and fasten it. To achieve a good result, you need to maintain uniform thread tension.

There are several options for knitting a crayfish step, look at the video for two of them:
Crochet edge trim - “Picot”
Usually done in a circle. You can also perform straight and reverse rows, but at the end of the first row the thread is cut, and the second row starts from the first loop of the first row.
1. Knit a row in the round using single crochets. 2nd row: * 3 single crochet, 1 picot (= 4 chain stitches and a half single crochet, knitted in the 1st loop of a chain of 4 chain stitches) *, repeat from * to * until the end of the row and end with a double crochet without a crochet.

2. This is what the border looks like after completing the 2nd row.

Pico- a slightly more complex way of crocheting an edge. Interesting for tying the edges of sleeves, cuffs, hats, berets. There are several ways to knit a picot; based on the thickness of the thread, the number of air loops connected in a picot is selected. The diagram shows different variants of this knitting.


Master class: Crocheting a product with “Piko” crochet
Crochet edge trim - “Bumps”
1. This finishing is done in a circle or in two straight rows only on the front side of the work. Knit the 1st straight row or 1st row in the round with single crochets, 2nd row or 2nd circle: 2 chain stitches, * skip the loop of the previous row, half double crochet in the next loop (grab the thread and insert the hook under loop you just made, grab the thread again and pull the loop through) 2 times. Knit 5 received loops *. Repeat from * to * to the end of the row and end with a half double crochet in the 2nd loop of the initial chain if knitting in the round; and half double crochet if you knit in straight rows.

2. Thick and soft finish is good for classic and elegant products.
Finishing the edge of the product with crochet arches
1. This finishing is done in a circle or in two straight rows only on the front side of the work. Knit the first straight row or 1st row in the round with single crochets, 2nd row or 2nd circle: * in the loop of the previous row, perform a single crochet (the 1st single crochet is always replaced with a chain stitch), 3 chain stitches and 2 more unfinished double crochets and knit together 3 loops on the hook, skip 3 base loops *. Repeat from * to * to the end of the row and end with a half double crochet in the 1st starting stitch if knitting in the round, and a single crochet in the last loop if knitting in straight rows.

2. Lightweight and soft finish suitable for hems of children's clothing, light summer jumpers, sweaters and tops.

Finishing the edge of the product with crochet interlaced arches
1. This two-color finish is done in a circle or on two straight rows on the front side of the work only. Knit the 1st straight row or 1st row in the round with single crochets (the number of loops is a multiple of 3 + 1 loop). 2nd row or 2nd round: *from the loops of the previous row, perform a single crochet, 3 air loops, skip 2 base loops *. Repeat from * to * to the end and end with a half double crochet in the first stitch if you are working in the round, and a single crochet in the last stitch if you are working in straight rows. Cut the thread and with yarn of a contrasting color, make a single crochet in the 1st loop of the previous row, 3 chain loops, pull out the hook and insert it under the arch of 3 chain loops of the previous row, grab the left chain loop and thread and make a chain loop *. Repeat from * to * until the end of the row and end with a single crochet.

2. This trim is suitable for the hem of children's clothing.

A few more beautiful crocheting patterns


In order to beautifully process a V-shaped or any other neck (collar) of a knitted product, such as a dress or cardigan, there are many processing schemes. A beautiful border can be made in different ways. The most effective type of design looks like crocheting the neckline. Tying the neckline to get a beautiful border is quite simple; even a novice knitter can easily cope with this task. The main thing is to carry out the tying strictly according to the pattern, then finishing the product with a knitted border will turn out smooth and beautiful.
Numerous patterns for tying a collar using crocheting can be found in abundance on the Internet and in specialized literature. Beginners are recommended to choose knitting patterns of a low level of complexity, which are accompanied by a detailed description of the work.
Crocheting the edges of a finished knitted product is one of the most important stages of knitting. Processing the collar of a product with a beautiful border is not a difficult task, but in order to correctly perform the binding, the knitter must be well versed in finishing patterns (know all the symbols) and have artistic taste in order to choose the most suitable option for processing the finished knitting from a variety of patterns.
You can decorate knitting with a decorative border in various ways, the main thing is that the chosen method emphasized the texture of the product. Before you start tying, it is recommended to study several design patterns for finished knitting, read job descriptions and choose the tying pattern that harmoniously matches the style and color of the finished product.
To make a decorative crocheted border you will need:
Crochet neckline: general description of the process
Before you begin decorative processing of the collar of a knitted product using a hook, you must calculate the required number of loops in accordance with the dimensions of the finished product. Next you need to decide on the color.
The color of the border may match the color of the finished product, or it may have a different shade, but you can also make the border from yarn of a contrasting color. It all depends on who the clothing is intended for (man, woman, child), as well as on the style. The main condition: the color of the border should harmonize with the color of the finished product and emphasize its texture.
 The decorative border can be crocheted in the following ways:
- Using the “crawfish step”.
- Using a combination of single crochets and picots.
- Using so-called “shells”.
Of these methods, the simplest option, suitable for beginning needlewomen, is "crawfish step". Despite the ease of execution, the neck tied using the “crawfish step” looks very elegant. More experienced craftswomen can choose an original combination of the “single crochet” and “picot” elements; the main thing is to strictly follow the pattern and be careful while knitting.
Gate finishing technologies using "shells" Quite simple, but requires care. In the first row, single crochets alternate with air loops, and in the second row, double crochets are inserted into the free loops, and unique decorative elements are obtained, shaped like sea shells.Beautiful crochet neckline: diagrams and practical recommendations with diagrams and videos
In order for the border of a knitted product to look beautiful and emphasize the texture of the knitted fabric, it is necessary to take a responsible approach to choosing the method of finishing the neck.
When choosing a design method, you need to consider the following factors:

Also, the craftswoman must adequately assess her level of crocheting skills. Beginner knitters are advised to choose the simplest neck design patterns. Experienced craftswomen can choose a more complex option, and can also improvise based on ready-made patterns.
Attention. The neckline and armholes of the product must be designed in the same style. If the neckline and armholes are designed differently, it will immediately catch the eye and the finished product will look tacky.
 If a novice needlewoman is not very good at crocheting, you can trim the neckline and armholes decorative braid. This finishing option will look good on children's clothing. In any case, before you start finishing the neck of a knitted product, you need to practice different tying methods and choose the most convenient one.
A knitted product with a neckline decorated using crochet immediately takes on a finished and very impressive look. The more ways a novice craftswoman tries to finish a neckline, the more likely it is that she will find her own signature method for decorating the finished garment. Decorating a neckline using crochet requires a creative approach to knitting and a developed artistic taste. The main thing is to successfully combine the neck design with the overall appearance of the product.
Crochet neck design (patterns)


Faced with the need to decorate the edge of a product, a knitter may encounter several problems: the binding tightens the edge or vice versa, it looks like a “skirt”, there is no way to carefully sew the finished border to the edge, it is not possible to beautifully tie the decor to the knitted fabrics.
It should be noted that such a task requires patience and compliance with several rules. This article contains a definition of what edge tying is with a description and general principles.
How to finish the edge of a knitted item
Of course, we are talking about the design of hand-knitted canvases. Binding is required to ensure that necklines, open armholes, cuffs and hems of garments look their best.
The first row in such cases should always include only single crochets (SC). The following proportions should be taken into account:
- The height of one row of fabric consisting of StBN is equal to one StBN of the strapping.
- The height of the row, which is connected with double crochets (dc), is equal to two dc of the binding.
However, when processing fabrics consisting only of StN, you should be careful so that the binding does not turn out to be too wide and stretched. Sometimes it helps to alternate between two sc and one sc (instead of working two sc in each stitch).
Binding of woven fabrics
Many craftswomen are attracted to such a scheme with a description of a simple openwork border presented below. It is suitable for processing towels, napkins, tablecloths, pillows and other items:

How to work with the scheme
To decorate the corners, you will need an unusual crochet edge. The diagrams describing straight patterns given below are only suitable for straight sections.
To or the bottom edge of the shelf, you need a corner pattern. With some experience, the craftswoman can independently create a suitable pattern from the material that is at hand.

This may be required by tying the edges. Schemes with descriptions rarely include corner panels, but you can get out of the situation as follows:
- Calculate the strapping so that the angle falls between the repeats or the center of the repeat.
- Starting from the first row of the binding, triple the post at the corner. That is, from one stbn you need to knit three.
- As the decorative trim increases in height, make the corner repeat similar to the other elements. The main thing is that they are equal in size.
There is another way to crochet an edge. Schemes describing only wide patterns can be made using this method: the strapping strips are cut at an angle of 45 degrees and sewn together. This method is only suitable for creating right angles.
How the harness is fixed
Crocheting the edges tied to the product is considered optimal. Diagrams describing almost any pattern are suitable for this type of work. A convenient factor here is that you do not need to calculate the length of the first row, therefore, the probability of error is lower.
They also often resort to sewing on a separately knit border. This method takes more time, but the problem of tight or too loose fabric disappears. You can sew it by hand or on a sewing machine, the main thing is that the product looks neat.
Knitted items will have a finished look and look even more beautiful if its edges are decorated with decorative binding. Edge binding, which is done with crochet, is used to beautifully design necklines, armholes, collars, jacket sides, cuffs, and the bottom of the product. In order to strengthen and weight ruffles and flounces, edge binding is also used. In this article, to help knitters, we have selected patterns for decorating borders of various types of products.
Be original! Use different patterns to achieve the most amazing results in your projects!
Trying to use the Rachy step in crocheting the edge
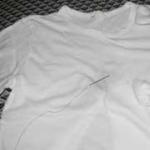
The most popular of the harnesses is the “crawfish step” pattern. In the photo below you see what the edge of the product looks like, decorated with this binding.

This crocheting of the edge of the product is done from left to right. Insert the hook into the outermost loop of the previous row, grab a new thread and pull out the loop. Next we knit 1 air lifting loop. Then we insert the hook into the loop that is to the right of it, grab the thread and pull out a new loop. Now there are 2 loops on the hook, as if twisted together. We grab the thread again and knit these two loops together. Then we repeat the same steps again. More details in the video tutorial.
In boutiques we are so often impressed by the lace dresses made from thin threads in the windows! But few people know that such dresses, and even better, can be crocheted in one or two evenings even by an inexperienced craftswoman!
Openwork binding for beginner craftswomen using patterns
Towels and handkerchiefs, the edges of which are crocheted by yourself, look very beautiful and original. For this design of the edges of the product, openwork crocheting of the edge is used (diagram below).

Description of the sequence of performing openwork binding.
From * to * - repetition of the motive.
1 row. Knit all the loops with a b/n stitch.
2nd row. 3 vp rise, * s/n, chain of 2 vp, s/n, chain of 7 vp, skip 1 loop of the previous row. Along the corners of the product to be tied, between double crochets, knit a chain of 13 chain stitches. The last chain of 7 v.p. connect to the first s/n.
3rd row. *1 tbsp. b/n knit in a chain of 2 loops of the previous row, chain of 4 vp, art. b/n in the middle of a chain of 7 vp, a chain of 4 vp* In the corners, knit in the middle of a chain of 13 vp. 2 tbsp. b/n. Between the non-woven posts in the corners, knit 3 chains of 5 loops.
4 row. Knit as row 2.
5 row. From * to * knit as row 3. In the corners knit 3 chains of 6 chains each.
6th row. From * to * knit as row 2. In the corners between the double crochets, knit a chain of 15 chain stitches.
7th row. From * to * knit as row 3. In the corners - 3 chains of 7 chains each.
8 row. 3 v.p. rise, * s/n, chain of 2 ch, * In the corners between double crochets, knit a chain of 17 ch.
9 row. Chains of 8 v.p. knit like this: 4 tbsp, picot, 4 tbsp, picot, 3 tbsp, picot, 3 tbsp. b/n.
You can see the result you should get in the photo.

We create our own stylish decoration for a shawl
is a piece of women’s wardrobe that is loved, honored and passed on from generation to generation. She is able to decorate and complement a woman’s outfit. Shawls decorated with arched air loops look great. Even a novice craftswoman can knit this type of binding. In the photo you can see the binding diagram and a photograph of the shawl itself.


The highlight of the shawl can be a fringe made of long threads. But this is a matter of your taste.
A simple and convenient cap with a detailed description of the process
They look more fun and original if their lower edge is decorated with a type of binding such as scallops. Looking at the following photos, you will be convinced that festoons add special charm and attractiveness to women's hats.


Decorating the edge of a hat in the form of festoons is not at all difficult. We bring to your attention a variant of such binding “Lacy Scallops”.
Knitting sequence for beginners in needlework
Cast on a number of stitches that are a multiple of 6. Knit in the round.
1 row. Columns b/n.
2nd row. *1 tbsp. b/n, skip 2 base loops, 4 s/n in the next loop of the previous row (knit 2 ch between the columns), skip 2 base loops.*
Continue the pattern from * to *. Finish the row with a connecting loop.


This concludes our master class for beginners, and you can find video tutorials below. We wish you success and inspiration.
Video lessons for beginners
Neck:
As you can see, not everything is so complicated, the main thing is to approach the knitting process with diligence. In addition, step-by-step master classes can come to your aid, which tell in detail and show what, how and where to knit, for example, our article. Be patient and forward to the feat!
We also recommend
 New Year's goat costume for children
 DIY crafts for the New Year for school, kindergarten: diagrams, ideas, photos
 Methodological development in the German language on the topic "fashion"
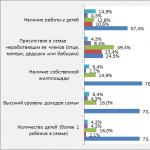 Material well-being Material need and material well-being
 Crocheting the edge: “crawfish step”, “picot” and “openwork” patterns
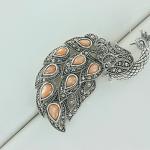 Magical and healing properties of marcasite Who is suitable according to their zodiac sign: compatibility in astrology