DIY flowers in a pot. Decorating an apartment and garden - do-it-yourself flower pots
Elena Mamchich
16:15 4.02.2017
There is not much time left before the start of calendar spring. This means that very soon the time will come to plant seeds and flower bulbs. So let's quickly review our stocks of old flowerpots, put them in order and decorate them with unusual decor.
Paper for decorating a flower pot
The easiest way to make a beautiful flowerpot out of an old unsightly plastic one is to wrap it beautiful paper and tie with ribbon or jute thread.
Textile decor of flower pots
Beautiful and simple You can decorate a flowerpot using jute thread. For example, you can wrap the thread around the flowerpot several times.

Or wrap the flowerpot completely. If desired the thread can be dyed. This option for decorating a flower pot is suitable for lovers of eco-style.

For those who love to sew, A suitable option for decorating a flower pot, as in the photo below.

Original idea decorate a flower pot with white lace different shapes and with different patterns.

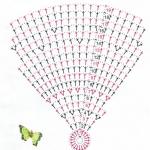
Knitted decor very popular now. And, of course, flower pots are no exception!

Decoupage flower pots
This option for decorating flower pots is a very common option. If you choose a decoupage napkin with a floral pattern, you will end up with a very cute flowerpot in Provencal style.

Decorating a flower pot using mosaics
This option will require a lot of patience from you, but it's worth it! For flowerpot decoration you can use old broken plates or cups, beads and even sea pebbles.

Flowerpot decor using natural materials
Just look how original and simple you can decorate a flower pot using simple twigs and glue!

Marine style lovers in the interior they will appreciate this original idea flower pot decoration.

Decorating a flower pot using paint
This method is perhaps the most common of all. Draw any patterns, flowers or family coat of arms. Anything that fits to decorate your interior.

If you are not confident in your artistic talent, then use stencils or stamps.

Using masking tape flower pots can be decorated with geometric patterns, which are very popular now.

To decorate flower pots it is necessary involve your children! You can leave handprints, foot prints on the flowerpot, or use your fingerprints to draw flowers and butterflies.

Decorate the pot with inscriptions and patterns
A regular flowerpot can be paint with chalkboard paint, so that you can write names or draw with chalk.

Paint the flowerpot with white paint and then using a black marker apply a pattern or write a wish, the name of a flower or a motto.


Find more ideas in each issue of the magazine
The ability to make something original and new out of unnecessary or ordinary things is very valuable when decorating a home. Create with your own hands from scrap materials useful thing is one of the most common hobbies, and hand made never loses its popularity.
You can make any thing yourself - from decorative jewelry to furniture. Here we will look at decorating a flower pot with our own hands, which provides enormous scope for creativity. Products created by craftsmen are suitable for both rural houses and country gardens, as well as modern interior apartments.

You can consider decorating a flower pot from a ready-made base in the form of the most ordinary plastic or earthenware, or you can use as a base things that at first glance seem unsuitable for this - tin cans, glass vessels, cardboard, pebbles, various finishing materials and many other items.
For lovers of handicrafts, decorating a flower pot with your own hands will not cause any special problems. Moreover, for its production they can use the most different materials. It is only important that appearance The product was combined with the decoration of an apartment or house. Vases, pots, containers for house plants can be made from everything you find at hand.

Used items
Every home probably has used aluminum cans, cans of paint and other liquids, etc. Their appearance leaves much to be desired, but the right decor will help create unique and interesting things. For example, fairly tall cans of canned pineapples or other fruits, soups, canned food for pets and decorative paints can simply be washed, the labels carefully removed and used as flower pots. Their silvery surface looks interesting in a high-tech or minimalist style.

If the jars have become bent during use or look unsightly, you can additionally decorate them with fabric, fur, pebbles or shells from walnuts. Directly about decorating flower pots we will talk a little lower. Or you can just paint it.

Everyone definitely has plastic bottles. modern man. You shouldn’t throw them away right away, because you can create a lot of useful things from them. For example, by leaving the necks of bottles, you can make beautiful flower pots for climbing plants. To use the base of the bottle as a flower pot, you need to give it strength and decorate it in an interesting way.

Fashionable in Lately became the use old shoes as flower pots. It could be rubber boots, and summer rubber slippers. Most often they are used in gardens and dachas; in modern apartments they are not so appropriate.

An old leaky bucket makes a great place for a large fern or other massive plant. To do this, the handles of the bucket are removed, the base is decorated and turned into a designer masterpiece.

The design of a flower pot and the process of creating it from old records seems interesting. The vinyl record heats up and easily changes its shape. If you give it the shape of a pot or bowl, you get very stylish decorative items.
You can glue wooden or plastic clothespins together to form a plant pot, or use broken children's toys. Pots are also woven from rolled newspapers or magazine pages. It all depends only on your imagination, free time and desire.

From old bags, lampshades, boxes, plastic packaging, watering cans or other equipment, you can also create unique pots, vases or containers for indoor plants. Even from used rubber tires you can create an interesting flower pot, however, you cannot do this without brute male power.
Construction materials
Boards, cardboard, leftover decorative tiles, broken bricks, chicken wire or various barrels can also be used to make excellent stands or pots for plants.
From thick or corrugated cardboard you can create completely different pots or flowerpots for indoor and garden plants. These can be ordinary round versions of pots, or they can be elongated rectangular or diamond-shaped models. A scan of a similar model can be found at folk craftsmen, or you can come up with it yourself, remembering technology or creativity lessons at school.

It is quite simple to design a flower pot from boards or wooden blocks. Having cut out the base, you can easily use nails or glue to create a real flowerpot for large indoor plants. Moreover, products made from rough, untreated boards are more suitable for streets, while processed wood looks great in an apartment. It can be additionally decorated with burlap, ribbons and other decorative details.

Leftover decorative ceramic tiles can be used to create a small square flower pot by simply gluing the pieces together. Mirror tiles and mosaic options look interesting.
Wire mesh can be used as flowerpots, large industrial barrels are suitable for installations with large garden plants, and they don’t even need to be particularly decorated: rough stands with delicate garden plants look harmonious.

Made from natural material
The most common for making flower pots is considered natural material. It could be pebbles, stumps, shells from various nuts, pine cones, etc.
From pebbles - flat pebbles of a streamlined shape - you can easily glue together an entire decorative composition, in which there is also room for a houseplant. You can also use cones or nut shells.

From an ordinary stump or log, which is often used as seating in the garden, you can cut out the inside and plant a plant there. It looks very stylish in the garden.
You can also create an interesting pot for indoor plants from vines or various twigs, but products made from vines are not so easy to make.

It’s interesting to decorate a flower pot with your own hands from half a coconut shell. They make excellent flowerpots for small plants that will fit perfectly into an eco-style interior.
Decorating the ordinary
Now let's consider the question of how to decorate a flower pot, what techniques can be used and what materials to use. Moreover, you can use the most ordinary store-bought plastic or clay pots, or you can decorate what was obtained as a result of the skillful use of used things.

One of the common ways to decorate a flower pot is to paste the product. various materials. These could be shells, beautiful pebbles, glass shards, birch bark, coffee beans, cereals, nut shells or cones, buttons or beads. With their help, you can create a certain picture on the surface of the pot using different textures or colors.

A special decoration is considered to be eggshells, which are applied to the surface using the crackle technique. The shells of boiled eggs are first cleaned, degreased in a solution of baking soda, and then dried. Then PVA glue is applied to the surface of the pot, and the shell is placed on top with the convex side up. Cover the top of the shell with a napkin or paper and press to form cracks. To keep the shell parts further apart, you can push them apart with a toothpick. The pattern is covered with ink on top, and after it penetrates into the cracks, it is washed off from the shell itself with a damp cloth. Ink remains inside the cracks, and the shell has its original appearance. All this splendor can be varnished on top.

Flowers can decorate any interior, complementing it with bright touches of fresh rich colors. Fresh flowers in originally decorated pots can become a bright accent of the interior, highlighting the design of a room or area. Decorating flower pots with your own hands is an activity that allows you to transform ordinary containers for plants into original decorative elements.
Clay pots are an ideal basis for using almost any hand-made technique, the choice of which can only be limited by the imagination and desire of the master. Decorating a flower pot with your own hands will not only give a second life to an old product, but will once again allow you to plunge into an exciting creative process.
As you know, plants feel great in untreated clay pots: the porosity of the clay allows the root system to receive the necessary amount of air
Unusual uses for eggshells
Eggshells are a popular, affordable and easy-to-use material for decorating various items. To create marvelous patterns, boiled egg shells, acrylic paints, construction glue or PVA, varnish and brushes are used. To decorate flower pots, you can use either traditional white shells or create unusual patterns in various shades of the color palette.
The work begins with a shell, from which the film on the inside has first been removed, then degreased in a soda solution, washed and thoroughly dried. Natural beige shell motifs white flowers will look spectacular on a dark base and vice versa. A light background can be created by applying a layer of contrasting dark tones of acrylic paint.

Decorating pots eggshell allows you to create a crackle effect, which is an elegant pattern of tiny cracks that looks like an antique effect
The technique of decorating flower pots is quite simple. . A layer of glue is applied to a small area of the surface and a solid piece of shell is applied with the convex side outward, gently pressed with your fingers for a tight fit. To give the unusual mosaic the required shape, you can use a pointed sword or awl. Large gaps that arise between large mosaic elements can be easily filled with individual small pieces. The surface decorated with a pattern is primed with PVA glue and left until completely dry.
The decor of flower pots in the craquelure style is completed by applying a layer of paint, which can act as either the main background of the product or become a colored basis for further decorating the item. When painting the shell, it should be taken into account that even after drying, the mosaic is quite mobile. The finished product is opened with a layer of varnish.
Shells for creating sea motifs
You can also use sea pebbles and glass, buttons and even small coins to decorate the pot. Combining materials will allow the author to significantly expand the field of imagination. Decorating flower pots with shells and other small objects is very similar in technique to decorating items with eggshells.

Shells are a universal material for creating marine-style flowerpots. Their ribbed surface effectively plays with tints under a layer of paint of mother-of-pearl colors.
Before use, the shells should also be washed and degreased. They are attached to the surface of the pot using high-quality construction glue, which has sufficient viscosity and dries quite quickly. The glue is applied with a brush both to the surface of the attached side of the shell and to the surface area of the pot. Each shell is fixed to the outside of the pot for a few seconds by pressing with a finger. The finished product can be simply varnished, or pre-painted with acrylic paints.
Also, instead of shells, you can use ordinary pebbles.
Tying a pot with twine
Decorating twine flower pots is a fairly simple way to transform an old product, allowing you to create interior elements in an ethno-style. The material for decoration can be either thick rope, thin rope or even ordinary wool thread. Decorating small pots with coarse thick rope woven from hemp or tow looks unusual.

The pot can be braided, tied, or simply applied to its surface with a ready-made thread pattern. A piquant highlight can be a combination of decor from coarse threads with bunches of dry grass
The technique of applying and securing thread decor is also quite simple. To give an old flower pot a new look, you can make several successive turns of twine tightly adjacent to each other. To prevent the decoration from “moving apart” over time and losing its attractiveness, the coils should be made with some tension and secured with secret knots and glue. The standard pot wrapping can be supplemented by overlaying patterns and combined with a braided wrapping of the product.
Other popular decor ideas
In skillful hands, any thing that is unnecessarily stored in bins can get another start in life. So old laces from sweaters and jackets, handles from paper bags can sparkle with new colors, becoming original decoration a familiar piece of furniture. Small objects are easily attached to the surface of the pot using hot glue.

A composition of multi-colored pebbles with a thin cord neatly placed between them looks very unusual.

This cute pot is decorated with old bolts, nuts and other small parts and finished with a layer of bronze paint and varnish.
Decorating pots with twine is successfully combined with decorating products with fabric, allowing you to create unique interior items. Both bright pieces of fabric and regular burlap are suitable for this purpose. Natural twine looks impressive on a motley checkered fabric. gray shade, on the burlap there is a bright-colored braid.
Ready-made satin and organza ribbons are sold in hardware stores. Variegated ribbons can be braided into strands and braids and then simply glued to the outside of the pot. Picturesquely intertwined multi-colored ribbons, decorated with all kinds of rhinestones and beads, will give the product a playful mood. Such a bright and cheerful flower pot will be a worthy decoration for any interior.

If you want to create a bright flower pot, the appearance of which evokes only positive emotions, you can use decorated ribbons and all kinds of beads in the design.

In this simple way you can make antique pots so that they look “like in Ancient Rome”

Bottle caps, paper clips, cotton balls, bundles of fishing line and even old wooden clothespins can also be used as decoration materials for flower pots.
Video master classes from designers
Decorating flower pots with your own hands is a great way to create exclusive items for your home and summer cottage, which will delight the whole family with their appearance.
To this day, floriculture remains a favorite hobby for many happy owners of personal plots. However, living in a city apartment is not an obstacle to growing flowers, and many housewives set up small greenhouses on window sills and loggias protected from the winter cold, in which you can even find exotic representatives of the flower world.
Flower pots have been, are and will be an integral attribute of home floriculture. In the era of developed capitalism, stores can offer customers a wide range of similar product.

However, despite all the diversity, many people wonder how to make a flower pot with their own hands, thereby giving it a zest and individual flavor.

Handmade flower pots
The material for making a flower pot can be anything that can be shaped into a bowl. These can be natural (clay and wood), construction (gypsum and cement) or any available materials, you just need to look around and show imagination and ingenuity.

Below are described simple techniques works with the most common source materials and photos of handmade flower pots.


Classic clay pots
To make it you will need: water, clay and a piece of fabric or newspaper. Add water to the clay and stir until it reaches the consistency of a hard dough, the main thing is that the resulting mass is plastic, homogeneous, without bubbles and does not stick to your hands.

The clay layer is rolled out and a bottom in the shape of a circle is cut out of it. The next step is making the walls and then attaching them to the bottom of the future pot. Bundles or twines with a diameter of 0.5 cm are used as a staple.

After sculpting is completed, the finished product should be wrapped in cloth or newspaper and left to dry. After complete drying, double firing is carried out, which removes remaining moisture and gives the product the necessary strength.

The firing process should be carried out at a temperature of +300 degrees for three hours.

Cement concrete pots
Cement pots are used to create outdoor flower arrangements. To make them, sand, cement and water are used in the classic proportions of 2:1:0.5. To give strength to the finished product, it is recommended to use a reinforced frame, which is advisable when making large-scale flowerpots.


Also, for pouring you will need a form, which depends on the size and can be made from a plastic bottle for small pots, and wooden formwork for massive products. If you have no experience working with concrete, then at first it is better to limit yourself to small accessories.


The shape for a small pot can be a five-liter plastic bottle with the neck cut off. The finished cement mortar is poured into the prepared mold, and an oiled two-liter plastic bottle is immersed in the center.

After the solution has completely dried, which usually occurs within two days, the plastic elements are removed. To make the surfaces smooth, a sanding machine with a felt wheel is used.

Wooden pots
They look very authentic and original, and the wood is easy to process and repair. To work you will need a drill, hammer, chisel, jigsaw or saw, chipboard and a small log.

Excess parts are removed from the log. Then, using a drill, a series of holes are drilled at the same distance from the walls. Using a hammer and chisel, the holes are widened and the core is removed from the log.

A pot with thick walls is formed from the resulting workpiece. To prevent the tree from interacting with moisture, it is better to place a plastic pot inside and plant flowers in it.


Decorating flower pots
To give the finished product an individual look, you can decorate the flower pot with various decorative materials. For example, clay can be painted with acrylic paints. This kind of work can be entrusted to children, who will happily make cute drawings.


A plastic flower pot will look very unusual after decorating it with nail polish. To do this, several bottles of varnish are poured into a bucket of water, then the pots are immersed there

The varnish diluted in water covers the surface with a thin film, resulting in an original and authentic pattern.

Compositions from flower pots
Pots can be used not only as containers for flowers. You can use them to make interesting and functional crafts and compositions.

An excellent example flower arrangement there might be a street fountain. To make it, take a large clay pot, which will serve as the base.

Several smaller pots in the shape of a pyramid are installed in it. A closed circulation system with a small miniature pump is installed at the top point. Create the required water pressure and decorate with pebbles and fresh flowers.


Variations of crafts made from pots are limited solely by the imagination of the master. These can be figures of people, animals or architectural structures, such as a picturesque castle, a miniature town or a lonely lighthouse.

You can make colorful flower slides and chandeliers, which are obtained by combining several large and small flower pots into one large vase. The main thing is to completely surrender to the flight of fantasy and not be shy to express your emotions.

Photos of DIY pots


In our homes, they don’t always match the interior of the room, and are often simply plain-looking. Spring is coming and we want to transform our home, put things in order in all corners and come up with something new for comfort in our apartment. Why not start with flower pots, because they are always in plain sight - standing on the windowsills or somewhere near the window. At the same time, we will transplant the plants that are tired over the long winter months into fresh soil and updated pots. First we need to decide what we want to change in appearance their flower pots. Maybe we're tired of their dull brown or grey colour? Then everything is simple: take acrylic paints, a brush and change the color. Do not forget that before you start painting the pot, it must be thoroughly washed, dried and degreased (to do this, wipe the pot with nail polish remover or alcohol with a cotton swab).
It is imperative to pay attention to what material the flower pot is made of. If it is plastic, then before painting the pot, prime the entire surface of the pot with PVA glue, let it dry, and then paint it in desired color acrylic paint. Except acrylic paints, you can use paint from spray cans.

When the paint dries, if you don’t get an even and beautiful layer, paint the pot again and again let the paint dry well. To secure the result, coat the pot with acrylic varnish. Only when the varnish becomes dry, start planting the flower in the pot.

As you can see in the photo above, the pots are not just painted with paint of one tone, but they are painted with designs that can be easily drawn by anyone who can at least hold a brush in their hands. The advantage of painting flower pots with your own hands is that you can come up with any design or pattern and try to bring it to life.

It is quite easy to decorate clay pots, especially those that are not glazed. The surface of the pot is porous, so before painting such a pot also needs to be primed with PVA glue. Once the glue has dried, carefully paint the pot in two coats. When the paint has dried, start painting.

If you wish, you can decorate several flower pots in one theme and use them to transform any room in the house. These are the kind of pots that boys might like.

And girls may like pots with flowers, butterflies (dragonflies) or birds.

If your child already knows how to draw something, try painting flower pots together. You will surely have a useful and interesting time.

Children will surely be delighted with pots with eyes and spouts. They can serve as containers for small toys.

For the kitchen, paint the pot with flowers, berries, teapots or polka dots.

For the bedroom and living room, get creative and draw something that matches the interior of the room.

When inspiration comes, drawings are quickly thought up and immediately brought to life.

Sometimes even the drawings on the pot seem to be not enough for us, but we want to add something else so that the flower pot or pot turns into something extraordinary. Then you need to look at home to see what can be glued to the pot so that it stands out from a number of its fellows. It can be anything: beads, sequins, buttons, plastic and felt flowers and other small decorations. You need to glue it with super glue or glue from a gun.

In a similar way, you can transform your flower pot by completely covering it with shells. Such a pot will well support the marine theme in the room.

Flowerpots and pots decorated with shells can decorate not only a room, but also a balcony, terrace or porch in a garden house.

If the pot turns out well, you should not plant a plant in it that will cover the results of your work with its leaves. Plant in it, for example, cacti that grow slowly and do not hang down.

A ceramic or plastic pot can be covered with pebbles. To attach the pebbles, you can use super glue or glue from a special gun.

Simple plastic pots, after being decorated with pebbles, are transformed beyond recognition.

Have you ever tried using textured plaster to decorate pots? And you try it. Get an interesting result. Apply textured (relief) plaster to the pot and, using a comb or notched trowel, apply any pattern you can imagine to the wet plaster. It is important not to smear the applied pattern, but to carefully dry the pot. In the future, the plaster does not crumble or peel off.

Another noteworthy way to decorate flower pots is by gluing pieces of tree branches. Take thin tree branches (preferably non-resinous ones), garden pliers and prepare wooden “rounds”. Start from the bottom by hot glueing them to the pot and continue until the entire area is filled. Alternate small and large “pieces of wood”. When the glue has dried, coat the pot with acrylic varnish.

And if you don’t want to cut the branches with wire cutters, just put two rubber bands on the pot and carefully push the equally cut branches under them around the entire pot. Then tie the branches together with twine.

Such pots can be decorated with thin branches painted with silver or gold paint and natural or artificial berries.

Many ways to decorate pots have already been invented. Perhaps you will come up with something of your own. Here I also bring to your attention how you can decorate pots with lace. Cut out the lace fragments and glue them to the pot, which is primed with PVA glue. Next, the pot with lace needs to be painted.

To decorate a pot with twine, you will need a spool of twine, PVA glue and a brush. Take the pot and coat the strip with PVA glue. Carefully begin wrapping the twine around the pot. Next, also to the very top of the pot: coat the strip with glue and wind the twine. Then let the pot dry. The twine can even be painted any color with acrylic paint.

If you suddenly want the flower pots to match the colors of the curtains or curtains, then you need to take the fabric from which the curtains are made and make a pattern for the pot. To do this, on a clean piece of paper, “roll” the pot from one edge of the sheet to the other and draw two rounded lines: along the upper and lower edges of the pot. Measure the circumference of the pot at the top and bottom, these dimensions should correspond to the lines you drew. Cut out the pattern and place it on the fabric, securing with needles. By the way, do not forget to leave an extra 1 centimeter at the top and bottom on the pattern so that you can tuck the fabric. Glue the cut fabric onto the pot with PVA glue and decorate it as you wish.

From unnecessary knitted items, sew these “suits” for your pots. They look fresh and beautiful in spring.

You might like the pot simply wrapped in burlap.

The pots in the matting bags look great, somehow it immediately feels like home.

Everything you read above makes sense to do with flower pots if they are still intact, without cracks, and the ceramic ones do not crumble or crumble. And if there is no point in transforming old pots, then take them to the country and make such a funny “potty” company out of them.

Good luck to all!
What and how to make flower pots with your own hands, read
We also recommend
 Fashionable bob haircut options according to face type: choose yours, photo See women's bob haircuts
 Charming and attractive DIY Cockerels!
 Crafts from threads: do-it-yourself magical toys
 Napkins with voluminous crochet butterflies
 Four beautiful DIY hair ties - master classes for fashionistas and their mothers Homemade hair ties
 Sometimes you really need to be supported...