DIY yarn toys. Crafts from threads: do-it-yourself magical toys
Many housewives will not hide the fact that they have impressive reserves of leftover yarn that are gathering dust idle in the closet. All you have to do is take a creative approach to the accumulated goodness to turn it into excellent, hand-made thread crafts.
A variety of techniques will allow you to make interesting decorative objects, original gifts and simple trinkets.

Craft options
Since ancient times, women have been passionate about creating a wide variety of things from threads. However, modern mothers can always buy any toy they like in the store. But the joy of joint creativity is priceless, so you can sometimes find them doing needlework with their children.


What can you make from leftover yarn? For example, decorative elements in the form of vases, lampshades, flowers. Various paintings will look good. Children will be delighted with voluminous toys in the form of fluffy animals.

What will be useful at work?
To understand how to make a craft from threads, you need to have a clear idea of what you will need. It's about the tool and the material.

Each new creation requires a different approach, but the general list will be something like this:
- yarn (wool or cotton, for example, floss);
- needle;
- scissors;
- PVA glue (needed for creating paintings, lampshades);
- glue gun (useful for creating animals);
- sheet of cardboard;
- wire.

Furry animals
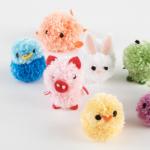
Wool yarn is an excellent material for creating voluminous crafts. It makes furry animals, fluffy yellow chickens and much more.

The toys are just a simple pom-pom, so it all comes down to the ability to create it. Below we will try to provide detailed instructions on how to make a craft from threads.

Making pompoms is quite simple. First, you should cut out circles from cardboard, the diameter of which will determine the size of future pompoms. A hole is made in the middle of the resulting blanks. After which the two circles are added to each other.

Next, armed with a needle and thread, you need to tightly wrap the cardboard circles by threading the thread through the hole in the center. The number of turns determines the splendor of the future pompom - the more, the better.

When it is no longer possible to wind, the free end of the thread is cut off, and the thread blank is cut along the entire circumference. It is convenient to use a blade for these purposes.


By spreading the cardboard to the sides, the product is tightly tied in the center. The final stage involves removing the cardboard elements, after which the finished pompom is straightened. Protruding ends and irregularities are removed using scissors.

Pompoms of different sizes will create different body parts of an animal or bird. If you use yellow material, you can create a cute chicken by gluing two pompoms together with hot glue using a gun.

The finishing touch will be the design of the beak and eye. In a similar way, you can make a dog, cat, frog and much more.

Creating paintings
If you have an impressive amount of thread scraps of different colors in your bins, then you can create a beautiful picture from them.

To work you will need cardboard, PVA glue and scissors. Drawing templates can be found on the Internet or prepared yourself. The image should be simple and have large elements.


First, the outline of the future image is drawn on the cardboard. If you have a template, you can paste it directly onto the cardboard. Next, the yarn of the desired color is cut into small pieces using scissors.

For convenience, the finished cuts are placed in separate boxes. Those parts of the future painting where one of the colors will be used are generously smeared with glue, after which they are sprinkled with chopped yarn.

Gently pressing it to the base, achieve gluing; the excess can be blown off or shaken off. The remaining work is done in the same way. Having filled the entire picture with yarn, it is framed.

Interesting options for thread crafts are obtained if the theme of the paintings is simple landscapes and flowers.

Openwork crafts
Below will be presented another master class on crafts made from threads. We're talking about an airy lampshade. To make it you will need:
- balloon;
- threads of small thickness (preferably cotton);
- PVA glue;
- scissors.


First you need to inflate and tie the balloon tightly. Then its surface is generously lubricated with glue, after which the ball is wrapped with thread. The main thing is that at the end there are no large clearings left on the surface.

The workpiece is left to dry until the next day. Then the ball is deflated and carefully removed from the thread sphere. Next you need to make a hole to place the cartridge inside. Energy-saving light bulbs are optimal because they heat up less than conventional incandescent light bulbs.

Openwork balls are suitable for creating baskets, toys and other decorative elements. You can wrap yarn around a vase, giving it an original appearance.

Decorative flowers
Floss can make very beautiful flowers. The principle of operation is similar to making an openwork lampshade or vase. If there is no suitable container on which to wind the threads, you can use regular crumpled paper. For better results, it is useful to wrap it with tape.

The blanks are wrapped halfway so that petals can be cut out from the resulting cup. To prevent fraying of the ends, a piece of thread is glued to them. The wire makes a good flower stem if you wrap it with yarn of the appropriate color.

When the individual elements of the future flower are ready, they need to be connected and fixed with glue. Thanks to the combination of different sizes and shades you can get excellent bouquets.

Photos of thread crafts inspire many with their unusualness and beauty. Anyone can join the ranks of handicraft masters, especially since the hobby is interesting and does not require large financial expenditures.

Creative work with threads and yarn will allow you to escape from the everyday hustle and bustle and give you a lot of pleasant time with your family.

Photos of crafts made from threads


Sewing thread is found in every home, even the most notorious bachelor has it in his cookie box. You can ask your grandmother if she has a braid of floss or a bag of yarn lying around on the mezzanine. Grandma will be happy to give them to you. In a needlewoman’s workshop, there are sometimes even too many of these leftovers. Recycling illiquid items is the principle of our handmade knitting thread crafts.
Threads can be new or used. If you got your grandfather's old multi-colored sweater, this is happiness for the needlewoman. But you need to work with him first.
Preparing threads for work
Unravel the sweater by wrapping each color of thread into a separate ball. If you use them right now, nothing good will come of it, because for now the loose thread resembles a cardiogram of a healthy person.
To straighten it out, you need to arrange a Russian steam bath for her. It's good if you have a double boiler. Then, instead of manti, place your balls in it and cook for half an hour until ready. But even without a double boiler, you can use a simple colander or a metal sieve, holding the threads over boiling water in a pan. After the bath, the balls should be dried well. This can be done even on a battery. As long as there is no finished product, we are not afraid of deformation or shrinkage of the thread.
Making toys from pompoms
 Crafts made from woolen threads for children can bring a lot of joy, requiring a minimum investment of money and time. In order for the child to get more joy from recognizing the figure, you need to choose an animal or bird that the child knows well. In this case there will be chicken.
To create crafts from knitting threads with your own hands, you must first learn how to make pom-poms.
Classic way
It is too labor-intensive and inconvenient; it is unlikely that it will be possible to involve a child in the manufacturing process. The procedure is as follows:

Another method described below in the DIY thread crafts master class is much better suited. Children of any age can take part in making a pompom, because it does not pose any danger.
Modern simplified method
We will need to find or make a template in the shape of the letter “P” with the distance between the “legs” equal to the diameter of the desired pompom. You can make it out of stiff cardboard, find a metal frame in your dad's garage, or use a picture frame, since they come in all sorts of sizes. An ordinary fork is great for small pumps. The main condition is that there must be a gap between the two horizontal edges.
To make a pom pom, follow this plan:

From a ball of thread you can easily make an egg from which our miracle chicken will hatch.
Now that you have learned how to make thread balls, you can start creating a toy out of thread with your own hands.
Master class on creating a chicken
In addition to the pompom, we will need:

Pompoms are the most waste-free method for recycling threads..
Crafts made from cotton threads
From soft and fluffy toys, you can move on to crafts made from threads and glue with your own hands. Here we just need:
- Grandma's stash of floss or bobbin thread. Threads should be cotton, hygroscopic.
- The cheapest inflatable ball.
- PVA glue.
The principle of making unique openwork products is very simple - take a mold and make a cast using it. Only our cast will not be monumental and plaster, but airy and threadlike.
Candy bowl as a gift for grandma
She can stand in the center of her table so that you can always treat yourself to some candy.

And don’t forget to fill the vase with the most delicious sweets before giving it to grandma. Then she will immediately run to put the kettle on. And then, with genuine delight, he will recognize his threads, which, most likely, would continue to gather dust in the closet. But your skillful hands came to the rescue.
Attention, TODAY only!
On the eve of a children's or main holiday, families and loving mothers strive to decorate their homes with interesting decorations. Some varieties are suitable for the main decor of the created interior. Particularly popular are toys made from threads, which are made using numerous techniques - everyone can express themselves. Next, popular and simple techniques for making toys from threads and their use in interior decor will be discussed in detail.
Knitted toys
Knitted toys are not easy to make, but they go nicely with the interior of the house. So, you can knit or crochet toys. The disadvantage of the presented idea is the inability to cope with making a toy if you have never held knitting needles or a hook in your hands before.
The following options for knitting toys from threads are distinguished:
- Knitted pillow toys. Often these are standard pillows knitted with stockinette or garter stitch, followed by decoration. For example, if cats are being formed, you need to knit a square or rectangle, fill it with cotton wool and other types of filler, and finally embroider a mustache on the “muzzle”, tie up two corners, forming ears.
- Crochet toys for home theater. Toys made from threads can be universal if they are made in a small size with a special hole inside (crocheted in the shape of a cone). Such products are attractively placed on the shelf and are used when children play when they are strung on their fingers.
- Crochet toys. These wonderful products are made for children or as decorative items. Various “stands”, coin holders, knitted figurines, made in a color suitable for the interior, can complement the entire design of the room.
Advice
You should not take on complex products if you do not have knitting skills. Just pay attention to anti-stress pillows, which are crocheted or knitted in the shape of a toy and filled with special plastic balls. Make these toys in the color of the room’s textiles and place them in the corners of the sofa.
From threads for washcloths
Enterprising mothers use threads for knitting washcloths to knit toys to attract the child to water procedures. Not all kids like to take a bath, much less wash themselves with washcloths, even if they are soft and designed specifically for children.
Mothers began to lure children by knitting funny toys in the following forms:
- hedgehogs;
- owls;
- strawberries, watermelons;
- snowmen;
- bees;
- flowers;
- cartoon characters - Minions or Smeshariki.
The product can be made in two versions - on a loop in the form of standard washcloths, or as a mitten. In the first case, it is convenient to use knitted fruits and vegetables, hedgehogs, flowers and Smeshariki. The sun with rays and any animal will look interesting in the shape of a mitten.
From woolen threads
Options for crafts can be represented by the following list:
- Pompom toys– the most common option for interior decoration. Pompoms are used to assemble compositions, make toys for children or children's mobiles for babies.
- – embroidery hoops and woolen threads are used here. With proper winding using different colors of thread, you can recreate a dream catcher or just a craft for a child - a sun, a heart, a cut fruit, etc.
- Compositions from homemade brushes– often special voluminous tassels are made from woolen thread (winding yarn with a cut in one side and pulling the base on the other side). With a few twists of thread you can make a snake, a caterpillar, a bird with a head and tail, and even a doll.
Dreamcatcher “Solar Wind”
- Similar homemade brushes are often used to make amulets of various shapes. For example, a doll amulet in a house can protect those living in it from the evil eye and damage. To make it, simply fold the thread in several layers and by pulling the threads in a certain way in the appropriate areas, form a figure - separate the head, torso, arms and leave the doll a skirt (a master class of the technique is described below).
- Animal figures and dolls are often made from woolen threads using the felting technique.. The technology for processing threads is complex, so only people who know the features of threads and the rules of work resort to this.
Children and adults often experience an allergic reaction to wool, so the choice of thread should be taken with caution. In addition, products made from wool collect more dust, as a result of which it is necessary to constantly wash the crafts, especially if they are used by children everywhere in their games.
Making decorations for the Christmas tree
2-3 months before the New Year, families think about the principle and idea of celebration. Don’t forget about decorations that you can easily make with your own hands from threads.
In this matter, there are three manufacturing techniques:
- “Dense” ball for the Christmas tree– to make it, you need to take a standard Christmas tree ball (it’s better if it’s sprinkled with sparkles or has a textured surface), and wrap it with glue and thread. Both melange yarn and plain yarn with stringed beads or seed beads are suitable for decoration.
- "Balloon- This is another way of making Christmas tree decorations from threads. Here you need to take a balloon, inflate it to a small size and wrap it with thread in a chaotic manner (the thread is first passed through PVA glue). Next, the workpiece is dried, the ball is carefully pierced and deflated - what remains is a “balloon”.
- Figures and elements made of thread– using thread, glue and a rubber mat (or a piece of polyethylene) you can make any crafts and shapes for the Christmas tree. To do this, pour a small amount of PVA glue onto the base and distribute it evenly. Next, you need to lay out the thread in a chaotic order, but in the shape of the object being embodied (star, Christmas tree, mitten, snowman, etc.). After the glue and threads have dried, you can remove the product from the base and hang it on the Christmas tree.
These simple toys are easy to make with children, so spend your free time usefully and interestingly.
From corks and threads
Toys made from corks and threads are quite interesting. The technique involves the correct placement of plugs, as well as the use of additional wire. Afterwards, they begin to wrap and wind the thread in a certain sequence and angle, in order to obtain as a result a figure, which is then further decorated.
A master class with step-by-step photos can be presented in the following form using the example of making a bunny:
- It is necessary to prepare a wine cork and wire in a small amount, but dense with the property of being easy to take shape.
- You need to make 6 pieces of wire of such length that you can fold it in half - you will need it for the paws and ears.
- Next, the wires are inserted into the appropriate places in the cork - two at the bottom for the legs, two on the sides and the same number at the top for the ears. The loops remain on the outside when folded.
- The frame for the rabbit is ready. Next, using thread and glue, they form a toy, wrapping all the parts separately - first wrap the wire parts, and then move on to the cork.
When finishing the work, be sure to hide the threads under the winding and, if desired, glue them. You need to glue the eyes, nose, and draw a mouth to the muzzle area.
Making an octopus
DIY toys are always carefully stored and used by children, so you can ask your child to make their own octopus from threads. To make it you will need wool or acrylic thread of a bright shade and scissors.
The manufacturing sequence is as follows:
- You need to fold the thread in several layers to a length of 50-60 cm. To make the octopus large, you may need more than one skein of yarn.
- Next, the threads are cut at both ends - you get separate pieces of thread.
- You need to step back about 25 cm from the top edge and tie the “stack” of threads with a rope or a beautiful ribbon.
- Then step back from the tied area about 17 cm and tie the threads again - you should get a ball of thread with “hair” on the head and still unformed legs below.
- The lower ends need to be distributed evenly over 7-8 tentacles. To form each braid, braid it, first distributing a separate “stack” of threads into three parts. Tie with ribbon.
- Braid the remaining tentacles in the same way.
- Glue the eyes, nose, and draw a smile onto the octopus's face.
Advice
To make the octopus more colorful and vibrant, use hair ties to tie it up. The more colors, the brighter the toy - it is more interesting for a child to play with it.
Conclusion
Toys made from threads are something new, unknown to children, since modern products no longer evoke the expected delight in children. To please your child, you don’t have to be a professional and study numerous techniques in needlework. It is enough to approach the matter with enthusiasm and start small - weaving or winding. Delight your children with unusual things to make them proud of you.

Toys are always fun and positive, and especially when they are fluffy, soft and so funny! Many women are involved in needlework, so working with yarn will be a pleasant and familiar experience for them. Even primary school children can be taught to make toys from pompoms with their own hands.


Master class on making pompoms
We will need:
- thin but dense cardboard;
- yarn;
- compass;
- scissors;
- "Gypsy" needle.
Work order
- Decide what diameter D the ball should be. Now you need to make a drawing. We are doing a master class on calculating diameters. Draw a circle with a diameter of approximately 3 cm. We will push small balls into this hole. Add 3 cm and the diameter of the ball and divide in half (3 + D)/2 = R – radius of the great circle. Cut two rings and cut them in one place.

- Fold the rings so that the slots do not match.

- Measure 2 m of thread, insert it into the needle and begin winding it onto the rings. You can do it differently: roll up several small balls and wind the thread from them into rings.

- You still have to finish it with a needle. We wind the required number of layers.

- Carefully cut the yarn along the edge of the template with thin scissors.

- The next task for children can be difficult. Help them, spread the cardboard rings a little and hold them there while the child threads a strong thread between them and ties them into two knots.

- Remove the cardboard rings.

- The master class is over - the first pompom is ready. Now you can make various toys for children from them.

He is so snowy and cold that even he himself is frozen and stands with a red nose, wrapped in a warm scarf. Let's start the master class with preparing tools and materials.
We will need:
- white yarn;
- hook;
- wooden skewer;
- thimble;
- beads for eyes;
- PVA glue;
- plasticine;
- cork from a plastic bottle.
Master class on making a snowman
- Cut cardboard disks of three different outer diameters and the same inner diameters. With their help we will make three pompoms of different sizes. But first you need to make a support. Burn a hole in the plastic cork with an awl, insert the tip of a wooden skewer into it and seal the inside of the cork with plasticine.

- Place the pompoms on the axle, starting with the largest one. Try not to do this too tightly so that the snowman looks slender.

- Crochet two white cap feet, pull them together and sew both to the middle pompom. It is necessary to make stitches through the middle of the pompom, sewing two legs at the same time.

- Attach a thimble to the top of your head using the end of a skewer. Glue or sew beads on the eyes and nose. We will not give a master class on knitting a scarf here, just try to make a strip of 6 loops with a 1x1 rib.

To make toys for children from pompoms, you must first imagine what you want and choose the right color of yarn. So, to complete the “Three Little Pigs” master class, you will need a ball of pink threads and three pink buttons. You can use small pieces of pink felt to make ears and hooves. Sew the buttons onto a long thread, and then glue them and the piglets' eyes. Finish the master class by gluing different bows to each pig.

A funny story in pictures, written for children, about funny Smeshariki became the reason for the appearance of these cute toys on store shelves. A master class on making them will save a lot of money on the family budget.
- Choose the color of yarn you want and make a pompom.
- Cut out eyes from paper and ears from felt.
- It is better to make noses from contrasting threads.

You don’t need any design to make them, just imagination and the desire to please children.
Making chickens is as easy as making smeshariki. You need to make two pompoms, slightly different in volume. Tie them together. The one that is smaller will become the head. It should be decorated with a beak made of red paper and two black eyes. Glue two legs cut from the same paper to the body below.

Master class “Snake”
To make a wise snake, we don't need diagrams. Simply knit seven small identical pom poms, winding rows of different colors each time. They should be done as evenly as possible, then our Kaa will become colorful and striped. We knit the eighth large pompom from plain yarn - this will be the head.

Take a long fishing line, thread it through the bead, and insert both ends into a needle with a wide eye. Now instead of a knot at the end of the fishing line you have a bead. Thread the line through all the pompoms, starting with the tail. The last one should be the biggest one
Do not make the pompoms touch too closely. Secure the fishing line to your head. Glue on the eyes and long forked tongue using paper or felt. The fluffy, kind and wise boa constrictor is ready.
Crafts made from threads will be a wonderful way to develop creative thinking and imagination, color and spatial perception, and thinking. But, besides all this, working with strings will be a good training for your baby’s fine motor skills. Let's add to this the cultivation of perseverance: playing with threads perfectly develops this quality. And if you like this prospect, then prepare paper, cardboard, glue, scissors and, of course, threads and strings of various colors and textures - and get to work!
Crafts from threads: fun applications
First of all, threads are an excellent material for appliqués. You can come up with a lot of interesting things with them. For example, an applique made of cut wool. Take woolen threads of different colors and cut them with scissors into small pieces (each color separately). Place the “trimmings” in different jars or boxes. Now you can start getting creative. This technique produces the best furry animals: kittens, sheep, foxes, bunnies, chickens. Winter pictures look good - Christmas trees, snowmen.
First experiments. Draw a picture on a piece of cardboard. You can find a picture in a children's book and copy (translate) it. Often suitable drawings can be found in coloring books for little ones: the pictures are large, without small details. When the template is ready, discuss with your child what colors of thread you will need for the work. Then generously coat a fragment of the pattern with PVA glue and show the baby how to take the shredded wool with his fingers and sprinkle the pattern with it. Spread the threads in a dense layer, press down lightly with your finger, let dry, and then shake off the excess. We do the same with other fragments of the application. It will turn out fluffy and cute.
Fun impromptu. By the way, you can make an applique without a base pattern. Let the child spread glue on any part of the paper and sprinkle threads of the color he likes on top. Then we grease another area with glue and sprinkle it with threads again. And so on until the entire leaf is covered with colored fluffy spots. What happened? Let the little one come up with a name for his masterpiece.
Contour maps. Now we need not cut threads, but whole ones. Take a sheet of cardboard, apply a simple image on it in the form of an outline (house, Christmas tree, boat, etc.). The baby’s task is to glue the thread along the contour. There are two ways here. Or you apply glue to the outline of the drawing, and the child applies a thread to the paper and presses it with his finger. Or a thread is dipped in glue, and then laid out along the contour and dried. In any case, this work is quite dirty. So put your child on something that you don’t mind getting dirty, and have plenty of rags and napkins ready to dry your hands. Let the baby decide for himself what color he will make the sun and what color he will make the Christmas tree. You can complement any drawing with similar applications: make a lush mane and tail for a drawn horse, a luxurious mustache for a cat, quills for a hedgehog...
Activities with threads: making a tablet for creativity
There is another interesting creative activity with threads that does not require any glue or paints.
Sanding arts. We will need thick woolen threads of different colors and a sheet of fine sandpaper (coarse sandpaper will not work, the child may get hurt). Then everything is simple: put the sandpaper in front of the baby, lay out a piece of thread on it. The thread seems to “stick” to the rough sandpaper, clinging to it with fibers. Now you can move the thread along the surface of the paper, creating some designs. You can “draw” whatever you want by laying threads of different colors and different lengths on paper. The sun, a Christmas tree, a butterfly, starfish, a boat, toys... Did you really admire what happened? We remove the threads and start creating again. By the way, this is a good game for developing imagination!
Together with mom. If the child is not yet able to lay out drawings, let him simply move a thread along the sandpaper, glue it and remove it, and touch the rough surface with his fingers. This will enrich his tactile experience. While the mother can create the drawings, let the baby try to guess what happened.

I have an idea! Older children can be taught to work according to the model. To do this, draw a few simple silhouettes or patterns on paper, and let your child try to lay out the same drawings from strings on your improvised tablet.
Magic story. And with the help of threads and an emery board you can create fairy tales! This is a very interesting activity with threads, which helps develop imagination in addition to fine motor skills. For example, mom lays out some silhouette from a thread. What is this? It looks like a small house. And who lives in it? Now it’s the kid’s turn to come up with a fairy tale hero and make him out of a string. The mouse is who lives in the house! The mouse went into the forest and found there...What? Mushroom? A basket? A coin? Let's fantasize together...
How to make a pompom from threads
Kids just love making pom-poms from threads. Maybe because they turn out so soft and fluffy, like little chickens?
Multi-colored balls. First, you need to cut out two identical templates from cardboard. This is a circle with a diameter of, for example, 6 cm. Inside it you need to cut a round hole with a diameter of about 1–1.5 cm. Place two of these templates together. Now take a thick woolen thread and show your child how to wrap the cardboard disks by threading the thread through the hole in the center and around the edge of the disk. You need to try to ensure that the thread lies evenly, each subsequent turn close to the previous one. Of course, the baby will not be able to do this carefully right away. But it's not scary. You will still get a pom-pom made from threads. When your baby has covered the entire cardboard with threads, take sharp scissors, insert them between the disks and cut the threads along the entire outer edge. Now we will pass a strong thread between the disks, wrap it several times and tie it tightly, securing the cut threads. Leave the ends longer. Now we make a cut in the cardboard blanks and remove them. All that remains is to fluff the resulting pompom, turning it into a ball. Entrust this pleasant operation to your child. That's it, ready!
Funny fluffies. You can make it. Two yellow fluffy balls connected together (using the very ends of the threads that we used to fasten our balls), bead eyes, a red cardboard beak and paws - and in front of you is a chicken. Collect a chain of several pompoms and you will have a wonderful caterpillar. If you dream up a little, you can get a hedgehog, a pig, a squirrel, or any other cute animal. Let your child think about how to turn a ball of string into a recognizable character. Thread pompoms can be used in a variety of ways: decorate a Christmas tree with them, make cool fluffy beads, decorate clothes.

Young winder
Natural installation. Bring a small tree branch from the street. It is important that there are several branches on it. Now give your baby not too long pieces of thread of different colors, all kinds of laces, ropes and ribbons. Let him wrap them around the branch as his imagination dictates. You can wrap a thread around one branch, you can throw the thread from branch to branch - you will get a wonderful exercise for your fingers. The resulting composition can perfectly decorate the interior of your home.
Where does the thread lead? While the baby is sleeping, unwind a ball of thread around the apartment, tie a small surprise (candy, a small toy, a bottle of soap bubbles, a cardboard book, etc.) to the end of the thread. Show your child the “guiding thread” and tell him that if he goes on a trip, untangles the thread and winds it into a ball, he can receive a gift. Who would refuse this?
- It is useful to give your child creative freedom. After all, in kindergarten, for example, most crafts are created according to a template. So let the child “draw” at home with a thread without an outline, glue long and short threads onto the sheet in the way he wants. Maybe he will try to lay out a recognizable plot, or he will end up with a confusing mess. In any case, the process will give him pleasure and teach him to make his own choices.
- When playing with strings, don’t forget about the opportunity to learn (or reinforce) many concepts with your child. Each time, name the color of the thread chosen by your child - and the colors will be remembered easily and quickly. Pay attention to the fact that “now we are taking a long thread, and this thread is short” - and gradually the baby will master such concepts as “long” and “short”, “longer” and “shorter”. “This woolen thread is thick, and now we will take a silk thread, it is thin.” Show, compare, pay attention, teach - and the result will please you.
Interesting games and activities for you!
We also recommend
 Fashionable bob haircut options according to face type: choose yours, photo See women's bob haircuts
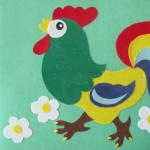 Charming and attractive DIY Cockerels!
 Crafts from threads: do-it-yourself magical toys
 Napkins with voluminous crochet butterflies
 Four beautiful DIY hair ties - master classes for fashionistas and their mothers Homemade hair ties
 Sometimes you really need to be supported...