Knitted berets for spring with knitting patterns. Several options for knitting a beret for beginners
Here are photos and pictures of knitted berets with a description of knitting and knitting patterns. Knitted beret hats are loved by adults and children. Knitting berets is a fun activity! Next, watch a video with a master class on knitting an autumn beret.
Knitted beautiful beret on a girl looks stylish from the photo. Many people like knitted beret hats so cute! Knitting berets is popular.

The openwork knitted beret is good, it has a description of knitting and knitting patterns. An openwork beret is perfect for summer. Such knitted products are very popular. The crocheted beret is very beautiful. Knitting berets is fun!

Knitted pink beret is knitted with a relief pattern. Very beautiful, it suits a girl!) Just like the picture!) Many people like knitted beret hats. Knitting berets is popular, such knitting gives joy!
Watch a video with a master class on knitting an autumn beret.

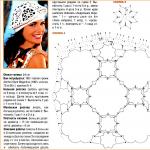
A beautiful set on a girl: a beret and a scarf. The set is crocheted from mixed yarn. Here is a description of knitting and knitting patterns.

Warm blue beret with knitting description, knitting pattern and beret pattern.

Beautiful beret with braids with a description of knitting. The beret is knitted.

The lilac beret is very cute, the beret is knitted. Here is a description of knitting a beret.

Brown wool blend beret with knitting description and knitting pattern. The beret is knitted.

Turquoise beret with knitting description. The beret is knitted very beautifully.

Gray beret with knitting description and knitting patterns. The crocheted beret is very cute.

Warm beret with braids with a description of knitting. The beret is knitted.
A beautiful beret with a description of knitting and knitting patterns. The beret is knitted.

A beautiful knitted beret for a girl with a description of knitting and a knitting pattern. The crocheted beret is very cute.

In the photo there is a girl in a blue beret with a scarf and mittens. The knitted beret, scarf and mitts are knitted very beautifully.

The striped beret is crocheted and looks elegant. The beret is crocheted with love!) Here is a description of how to knit a beret and a knitting pattern. Knitted beret hats will never go out of style.

A gray beret really suits a gray-eyed girl!) Just like the picture!) Here are some beautiful knitted beret hats you can knit!)

This fashionable beret is crocheted from melange. The crocheted beret is associated with fiction. The girl in the knitted beret in the photo looks stylish. The beret includes a description of knitting and a knitting pattern.

The girl in the photo is wearing a blue knitted summer beret. Just like the picture!)

Crochet baby beret with scarf for a little girl, knitting description and knitting patterns. The beret is crocheted in a cute way.

The beautiful knitted openwork orange beret and scarf on the girl in the picture look luxurious!)

We crochet a beautiful beret with a delicate pattern. Here is a detailed description of how to knit a beret.

And here is a white crocheted beret. Ideal for summer, the beret is very cute!)

Blue beret with a beautiful peacock feather pattern. The beret is knitted. Here is a description of knitting and knitting patterns for a beret.

In the photo there is a knitted beret with knitting needles. Openwork beret with description and knitting patterns.

Delicate knitted blue mohair beret, just like the picture! The girl is also very good!)

This voluminous blue beret is comfortable and warm!) The beret is knitted. Just like the picture!)

The girl in the photo is wearing a cool burgundy knitted beret!) A fashionable girl looks great in a knitted beret!)

In the photo there is a girl in a red knitted beret and the same sweater. Just like the picture! Looks great!

In the photo there is a girl in a gray knitted beret. In such a knitted beret you will not freeze in cold weather!)

This beautiful knitted wool beret suits the girl very well. Beret with a jacquard pattern!)

Charming girl in a light pink openwork beret for spring.

The girl in the photo is wearing a comfortable and beautiful white beret.

The photo shows a pretty woman wearing a beret and a scarf. The woman is wearing a delightful melange knitted set: a knitted beret and a scarf!)

A cute girl is charming in a knitted beret with a pompom!) Just like the picture!)

A girl is wearing a cozy and beautiful knitted beige beret.

The little girl in the photo is wearing a beautiful and fashionable beret with a visor!))

Beautiful summer crocheted beret. It is necessary in the summer. A knitted beret is an excellent replacement for a sun hat!)) Just like the picture!)

This beautiful green beret makes the girl feel comfortable and warm!)

In a light openwork beret in the spring you will be irresistible!)) Someone can wear this far from winter beret in winter, if the winter is warm!)

Charming Jennifer Lopez in a knitted beret with a visor is gorgeous!) Cool!))

How beautiful the girl in the photo is wearing a fashionable knitted beret with a jacquard pattern and a pom-pom!)

A light openwork lilac beret in cool summer weather is so pleasant and comfortable!))

Have you chosen a chic coat in the store and are now thinking about a headdress? Knitting is a great solution to this problem. A beautiful beret can be knitted using knitting needles by choosing the appropriate yarn. This is how they create beautiful images with coats.
Perhaps this idea will allow you to create a whole set: a stole, mittens and even leg warmers or mitts.
This article will reveal all the secrets of a stylish knitted beret. For each model there is a description, diagrams and other tips.
Many types of yarn are suitable for berets. If this is a summer beret, then it is better to pay attention to thin cotton.
Spring fashionable berets can be knitted from baby pekhorka or a similar yarn composition. Volumetric products will look more impressive.
 What about winter?, you need warm yarn and the more wool there is, the better and warmer it is. Some berets (French hats for women), despite the thick fibers of the yarn, are proposed to be knitted in two threads.
 Beret knitting needles are required the following: firstly, suitable in thickness to the yarn, and, secondly, circular or stocking. In fact, many patterns are made by knitting in the round.
 There are also those that require regular knitting needles (that is, straight knitting needles), but there are very, very few such models. After all, a seamless product is easier to create and more comfortable to wear; nothing gets in the way.
Determining the size for knitting
Although the beret looks loose, it is not dimensionless, so you will have to take measurements. There is a size chart for hats. It looks like this.

It contains two main indicators:
- Head circumference;
- depth.
Self-measurement of head circumference is carried out using a measuring tape. The measurement line runs along the forehead in front and along the occipital protuberances in the back. This is a very important indicator for a beret, so that the elastic band securely holds the knitted product.
Important! Since the knitted product stretches well, 2-3 cm should be subtracted from the size of the head circumference so that the beret fits more tightly to the head.
 You can either look at the second size in the table or measure it yourself. To do this, a measuring tape is passed from the lobe of one ear to the lobe of the other. The ribbon should envelop the crown of the head. Then divide the indicator by 2 and add centimeters for the beret, depending on the model.
 We calculated each size, only the number of loops is again another calculation. It will help you count the sample. You will need to knit a small rectangle.
For beginners, the picture shows how to cast on the first stitches on 2 knitting needles placed together. Then we take out 1 knitting needle and start knitting a sample; you can immediately take the repeat (part of the pattern) as a basis to see it on the yarn and choose the right knitting needles and knitting density.

Using knitting needles, cast on 20 loops and knit a little more than 10 cm in height. Next, use a ruler to determine how many loops and rows a 10*10 cm square contains. This will be the density of the fabric.
Important! Very often the model also includes an explanation of the knitting density - this is a very important indicator.
 Even if you bought yarn, indicated in the description and knitting on the same needles - the knitting density will be different.

 The thing is that we pull the thread along the index finger with different forces. This determines what kind of knitting should be done - tight or loose. That’s why it’s important to count everything for your product and your hands.
Step-by-step instructions for knitting a women's beret
It is more convenient to knit with knitting needles from larger to smaller. It's easier to make decreases than additions. And the additions will always be noticeable.
Therefore, you need to start knitting a beret with an elastic band. Then, accordingly, the base goes into the crown with typical crown decreases. Let us dwell in detail on each type of new beret models below with diagrams.
Pink warm beret

A beret made of soft yarn with a small addition of wool looks very charming. This model can be useful for winter. Made using regular and English elastic bands.
To work you will need:
- pink yarn 100 g (180 m per 100 g, viscose 67% and acrylic 33%);
- stocking needles No. 3;
- knitting needle;
- elastic thread (spandex).
The sample density of this pattern is 10*10 cm=11 stitches*15 rows. It is proposed to knit your sample and determine your density, plus, if necessary, immediately make adjustments.
Cast on 92 stitches on the knitting needles and knit with a 1*1 rib in a circle to a height of 3 cm. Then move on to the main pattern of the fabric - this is an English rib. Reach a level height of 18 cm from the point of the elastic band, and begin decreasing.

To prevent the drawing from looking askew, decreases should be made using the following method:: create three loops together, purl one and make sure that everything follows the pattern of the fabric. Next, knit three rows using an elastic band 1*1 and bind off all the loops in the fourth row. And so pull the necessary thread and fasten it to the product from the inside out.
Additionally, you need to pass an elastic thread under the current loops from the previous row and also tighten it. This beret fits size 56.

Charming thin, but quite warm beret. It will be possible wear in spring (autumn) time. With a jacket, coat, raincoat and cardigan.
To work you will need:
- fine wool yarn;
- knitting needles number 3.
This model corresponds to size 56. The knitting density of a sample of this model is for 10 * 10 cm = 24 loops per 36 rows. It is better to calculate your density for more accurate work.
The set for the size, as a result of the indicated density, turned out to be equal to 162 loops. Therefore, we use knitting needles exactly as much as we got when counting and begin to make an elastic band for the beret. This is a 1*1 elastic band (knit/purl loops). You should knit no more than 9 rows. So that the elastic is not too wide and not too narrow.

Pattern for a gray beret “leaves”
After the elastic band, you should move on to the next pattern and knit to the appropriate depth. The diagram shows decreases and therefore it will be easier to create your ideal beret. If you wish, you can make it a little longer. Just pull off the last loops.
Beret motley
Excellent The winter beret model will fit under a coat and even a sheepskin coat. A lady can consider herself a real fashionista in it.

To work you will need:
- yarn of two colors 200 g;
- knitting needles No. 3;
- additional knitting needles for braids.
For a 56 cm model, 106 loops will be enough. Since the thread chosen for the beret is thick and plus the knitting takes place in two threads.

The model traditionally begins with an elastic band. This is a combination of pattern number 3 (braids) and garter stitch. Knit this way for about 3 cm. Then make a false English elastic pattern between the braids.

Description and photo of “false gum”
Knit until the height from the elastic is 17 cm.
Then start cutting the loops according to the pattern of the fabric, after which make 3 rows without shortening and bind off all the loops. Pull the crown tighter and the beret is ready.
Takes a burgundy checkerboard
A stylish beret will add bright notes to your look. This burgundy and even wine color is very popular this season. Not only jeans can be burgundy, but also berets. Let's try to connect with the stylish trend right now.

To work you will need:
- Viking Alpaca burgundy yarn 2 skeins;
- circular and stocking needles No. 3 and No. 3.5.
- The knitting density is 10 cm wide - that's 23 loops.

Scheme_4 “checkerboard” for a burgundy beret
Cast on 120 stitches with knitting needles for size 52 cm and knit with an elastic band 3*3 approximately 3 cm. Purl the next row with additions of one loop every three loops.
Go to the checkerboard pattern diagram and reach a height of 22 cm. Start decreasing as follows:
- two loops together and two in the pattern (so until the end of the row);
- knit a row according to the pattern;
- one loop according to the diagram and two loops together according to the diagram;
- knit according to the pattern;
- repeat the last two rows - 2 times;
- two loops together according to the pattern;
- repeat last 4 rows (until there are 10 stitches left on the needles).
Then trim the thread and tighten the loops with this thread. The beret is ready and you can decorate it with a small emblem.
Patterns for women's berets


Original pink beret “cubes”
Like these ones lovely models will help to dilute the look and make winter warmer, and autumn and spring more beautiful. We are trying to knit the model we like now. Good diagrams, useful and very clear description. Inspiration will also help you make quick, high-quality new things.
A knitted beret is a beautiful accessory that can complement any look. To knit a beret with knitting needles, you need to choose a suitable model and prepare the necessary equipment.
Even novice masters can do this task.
Regardless of the chosen model, each beret is created from three components:
- main part;
- headband;
- crown (or bottom).
Preparation for knitting consists of:
- Choosing a model, pattern and knitting method.
- Taking the necessary measurements to calculate all components of the beret. If desired, you can prepare patterns.
- Choosing the type of loops and knitting technique.
- Determination of the density that the finished product should have.
The main tools for creating a beret are knitting needles and yarn, but there are some subtleties here too:
- the choice of color and quality of thread will depend on what season the headdress is intended for;
- for knitting a beret, circular (or stocking) ones are better suited;
- knitting in the round will allow you to make a product without a connecting seam;
- If desired, you can use straight knitting needles, but then you won’t get circular knitting, and there will be a seam at the back of the beret;
- the number (which is determined by their diameter in mm) can be chosen at your discretion;
- the thinner the knitting needles, the denser the material;
- You can rely on the information on the yarn packaging; usually the recommended number is indicated there.
Schemes and descriptions
To make the task easier, there are special schemes.
Simple (or classic)
For the beret you will need:
- yarn - 210 g;
- stockings No. 8.
What to do:
- cast on 10 loops (hereinafter - p.) and distribute them on the knitting needles, 4 pieces each;
- start circular knitting, alternating 1 row (hereinafter referred to as r.) of knit stitches, then 1 r. purl;
- after 29 r. a uniform decrease is made by 10 points;
- after this you need to knit another 5 rows;
- Now you can connect the remaining stitches with thread, pull them together, and tuck the thread inside the product.
Openwork
We knit an openwork beret.
 For the product you will need:
- circular No. 3, 75 and No. 4;
- yarn (100 g per 74 m) – 100 g;
- hook.
Patterns for this model:
- Elastic band 2 LP for 2 IP.
- 2p – 2 sts together to the left: join two sts into one knit.
- 2 PP – 2 sts together to the right: swap the second and first sts on the left sp and knit them in k1.
Knitting process:
- cast on 96 sts on No. 3.75, start knitting in the round;
- after 5 p.m. start knitting an elastic band;
- after the next 12 p.m. the pattern changes;
- next row: 2 persons. from 1 p. - 2 persons; the cycle is repeated for the entire row and the result is 144 sts;
- then follows a series of people. P.;
- repeat this knitting sequence 5 times from 1 to 10 rows;
- Now you can turn it down.
So, the complete scheme for creating a beret is as follows (deciphering the meanings below):
1 r: 4 i, 2 PP, 4 l, 2 PL, 4 i;
2 r: 3 i, 2 PP, 4 l, 2 PL, 3 i;
3 p: 3 i, 6 l, 3 i;
4 r: 2 i, 2 PP, 4 l, 2 PL, 2 i;
5 r: 2 i, 2 PP, 2 l, 2 PL, 2 i;
6 r: 1 and, 2 PP, 2 l, 2 PL, 1 and;
7 p: 1 and, 4 l, 1 and;
8 r: 2 PP, 2 l, 2 PL;
9 r: 1 l, 2 PP, 1 l;
10 r: 2 PP, 1 l;
Explanation for beginners: p = row, i = purl loop, l = knit stitch, PP = half loop (used for processing the edges of the product).
As a result, there are 9 loops left on your future beret. You need to thread a thread through them and tighten them. Thread the end of the thread to the wrong side using a hook.
Gerda
Otherwise it is also called the Basque beret. Usually knitted from warm yarn and suitable for the warm season.
A distinctive feature of the model is the recognizable ornate pattern. Usually these are embossed braids.
 This product usually requires several types of knitting needles:
- stockings No. 5;
- circular with numbers 5 and 3.5;
- for knitting braids you will need 1 additional. sp.;
- yarn of your choice, which is suitable for knitting with the specified sp.

 The product is knitted from the bottom edge to the crown:
- You need to cast on the number of stitches: for size S/M you need 84 stitches, for M/L 96 stitches. You need to do this on circular stitches No. 3.5 and close the stitch into a circle.
- Knit elastic in circular rows: 3 p. p. (IP) * 3 persons. n. (LP). Knit this way for about 10 -12 r.
- Next you need to add stitches and increase the width of the beret: 3 IP, 1 LP, 1 yarn over, 1 LP, 1 yarn over, 2 LP, 1 IP, 2 LP, 1 yarn over, 1 LP, 1 yarn over, 1 LP. This is one cycle (or rapport).
- There are 7 or 8 repeats in total, depending on the size. In each of them 4 points are added.
- The result is 112 stitches on the needles for size S/M, or 128 stitches for size M/L;
- Next you need to go to circular No. 5. At the beginning of the pattern, the total number of loops in the repeat is: 13LP + 3IP.
- Gradually their number increases to 32 rubles, then decreases.
- After 51 r. 42 stitches remain (or 48, if the size is larger).
- When there are few loops left, you can switch to stocking stitches for convenience.
- Then the reduction of the paragraph begins: in the next circle, 3 IPs are combined into one, after that 2 LPs are combined into one.
- Now you can connect all the remaining stitches with one thread and tighten them.
- Tuck the end of the thread inside the knitting.
Volume
For example, we can consider the average head volume of 55 - 56 cm. Before work, you need to prepare:
- stockings No. 5 and No. 6;
- one auxiliary;
- yarn (50 g per 70 m) – 10 g;
- markers.
 The following types of knitting are used for this product:
- stockinette stitch – circular knitting only in LP (knit stitches);
- garter stitch - in circular knitting, the types of loops alternate: 1 row of LP, then 1 row of PI.
Knitting pattern:
- 1, 2, 3 and 4 rubles. – facial surface.
- 5 rubles: *8l, using extra. sp., 8 r. are knitted on 6 loops. facial stitch (1 open bump), stitches return to the right needle. This cycle is repeated for all subsequent loops.
- 6, 7, 8, 9 r. – facial stitch.
- 10 rubles: 1 l, 1 open cone, 7 l, the cones are displaced. Repeat the cycle from rows 1 to 10.
For optimal knitting density, you should adhere to the following indicator: for an area of 10 by 10 cm, there are 14.5 loops per 21 rows.
Knitting process:
- Cast on 78 stitches on needles No. 5. Start knitting with garter stitch. When the knitting height reaches 4 cm, switch to No. 6.
- Start knitting the main pattern. In the first row you need to increase 34 stitches evenly.
- After 30 r. the transition to the front surface is made.
- Next, you need to decrease sts. Using a marker, mark every 14 sts. In the new row, the marked sts are knitted together with the marked ones, joining into one.
- Knit until there are 8 stitches left. You need to thread a thread through them and pull them together. The end of the thread is tucked inside the beret.
English rubber band
This model is quite simple, suitable for beginners:
- start with a simple elastic band 3 cm high;
- for English elastic, thicker knitting needles are used;
- 1st row: 1l, 1i;
- 2nd row: 1 l, straight yarn over, purl removed; the loop remaining on the right needle is not knitted;
- the main part of the beret without a side is 10 - 13 cm;
- followed by 4 rubles. elastic bands: 1l, 1 and;
- then decreasing the loops;
- after 8 p.m. decrease, connect the remaining stitches with thread and hide it inside the product.
With braids
For the product you will need:
- yarn - 3 skeins of 220 meters;
- No. 4 and 4.5;
- additional.
 Knitting density: 20 loops per 26 rows. For a 10 cm section of stockinette stitch, knitted No. 4.5.
Knitting process:
- On number 4, dial 103 p.
- First r. (front side) starts with 1 knit stitch. Then follows the cycle: 1i, 1 l. Repeat until the end of the row.
- Second r. starts with a purl stitch, then cycle: 1 l, 1 i. it is repeated until the end of the row.
- Repeat the first 2 r. twice more. Then again 1 r. 1 time.
- Next (wrong side, additional row): starts with 6 knit stitches, then cycle: add 1 loop from a crossed broach, 1l. Repeat the cycle until 6 stitches remain. Knit 6 l.
- Change to No. 4.5.
- 1 r. (front side) all stitches are knit.
- 2 r. (like all purl p) all p. purl.
- 3 r. : 1 l, then cycle: (remove 4 sts on an additional knitting needle during work, 4 l, 4 l from an additional knitting needle) perform 2 times, 4 l, (slip 4 sts on an additional knitting needle before work, 4 l, 4 l from an additional knitting needle), 4 l. repeat the cycle until 1 loop remains, it will be a knit stitch.
- 5, 7, 9 r. – facial.
- 11 row: 1 l, then cycle: 4 l, (slip 4 sts on an additional needle before work, 4 l, 4 l from an additional knitting needle), 4 l, (slip 4 sts on an additional knitting needle while working, 4 l, 4 l from an additional knitting needle) perform 2 times. Repeat until the last stitch, it will be a knit stitch.
- 13, 15 rub. – facial.
- 16 rub. – purl.
- All rows are repeated until the knitting reaches 16.5 cm.
To complete the product, you need to form the top:
- 1 rub. (front side): 2l, 2 together l; repeat decreasing stitches until the last two, they are knit stitches;
- 2 r. and all purl ones - IP;
- 3 p.: 1 l, 2 l together; decrease to the last two stitches, they are knit stitches;
- 5 p.: 2 p. together, repeat until the end;
- 7 rows: 1 knit, and all the next 2 rows until the end of the row.
Connect the remaining loops with thread and tighten. Hide the end of the thread inside.
You will need:
- thick yarn;
- №10, 12, 15;
- When working with thick yarn, the loops are cast on 1 knitting needle.
 Knitting process:
- cast on 34 loops;
- 1, 2 r.: 1l, 1 and;
- 3 rubles – transition to No. 12;
- then the loop is removed with a crochet and knitted;
- 4 r.: knit with double crochet is knitted like k and repeated; so until 7 p.;
- 7 r.: transition to No. 15, the same mating continues until 13 r.;
- The last rows need to be knitted a little tighter;
- after 1 p.m. transition to No. 12, knitting: knit with double crochet, purl to purl;
- when the mating becomes denser, switch to No. 10;
- gradually you need to decrease the loops (1 should be i, followed by l);
- The last row is knitted with knit stitches.
Connect the remaining loops with thread and hide its end.
For all seasons
The beret, depending on the model and yarn, can be used at any time of the year. This headdress fits harmoniously into different looks.
An unusual or bright color of an accessory can make it an accent and refresh the look.
Despite its more open cut compared to a hat, the beret is actively used in the winter season. To make it comfortable, you should consider some features:
- The beret should be made of warm yarn. It is advisable to use different mixtures with wool.
- Make a choice in favor of models that keep your head as warm as possible and cover your ears.
- Winter models are often equipped with mittens, gloves or scarves made from the same yarn.
- Hats made from natural yarn should be washed delicately. Then you need to let the product dry on its own without exposing it to heating devices.


For autumn
An excellent solution for changeable weather in spring or autumn. Since many models partially cover the head.
- demi-season berets should be made of light, natural yarn;
- they should not be as warm as winter ones, and not quite light as summer ones.


Summer
A summer knitted beret is solely an element of decoration and an addition to the image:
- such hats are made from fine yarn, preferably natural and breathable;
- as a rule, these are models with an openwork pattern;
- a beret in summer can support different styles: romantic or, for example, marine (depending on imagination);
- For summer models, light colors are preferred that will not get too hot in the sun.


For girls
This beret can be made into a smaller copy of any model for adults. Or you can combine threads in brighter and more fun colors for your child.
 The girl's head circumference is approximately 48 - 50 cm.
- For the rim you need to cast on 104 loops. Next, you need to distribute them onto 4 knitting needles and knit an elastic band 4 cm high.
- Now you can switch to stocking stitch. In the process, you need to gradually add 64 loops, expanding the main part. There should be 42 loops on each.
- It is necessary to knit the product until its height reaches 6 cm. Then the loops are gradually reduced.
- Find the 28th loop on each and mark it (you can use a thread).
- Knit the marked loop with a knit stitch together with the previous one into one single loop.
- Make a decreasing stitch in the next 27 rows.
- After this is done, there should be 6 loops left on each.
- Continue knitting until the height increases by another 2 cm (this will be the crown of the beret).
- Now all the remaining loops need to be pulled together and secured with a working thread.
Fashion models 2018
In 2018, berets are very popular.
The most popular items include products with embossed openwork or classic English elastic.


The styles of such knitted berets are simple and expressive.
Very three-dimensional shapes are often used.
 The 2018 models are mainly dominated by smooth, soft lines.
In the color scheme, preference is given to light, pastel colors. Or a shade from the color type of the beret owner.
Whatever the fashion trends, you should focus on your individual style and personal preferences.
Description of knitting a beret Size: 52. Yarn consumption: slightly less than 100 g. Knitting needles: No. 3.

This material helped me a lot:
"let's considerhow to knit a beret . We will knit it on two knitting needles. To calculate the loops on the beret, you need to very closely measure the circumference of your head. Let's say it turns out to be 56 cm. From the resulting number, subtract 3 centimeters for stretching. That is, the head circumference is 56 cm - 3 cm = 53 cm. Then we calculate the number of loops based on the pattern. We knit a sample of 10 - 15 cm with an elastic band one on one, and the pattern with which we will knit the beret from the yarn from which we will knit the beret with the same knitting needles. We will knit a beret with a checkerboard pattern. We measure the samples in a stretched form and count how many loops are contained in 1 cm of knitting. Suppose we counted 30 loops in a 15 cm sample, then there will be 2 loops in 1 cm. Then you need to cast on the knitting needles 53 cm x 2 = 106 loops. Knitting a beret consists of the following operations: 1. Knitting a side in height, it can be from 2 to 5 cm (sometimes they knit a side of 10 cm and fold it in half); 2. Knitting the height of the beret - from 8 to 12 cm. 3. Knitting the bottom of the beret - from 22 to 28 cm. "http://sinita.ru/kak-vyazat-beret-spitsami/kak-vyazat-beret-spitsami#more- 1012

Cast on 88 stitches on circular needles No. 3 and knit with an elastic band 1 x 1. After 4 cm, knit 1 row (reverse row with a purl, then 4 cm with an elastic band. This will be the edging of the beret. Next, make additions in the first row after the elastic: * 2 knits. , yarn over *. Repeat ** along the entire row and knit only = 132 stitches. Then knit without adding 40 rows after the elastic, make 1 reduction: * 10 knit stitches, 2 knit stitches together*. Then 1 row without decreases. 2nd reduction: * 9 knit stitches, 2 knit stitches together*. Repeat 1 row without decrease. 3rd row: * 8 knit stitches, 2 knit stitches together *. without decreasing. Continue decreasing across the row until there are 12 stitches left on the needle. Sew them together with thread.
Even a novice needlewoman can knit berets for women. Schemes for creating this headdress with a detailed description will help you achieve the desired result.
The main criteria for selecting a model will be not only the style, but also the yarn. It is she who plays the main role in how the beret will lie, keep its shape, and most importantly, how it will be worn.
Angora
Description:
Cashmere
Description:
- The amazing properties of mountain goat wool yarn allow you to knit an absolutely smooth, warm and soft fabric.
- Cashmere thread is lighter than wool thread, but much warmer.
- To prevent pilling, cashmere thread is mixed with wool thread in different proportions.
- Cashmere does not like dust mites, which is important for allergy sufferers.
- Such a thread cannot be cheap, since it is combed out of goats only once a year, during the spring molting period. There is a lot of manual labor involved in production.
Alpaca
Description:
- The yarn is collected from the wool of alpaca animals.
- Like camel wool, alpaca wool is stiff and does not mat at all.
- Does not form pellets.
- Has thermoregulatory properties.
- In order to reduce itching, mix with other types of yarn.
Mohair
Description:
- Mohair is the wool of Angora goats.
- Yarn consisting entirely of goat hair is not produced, it does not hold its shape. To do this, add the hair of other animals to the composition.
- The wool of these goats has the ability to increase blood circulation in humans.
Wool
Description:
- Wool thread can be twisted from the hair of any animal: rabbit, sheep, dog, goat.
- The thread is sinuous and elastic, for this reason products made from it do not wrinkle.
- The disadvantage of wool is the formation of pilling on products, so it is often mixed with other types of yarn to reduce this defect.
Acrylic
Description:

Mersenized cotton
Description:
- As a result of the latest processing technologies, the yarn becomes dense and slightly fluffy.
- The products do not stretch, creating a light backcombing effect.
- Does not form pellets.
Iris
Description:
- Available in a wide range of colors.
- The thread has a shine, which gives the product an elegant look.
- Does not shrink, washes well and can be starched if necessary.
Bamboo
Description:
- Made from plant fibers, the thread is not chemically treated.
- Retains its antimicrobial properties without causing allergic reactions.
- Bamboo fabric is softer than cotton when knitted, silky to the touch, with a slight shine.
- Widely used for knitting summer openwork berets.
Silk
Description:
- Natural thread is a waste product of the silkworm.
- Pills do not form on products made from silk yarn.
- Perfect for summer openwork berets.
- Does not deform after washing, soft and pleasant to the body.
Basque beret: diagram and description
Description:

Description of work:

Volumetric beret: diagram and description
Knitted berets (patterns and descriptions for women are extremely varied) look beautiful both with openwork patterns for the spring-summer season, and with a dense weave for winter. 
Description:

Garter stitch beret: diagram and description
Description:

Stages of work:

Beret with an English elastic band: diagram and description
The thicker the thread in the yarn chosen for the beret, the larger the number of knitting needles you need to use to knit the product. 
The presented model requires a 100-gram skein of yarn 500 meters long.
Description:

When there are 12-15 loops left on the knitting needle, the thread is broken and pulled through all the remaining loops at the same time, pulled together and secured from the wrong side.
Beret with leaves: diagram and description
Description:

Braided beret: diagram and description
Knitted berets (patterns and descriptions for women are in magazines and on Internet portals) allow you to make your wardrobe individual. 
Description:

Beret “Pumpkin”: diagram and description
The “Pumpkin” beret is shaped like a vegetable of the same name, however, it is one of the most interesting knitted models for women. Its knitting pattern is not as complicated as it seems (detailed description below). 
Description:
- The presented beret is knitted from wool with threads of medium thickness.
- In the flowing mixture of colors of various shades, this model looks stylish and original.
- Interesting in its design and assembly method.
- Knitted with circular needles.
Stages of work:
- Cast on 90 stitches on circular knitting needles and knit 5-6 cm in a circle.
- For teeth in one row, knit 2 loops together and then make 1 yarn over.
- Returning to the previous number of loops, continue the inner part of the rim for another 5-6 cm.
- Starting to knit the central part of the beret, you need to divide all the loops into 30 parts. These will be its convex parts.
- The center of the pumpkin tooth-rib consists of 2 loops, they are always knitted with the front one, and 1 loop, knitted with the purl.
- Add loops through the row in each clove - edge on both sides of the purl loop, simply pulling an additional loop from the bottom row.
- As a result, 6 loops will be added on both sides of the purl loop.
- In one clove - rib there will be 1 purl, on both sides there will be 6 scarf ones and between the cloves - ribs there will be 2 front ones.
- After a complete set, you should begin to decrease the loops, after one row, returning to 90 loops.
- For contrast and knitting the bottom of the beret with a garter stitch pattern, knit 4-5 rows.
- The previous 90 loops are divided into 6 and after every 15th loop they are joined together with 2X 1 loops across the row.
- When there is 1 loop from the sector on the knitting needle, the product is finished.
Simple braids for beginners
An original model in which braids are the basis of the fabric. 
Description:

The braid fabric is knitted at a height of 23 cm and begins to finish by first cutting the purl loops between the braids evenly, and at the end in the last two rows they switch to knitting.
Summer openwork beret: diagram and description
Knitted berets (patterns and descriptions for women are publicly available) allow you to create unique models that captivate the eye. 
Needlewomen knit them to give themselves a romantic, individual look.
Description:

New: fashionable beret Nako
The Nako beret is the invention of an Italian designer. It was he who thought through the thickness of the spokes. And if you deviate from the master’s recommendations and knit the edging with smaller knitting needles, the beret simply won’t fit on your head. 
Description:
- Thin yarn is not suitable for such a product. Threads of medium thickness and with the addition of acrylic are used.
- The beret consists of 3 parts that complement each other.
- First, the central part is knitted with the main braid pattern.
- Next, trim the trim around the circumference of the head. At the end of the work, the bottom of the beret is formed.
- For execution, take thick knitting needles number 5 and 6, as well as an additional knitting needle necessary for knitting a braid.
- This product is suitable for wool yarn with the addition of acrylic.
- Cast on 20 stitches for the central pattern on 6mm needles.
- The braid itself consists of 16 loops and 2 loops along its edges.
Beret bottom:

Additional beret knitting optionNako:

Beret with checkerboard pattern
Simple to make, stylish and neat, this knitted beret is suitable for women of any age. Even a novice needlewoman can understand the creation scheme and description of the pattern. 
Description:
- It is convenient to knit the beret with a 3x3 elastic band, which will smoothly transform into the “Leaf” pattern.
- Add volume loops from purl loops, increasing their number by 50%.
- You can also knit an elastic band with thinner knitting needles: the knitting will be tighter, and for the fabric of the beret itself, use knitting needles 2 numbers larger.
- Any yarn is suitable for this model; the beret is interesting both in summer and in insulated versions.
- The loops are cut evenly when the entire row is knitted with purl stitches only.
- In order not to disturb the beauty of the pattern, 5 cm before the end, they begin to knit with a garter pattern, reducing to 15 loops. They are collected on a string and pulled together.
Knitting pattern:

Mohair beret: diagram and description
Description:

Berets knitted with mohair thread for women of any age do not need complex patterns and descriptions.
Video: knitting berets - diagrams and description
How to knit a beret with knitting needles, watch the video:
How to knit a simple beret, watch the video:
We also recommend
 Four beautiful DIY hair ties - master classes for fashionistas and their mothers Homemade hair ties
 Sometimes you really need to be supported...
 Several options for knitting a beret for beginners
 Men's dark gray noble vest
 We sew cool pillows: step-by-step master classes
 We sew a simple nightgown for beginners: everyone can do it!