How to make a beautiful rooster out of paper. Charming and attractive DIY Cockerels! Master Class
You can make a figurine of a rooster with your own hands for the New Year holidays from the most ordinary colored paper, cotton pads and other available materials. Our interesting and educational master classes with step-by-step instructions, photos and videos will tell you exactly how to make such cute toys and beautiful crafts in kindergarten and school. In addition, we will share information on how to sew a bright, optimistic and joyful carnival rooster costume for a child at home, symbolizing the coming 2017. Be inspired by our holiday ideas, make your loved ones happy and spend your celebrations fun, creatively and with imagination.
Rooster - the symbol of 2017 - do it yourself for kindergarten - paper craft using a template
In kindergarten, you can make a rooster with your own hands, symbolizing the coming 2017, from ordinary colored paper and cardboard templates. By doing this colorful and bright work, kids will develop creative thinking, learn how to correctly combine color shades and reinforce the rules for the safe use of stationery scissors. The finished craft can be presented as an unusual exhibit for a New Year's exhibition or used as an element of original and stylish New Year's decor.

Necessary materials for crafts from colored paper in kindergarten
- white cardboard
- set of smooth colored paper
- velvet colored paper
- stationery scissors
- PVA glue
- simple pencil
Step-by-step instructions for the craft “Rooster – the symbol of 2017” for kindergarten
- On white cardboard, using a simple pencil, draw the elements of the rooster figure - the head, body, wings, comb, parts of the tail, legs with claws, etc. Then carefully cut out each detail with scissors.

- Applying the templates to sheets of colored paper, cut out all the necessary parts of the bird.

- For the basis of the future composition, take a sheet of light green cardboard. If desired, you can use a different shade. The main thing is not to take too thick, dark tones. On them the rooster will either be completely “lost” or will be poorly visible.

- Glue the body to the base approximately in the center.

- Then cut out the head of a rooster from dark green paper and glue it to the body so that one part overlaps the other slightly.

- Carefully glue the red comb, beard and beak to the head.

- For the eye, cut out a large white circle, a smaller black one and a very tiny white one again. Glue them together and glue them where the rooster's eye should be located.

- Glue the blue wing fragment to the side. And on top of it is the white part - a feather.

- Glue the legs to the bottom of the body and decorate them with bright yellow claws.

- Finally, do the tail. Glue the largest and longest feather on top, and smaller fragments under it. Finish with the tiniest piece of construction paper.

- Glue daisies pre-made from colored paper around the rooster figure. Allow the work to dry, if desired, frame it and hang it in a visible place at home or in a kindergarten.
Do-it-yourself paper rooster at school - how to make a New Year's craft 2017

Schoolchildren in grades 1-3 can easily make a cute, cheerful and bright New Year's rooster out of colored paper with their own hands. The New Year's craft is so simple that the help of adults in the manufacturing process is practically not required. But the work will be an excellent interior decoration and will delight the eye and lift your spirits all winter.
Necessary materials for creating a New Year's rooster with your own hands at school
- set of colored paper
- glue stick
- ruler
- scissors
- simple pencil
- cardboard template in an elongated semi-oval
Step-by-step instructions for a master class on making a New Year's rooster out of paper for school

DIY New Year's toy Rooster made from cotton pads - master class for elementary school

This master class will tell you how to quickly make a simple but very cute New Year's toy rooster out of cotton pads at school with your own hands. A minimal amount of materials is used for manufacturing, and the process itself takes about 15 minutes and does not require any effort from the child.
Necessary materials for New Year's crafts 2017 from cotton pads at school
- plastic spoon
- cotton pads
- yellow, black and red felt (can be replaced with colored paper)
- simple pencil
- universal glue
Step-by-step instructions for a master class on making toys for the New Year 2017 for school
- Place two cotton pads together so that they clearly coincide along the edges. Draw the outline of the rooster's wings with a simple pencil, and then carefully cut out with scissors.
- Take a whole cotton pad and glue the prepared wing blanks to it on both sides.
- Then place a plastic spoon in the center of the resulting base, and glue another cotton pad on top.
- Cut out a beak, comb and eyes from felt scraps. Carefully glue all this to the convex part of the spoon.
- Cut out a bow tie and round buttons from felt. Glue them to the body of the rooster and stick the craft with the sharp end of a spoon into a flower pot or a specially prepared foam rubber stand.
DIY crafts for the Year of the Rooster - a magnet gift for friends

Before the New Year holidays, the thought always arises of what unusual gifts to give to friends and family. If the answer to this question has not yet been found, you should use the tips from the master class below and make a cute craft for your loved ones with your own hands - a cockerel, the patron of the coming 2017.
Necessary materials for making a cock magnet
- coffee beans
- rhinestones
- sequins
- red felt
- piece of burlap
- rectangular magnet
- cardboard
- coarse thread
- scissors
- glue gun
- hook
Step-by-step instructions for making your own crafts for the Year of the Rooster

New Year's rooster - DIY children's costume for the 2017 matinee

According to the eastern horoscope, the Rooster patronizes 2017 and is its symbol. Anyone who wants to enlist the support of this badass with bright plumage needs to purchase a toy figurine in the store before the New Year holidays or make a rooster with his own hands. Master classes on making holiday birds from paper, cotton pads and other available materials are presented above and described in great detail, so no one will have any difficulties with making crafts and gifts. And in this lesson we will tell you how to make a rooster costume with your own hands at home for a festive party in kindergarten or school.
Necessary materials for a children's New Year's rooster costume
- T-shirt and shorts pattern
- soft fabric (or plush) yellow
- scraps of colorful fabrics
- scissors
- thread
- sewing machine
- colored paper
Step-by-step instructions for a master class on making your own rooster costume for the New Year 2017
- Take a pattern of a T-shirt and shorts that fit the child in size. Cut out corresponding blanks from yellow fabric according to this shape.
- The sleeves of the T-shirt are cut out like wings. Sew an oval red shirt front in front. Sew all basted seams using a machine.
- Cut a shaped collar from orange material and sew it to the neckline of the T-shirt by the edge.
- Cut out one circle from red, yellow and green fabric (red is the largest, green is medium, yellow is small). Cut each piece of fabric exactly in half and carefully sew it from the inside to form a semicircle.
- Fold all three semicircles so that they slightly overlap each other and secure with a sewing stitch. This is the tail of a rooster.
- Sew a tricolor rooster tail into the back of the shorts. Insert an elastic band on top.
- Measure the volume of the child's head and, guided by these data, sew a hat from yellow fabric on a machine. Sew a red beard and an orange beak into the front seam. Attach a red comb to the top. From the inside, sew a soft elastic band to the hat so that the headdress does not slip off the head.
What could be better than to earn the respect and win the trust of the Fire Rooster by making a figurine of the symbol of 2017 with your own hands. This craft can be an excellent gift for family, friends and relatives, or a wonderful item for interior decoration, or it will do a great job of combining these two useful qualities.
The cockerel is a domestic bird that loves order, comfort, everything natural, but at the same time does not tolerate dullness and routine. When making a craft - a rooster for 2017 with our own hands, we will take this into account, and we will try to show off our imagination, impressing everyone with our creative abilities. The examples of original products collected below with photographs and descriptions of the manufacturing process will help with this.
Almost any master class on making the 2017 symbol with your own hands is extremely simple and requires a minimum of skills and abilities. You can even implement these creative ideas together with your children, turning the creation of original crafts into an exciting activity that will develop creative skills in children and bring you even closer to each other. After looking at the craft options presented below, you will understand how little materials you need to create amazing things that will delight your family and friends and, first of all, surprise you. With our help, you will understand that echoing is simple, fun and terribly interesting!
Having familiarized yourself with many ideas, it is quite possible that insight will come to you and you will be able to do something completely different from the samples we have given. Watch, get inspired, create!
Idea No. 1. Master class miracles in the chicken coop
A pillow depicting a bright rooster or his favorite hens will not leave anyone indifferent. Such an accessory will pleasantly enliven the atmosphere of any room in the house - be it a living room, bedroom, children's room or even a kitchen, not only for the New Year 2017, but at any other time. Moreover, making this miracle is not at all difficult. 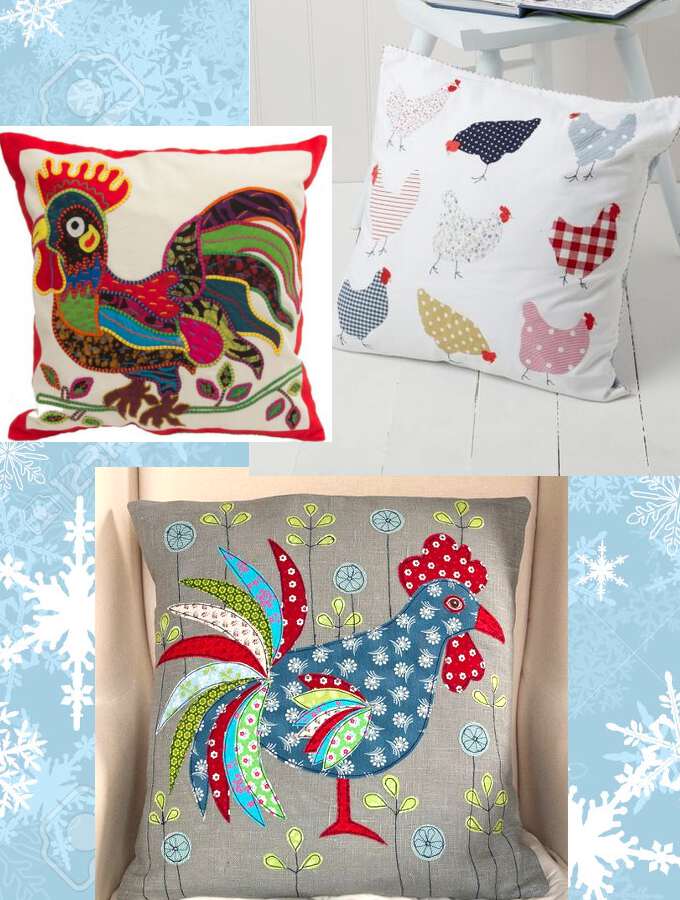
This multi-colored cockerel is made in the form of an applique. First, you need to draw and cut out individual parts of the cockerel from paper, and then, selecting bright fabrics of different colors and patterns, cut out from them individual elements of the future pillow decoration using ready-made patterns. Then the elements are carefully sewn to the base. Along with the cockerel, flowers, grass, butterflies, ladybugs will coexist perfectly on the pillow - in a word, everything that your imagination inspires you to do.
Instead of one owner of a poultry yard, you can depict many chickens by choosing interesting combinations of fabrics with different patterns for them - from small polka dots and cages to cheerful flowers. Such an applique will look organic on a plain fabric in light colors.
Idea No. 2. Let's fly!
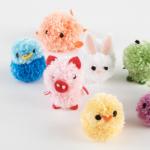
Volumetric stylized figurines of cockerels and hens hanging on a string will look great; they will be an excellent alternative to a static panel to create a festive atmosphere for the New Year 2017. Such a craft is a symbol of the year, made with your own hands, you can easily hang it from place to place, coloring one or another corner of the apartment with bright colors. A brood of chickens will delight anyone - from an elderly grandmother to a fashionable teenager - the birds impress with style and creativity, carry the warmth of your hands and are endowed with their own special character. 
Mother hens
Using one pattern, we cut out the blank of the future chicken, consisting of 2 parts, sew them together, and stuff them with cotton wool. Separately we make and sew on the comb, beard, beak and eyes. You can decorate the top of the chickens to your liking with flowers (as in the photo), beads, rhinestones or even feathers, additionally quilting the sides over the entire surface or just along the edge. Don't forget about the legs - we make them from thick thread, and the buttons sewn together will serve as the paws. You can make several of these birds and hang them by a ribbon.
Cheerful cockerels
The master class for making such an installation is extremely simple. Cockerels are made from pieces of multi-colored fabrics shaped like an egg. We give it a resemblance to the original by sewing on the comb, beak and eyes, and at the bottom we attach a little straw to make something like a nest. We hang the birds on thick threads of different lengths, threading beads through their ends. At the final stage, we attach the cockerels to a bar, stick or branch, providing a rope on it so that it is convenient to hang our craft from it. The ends of the branch can be decorated with several leaves of paper or fabric, fixing them with glue.
Rooster-heart
If there are cute trinkets, then this craft is one of them in the first place. You can make it from multi-colored felt, experimenting with color combinations, because the cockerel, as you know, is a motley bird. So, the base of 2 parts is cut out in the shape of a heart, the middle is filled with cotton wool, the edges are carefully hand-stitched. A bright tail, comb-beard, beak, eyes and wings are cut out and carefully sewn to the base. A braid is sewn in the middle, by which it will be convenient to hang the cockerel wherever you want it. This master class involves making cockerels of various sizes and in any quantity. Birds can be an excellent Christmas tree decoration; you can even make a garland out of them, or you can hang them somewhere in the house, where this cheerful company will delight the eye and soul.
Idea No. 3. Funny anti-stress cockerels
This master class will allow you to make a three-dimensional cockerel for the new year 2017, which can be placed on shelves, a table, or a bedside table. It holds its shape perfectly and pleases the eye with its cheerful and unusual design. 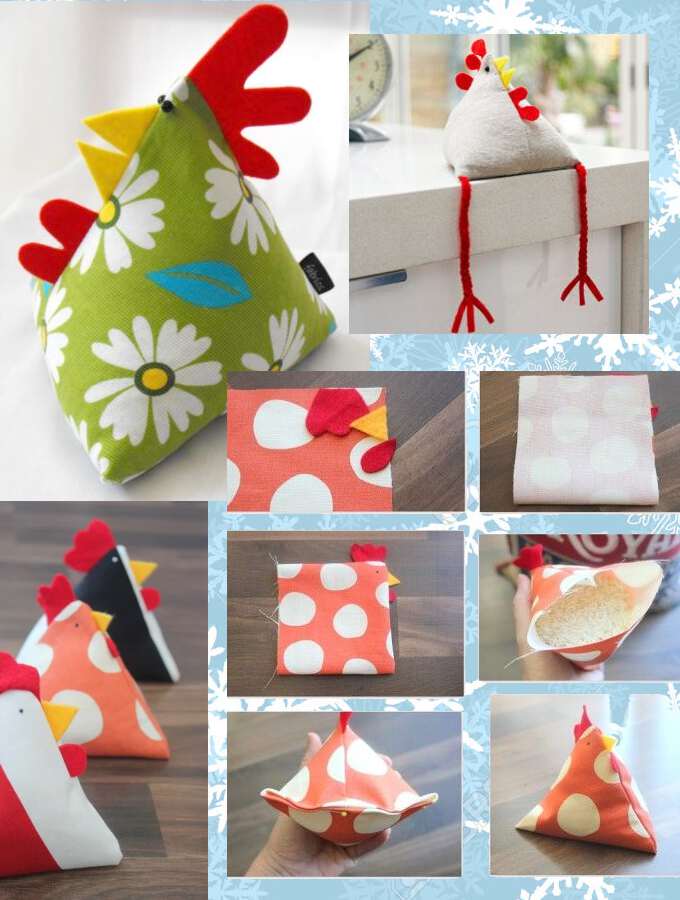
The voluminous cockerel fits perfectly into both holidays and everyday interiors, making it brighter, more interesting, and more fun. He looks funny and always cheers up everyone who looks at him.
So, first we choose the fabric from which we will sew the cockerel. It is better to opt for bright materials with a colorful, positive pattern - peas, flowers, checks, stripes. A plain fabric is also suitable, from which you can make various bold combinations. Procedure:
- cut out a square bag from fabric;
- we sew into its edges a pre-cut comb, nose and beard;
- place cotton wool or a special filler inside the bag;
- sew up the remaining edges to create a pyramid cockerel.
If you really want to, you can make the bird’s paws out of red thread - it will look very funny. Such a cockerel will sit well where he is assigned. If you wish, you can make a whole poultry yard - a cockerel with many hens and even small fluffy chicks.
Idea No. 4. Golden comb
The rooster, the symbol of 2017, will not be difficult to make if you have the necessary pattern of parts. Having selected a fun, fun material, we cut out the blanks for the base and wings attached to the photo, sew them together and stuff them with cotton wool. If possible, we make the body and wings from different contrasting or well-combined fabrics. The crown comb should also be voluminous. 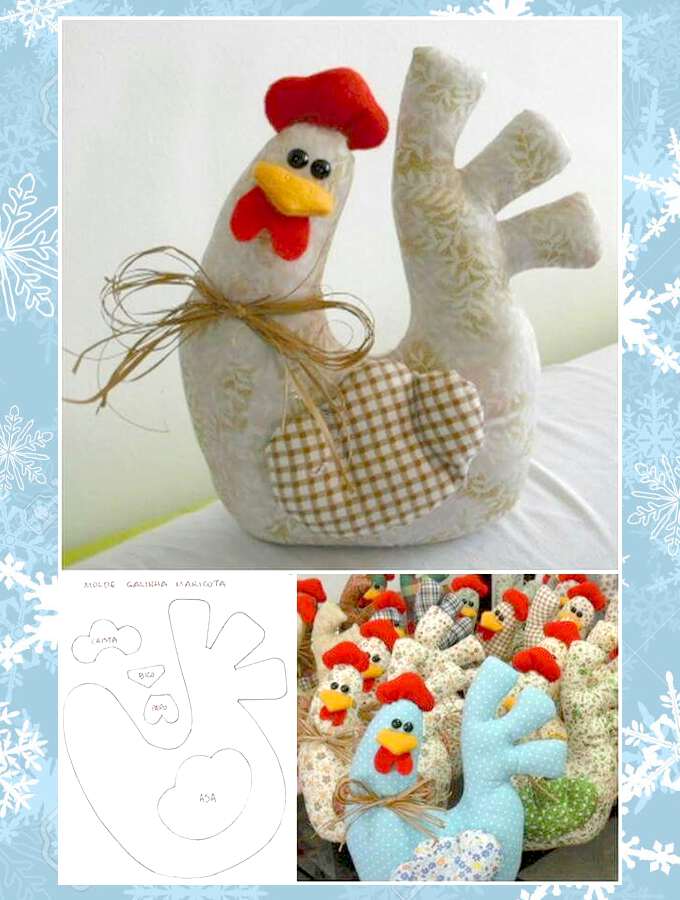
It is sewn to the head like a crown. The beak and beard can be made of felt, and black beads will serve as eyes. As a finishing touch, a straw bow is sewn onto the neck, and our gentleman cockerel is ready! Don't limit yourself to just one bird, make a whole poultry yard, put all its inhabitants in a basket and place it under the Christmas tree or in the center of the holiday table. It will be original, and most importantly, the Rooster will appreciate it!
Idea No. 5. Button glamor
Looking at the rooster, the symbol of 2017, made from buttons, you are surprised at how beautiful and unusual a craft made from ordinary things found in every home can be. Surely you also have a whole handful, if not more, of buttons inherited from your mother. They lie there, lying idle, more and more giving way on clothes to zippers, Velcro and buttons. It's time to correct this annoying injustice - let's collect all this wealth and boldly begin to create!

All you need to create such an original cockerel are colorful buttons of different sizes and shapes. The main thing is to choose a harmonious color scheme so that the “plumage” of the owner of 2017 looks royal. Small rhinestones in the color of the buttons will also be irreplaceable, which will play the modeling role of filling the gaps formed between the buttons.
This master class is quite simple and requires only a competent selection of components and patience. You can lay out the cockerel on fabric or paper, colored or plain. It would be a good idea to mark the outline of the bird on the base before starting work, so that the cockerel does not move to the side during the creation process. Then we begin to lay out the buttons, first applying glue to them and gradually filling this outline. The finished painting deserves a frame and an honorable, most prominent place in the house.
Now you know how to appease a proud and arrogant cockerel - just make a symbol for the coming 2017, and you will be guaranteed his patronage. In addition, you can enjoy the creative process, improve your skills and really please your family and friends.
According to the eastern calendar, the coming year 2017 will pass under the auspices of the Fire Rooster. The Rooster loves rich colors in clothes and interiors, natural materials and original things. All these characteristics correspond to New Year's crafts that are suitable as souvenirs for friends and family. You can make a beautiful rooster with your own hands from different materials: paper, cardboard, cotton pads, fabric. And for the New Year's party in kindergarten or elementary school, you can sew a costume for the symbol of the coming 2017. In our article today, we have collected for you the brightest and most interesting step-by-step master classes with photos and videos of cockerel crafts for children and adults. Be sure to use them to create an original gift for the New Year! And such a rooster with his own hands will certainly attract good luck to you!
Symbol of 2017 Rooster made from cotton pads with your own hands for kindergarten - master class with step-by-step photos
The first master class on creating the 2017 symbol of the Rooster with your own hands for kindergarten contains two options for crafts - from cotton pads and colored paper. An ordinary plastic spoon is used as the basis for the bright cockerel. Find out how to make a rooster symbol of 2017 with your own hands from cotton pads for kindergarten from the instructions below.
Necessary materials for a rooster made from cotton pads with your own hands for kindergarten
- disposable plastic spoon
- cotton pads
- white and colored paper
- scissors and glue
- marker
Instructions for a master class on a rooster made from cotton pads for kindergarten
- For the first option for kindergarten we will need: two cotton pads, a plastic spoon, paper and glue. First we make the wing blanks. Cut out wings from a piece of white paper folded in half, as in the photo below. Cut out a beak and scallop from red paper.

- Let's move on to assembling crafts for kindergarten. First, lay out a cotton pad, then the wing blank, and a spoon on top. Coat the second cotton pad with glue and place it on top, pressing it tightly with your fingers. Set aside until completely dry.

- Let's move on to the second option. For this in kindergarten we will need: yellow paper, a plastic spoon, glue, a piece of red paper. We cut out the shapes of the scallop and beak from red paper.

- Turn the spoon over and coat it generously with glue. Then wrap it in a piece of yellow paper and let it dry.

- Cut out a square from yellow paper and thread it through the leg, as in the photo. Fix with glue or tape.

- Glue the scallops and beaks to the blanks, and draw the eyes with a marker. Ready!
A simple do-it-yourself paper rooster for an elementary school or kindergarten - step-by-step photos of a children's craft
The next master class is devoted to simple DIY rooster crafts made from paper and cardboard and is perfect for elementary school or kindergarten. And don’t think that such a craft is purely decorative. A simple do-it-yourself paper rooster for an elementary school or kindergarten can be used, for example, as a cap for a New Year’s costume.

Necessary materials for a paper rooster for elementary school or kindergarten
- cardboard
- colored paper
- scissors
- pencil
- eyes

Instructions for a master class on New Year's crafts DIY paper rooster for school or kindergarten
- We roll a sheet of yellow cardboard into a cone shape and mark the joint line with a pencil.

- Apply glue to the cardboard and press firmly for several minutes. When the cone has set a little, cut off the excess edge.

- On orange paper we make marks for the tail blanks. We measure strips approximately 2-3 cm wide along the entire length of the sheet.

- We cut out the strips and wrap them tightly around a pencil.

- We remove and get wavy “feathers” for the tail of our cockerel.

- On white paper we outline two blanks 5 cm wide and cut them out.

- We fold each strip like an accordion and glue it to the base of the cone - these will be the legs of the rooster.

- We make wing blanks and small circles for the feet from orange paper.

- Glue the wings. We cut out two blanks for the scallop from red paper.

- Carefully glue the comb to the top of the cone, clasping it on both sides. We also cut out the blank for the beak and attach it.


- All that remains is to glue the eyes and our DIY New Year’s craft for kindergarten or school is ready!
DIY craft for the New Year 2017 of the Rooster from salt dough for school
Salt dough is an excellent material for DIY crafts for school, including for the 2017 New Year of the Rooster. Our next master class is suitable for both kids and adults. How to make an original craft for the New Year 2017 Rooster for school with your own hands from salt dough, read on.

Necessary materials for the New Year's toy DIY salt dough rooster for school
- salty dough
- watercolor paints
- water and brush
- beads
- plasticine knife
- cardboard
Instructions for making a rooster for the New Year 2017 from salt dough for school
- Salted play dough is easy to make. You need to mix 1 cup of flour with half a glass of coarse salt and half a glass of water. Knead a non-sticky dough and get to work. Roll the dough into a thick sausage and distribute it over the cardboard in the shape of a heart.

- From pieces of dough we form an eye and a beak. We attach them to the main part, lightly lubricating the joint with water.

- Add a comb and use a plasticine knife to make simple textured patterns on the body.

- We make 5 small balls and form a tail out of them.

- We make the wing from a larger ball and add texture to it with a knife.

- We decorate the rooster using beads or pearls.

- We use watercolors to paint a craft for school in bright colors.

- Let the paint dry a little and add color. We dry the craft with our own hands in the sun.

DIY Christmas toy Rooster made of felt, master class with photo
The next master class will tell you how to make a New Year's rooster toy out of felt with your own hands, for example, for school. Felt is a very simple and pleasant material, so don’t be intimidated by it. And a ready-made New Year's toy in the shape of a felt rooster will become a decoration for any Christmas tree.

Necessary materials for making a New Year's felt rooster with your own hands
- foam ball
- thin felt white and red
- red threads for knitting
- pencil, paper, scissors

Instructions for a DIY Christmas rooster toy made of felt
- Measure the diameter of the ball using a paper strip.

- Divide the strip into five equal parts and mark it on paper.

- Transfer the marks to the ball.

- We make markings on the ball, as shown in the photo below. Using a utility knife, make shallow cuts along the marks.

- We make 5 sheet-shaped blanks from white felt.


- We place the blanks on the ball and use a thin file to fix their edges in the slots.

- Now we cut out the blanks for the wings and head - two pieces each.

- Between the two parts for the head we fold a red thread imitating a comb. We also make a beard out of it. Glue and add eyes and a beak made of red felt.

- We trim the wings with red thread and glue them to the main part of the craft.

New Year's rooster for a DIY gift, step-by-step master class with photos
The DIY New Year's rooster from the step-by-step master class below is perfect for a gift. You won’t be able to make it in kindergarten or elementary school—it’s too complicated a craft for children. But for creative adults, a DIY New Year's rooster as a gift (master class with photos) is perfect. In addition, the finished craft turns out to be of good quality (this is not a craft made from cotton pads or paper), although it is made from a cardboard tray of eggs.

Materials for a New Year's rooster for a DIY gift
- cardboard egg tray
- scissors
- acrylic paints
- ball
- newspapers
- cardboard
Instructions for making a DIY New Year's rooster craft for a gift
- We cut off the internal partitions, cut them in half and connect the two pieces together.

- We cut off the side convex parts of the tray, as shown in the photo. We form the beak from a small triangular piece.

- From the flat part of the lid we cut out 5 blanks for the tail. From the remaining parts of the tray we cut out oblong blanks in the shape of leaves.

- Glue the leaf blanks onto cardboard in the shape of a wing (2 pcs.). We assemble the neck from the first blanks, add a beak and a comb made of cardboard. Inflate the balloon and wrap it with strips of newspaper dipped in glue.

- Let the papier-mâché dry and deflate the ball, cut off half of the workpiece and proceed to assembly.

- Paint the finished rooster with acrylic paints.


On the Internet you can find a huge number of master classes on how to make a cockerel with your own hands from paper. The main ones will be discussed below.
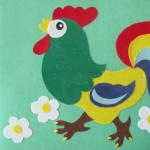
Crafts for a child in kindergarten
Despite the fact that there are many techniques for making a rooster out of paper, this article will discuss the most primitive of them, which anyone can handle.
In addition, you should take care that the bird has a comb and beard. They are cut out separately from red colored paper and glued to the drawing using PVA glue. The finished fake is most often decorated with sparkles. To do this, you should first treat it with glue, and then shake off all the excess glitter.

Volumetric symbol of 2017
The symbol of 2017 is easy to make with your own hands and in the form of a cone. This paper cockerel, made for the New Year, will become an interesting element in the decoration of the New Year's interior in the apartment. The basis of such a cockerel is a cone. To make the body, you do not need any additional templates. You just need to roll a piece of paper into a “ball” and voila - the cockerel is almost ready. To prevent the body from falling apart at the most inopportune moment, it must be glued together. To do this, use PVA glue. Next, cut out a beard and comb from colored paper. They should be red.

The upper part of the cone is the “face” of the bird. The beard and comb are glued here. You should also make sure that the cockerel has eyes. They can be made of black colored paper. To make the eyes look like real ones, you need to glue another bead to each black part.
The wings are made from strips of paper. They should be a contrasting color in relation to the body. The same goes for the tail. To make it, the same technique is used as for the wings. You can attach a thread to the finished cockerel. This makes it easy to hang the bird somewhere. For example, for a holiday tree.
According to the Chinese calendar, each year is endowed with its own patron - one of 12 animals. There are beliefs that in each coming year a specific eastern sign influences people's lives. That is why, on the eve of the New Year, it is advisable to learn all the subtleties and features of the patron of the coming year in order to properly meet and achieve his favor.
Having learned the preferences of the patron, you can try to appease him in order to achieve his favor and have success in all your endeavors throughout the 12 months. On January 28, 2017, the Red Monkey will pass the baton to its tenth comrade, the Fire Rooster.
The Fire Rooster is the embodiment of thriftiness, self-sufficiency and extravagance. With the exception of the animal, you also need to become familiar with its preferences.
It is not difficult to guess that the Fire Rooster brings with it fiery and bright colors: orange, red. Sages have long been of the opinion that fire symbolizes a continuous upward striving and has a powerful living energy that has purposefulness and self-improvement.
Red colors have always symbolized love and passion. So we can conclude that 2017 will be full of romantic adventures and adventures.
For established couples, the year promises turning points: marriage, revival of former passion, etc.
According to the eastern calendar, the Rooster appears as a sophisticated, witty and insightful animal. In all his endeavors, he strives for perfection and tries to bring everything he starts to an ideal end. In addition, he simply cannot ignore attention and loves compliments in his direction.
When celebrating the New Year 2017, its symbol should be present in every home, so in this article we will look at how you can make a rooster with your own hands. Such cute souvenirs can also be used as a gift, because they are always priceless.
There are always several balloons at home. If from the yellow ball of yarn there is a thread about 1.5 m long left, and somewhere in the bins there are scraps of cotton fabric lying around, we will take out the listed wealth, PVA glue, a piece of cardboard and scissors. Let's make a colorful Christmas tree toy - a rooster.

In order to make a rooster with your own hands, you need to prepare:
- ball of yellow yarn
- balloon
- scissors
- red fabric
- ready-made eyes for toys
- PVA glue, or better yet superglue.

First, let's inflate the balloon to the size we need. This makes it easier to decide what size to make the paws, beak and comb of the cockerel.
From red fabric we cut out a triangle - a beak, two legs and a trapezoid. The last geometric figure will soon turn into a real comb. We will not decorate the earrings; too many red details spoil the appearance of the toy.

Fold the trapezoid in half and round the fold line in two places. After this, shorten the base of the ridge slightly.


Lubricate the balloon generously and quickly with PVA glue. We take the ball in our hands and wind the thread around the ball in any order. The number of turns is not limited, only the second row will have to be additionally lubricated with glue.
On the last turn we decided to leave a loop, with which we will hang the cockerel on the tree.


All that remains is to glue the parts cut out of red cotton onto the yellow base. I must say, the work is not easy. PVA takes a long time to dry. It is better, if possible, to use Moment glue or any other superglue.


While part of the Christmas tree decoration is drying, let's work on the wings of the cockerel. We will cut out a blank from cardboard that is similar in appearance to the crown shown in the picture.

We wind a thread of yarn between the teeth of the cardboard in several layers, after which we fix the bottom of the wing by stretching the thread between the rows. We remove the finished wing from the machine. Let's repeat the procedure again.


We glue the wings to the toy using PVA. We are waiting for the result - for the glue to dry completely for at least an hour. Well, all that remains is to attach the ready-made eyes purchased at the craft store.

We can't wait to put the cockerel on the Christmas tree and admire the toy we made with our own hands.

Everything is fine, but an orange ball with yellow yarn looks more harmonious. We recommend using fleece instead of cotton.


How to make a rooster from plasticine - master class with photos
Now let's look at how to make such a colorful rooster from plasticine.

For this we will need plasticine of a variety of bright colors and stacks.

Take half a yellow block.

And give it the shape of an egg.


We sculpt a red beak.

Attach the comb as shown in the photo.


Then - the eyes and beak.

We make blanks for wings from green plasticine.

We also recommend
 Fashionable bob haircut options according to face type: choose yours, photo See women's bob haircuts
 Charming and attractive DIY Cockerels!
 Crafts from threads: do-it-yourself magical toys
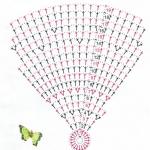 Napkins with voluminous crochet butterflies
 Four beautiful DIY hair ties - master classes for fashionistas and their mothers Homemade hair ties
 Sometimes you really need to be supported...