Decoupage with eggshells on a bottle. Decoupage bottles with eggshells

Hello to everyone who loves to make beauty with their own hands!
Now we will decoupage the bottle on an eggshell. This is bottle decoupage for beginners using a napkin. By following all the steps of the master class, you will definitely learn how to make decoupage.
Decoupage of bottles with your own hands is a very interesting and exciting activity. I will say more, you can even earn extra money from this.
What materials will you need:
- Beautiful glass bottle;
- White acrylic paint;
- Eggshell;
- Toothpick or needle;
- PVA glue;
- Soft brush, sponge, cloth;
- Decoupage napkin;
- Acrylic lacquer.
Acrylic paint, varnish and PVA can be bought on the construction market. Decoupage napkins are often sold in supermarkets or craft stores.
Let's get started with the master class.
Step 1.
We clean the bottle of all labels and stickers. Using a sponge, paint with white acrylic paint. If you didn’t paint it all at once, paint it a second time, but after the first layer of paint has dried.

Step 2.
We break the eggshell into pieces of 1-1.5 cm. Apply PVA glue to the bottle in small sections.


Apply the shell and press with your finger. The shell will split into several pieces. Using a toothpick or a needle, we straighten the shells, distributing them evenly on the bottle so that there is approximately the same distance between the pieces.


In this way we cover the entire bottle.

Step 3.
Chop the shell into small pieces. Lubricate the neck of the bottle with glue and sprinkle with small shells.

Step 4.
When the glue has set a little, you need to secure it. We dilute PVA with water 50/50 and cover the entire bottle.

Step 5.
The paint has dried, now we paint the bottle with acrylic paint 2 times.


Step 6.
Take a decoupage napkin and separate 2 layers, leaving the top one with the pattern. We tear off the necessary fragments with our hands.


Why with your hands and not with scissors? This results in torn edges that blend into the background and the edges of the napkin simply won’t be visible.
Step 7
We place a fragment of a napkin on the bottle and use PVA glue diluted with water to glue it. Glue from the center to the edges. Use a soft brush to expel the air from under the napkin and smooth out wrinkles.


Instead of throwing away eggshells, you can turn them into something amazing... Decor from eggshells simple and accessible to everyone. Even without experience in decorating, you can achieve excellent results. This seemingly banal material turns into real masterpieces!
Laying out a mosaic is quite a painstaking job, but a beginner can make it easier by doing decoupage on eggshells.
The technology is very simple: apply PVA glue to the fat-free workpiece, lay out the shell, place a fragment of a napkin on top (or a whole one), press down so that the relief is drawn, let it dry. The film was first removed from the shell.
Unusual decor will easily update old plates and saucers.
Cup stand - guests will be amazed at your skill!

For decorating a kitchen in Provencal style.
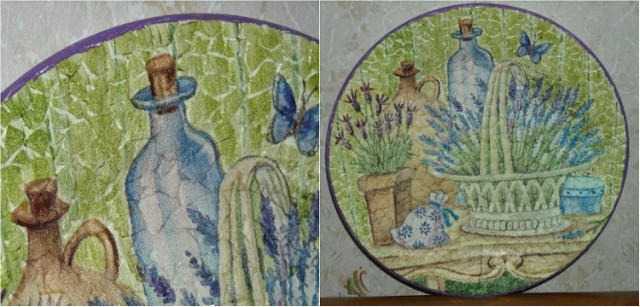
And such a plate will be a wonderful handmade gift.

You can decorate completely different objects with eggshells.
Spectacular bottle design in African style.

You can also pre-paint the shell and then lay out a design from it.
This wonderful work effectively combines various materials: shells, beads, glass beads and natural stones. 
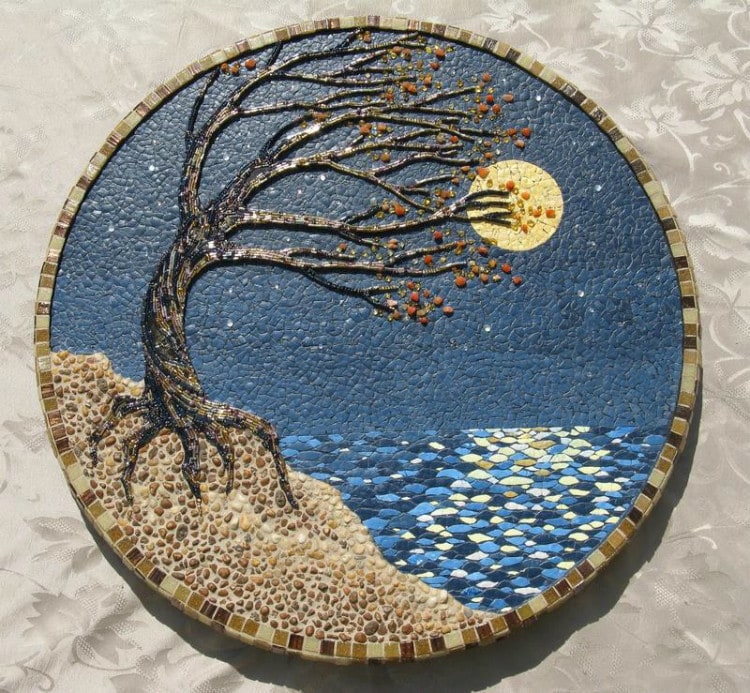
Of course, this painstaking task will take a lot of time and effort, but the result is worth the time spent: finished works amazes the imagination!
Decoupage on eggshells. DIY bottle decor. Master Class
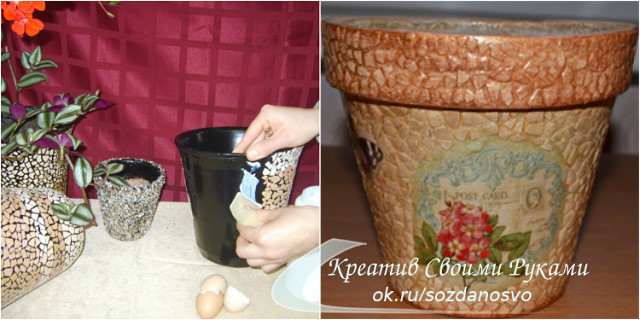
Flower pot decor - aging effect. Decoupage with eggshells.
Let's make this rare wine bottle.
We will need: - the bottle itself (cleaned and washed of all stickers); - eggshells (you must first remove the inner films from it - this is easier to do in running cold water); - PVA glue; - wide flat brush (preferably synthetic); - napkins for decoupage; - a toothpick or a thin wooden stick; - white acrylic paint; - paint of a contrasting color (in my case it’s brown); - varnish for the finishing coat (in my case it is regular parquet varnish). Well, that seems to be it. I warn you right away that the work, in principle, is not difficult, but in terms of pasting the bottle with eggshells, it is long and painstaking. Begin? There is a method when they smear glue on the surface of the object to be decorated and apply a piece of shell to it, and crush it in place, for example, with the blunt end of a brush or scissors, pushing the resulting small pieces apart with a toothpick... But for some reason it was inconvenient for me. I did this: take the shell, put it on the table,
2.
we immediately crush it into smaller pieces with a simple finger press,
3.
and for work we use these ready-made small fragments.
4.
Apply glue to a small area of the bottle (it is more convenient to start working from the top from the neck and move downwards around the circumference
5.
Using the tip of a toothpick (at the beginning of work, you can moisten it a little so that pieces of eggshell stick to it more easily, in the future this will not be necessary - from working with glue, the toothpick will already become a little sticky and picking up shells will be quite easy) take a suitable piece of eggshell
6.
and apply it to the area greased with glue,
7.
pressing down a little so that it sticks better.
8.
And thus, carefully and slowly cover the entire surface of the bottle with eggshells, with the exception of the bottom.
9.
Let the bottle dry thoroughly and cover it with white acrylic paint.
10.
This is what our bottle looks like now - covered with shell and painted with white acrylic.
11.
Then we take brown paint (by mixing and diluting the colors, we achieve the desired shade), pour it into a saucer (or any other small dish)
12.
and use a regular kitchen dishwashing sponge to paint the entire surface of the bottle.
13.
And immediately, before the brown paint has dried, wipe the bottle, without pressing too hard, with a damp, clean rag.
14.
We do this in order to highlight our future “cracks”: the paint will be erased from the surface of the shells, and they will remain light, and brown paint will remain in the recesses BETWEEN the shells - these will be our “cracks”. Like this:
15.
Let's start with the actual decoupage. We tear out the fragments that suit us from the napkin, separate the top layer with the pattern and glue it in the right place. (We tear out, rather than cut out, the fragments because SO the edges of the picture will not be so clear and less noticeable. And we glue it as follows: attach the fragment to the surface of the bottle, apply a drop of glue to the center of the picture and carefully move the brush from the center to the edges to thoroughly coat the entire drawing. We try not to pass over one place several times and not to put too much pressure on the brush, so as not to tear the soaked napkin. It is better to start with larger fragments, and then place the smaller ones on the remaining voids).
16.
Here's what we got:
17.
18.
19.
20.
21.
And don't forget about the bottle cap :)
22.
When the glue is completely dry, we can coat our work with varnish. At first I took aerosol varnish for this purpose. But I didn’t like the result: it doesn’t have the gloss and shine that I wanted to achieve in the end...
23.
Therefore, for the next layer I used ordinary parquet varnish, purchased at a hardware store (and, in my opinion, also at a SOVIET hardware store;))). But there is one peculiarity here: almost all varnishes for woodworking (including my parquet one) give the treated surface some yellowness - one is darker, the other is lighter - but EVERYONE turns yellow. Because This yellowness did not interfere with my motive at all, I took parquet varnish. But if you need an exceptionally transparent and colorless coating, then you should buy something from acrylic varnishes - it is better to consult with the seller in the store.
24.
To be honest, I didn’t count how many layers of varnish I got. But probably something like five...
25.
26.
27.
28.
30.
And this is what our finished work looks like.
Decoupage on eggshells. Master class with step-by-step photos
Master class with step by step photos"Decoupage on eggshells"
Performed: Lapteva Svetlana Khristyanovna, teacher of the state budgetary institution Novosibirsk region"Social rehabilitation center for minors" Tatarsk
Purpose: gift, interior decoration.
Target: Making a painting using decoupage technique using eggshells.
Tasks:
- introduce the technology of making work using the technique of decoupage on eggshells;
- bring up artistic taste and a creative attitude to work, perseverance in achieving goals, accuracy.
Decoupage is one of the decorative techniques different surfaces. Using this technique, you can create exclusive interior items, dishes, vases, flowerpots, photo frames, decorate clothes, make your own fashionable accessories and do much more as your imagination allows. Decoupage - ancient technology, which has become fashionable again in recent years.
Decoupage on eggshells gives the surface of the product an unusual texture and volume.
There is nothing super complicated in the manufacturing technique, but you will need due patience.
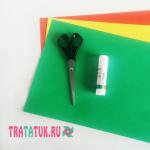
To complete the work you need:
- frame without glass;
- water-based acrylic paint;
- eggshell;
- PVA glue;
- napkin with a pattern;
- scissors;
- brush;
- toothpick.

Work must begin with preparing the shell. Wash the fresh egg shell and leave it in water for 2 hours.

We remove the film on the inside, and then let the shell dry thoroughly. The shell will become more fragile and there will be no smell.

We take the shell, break it into not very large pieces and, using PVA glue, with the concave side inward, begin gluing it onto the cardboard from under the frame. Let's start doing the work from the corner.

The shell fragments, as well as the distance between them, can be large or small at your discretion.

Gradually fill the entire space completely. The base is done, we leave our work until the glue is completely dry.

The shells turned out to be different colors. Now we need to make it monochromatic. We take white acrylic and coat the resulting base with paint twice, drying in between. When applying paint, you need to pay attention: if the acrylic is thick, then you need to dilute it a little with water. When applying paint, it is necessary to ensure that the gaps between the shells do not “fill” and the surface is not leveled, otherwise the effect of cracks will not be clearly expressed.

Take a simple single-layer napkin. We decide what motifs we will use for decoupage.

We cut out two different motifs along the contour.

We place them on the base and try them on. If necessary, we remove or add something. I cut off the bud from the top flower, since it creates an overlay when combining the second motif.

We take the top motif of our work, place it in the place we need, drip PVA glue into the center and glue it to the base. Glue from the center to the edges to remove air bubbles or folds.

You must work very carefully, as the napkin is very thin and can easily tear.

Let's try the second motive.

We glue it carefully.

Leave the work until the glue dries completely and frame it.


I made the frame more fun using the decoupage technique.

And this work was done in a similar way, only the eggshell was glued in smaller pieces.

I hope that my master class is useful!
Eggshell decor is one of the simplest types of decoration. With its help, surfaces acquire a mosaic texture, and paints will help to depict original designs. Eggshells are used to decorate bottles, flower pots, candlesticks, jars, vases and even furniture. The material is combined with pasta, cereals, salt and accessories. Any novice decorator can handle this type of decoration. It does not require any special skills or special tools, and the basic material for creativity can be found in every home, because waste from eggs usually goes straight into the trash. Let's take a look at a couple of master classes and pick up some simple but original ideas.
How to prepare shells for needlework
To begin, the shells are thoroughly washed in a soapy solution. As you know, colonies of dangerous bacteria can flourish on the surface of eggs, so do not skip this important step when working with the material. Soap can be replaced with alcohol or another disinfectant liquid. Some people prefer to boil the shells in boiling water for 10-15 minutes. Heat treatment will also perfectly disinfect the surface of each piece. During washing, any film that may remain is removed. Then the shell is laid out on a piece of clean cloth or napkin and dried thoroughly. The finished material is crushed by running a rolling pin or glass bottle over it several times. There are several ways to attach the shell to the surface being designed:
- In the first case, a layer of glue is applied to pre-degreased glass, plastic or ceramics. It is “sprinkled” with crushed shells or the container is “dumped” in them. Then the resulting mosaic is pressed against the surface with a sponge to secure it better.
- For another method you will need tape. The shell is glued onto it. A layer of glue is applied to the prepared surface, and tape is attached on top. Now you need to wait for the fastening agent to dry completely, after which you carefully remove the adhesive tape.
- The third method is perhaps the most time-consuming. Glue is applied to the surface and shell “shards” are attached to it manually one by one. The process will take a lot of time, but the pattern will not be random, but will correspond to the author’s idea.
It doesn’t matter at all what color the shell is; in most design “recipes” it is subsequently painted over.
Decorating a flower pot
The decor of the flower pot is made in two versions:
- Complete surface coverage with shell;
- Partial application of pieces.
To begin with, the pot is first cleaned of dirt and dried. For complete coverage, its entire surface is coated with glue. Then the shells are attached. After drying, a layer of paint is applied on top. It is better to use acrylic or tempera, as they adhere better to the surface, are not afraid of water and fade more slowly. You can apply another layer of paint to the dried layer using a shaped stencil or create a design yourself. Secure the layer with varnish. For partial decoration, the pot is pre-painted desired color, and glue is applied only to those areas where they plan to place the shells. Most often, they are made into horizontal stripes of different widths or primitive geometric patterns. The pieces are glued to the surface of the pot, allowed to dry, now original decoration The window sill is ready.
On flower pots“plant” drawings look organic: blossoming buds, maple leaves, bouquets.
Options for decorating glass containers
The technique of applying shells to the surfaces of jars, vases and bottles is no different from the design of other ceramic and glass objects. Some people prefer to give the pieces the desired color ahead of time. For these purposes, they are placed in a container with dye and allowed to dry. To secure it, the shells already glued to the bottle or jar are additionally coated with varnish. A similar step is resorted to in cases where natural color the material does not harmonize with the overall composition, and paint cannot be applied on top, since the decor becomes the final chord in the work. The vases are additionally covered with voluminous satin flowers, buds made of felt pieces, bows, beads and lace. Colored pasta of interesting shapes and coffee beans in combination with shells would look appropriate on the surfaces of “kitchen” spice jars. Rows of twine are added to the bottle decor, which is used to wrap the container. You can also glue real spikelets or blades of grass onto the surface, which are covered with paint on top.
Decor of flat objects
When decorating plates and coasters, eggshells will act as a background onto which a design will subsequently be applied. If you don’t have a brush, then stencils and napkins for decoupage will come to the rescue. The shell can be glued to the entire surface of the plate, randomly filled with it in individual areas, or only the border can be made in relief. The technique of combining textures is also used, when one area is filled with shells, and the other with small beads, cereals (buckwheat, rice) or salt. The technique of partial volumetric visualization looks original: in the picture some element goes beyond its scope. For example, in a rural landscape with a cozy house, a fence is made of wood and glued to the surface of the saucer on top of the image. In “natural” paintings, real blades of grass, twigs, pine cones, leaves or dried flowers are glued to the surface.
If the surface of the stand or plate will decorate the city landscape, then the shell, painted in grey colour, will be an excellent imitation of stone pavement.
Decorating furniture with shells is usually done partially. A “solid” relief background on large surfaces may slightly lose its color. However, this material perfectly imitates snake skin. Natural finishing of furniture items costs incredible amounts of money, so shells are an option for creating original decorations that will be indistinguishable from the original at first glance. The registration process may be delayed due to the specific processing of the base material. Each piece of shell will have to be processed separately. To do this, you will need tweezers, which are used to manually bite off the extra millimeters from the edges to give them the round shape characteristic of reptile skin. Gluing the shells will also take a long time, since in this case the degree of similarity to the original depends on their location. Dye tones are selected in accordance with the natural skin tone of the reptile. First, apply a light shade to the entire surface and allow it to dry completely. Then on each “scale” more dark color. Eggshells are used to decorate any surface: from traditional wood to plastic. Shelves, cabinet fronts, coffee tables and lamp stands designed in this way look original.
Decoupage and shell
Both of these techniques are organically combined. There are two ways to combine:
- A part of a napkin with a picture is glued onto a pre-primed surface. Regular PVA glue is best suited for this. After the image has dried, a layer of adhesive is again applied around it to hold the shells. For reliability, they are pressed with a toothpick or sponge. After the surface has dried again, it is covered with paint.
- First, the shells are glued to the glass or plastic. After drying, prime the embossed surface twice with a sponge. It is necessary to go through several times to thoroughly paint over all the gaps and gaps. After drying, the picture is transferred using the decoupage technique.


We also recommend
 How to do golden makeup
 Ultrasound of the mammary glands, when to do it and how many times?
 How to increase pensions for working and non-working pensioners: methods, step-by-step instructions Distribution of funded pension payments
 DIY paper Christmas ball for the Christmas tree
 Application from corrugated cardboard How to make corrugated cardboard by hand
 How to learn to write beautifully and make your handwriting perfect?