How to tie a men's tie. Tie knots: types
This is useful to know not only for men, but also for their caring women.
The ability to tie a tie correctly is one of the most important skills in the arsenal of a real man and a caring wife. Today, there are dozens of ways to create knots, and each of them depends on personal preference. They all have one thing in common - they make men irresistible.
In this article Bright Side 7 simplest and available options tying a tie in the form of visual diagrams.
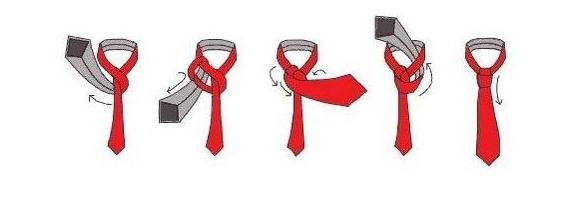
Simple knot
The simple knot, also known as the oriental or kent knot, is very easy to learn as it only requires a few steps. This knot looks good with thick ties and is suitable for tall men.
1. Unfold the wide end of the tie with the seam facing out.
2. Pass the wide end under the narrow one.
3. Then we put the wide end on it.
4. We insert the active end of the tie into the neck loop from below.
5. Pull the wide end into the eyelet formed after the 4th step.
6. Lower the wide end down to tighten the tie knot. We get a simple node.
To adjust the diameter of the neck loop, move the knot along the thin end.
Quarter knot
Named after the 19th century gentlemen's club "Four-in-Hand". In Russia it is better known as quarter. This is the current champion among ties. Its popularity is due to its simplicity and versatility.
1. We tie the tie around the neck so that the wide end is on the right and the thin end on the left, with the front side of the tie on top. When tying, use only the active (wide) end.
2. Cross the wide end with the narrow one, with the wide one above the narrow one.
3. Place the wide end of the tie under the narrow one.
4. Let's do it again.
5. We pass the wide end of the tie into the neck loop from the bottom up from the inside.
6. Pull the wide end into the loop formed from the wide end.
7. Lower the wide end down to tighten the tie knot, and the “four” is ready. Move the knot along the thin end to adjust the diameter of the neck loop.
Double knot
This is a compact unit. Great for long collar shirts. The tie must be from soft fabric, not very short.
1. We tie the tie around the neck so that the wide end is on the left and the narrow end on the right. Place the narrow end slightly above the navel (the distance may vary depending on the height of the person, the length and thickness of the tie). When tying, use only the active (wide) end.
2. Cross the wide and narrow ends, the wide one should be located on top.
3. Pass the wide end under the narrow one.
4. Place the wide end over the narrow one.
5. The second time we pass the wide end under the narrow one.
6. Place the wide end on the loop formed around the narrow end.
7. We insert the active end of the tie into the neck loop from below.
8. Pull the wide end into both loops formed.
9. Pull the wide end down to tighten the tie knot. Move the knot along the thin end to adjust the diameter of the neck loop. In a double knot, the first (inner) loop should peek out slightly from below.
Windsor
1. The front side of the tie faces forward, the wide end is located on the right, the small end on the left. Only the active (wide) end moves.
2. Cross the wide and thin ends so that the wide one is located above the thin one.
3. We insert the active end of the tie into the neck loop from the bottom up.
4. We wrap it down in the same direction as after the 2nd step.
5. We guide the wide end under the narrow one.
6. Raise the wide end of the tie up.
7. We wrap it down, through the neck loop, in the same direction as after the 5th step.
8. Wrap the wide end over the narrow end.
9. We insert the active end of the tie into the neck loop from the bottom up.
10. We pass the wide end into the loop formed after the 9th step.
11. Carefully tighten the tie knot; if necessary, adjust the fold under the knot. Adjust the diameter of the neck loop by moving the knot along the thin end. The Windsor knot is ready!
The bow tie
1. Wrap the bow tie around your neck, right side up. Adjust the tie so that one end is longer than the other. Let's call one end “end A” (long), the other “end B” (short).
2. Cross the ends so that the long one is on top.
3. Pass end A into the neck loop.
4. Fold end B in half to form a bow and lay it across end A.
5. Lower end A down to the middle of the bow that was made in step 4.
6. Holding end B, fold end A right sides together, as shown in the diagram, and squeeze into a bend.
7. Pull the folded end A through the loop behind end B.
8. Take the bow by the two ends and pull in different directions to tighten the knot.
9. Adjust to achieve symmetry.
10. Your butterfly is ready!
Pratt
The inventor of the knot, Jerry Pratt, worked for the US Chamber of Commerce. For 30 years, Pratt tied his tie with his own unique knot before host Don Shelby "discovered" it and talked about it on local television in 1989.
1. The reverse side of the tie faces forward, the wide end is on the right, the small end is on the left. Only the active (wide) end moves.
2. Cross the wide and narrow ends so that the wide one is located under the narrow one.
3. Raise the wide end of the tie up.
4. Pass it down through the neck loop.
5. Place the wide end over the narrow end.
6. We insert the active end of the tie into the neck loop from the bottom up.
7. We pass the wide end into the loop formed after the 6th step.
8. Carefully tighten the tie knot. Adjust the diameter of the neck loop by moving the knot along the thin end.
Eldridge (complicated but effective)
"Eldridge" is a non-standard, complex and spectacular tie knot that is tied in 15 steps. It was invented by Jeffrey Eldridge in 2007 and quickly became popular. Unlike the vast majority of tie knots, the Eldridge knot is tied by moving the narrow end.
1. Place the tie around your neck with the right side facing out. The end of the wide end should rest above the belt buckle. When tying, move only the narrow end.
2. Cross the narrow and wide ends, while the narrow one should be located on top.
3. We wrap the narrow end to the other side, wrapping the wide end on the inside.
4. Raise the narrow end up above the neck loop.
5. We pass the narrow end through the neck loop from top to bottom and bring it to the opposite side of step No. 3.
6. Place the narrow end over the wide one and insert it into the neck loop from the bottom up.
7. We lower the narrow end raised up after the 6th step down to the opposite side and bring it behind the wide end on the opposite side. At this step we do not tighten the knot.
8. We wrap the narrow end to the other side and insert it into the loop formed after the 7th step.
9. Tighten the knot by pulling the narrow end to the side.
10. Pass the active end through the neck loop from top to bottom on one side.
11. Once again through the neck loop from top to bottom, with the narrow end on the reverse side. Don't tighten the knot.
12. We wrap the narrow end to the other side and insert it into the loop formed after the 11th step.
13. Pull the thin end to tighten the knot.
14. Hide the remaining part of the narrow end behind the neck loop.
15. The Eldridge unit is ready. Let others be jealous!
An indisputable fact: the ability to tie a tie correctly and beautifully is one of the most important skills in your arsenal. successful man and a good wife. Today there are several dozen ways to create an elegant knot. Your choice will depend not only on personal preferences, but often on the format of the meeting. But more about everything.
The easiest way to tie a tie: option 1
This method is the basics. The simplest, most banal and fastest. After successfully mastering it, you can safely move on. So, first, we throw the tie over the neck so that the seam is on the inside.
- On the left side we have the thin end of the tie, on the right - the thick one. Take the thick part and place it on the narrow one (refer to the photo instructions).
- Now we take the large end of the tie and thread it from above through the neck loop that has formed.
- Then we pull the thick end down and pass it under the thin end in the direction of the right hand.
- We again draw the thick end over the narrow one, but this time in the direction of the left hand.
- Pull the thick end up through the neck loop. And we thread the thick one from top to bottom into the eyelet, which was formed by it. We carefully tie the resulting bundle. As you can see, this is a really easy way to tie a tie!

How to tie a Windsor tie correctly: option 2
If you need to tie a tie the classic way, then this is definitely Windsor. You will end up with a large triangular knot that has an elegantly strict symmetrical shape. You can get such a knot by double fastening the tie to the neck loop. If you don’t like a large bun, then this method will be relevant for ties made of light fabrics. However, it is worth considering that it is best to tie a Windsor tie to collars with a wide neckline.
A few words about the legend associated with the name of this tie. When Edward VIII abdicated the throne and became Duke of Windsor. It was he who became the inventor of this unit. At one time, he was rightfully considered a trendsetter. Thanks to this person, the nobility fell in love with pullovers, knee socks and boutonnieres.
Place the tie around the neck so that the seam is on the inside. The thick end is located on the right, and the thin end on the left.

- Take a thick tie and place it on top of a thin one. Now the thick one needs to be passed through the loop from behind and pulled forward again (note how this is done in the picture).
- As for the thick tip of the tie, you need to pull it down and move it towards your right hand.
- We pull the thick end from the front into the neck loop that has formed and move it towards the left hand. On a note! Please note that such a knot is only relevant for collars with widely spaced corners, because the bun turns out to be quite voluminous. If you combine this type of knot with another collar, it will look rather short.
- We get a knot, over which we draw the thick end of the tie in the right direction.
- Now we pass the thick tie upward through the neck loop.
- The thick end in front formed an eye. We pass the thick tip through it and tie a knot. Ready! Now you know how to tie a tie double knot.
Other ways to tie a tie: Cross knot
Another option on how to easily tie a tie. This type of knot is relevant for all types of long ties, although it was originally invented for a model whose ends were the same width along the entire length. Today this type of knot is called a “double”, “Italian”, “square” tie. In Europe it is most often called "Christenses".You can tie such a tie for high collars, the size of which starts from four centimeters. Models made of natural wool or cashmere are considered ideal for a Cross tie, which means this knot is most often made in the winter.

The "cross" tie was especially popular at the beginning of the twentieth century. However, after such a peak in demand, it was quickly forgotten. It was invented by Swede Amanda Kristinsen in 1917. The lady had her own production of ties, and she was madly in love with her business. In one of the catalogs she gave her name to the new node. The Cross Knot may seem difficult, but it is not - you just need to try it a couple of times. Nevertheless, in Russia at that time it took a long time to get used to it.
So, how to tie a tie step by step. To begin, we place the tie on the neck in such a way that the thick end is on the right side and the thin end is on the left.

- Place a thick tie on top of a thin one so that it points to the left. After this, carefully bend the thick tip around the narrow one, and bring the thick tie under the narrow one in the direction of the right hand.
- Next, we throw the thick part on top through the loop that has formed and bring it to the left side.
- As for the thick tip, we wrap it around the narrow one.
- Then we turn the thick end to the right and pass it through the loop.
- Now we thread the thick tie through the double eyelet that has been created as a result. Carefully tie a knot. Ready! Read about other tie knots below.
How to tie a tie with a Hanover knot beautifully
If you need to quickly tie a tie, then this is not the option. The Hanover knot is quite complex, but undeniably beautiful. As you can see in the photo, this is a symmetrical knot in the shape of a triangle. It is slightly larger in size than the Windsor, which means it requires the widest possible collar. On a narrow collar, it will simply block part of the tie, and its shape will be ugly distorted.We start tying a knot by throwing the tie around the neck so that the seam is on the outside. Look carefully at the photo on how to tie a tie.

- We cross the ends of the tie so that the wide part lies with the seam facing out, and the narrow tie lies on top in the right direction. Now we overlap the wide one to the right side over the narrow one.
- Next, we pass the wide part through the neck loop from bottom to top.
- We bring the thick end down and to the left, after which we wrap the knot with this end.
- Once you have wrapped the knot once, bring the thick end through the top of the loop.
- Then we wrap the wide end around the knot again, laying it from the left side to the right.
- Behind the knot we bring the thick end through the neck loop. Then we pass it through a knot, tie it and straighten it. Ready! The following instructions on how to tie a tie are below.

In detail: how to tie an Oriental or Oriental knot
Oriental is another ultimate knot that can be used to tie a tie. But, oddly enough, men use it much less often than everyone else. Despite its simplicity, this type of knot has serious disadvantages. For example, if you tie it not particularly responsibly, then over time the tie will change shape and become ugly distorted, and then it may even come undone. However, the Oriental knot is ideal for ties made from dense fabric: for example, woven, knitted, or wool.Historical reference
Translated from in English"Oriental" tie means "Eastern" or "Asian". By the way, in Asia this knot is a classic one. A diagram of the Oriental tie knot is presented below.

Throw the tie over so that the seam is on the outside. There should be a wide end on the right side, a narrow end on the left.
On a note! There are knot options that can accentuate a round or narrow face. And there are nodes that can hide a number of shortcomings. The node is very miniature, and if you are the owner round face, then it is better not to use this node.
- Cross the ends of the tie, placing the narrow part on top of the wide one (direction to the right).
- Take the wide tie in your hands, bend it around the narrow one, and lay it down, pointing it to the left.
- Thread the thick tie through the neck loop behind our knot. Then pass it through the loop from top to bottom, tying a neat knot. That's all!

How to tie a Double Knot?
This knot has a very beautiful, compact shape. This is achieved by double tying. There is nothing complicated: even a beginner can master this knot. Its main purpose is all the variety of ties made from light fabrics. It’s worth considering that short ties are not suitable for a double knot, but long, thin ones are fine.
Place the tie around the neck so that the seam is on the inside. On the right side is the wide end of the tie, and on the left is the narrow end.
- So, we start by placing the thick end of the tie over the narrow one, then they need to be crossed (see how shown in the photo instructions). Now you need to wrap the thick part around the narrow part. Please note that the turn should be as complete as possible: in other words, the wide end of the tie should again point in the left direction.
- Next, we pull the thick part of the tie under the narrow part in the right direction.
- You see that it turned out to be an ear. Along its top, the wide end must again be returned to the left side.
- Again we take hold of the wide part of the tie. It must be passed through the neck loop.
- Final steps: we pass the thick end through the double eyelet that we have created. We tie a neat knot. The knot must be straightened so that our double tying is noticeable. Ready!

You may also be interested in other tie knot diagrams:
How to tie a tie with an elastic band (bow tie)


How to tie a thin tie


Do you know in detail how to tie a tie in another way? If yes, then share with our readers in the comments below the article!
If you are looking for a place to business meeting, then welcome to our catalog: you will find hundreds of the best bars in Kyiv with detailed descriptions, photos and guest reviews.
You may also be interested in:The ability to tie a tie is like knowing Mandarin - there is no urgent need for this, but demonstrating this skill always turns out to be impressive. Helping your dad or husband get ready for a meeting, or helping your brother get ready for a friend's wedding - you never know when sleight of hand and how to tie a tie might come in handy. Even if your male environment does not favor you classic style, the ability to tie a tie may come in handy for you - the knots on fashionable thin scarves come specifically from men's fashion. ELLE has prepared a variety of patterns on how to tie a tie.
Quarter knot

The most popular and easiest way to tie a tie is a four or quarter tie. In some families, the skills of how to tie this knot are passed down from generation to generation, from father to son. With all the advantages of the ease of this technique, there is one small disadvantage - you definitely won’t be able to stand out from the crowd with such a knot. But in this case, you can always choose a tie with an interesting texture, pattern or color combination.
Windsor knot

This method and type of knot is named after the Duke of Windsor, who apparently preferred it to all others. In addition to being ideal for special occasions, this knot is also the most comfortable - it does not tighten the collar of the shirt, allowing you to freely loosen and remove it without untying it. The main thing you need to know about this method is that the tie for it must be 4 centimeters longer than the standard one, so that it can go down almost to the belt.
Half Windsor knot

Why do you need a Windsor knot when there is a half-Windsor knot? - British gentlemen often joke. The whole point is that the half-Windsor is not only simpler than its “big brother”, it also looks much more elegant - mainly due to the fact that it is asymmetrical and less voluminous. However, this knot is still formal, suitable for most types of collars and shirts and can be used on all types of ties.
Victorian knot

This knot is often called a "four" knot with an extra turn - simply because the end of the tie is wrapped around the knot four times and then tucked inside. The result is an asymmetrical and wide knot, but still simple enough to be used in Everyday life– it is ideal for office suits and shirts.
Knot "Oriental"

This knot is tied in just three steps, so it is considered one of the simplest. But here lies the main problem of this method - since the knot is not very tight, ties made of thin materials simply will not hold their shape and will hang on the collar. So for such a knot you need to specially select a tie made of dense material, for example, wool. Another catch is that this tie is easy to take off, but it comes out just as easily. Therefore, it is better not to forget about it and correct it during the day. Oriental is completely unsuitable for special occasions, but it will look harmonious in the office.
Diagonal knot

If you have already learned how to tie all the previous knots, you can safely move on to the diagonal one - this will require all the skill and sleight of hand. This knot consists of two layers, it is asymmetrical and, unlike many others, it cannot be easily removed - it must be untied. But a diagonal knot looks impressive and elegant - especially if you choose a deep-colored tie made of light fabric.
Kelvin knot

This knot bears the name of the inventor of the temperature school, mathematician and physicist Lord Calvin - and all because the scientist developed the idea of \u200b\u200bthe structure of atoms from knots. Lord Calvin has nothing to do with the technique of the knot itself, although tying such a knot is not much easier than understanding his theories. Due to its oblong shape, this knot will look great on thin cotton or wool ties, but it is better to wear it not to the office, but to special events.
Knot "Baltus"

One of the widest knots, the Balthus knot was invented by the Swiss artist Balthasar Klossowski in the 1930s. The artist wore it in an eccentric way, leaving the wide end short and the narrow end long. It is not recommended to repeat this today, and it is better to tie such a knot on light silk ties. This method is ideal for short men - it hides the length of ties and evens out the proportions of the suit.
Cavendish knot

This knot is an interlacing of two quarter notes - it sounds difficult, but in practice it is quite easy to handle. It does not look solemn and is perfect for office everyday life - and it will be immediately noticeable that some effort was put into the image. It is better to tie such a knot on ties made of lightweight materials and combine them with a wide-spaced collar.
Onassis knot

It was invented, as you might guess from the name, by Aristotle Onassis, a Greek businessman and second husband of Jackie Kennedy. He modified the classic "quarter" by loosely wrapping the wide end of the tie rather than securing it. This knot looks very eccentric and suits men with the style of someone like Liberace. But at the same time it fits perfectly into women's fashion. Ties for such a knot should be chosen bright and with interesting prints, but made of light fabrics.
Prince Albert Knot

One of the most beautiful knots, the Prince Albert knot resembles the bud of an unopened flower. It is not so easy to create, but it is worth all the effort - the main thing is to form the final knot using back hinge. Since this knot requires a little more length than usual, it is suitable for short men.
Pratt knot

The most popular knot in America, it appears on almost all ties of local businessmen and politicians. It is unpretentious and is tied quite simply, the only thing you need to take into account is that it is tied with the seam facing out, and at the end the collar of the shirt hides this seam.
Nikki knot

Pratt's younger brother, the Nikki knot, by its origin, has nothing to do with America or Nicholas II (as you know, the Russian emperor was sometimes affectionately called “Cousin Nikki”). This knot was invented by the owner of a Milanese tie factory, Ernesto Kurami - he specially made it so that the tie would not fray and could last for a long time. For such a knot, it is better to use textured ties - a shape reminiscent of a pyramid will emphasize the beautiful texture of the fabric.
Cape knot

A very rare and beautiful knot that will immediately make you stand out from the crowd of “men in black” at any event. Due to the complex shape of the knot itself, it will look beautiful on ties with unobtrusive prints of deep colors. But under no circumstances should you do it on striped ties - this will create an insane visual effect that will give the tie owner’s interlocutors a headache.
Cross knot

Initially, this knot really resembled a cross, which is why it got its name. It can also be found under the name "Christensen" after the Swedish tie manufacturer Amanda Christensen. This knot looks most beautiful and elegant on thin ties and is suitable for thin men; on large ones it will look ridiculously small.
Eldridge knot

This knot challenges the standard knots of the business world - it is complex, braid-like and yet quite formal. For such a knot, you need to choose a tie that is not too short and not colorful, and combine it with the same neutral color scheme of the suit. This method of tying a tie is very new, so you can’t see it very often – which, of course, is a plus for anyone who wants to make an impression.
St. Andrew's Knot

A reason for pride - the author of this knot was a woman, artist Lisa Van Wijk. It comes from the Prince Albert knot, but is even wider and more elongated. It's better to tie it on light-colored ties - dark fabrics simply won't show all the hard work you've done. At the same time, stripes and ornaments on such a knot, on the contrary, work very well.
People are greeted by their clothes, as one famous proverb says, so a successful man must look brand new. This applies to the style of clothing, hairstyle and hair styling, the presence of additional accessories and even manners. Stylists insist that a modern man’s wardrobe must include a classic suit, shirts, bow ties and ties for different cases life.
It is even offered for beginners step-by-step instruction, how to tie a tie, because when meeting this accessory, many men fall into a stupor. In fact, there is nothing complicated in tying a tie; it is enough to find a simple method for beginners, and after mastering it, practice with more complicated techniques. And if a man has step-by-step instructions or video lessons in his arsenal, this will make his fate even easier.
Before selecting instructions on how to tie a tie step by step, a man needs to familiarize himself with the basic rules and requirements from stylists and designers. Firstly, it is worth understanding that a tie should be an addition to the overall look, and it should not cause a feeling of embarrassment or discomfort. Secondly, regardless of the fabric and type, the tie knot should not be overtightened or crumpled. The tie should be woven directly on the neck.
For reference! The tie appeared in a man’s wardrobe back in Ancient Egypt, that’s exactly what history says. Then it was a piece of geometric material on the shoulders, indicating the high status of the owner. The ancestors of such an accessory were also the ancient Chinese; warriors and nobles had similar scarves around their necks.
When choosing a tie, you need to pay attention to 3 parameters - the width of the tie, its length, as well as the color scheme and pattern. Today, designers offer 3 types of accessories - classic for formal events, festive and creative for creative individuals. The length of the tie should ideally be up to the line of the belt plaque. But there are a huge number of options for how to tie a tie for all types and occasions.
Do you wear fancy ties?
YesNo
Simple knot: knit and don’t worry
The simplest method of tying a tie step by step is the Kent knot, or as it is popularly called. This technique is ideal for accessories made from durable and rough fabrics, as well as under a shirt with a small or narrow collar. To perform a simple knot, a man needs to perform several actions, according to the instructions, namely:
- The tie is placed face up around the neck, with the narrow stripe on the left and the wide stripe on the right. It is desirable that the thin part is above the navel.
- Next, a wide strip is laid on top of a narrow one to form an intersection.
- Now, with the wide end, the inside facing outwards, make a loop around the bottom of the tie, wrapping it from left to right, after which they push the wide edge near the collar of the shirt from the outside forward.
- Now the end of the wide strip needs to be threaded into the resulting pocket from it, stretching the strip to the desired length.

The resulting knot must be straightened and tightened a little, but so that there are no folds or dents. The wide strip needs to be smoothed over the narrow part of the tie, lowered to the beginning of the belt on the trousers. The accessory must be woven in such a way as not to wrinkle the fabric and form a neat, uniform knot in the center of the shirt collar. You can visually see all the steps to create a simple node in the photo below.
Step-by-step instructions for a double knot
The easiest way to style a classic tie is to braid it with a double knot. It is necessary to form such a knot strictly on the shirt, since individually the knot can turn out to be inharmonious or completely asymmetrical in tandem with the shirt and suit. The optimal length of the ends of the tie is no less than 2 cm from the belt line.
Step-by-step instructions for a double knot include the following steps:
- The tie is placed on the neck with the front side facing up.
- And then a wide stripe crosses the narrow one from left to right.
- Now the wide ribbon is passed under the narrow one to form a pocket from right to left.
- After the knot is formed, the wide strip is pulled through the narrow one.
- The wide end of the tie is sent to the side to tighten the first knot.
- Next, they again make a knot over the first one, wrapping a wide strip of tie around the narrow one.
- Now the same edge of the accessory is raised to the collar, from the inside it is pulled through the loop on the neck.
- A wide strip is threaded into pockets using a double knot.
- Finally, the tie is pulled down to the optimal length.

The wide strip must overlap the narrow one, stretching down to the very strap on the trousers. And in order to thoroughly master the technique for beginners, you should look at each step in the picture below.
Beautiful knot: instructions in pictures for beginners
To learn how to tie a tie correctly, you need to master the standard techniques and instructions that were described above. They are most often used for work environments and official events. But for holidays and special events, another way of decorating a tie is more often practiced. A striking example is the Wismar tie knot, characterized by sophistication and elegance.
You can learn a beautiful knot if you review in detail all the execution steps, namely:
- the tie is placed on the neck, after which a wide strip is crossed across the narrow edge;
- then the same wide end is passed up through the loop on the neck;
- now a wide stripe is used to make a knot on one side of the loop;
- then a wide strip is threaded from the bottom of the narrow strip of the tie, as shown in the picture;
- the wide edge of the tie is thrown from the outside inside the loop from the second side, but from top to bottom;
- now the strip is pulled down to form a second knot on the tie;
- a wide strip is placed on top of a narrow strip, lowering down along the shirt.

It is theoretically difficult to understand the procedure for weaving a beautiful knot, so it is better to compare each step with pictures and a visual illustration of the actions. The name of such a knot is pratt, it is practiced to create a formal image for men and women, preferring ties made of satin or silk. Today, this style is also welcomed in office settings, but it is combined with fashionable and stylish outfits of a modern style.
Video with step-by-step instructions
For some men, it is enough to look at pictures and illustrations of how to weave different knots from ties and neck scarves step by step. For others, it’s easier to learn similar techniques with the help of video lessons in order to visually view all the actions of a man. Therefore, experts offer the following videos for training:
Double knot:
Beautiful knot:
All three options are widely used around the world among men of all ages and clothing styles. And if earlier each type of tie and weaving implied certain circumstances, today stylists promote freedom of choice and self-expression, including with the help of such accessories.
Conclusion
You can learn how to weave a tie in pictures, theoretically and with the help of videos, but it is better to combine all three techniques to improve your knowledge and skills. A tie is an important attribute of a modern and successful man; it can be combined with classic suits, and with informal and stylish clothes. It is only important to know the rules for choosing an accessory, the method of its design and combination with certain items of clothing.
For many men, securing a tie nicely and neatly around the neck is considered a huge and insoluble problem. After all, there are quite a few tying options. can be either simple or complicated.
The tie has always been one of the most expressive. This is due to the fact that it, practically the only one, brings variety to the monotonous and conservative clothes of men and gives individuality. This accessory can tell a lot about the character of its owner, habits and lifestyle.
What should a tie be like?
The larger the man's shoulders, the smaller the visible part of the tie should be. The optimal width is 9-11 cm. If the owner of the tie is large, this measurement of this accessory should exceed the standard one and be approximately 12-13 cm.
The color of the described item of clothing should be in harmony with the color of the suit and shirt. In this case, the shirt should be a tone lighter than the tie, and the jacket should be a tone darker.
A dark-colored accessory with a small pattern is considered casual, while a bright one with a large pattern is considered formal.
The knot must be tight.
The tie should go down a couple of centimeters below the belt, while covering the distance between the waistband of the trousers and bottom button shirts.
There must also be harmony between the width of the accessory and the collar. Nowadays, the optimal width of a tie near the neck is considered to be 8.2 cm, but options from 7 to 9 cm are acceptable.
Fashion and traditions
Designers and fashion experts advise every stylish man to acquire several types of this item of clothing. First of all, this is a plain tie. It must be chosen so that it suits several suits at the same time.
The second must-have option is a striped tie. It should be matched with a plain outfit.
The third option is a bright tie. Of course, it is more suitable for young people and people of creative professions. And stylists recommend that respectable gentlemen wear bright ties in summer period and under light jackets.
Designers also advise having a polka dot product in your wardrobe, but the main rule when choosing it is not to overdo it with the size of the circles.
Simple tie knots
1. Simple. This option is suitable for people just starting to tie a tie knot. It is standard and suitable for almost any type of product.
2. Universal. This option is the most popular way to tie a tie. This can be made from wide, dense or silk of standard width, as well as from a narrow product that is now in fashion.

3. Elegant. This tie knot is slightly different from the universal one. Just one more turn is added on the right side. You can achieve the desired knot size by experimenting with accessories of different widths or changing the position of the wide and narrow ends.

4. Interesting. Pairs perfectly with high collars. Such a knot will be a godsend in winter. Wool or cashmere products are suitable for this.
These were standard and simple knots for a tie, but there are knots that are more ornate and more interesting.
"Victoria"
It is a double knot, thanks to which an additional thickening is formed on the tie. This option is often used for products that are thin or have lost their original appearance. The next photo clearly shows a double knot.

"Pratt"
This option is the simplest and fits a narrow buttoned shirt collar. The highlight of this method is that it is tied inside out from start to finish. This option will initially require some effort, and the speed of tying depends mainly on the material from which the tie is made.

Quarter
This knot will fit shirts with a standard collar. It has a straight, long shape and is very easy to tie. The knot has a wedge-shaped, slightly asymmetrical appearance, and also has the property of self-dissolving. Of course, it's not as easy as tying a tie with a double knot, but for people who don't want to master several ways at once, this is ideal.

"Windsor"
This knot goes well with flared collars. It turns out tight, wide and voluminous, while having triangular shape. It is quite difficult to perform the knot; the main difficulty is remembering the sequence of actions. Most often, "Windsor" can be found at official events.

"Half Windsor"
This method is a simplified variation of "Windsor". It has an average width relative to the original method. The Half Windsor shape is triangular, symmetrical and most suitable for standard width collars. The knot looks decent, but at the same time does not require much effort in design.

"Eldridge"
The tie knot has a rather non-standard shape. It is somewhat reminiscent of weaving " fish tail" Although this knot is difficult to perform, it is worth it, as it looks very impressive! The difficulty of tying the Eldridge knot consists of 15 steps. The procedure is different from all others, because the main role is played by manipulations only with the narrow end of the tie. And after the knot is completed, the short remainder should be hidden behind the collar of the shirt. refers to corporate rather than official options.

We can conclude that there are different knots for tying the main men's jewelry. How to tie a tie is up to the person to choose. Of course, you should pay attention to the fabric from which this accessory is made, the color in which it is made, the suit and shirt with which the tie is worn. You should also take into account the event the man is going to. If all the points are met, the person will not look ridiculous; rather, on the contrary, he will attract attention with his elegant appearance.
We also recommend
 Knitted toys - bells with patterns, crocheting bells
 List of products and important complementary feeding rules for a six-month-old baby
 Letter Y (And short) in poems, stories, proverbs All about the letter Y short
 Natural ingredients to protect hair health
 Hardware pedicure step by step Hardware pedicure step by step
 We sew wallets and handbags with a clasp: templates and master classes