How to sew a buttonhole on a sewing machine. Machine made buttonholes
As a rule, air loops are made from the fabric of the product, but you can also use a corset or round cord or roller. In addition, it is possible to make air loops from threads. The main thing to keep in mind is that fasteners with thread loops can only be used in cases where they will not be subject to heavy load. In terms of strength, they are certainly inferior to traditional options, which means they can rupture under significant pressure.
You will need:
- Hand sewing needles
- Yarn or cotton floss to match (it is better not to use wool)
Step 1
Fasten the thread on the wrong side and bring the needle to the front side at the point where the loop begins. Place a loop over your finger (the loop should be large enough for the button to fit through), and then insert the needle at the second point of the loop to the wrong side and out onto the face at the first point.
Step 2

Repeat the last step 3-4 times to make the loop thicker. Holding the project in your left hand, place the thread on your index finger and pass the needle through the loop, as in the photo.
Step 3
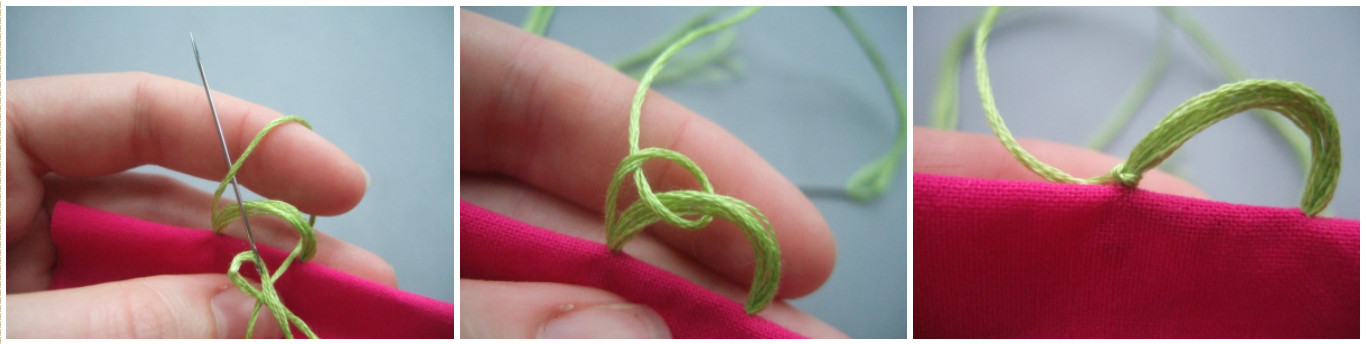
Pass the needle through the second loop on your index finger, then remove your finger and tighten the thread, pushing the resulting “knot” to the base of the loop.
Step 4

Repeat the previous step, continuing to add more and more stitches until you make sure they fit together fairly tightly.
When you reach the end, securely fasten the thread from the inside out.
In the recent Soviet and perestroika times, clothes and the most basic household items were obtained with great difficulty. What was sold in stores and markets was far from ideal, and many housewives remade purchased items, adjusting them to their tastes and preferences.
Modernization affected not only clothes, but also curtains, tulle, and towels. They were often sold by the meter; buyers had to process the cuts themselves and figure out how to place them on cornices and hooks. Then every woman knew how to make a loop of thread on a curtain or kitchen towel, knitted cardigan or light silk dress, which cannot be said about her contemporaries.
Thread disgrace
The first image that comes to mind when hearing the phrase “loop of thread” is the pendants on which unsightly curtains are attached in grandma’s country house or dacha. Indeed, when a curtain is hung quickly and not so much for decorative purposes, but as protection from flies and curious prying eyes, the housewife will not delve long into how to make a thread loop more beautiful and neat. A few threads folded together are sewn to the edge of the curtain and the job is done.
As a result, such loops often have unequal lengths, are not located at equal distances from each other, and upon closer examination they do not look very attractive. In this article, readers will be able to look at visual photos and read little tricks on how to make a loop of thread for curtains, clothes, kitchen and bath towels.

Correct loop of thread
If you carefully read the previous section, you can immediately understand typical mistakes, which are allowed by seamstresses when creating loops. Regardless of the purpose for which they are made, a few simple rules must be followed:
- load compliance;
- symmetry;
- equidistance;
- aesthetics.
Based on the initial task, it is necessary to select the type of loop, the thread from which it will be woven, and the method of attaching it. After all, it’s one thing to make a small clue for an easy towel fabric, but it’s quite another to attach a heavy curtain to the cornice. In the same way, there will be a difference in how to make a loop for clothes from thread: for a silk blouse with a bead button, you need to create a light, airy hook from the finest satin threads, and for knitwear It would be more appropriate to knit a loop of yarn.
We think, we select, we do!
So, before you begin painstaking work, which requires a considerable amount of patience and endurance (the work will be monotonous and monotonous), you should choose the right thread for the loop. Several criteria need to be assessed. First, it is important to analyze the color of the thread, then its composition and thickness.

For tulle curtains, it is best to use regular #40 polyester thread. Its advantages are that it is durable and does not fade over time, which is important - having completed the work once, you will not have to think again and again about how to make a loop of thread, because it is especially difficult to do this on a finished product.
Towel loops must also be made from strong and thick threads, because terry fabric, having absorbed moisture, becomes very heavy. But simple kitchen towels can cling to hooks and the thinnest loops.
Secrets of weaving
There are several methods for creating loops. The work can be done with a simple sewing needle or crochet hook. These two methods are radically different from each other, although as a result both look just great.

Loops made with a needle look incredibly neat, and you can’t always tell what they are handmade. First you need to select a place for the loop and fasten the thread at a certain distance from the edge (1-1.5 mm). The next step will be a set of arcs, their length depends on what you will need to hook the loop to, and the number depends on the desire and type of product. A standard curtain loop is 3-5 threads. The main thread should not be laid in one direction, but the direction of the needle should be changed, first from left to right, then back, each time pulling a new arc and adjusting the length of the turn.
In order for the loop to look neat and be as secure as possible, it should be overcast. To do this, use a tatting stitch (a loop stitch, but with alternating knots - first the needle enters the loop of the overcasting knot from the front, then from the back), a Gedebo stitch and a double loop.
The stitching is completed by piercing the fabric with a needle and securing the thread at a short distance from the loop. So its edges seem to be smoothed and strengthened. These methods are best suited for thin materials, and if you are faced with the question of how to make a loop of thread for a button, an air fastener made with a needle is the most correct solution.

How to hook a curtain?
There are several ways to attach curtains; they depend on the type of curtain rod and the style of the panel. If it needs to be attached using small loops of thread, then, as mentioned above, it is best to use smooth and durable yarn, matched to the curtains.
The easiest way to pick up loops is to crochet. This could be a simple braid made of air loops, or it could be a more labor-intensive option - stitching arcs of threads or a post. Before you make a loop on a curtain out of thread, you need to carefully secure it at the edge of the fabric. The loops can also be made with a needle, then it is better to use a tatting seam, as a result they will turn out light and openwork.
Hanging up a towel
Towel loops are the easiest and fastest to make. First of all, because the product requires only one piece. However, on the other hand, if the weight of the curtain is distributed evenly on many hooks, then the towel is held on one, and in order for it to bear the load placed on it, it must be properly made.
So, how to make a loop of thread on a towel? The edge of the thread must be secured correctly, following the advice described above (inject the needle at a short distance from the edge) and having formed a strong loop from several arcs and stitching, complete the work, stepping back slightly from the edge of the arc. An important nuance It is in the case of towels that the length of the loops will be determined. For curtains, it is selected depending on the cornice and the depth of the hooks. In the case of clothes, the loop is made slightly larger than the diameter of the button, but for towels it is better to lengthen it, for ease of hanging and removing from the hook.
fb.ru
How to make loops from threads? Kinds. Step-by-step manufacturing technology. Photo
Hello again!
Thread loops are used as a partner for a hook or button on fasteners.
But before making a thread loop, you need to decide on its future location on the product. And remember at the same time that fasteners with thread loops can only be used in those places on finished products where they will not be subject to very heavy loads. They simply cannot withstand significant pressure on their “shoulders” and will burst.
The thread loop is never put on display. It is always located somewhere inside, away from prying eyes. To make it as less noticeable as possible on the product, it is made with threads in the color of the base material.
Having decided on its future location on the product, you also need to decide for yourself whether this loop will “work in tandem” with a hook or a button. Because a flat loop will be enough for a hook, but for a button the thread loop should rise somewhat above the surface of the material. The volume of space between the loop and the surface of the material should match the size of the button and be even a little larger. The button should fit freely through the buttonhole.

So, first we sew on a hook or button and use them to determine where the loop will be, what type it will be and what size it will be. It would be best to make marks on the fabric to indicate the edges of the future loop.

According to the method of execution, thread loops are of two types - chain and overcast with overlock stitches.
Chain loop or air chain.
In the place where the beginning of the thread loop will be located, we make a small stitch (without piercing the front side of the product).

We leave a small tip of the thread (while it is in “free flight”).

With a couple of stitches we secure the thread (one end of the loop) in this place. We lay the stitches one on top of the other.

We make one more stitch, but this time in order to form a loop from it.

We thread the fingers of the left hand, thumb and index, into the resulting loop. The loop appears as if thrown over the fingers.

With our right hand we pull the thread that came out of the puncture in the fabric (the edge of the thread that comes from the needle).

Now with the middle finger of the left hand we hook (pry) the tense right hand thread and pull it to the loop, and then inside the loop.

When we begin to pull the thread through the formed loop, a new loop is automatically formed from it. While pulling this new loop out of the previous one, we simultaneously drop the previous one from the fingers.

As we pull out the new loop more and more, we tighten the old one and thus the formation of chain links begins.

You need to repeat everything again and again, and the result will be a chain - a thread loop.
In the pictures, to make it clearer and better visible, the whole process was done with thread in one layer. In fact, it is better to make a thread loop from not very thin thread in two additions. It will look better and stick to the finished product stronger.
This picture shows a thread chain made from thread already in two folds.

When the thread chain has “grown” to the desired size, it needs to be completed (secured from unraveling). To do this, you need to thread a needle and thread into the last elongated loop and tighten.

Using a few stitches, attach the finished thread loop to the surface of the product.

The ends of the thread (at the beginning of the loop and at the end) with the help of a needle must be drawn through the inner layers of the product somewhere to the side. Bringing the needle and thread out, carefully cut at the very surface of the material.

A loop of thread covered with loop stitches.
The next type of thread loop, a loop covered with loop stitches, differs from the chain loop in that the length of the previous one, the chain loop, can be controlled during operation. But the length of the loop sewn with buttonhole stitches needs to be determined before it begins.
Make a small stitch at the beginning of the loop. Leave a small tip of the thread.

Make the next stitch at the end of the loop.

You can make several such stitches connecting the beginning and end of the loop - from 2 to 4. Stitches can be done in different ways. Making punctures in the material in the form of an elongated letter O or an elongated letter X. And so it will be correct, and so. Because further on, they will still be wrapped around with looped edge stitches.

This is the entwining of loop stitches performed in one thread.

There are two threads here.

And loop stitches are done like this. A loop is formed from the thread that comes out of the material. The needle and thread are threaded through this loop and tightened around the long stitches laid to encircle them.
Having completed a thread loop entwined with overlock stitches, the ends of the threads must be secured in the inner layers of the material.

I wish you, dear sewing lovers, that all the thread loops you make will serve you for a long time and never let you down! Sincerely, Milla Sidelnikova!
www.milla-sidelnikova.com

A carefully executed thick loop with an eyelet looks very professional on the product. There is nothing complicated in such processing, the main thing is to choose the appropriate threads and cord. If desired, you can make other types of buttonholes, for example, a loop rounded on one side.
- In the desired location, mark the loop in the shape of a keyhole. Sew around the markings at a distance of one stitch. Cut through the loop and cut a circle at the end. (The rounded part of the loop can be pierced with an awl.)

- Place a piece of thin cord around the loop, or you can use double folded thread to sew the loops. Using overlock stitches, sew the cord around the loop inside the utility seam line. At the straight end of the loop, insert a pin and tie the ends of the cord over it with a single knot.

- Starting at the straight end, overcast one side of the loop, covering the utility seam. Make stitches close to each other and after each stitch tighten the thread so that they lie evenly and without gaps, completely hiding the cut.

- When sewing a rounded part, turn the fabric as you work so that the stitches lie evenly. The knots should lie as close as possible to one another and cover the end of the loop. Turn around and continue stitching the other side of the loop until the end.

- Complete the last stitch by passing the needle through the knot tightened in the first stitch, removing the needle at the bottom left corner of the straight line. smooth edge loops. Finally, make 3 or 4 long cross stitches to outline the straight end of the loop.

- Tighten the ends of the cord or doubled thread so that the loop is tight and smooth. Tie the ends of the cord where the long stitches are double knot and trim. Hide the knot and ends of the cord under the long stitches. Finish by overcasting long stitches while tacking the fabric of the project.

As a result, we got a professional buttonhole with an eyelet.
This post is posted in the Sewing in Detail category and tagged Button.
kroykashite.ru
Loops are the main element of a button fastener; their size and location depend on the size of the buttons and the style. The length of all loops depends on the diameter of the buttons, except for decorative loops, it is usually equal to the diameter of the button plus 0.3 cm allowance for the thickness of the button.

The allowance is made for the free passage of the button in the buttonhole. When laying out the pattern on the fabric and cutting, mark the loops; to do this, set the distance of the loop from the side according to the selected style, then mark the loops along the front side of the cut of the product. Loops can have a lobar direction, a transverse direction and an oblique direction. The loops are located no closer than 2cm from the edge. If the product is double-breasted, then the distance to the loop from the edge of the bead should be equal to the diameter of the button.
Lined or hinged hinges. One of the types of loops is line loops or decorative hinges. Such loops are sewn from fabric of any quality, thin, dense, leather and drape. Such loops are made on fur coats and other things made of fur and leather. These are not just buttonholes, but also a decorative detail on sports-type skirts and jackets. In addition, stitching loops are very durable and they are sewn on lingerie, bras big size with a wide belt.

Usually you need several such loops for a product, so take a strip of fabric along the grain thread of the required width, focusing on the width of the loops and the diameter of the buttons. For example, let’s take a strip 3-4cm wide, fold it in half lengthwise with the front side inward, bend the cut edges inward on both sides by 0.5cm. Sew at a distance of 0.2 cm from the edge. Turn the strip out, straighten the seam and steam. Cut the strip into required number loops
Fold the piece for the loop in half and give it the shape of a loop with a triangular tip. Sew a stitch across each loop by hand or by machine, this will fix its shape. Attach the ends of the hinged loops to the right shelf according to the markings from the inside out. Baste and place a strip of fabric with the right side inward, so that the ends of the loop are not visible, stitch 0.5 cm from the edge and bend the hem towards the front side or other part. Straighten the seam and sew one or two lines.
Loops of thread or air loops. Such loops are made from thread for small buttons or loops for hooks. Such loops of threads of different colors are used to fasten cuffs, closed collars, and on children's dresses.

You can make a loop from threads like this: Fasten the thread to one side of the intended loop and pass it several times inside the fold of the fabric, at a distance equal to the diameter of the button. The outer visible threads are overcast with a buttonhole stitch, or wrapped with silk or simple threads to match the product, reaching the edge of the loop, the thread is secured on the wrong side.
Overlock buttonholes or slotted buttonholes. The most common type of loop for clothing. Used for men's, women's and children's clothing, underwear, coats and shirts. Their advantage is that they can be processed on a sewing machine, if this is provided for by its technical capabilities. If you don’t have a sewing machine, you can sew the buttonholes by hand. You need to mark the line of the loop, then sew with a stitch “forward the needle” on both sides of the marked line of the loop 3mm from the basting.

After this, prick a line on a needle and put it on a pencil, cut with a razor along the loop line, so these loops are welted and overcast. After this, sew the loop from right to left, making a tack at the starting edge. After overcasting one edge, make a tack and overcast the second edge of the loop.
Loop for a large button on the stem. This is also an overcast stitch, but it needs to be done a little differently. So that the button lingers in it and does not break the loop. A cut is made for it along the loop line with a wedge-shaped extension. Stepping back from the basting line, sew to the edge, then secure the cut with stitches (1).

Start sewing the loop from the end of the loop with loop stitches, to do this, insert the needle from the wrong side, pull the thread so that a loop remains. From the wrong side, insert the needle into the loop and, pulling the thread, adjust the knot to the very edge of the loop slot (2). The hole on the edge of the loop is also sewn with the same stitches, pulling the knots upward. Continue sewing the second side of the loop (3). At the very end of the loop, lay the thread to the width of the loop, this will be a tack. Treat the loop tack with entwining or loop stitches. Fasten the end of the thread to the wrong side.
Button closure
Let's talk about the clasp, or more precisely, about products with a strapwith button closure.
The button closure is the most common closure.
Whatever you knit - a coat, cardigan, jacket, blouse - all these products have a fastener.
The classic and most common is the button closure.
And one of the main elements of the fastener is the loops,
which are performed on the plank.
Calculating and immediately knitting buttonholes on a placket is a tedious task and does not always bring the desired result the first time.
The first fitting of the product and immediately the first trouble - the mismatch between the important and the main loop at chest level.
And this is a very, very important (main) buttonhole.
It is necessary to knit this particular loop correctly, otherwise the strips of the shelves of the product will diverge in the chest area.
MARKING THE MAIN LOOP ON THE PLANK.
So as not to torment yourself or the yarn every time and not to tie the bar,I'll show you how to make loops in the right places.
Where it (the loop) is really needed, and not where it turned out
when knitting by machine.
Everything is very simple.
We knitted the product, steamed it, and swept it away for fitting.
During fitting, mark (with soap or thread) on the product (not on the bar) the location of the main loop.
I call it the main one, because all the markings come from it.
Of course, you guessed where this magical place is.
Right! This is the chest line.
Our strip is already knitted, steamed, and basted to the product.
I gave this master class at the “Gatherings” forum meeting.
And there is a description in the topic “Caution, rake. Mary's advice"
but, unfortunately, the photos disappeared.
In this master class I showed how to make and process loops
on the bar. I will tell you how to knit such strips in another lesson.
Use a little imagination and imagine that the strip is basted to the product.
We mark the place of the main loop on the product at chest level.

We did a fitting. They sewed the item “ready-made”. Sewed on the bar.
Don't forget that the markings on the shelves must match. 
Here - CAUTION, RAKE!
If we mark with soap, then after grinding the strip we must steam the shelves and the soap will disappear.
And if we mark with soap and make several stitches with a contrasting thread,
then calmly steam the iron, the soap will disappear,
but our mark on the product will remain in the form of this thread.
We attach our buttons and make markings on the bar.
On the side where the centimeter lies, imagine
that on this side there is a shelf of the product.
In this case, “buttons” with Russian symbols, with a denomination of 1 ruble.
Don't forget about the ratio of the diameter of the button and the width of the placket.


How to make buttonholes on a knitted placket by hand
Loop design. How to make and fasten a loop by hand.
The places for the loops are determined, and we begin to create them on a flat (tied) place.The loop should be located in the middle of the bar. In this case, 5 loops are enough for us.


Of these 5 loops, we cut only the middle loop

We begin to pull out this trimmed loop, CAREFULLY, with the eye of the needle, in one direction and the other.


We get two tails and a hole in the middle.

We hide the tails in different directions. We stretch (hide) them into the bar.
The plank is knitted with REPS weave or closed sash (extended loop)
and in this weave, all the ends can be neatly hidden in the strip fabric.

There is one hole left. Now we will turn it into a loop.
Take a thread and fold it in half to form a loop.

First, with 2-3 stitches, we secure the vertical column.

Then, using a kettel stitch, we secure the open loops.

Again 2-3 stitches, this is the fastening of the second vertical column.

And we secure the last open loops with a kettel stitch.

We fasten the thread we used and hide its ends in the bar.
Here is a button, and here is a loop.

To ensure that the loop does not stretch during operation,
its size should be slightly smaller than the diameter of the button itself.

How to sew on buttons?
The buttons on the second placket are not sewn exactly in the center,and slightly moving it from the center, towards the side seam, approximately 0.5 cm.
Then, when fastened, the planks cover each other.
I shared with you a simple, but reliable and proven over the years
in practice, manufacturing method horizontal loops for buttons, on the placket,
which is knitted on a knitting machine.
Vertical hinges I do it on a sewing machine.
Buttonholes made on a sewing machine behave wonderfully and take much less time to make.
Watch the video tutorial on how to make vertical loops on a sewing machine.
The plank is connected on two fonts with REPS weave (closed sash or elongated loop).
You can master this technique of making a loop on any scrap,
connected by this weave. It's not difficult at all.
And then the buttons on your products with fasteners will always be in their places!
Good luck!
And all the most magical and fabulously kind to you.
Do a small task, but master it perfectly and treat it as a great task.
Remember that every job is a learning opportunity.
Follow the blog news. This is easy to do by subscribing to blog news.
See you in the comments.
Your Mara (Marina Ostrovskaya).
Details are an important part of the image, and they need to be given no less attention when sewing clothes than the choice of fabric, its color, style and clarity of seams. Therefore, it is important for novice tailors to know the types of buttonholes and how to make them yourself. If you follow the instructions, it's not that difficult. In this article we will look at how to make buttonholes manually on a machine and using a needle and thread.
Types of loops
There are 5 types of loops in light clothing. This:
- overcast loops;
- loops made of tucked cord;
- loops made of straight flat fabric;
- air;
- webbing.
The location of the welt loops on the fabric can be different: transverse, lobar or oblique. But the sewing process itself has no fundamental differences.
Overlocked loops
This type of loop can be done by hand. Or maybe on sewing machine, selecting a special mode for this. The point of overcasting is to prevent the fabric from fraying on the button hole. This loop can be made either in the same color as the product or in contrast. It depends on the idea of the item of clothing being made. So, how to make your own buttonhole by hand?
First, you need to mark the locations of the cuts with chalk or a special marker, which subsequently completely disappears. You need to draw on the front side of the future product. You need to start and finish sewing a loop with a thread using bartacks. They can be clearly seen in the next picture.
You need to make fastenings in this way: several even stitches forward, then back and forward again.
It is necessary to sheathe the place of the product where the slot will subsequently be made not tightly, leaving a small gap. So the thread with which we sew the loop will remain intact. You need to overcast one side first, and then the other.
But you won’t be able to make a perfectly straight overcast buttonhole by hand. Therefore, the manual method is relevant only for those needlewomen who do not have sewing machines. However, given the presence of this miracle of technology, which facilitates tailoring work, the process will not be fundamentally different. The loops will only become smoother and neater. But still, we’ll take a closer look at how to make buttonholes with your own hands using a sewing machine.
First, again, we mark everything with chalk (it is important that it is always sharp) or a marker on the front side of the clothing, linen, etc., based on the size of the button. The second is to install a special foot on the machine, which is specifically designed for sewing buttonholes. It looks something like the one shown below.

After stitching, carefully cut holes between the stitches with a thin blade. That's it, the stitched loop is ready.
That's how graceful and airy they look.

And for buttons by hand? This is not very difficult, and even not the most experienced seamstress can do it.
To make a roll (this is the second name for this loop), you need to cut a strip of fabric on the bias (5 degrees), the width of which will be 3 cm. The length depends on the intended size. The loop should be sewn with stitches of approximately 1.5 mm, no more. Large stitches will make it difficult to turn the roll out later. The strip should look like a funnel: at first a little narrower, and then wider. After the future loop is stitched, the excess fabric along the seam must be carefully cut off. This will make it easy to turn the steering wheel and it will remain level.
You can turn the loop out using a needle, hooking it onto the remaining thread and pushing it inside with the blunt end. Use a thimble, it will protect your fingers from injury.
After the cord is ready, it needs to be ironed by pinning one end to the ironing board. The roll does not need to be ironed, but only slightly ironed, holding the iron against its weight, because the product should remain round and not become flat.
Now the loop from the tucked cord can be sewn to our product.
Loops from a straight strip of fabric

Let's look at the instructions on how to make buttonholes by hand.
For this loop, a strip 3.5 mm wide is cut out, and its length will be 4 cm plus two button diameters. This strip is folded in half inward, inside out, and then the folded edges are sewn together. You need to step back 1 mm from the edge. Next, fold the strip in half, but crosswise, forming a triangle on the fold, and run a transverse stitch along it. We bend the ends. The loop can now be attached to the fabric. We equalize the ends. We attach it to the front side at a distance of 4-6 mm from the cut of the item. It is possible to finish the edges of this fastener by hemming or hemming.
Air loops
They are made from threads. It can be silk, floss, etc. It all depends on whether the fastener is hidden or not, whether it is a bright finish or a regular loop, and on the thickness of the fabric. For example, on thin silk, other loops may look heavy and rough, but a thin, airy one is just right. So how do you make buttonholes by hand?

The essence of the work is to make a loop from several layers of thread, and then finish it. The diameter of the loop should be 1-2 mm wider than the button. How many arcs are needed for this loop must be determined based on the thickness of the threads. For some, 3-4 is enough, but for thin silk, 12 may not be enough.
Loop processing options can be varied. For example, a tatting seam, when everything is overcast with a regular buttonhole stitch, but the knots are made either in front or in the back in a checkerboard pattern. Gedebo stitch is also suitable. Thanks to this finishing, a rib is formed on the loop along its entire length. The stitching must be done from the wrong side. The double loop stitch is also well suited for sewing chain stitches. It also needs to be done from the inside out. Due to the fact that the needle is inserted into the loop not once, but twice, the seam is quite tight.
These loops are difficult to make. But there is a little trick that will help make it easier. So that the fabric does not fray and is accurately marked, you need to use masking tape.
How to make buttonholes by hand: step-by-step instruction stitching loop:

It should be noted that such loops are used, as a rule, in the process of making thick outer clothing such as a coat.
We learned the basics of how to make buttonholes by hand. But sewing is a creative process. And fantasy occupies not the last place here. It’s especially cool to think and work on how to make a real decoration of the whole thing out of fasteners, and, of course, then wear this original product with pride.
There are nuances in the product that are invisible to the average person, by which the craftsman can quickly and accurately determine the class of tailoring. These include sleeve caps, stitching, and fit. But one of the most important points are undoubtedly loops, including a loop with an eye. And it is hinges that fashion houses pay attention to Special attention. Despite the fact that a slotted buttonhole with an eye can be made using sewing equipment, luxury ateliers make such buttonholes on expensive coats and jackets exclusively by hand. And this operation is trusted only to a master with extensive experience.
Let's master this necessary sewing operation and learn how to make exclusive slotted loops with an eye, because your products will only benefit from this!
Welted loop with eye - master class
There are many various techniques When performing such loops, each master has his own tricks and secrets. We will consider the most, in our opinion, nice option loops - with a raised chain stitch.
To perform this sewing operation we will need:
- Madeira Aerofil thread No. 35. You can also use any other strong thread No. 30 or 35; special strong silk threads are also used. Threads are selected to match the fabric of the product or contrasting ones, depending on the designer’s idea. For clarity, we use contrasting yellow threads.
- A piece of wax. Waxed thread is less “shaggy” and tangles less, so the thread for making loops is pre-treated with a piece of wax.
- Metal ruler for marking loops.
- Rectangular ruler for marking loops.
- Punch.
- Awl.
- Snacks.
- Loop ripper. In case of an error, a seam ripper will come in very handy.
Rice. 1. Tool for making eyelet buttonholes
Step back 2 cm from the edge of the product and draw an edge line along which the loops will be made. Set aside the width of the finished loop from the line at a right angle (in our case it is 2.5 cm). Place the loops at the same distance from each other. For coats it is 11-12 cm, for jackets and men's jackets 8-9 cm.
Rice. 2. Marking the edge of the loops
Rice. 3. Marking loops
Lay fixing snares along the side. Also lay fixing snares around each loop so that they do not intersect with the loop markings. Measure a thread about 60 cm long, wire it by pressing the thread tightly to a piece of wax and pulling it along the wax.
Rice. 4. Fixing snares around the loop
Rice. 5. Waxing thread
A spacer thread is used to lift the loop. To prepare it, bend the waxed thread in half and start twisting it on both sides in different directions (Fig. 6). When the threads are tightly twisted, bend them in half again - the threads themselves will twist together. We received a spacer thread consisting of 4 threads twisted together (Fig. 7).
Place the punch on the edge of the loop closest to the hem, and on the wrong side place a piece of fabric folded several times. Punch the “eye” of the future loop (Fig. 8). Using snips or straight scissors, cut the loop along the markings (Fig. 9).
Rice. 8. Punching a peephole using a punch
Rice. 9. Cutting a loop
Secure the end of the prepared interlining thread with a pin and lay it along the loop (Fig. 10). Treat the thread for making the loop with wax, thread it into the needle, make a knot and stick it on the back side of the product at a distance of 2 cm from the edge of the loop (Fig. 11) (after completing the work, the thread is cut and removed).
Rice. 10. Laying the interlining thread
Rice. 11. Starting work from the back of the product
Bring the needle to the outside at the edge of the loop, at a distance of 2 mm from the cut. Wrap the needle around the spacer thread and insert the needle from the back side, bringing it out to the outside close to the first puncture (Fig. 13). Try to make punctures at the same distance from the incision - about 2 mm.
To get a beautiful stitch at the top of the loop, the thread must twist (see Fig. 15). To do this, insert the needle into the loop under the lower thread and pull it up.
Pull the thread up so that the stitch is on top. Continue stitching as shown in fig. 13-16.
Rice. 16. The thread is pulled up

We also recommend
 How to dress beautifully every day (for girls)
 How to crochet a simple napkin: diagrams and photos of work for beginners
 What to do if your husband is rude and nervous?
 Tunic from motifs - “mills” How to crochet the “Mill” motif
 Knitted women's pullover with V-neck
 Bob haircut for short hair photo, front and back views