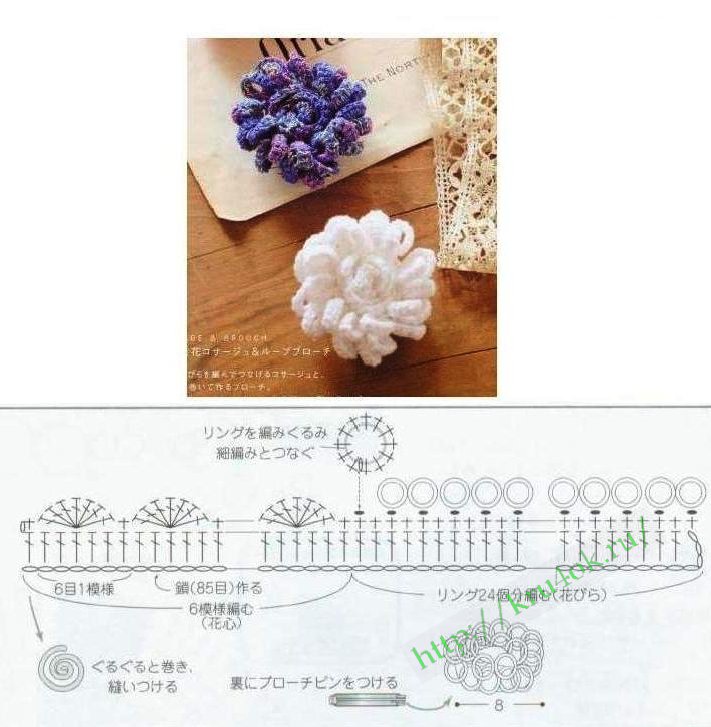
Cute crochet flowers for clothes and hats. Crochet summer hats
We knit 3 lifting stitches and 13 double crochet stitches into the amigurumi ring.
Then we close it into a ring, fastening it with a connecting loop - we get a circle. 
Next, we continue knitting according to the proposed pattern below:
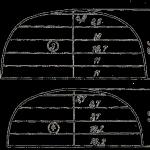
1r. - pr x 14 times = 28 p
2 rub. – treble double crochet, double crochet x 14 times = 42 sts
3 rubles – 2 double crochets, row x 14 times = 56 sts
4r. - 3 double crochets, row x 14 times = 70 sts
5 rub. - 4 double crochets, row x 14 times = 84 sts
6r. - 5 double crochets, row x 14 times = 98 sts
7r. - 6 double crochets, row x 14 times = 112 sts 
The base for the women's hat is ready, the next 15 rows, i.e. From rows 8 to 22 we knit a double crochet stitch. We get a hat. 
The last stage is knitting an elastic band. To do this, continue knitting with single crochets behind the back wall. 


As a result of this knitting we get such an interesting elastic band. 
To make our hat look more elegant, beautiful and original on your head, we will crochet a chic flower for it using the same color of yarn.
Crocheted flower for a hat - step by step with photo:
So let's get started...
In the first row we need to knit a chain of 52 chain stitches. 
In the second row we cast on three instep stitches, and knit one double crochet stitch into the base loop, *skip one loop of the bottom row and into the next stitch we knit a double crochet stitch, chain stitch, double crochet stitch*. Repeat the action from * to *. 
Third row. We unfold the knitting and knit three lifting loops. Next, in each tick of the previous row, namely under one chain stitch, we knit 2 double crochets, 3 double crochets, 2 double crochets. We repeat this action until the end of the row. 
There is only one last row left that we need to knit. To do this, unroll the knitting, knit three lifting stitches, knit 9 double crochet stitches into the first arch, then knit 10 double crochet stitches into each arch. The base for the flower is ready. 
We collect the flower by twisting it in a spiral, starting from the center. We will use a tapestry needle and sew the flower between the rows in a circle so that it does not fall apart. 
Sew a mother-of-pearl bead in the center of the flower. 
We sew the flower itself to the hat. 
Summer crocheted hats with flowers - many patterns, ideas and designs
Here are collected diagrams of beautiful openwork hats and color schemes for them. There is also material on how to starch and dry these hats.
 |
|
 |
 |
 |
 |

Thread - begonia, hook 2.1. 1 skein was enough.
I'll try to write how I knitted (from memory)
I knitted a strip of fillet mesh around the circumference of my head (4 rows) - in a circle - this is how the bandage turned out
Then I attached the thread and knitted the strip on top with fillet. I tried it on my daughter. The holes were large. I tied them with fans, but at the same time adjusted the pattern so that it did not expand, but vice versa
Fields:
When moving to the brim, I knitted 1 row of sc (I always knit 2-3 rows of sc, but here I didn’t knit it and the hat doesn’t fit so tightly to the head - I did this deliberately so that the hat would be looser at sea)
then 3 rows of arches from 5th century. P.
And then fans according to your favorite pattern 
Then I tied a double ring of regilina sc, then with a crawfish step.
Hat “Little Lady”


diagram and description of the side part


Diagram of the bottom and crown for exhaust gas 49-50 cm.

My yarn

My connected 13 rows of the bottom:

Up to the 13th row inclusive, we knit the same for all sizes.
* * *
ATTENTION:
When knitting a pattern in those places where we stick the hook into the post, it is advisable to use the “deep” sticking method. The hook must be inserted not under the two upper half-loops of the column, but into the body of the column itself. This method will not allow the pattern to shift when we knit with the crown.
* * *
Starting from the 15th row for all sizes we knit according to the pattern. Repeat rows 15-20 two more times.
They differ from the 15-20th only in the last row. Instead of a dc, I knitted a sc.
We also knit rows 33-38 according to the pattern.
38th row - RLS in each column.
The fields start from the 39th row.

We finish with the CROWN and insert the FIRST regelin equal to the circumference of the head. I made one vein. This is where we complete the work of the RLS. Steam.
We knit the BRIMS of the hat.
In the 39th row we make increases in every 3rd column,
In the 45th row - every 4th, in the 51st - every 5th.
The point is that in each row with increases you need to add 56 CH (7 reports). That is, in the 39th 168/56 =3, in the 45th (168+56)/56=4, etc.
STRENGTHENING FIELDS.
After the last row of fields is knitted, they need to be steamed well.
On a horizontal table surface, the fields should have the shape of a flat circle.
We take the SECOND regilin (TWO veins at once) and tie it with RLS. The length of regilin is not measured in advance!!! They just cut off the excess later.
We straighten the fields well.
Let's steam!
We tie the same row of RLS again. And we tie the last row with a “crawfish step” through the post.
On a plane, the fields should still be shaped like a flat circle.
Once again we steam the fields with an iron through a damp cloth!!!.
To add rigidity, I used SALVITOSE, which is used in felting.
Air dried.


DECORATION.
It must be removable - on a pin or button.
Knitting daisies is very easy.
Dial a chain of 2 v. n. In the first of them, knit 8 half-stitches and close them in a circle in the 1st half-stitch.
When the whole chamomile is ready, tie each of its petals in succession with connecting posts. This will allow them to keep their shape and not curl.

For the centers of the daisies, make small pom-poms using a regular dinner fork.

We wrap thread around the teeth of the fork. Then we tie it with an additional thread in the middle, remove it from the fork and tighten the knot. Then fluff and trim. Sew to the center of the daisy.
Two daisies are small, and one is slightly larger. For it, the scheme is the same, only for the petals we dial not 7, but 9 v. P.

I made a decoration on a button clasp for bags.
We will need a button and a knitted circle - this is what the daisies will be sewn on:

In finished form:

We attach the button to the hat


Scheme (for petals only):

Designations: the sketched dots on the diagram are the loop that is on the hook; the numbers in brackets are the number of loops that we pull from the connected column (to make it easier to count loops)
Blind (connecting) loop

I knit from Soso threads (50g=240m) with a regular hook No. 1.5 (without a handle)
Step by step photo of the process:
1. We knit 6 single crochets into a sliding loop

tighten the thread and close it in a circle.
2. Grabbing only the back half of the loops, we knit 11 single crochets (1 sc in the first half and 2 sc in the subsequent ones), connecting in a circle.

Half loops of a smaller circle will be needed for the upper petals.
3. We knit arches for the lower petals: cast on 5 air loops (c), skip 3 loops of the circle, fasten to the fourth; repeat 2 more times, fasten the last arch into the loop from which the first arch was knitted.
4. We begin to knit the first lower petal: Cast on 4 stitches. p. If you turn the knitting a little, the back (purl) jumpers will be visible

there is one loop on the hook (shaded point in the diagram), we pull out one loop at a time from the purl jumpers (4 sticks), we pull the last one out from under the arch (outermost stick)

there should be 6 loops on the hook
5. Close the row: grab the working thread and knit loops in pairs on the hook (grab the working thread and pull it through 2 loops, grab the working thread and pull it through the next 2 loops). We have the first row (connected column)

6. If you turn the knitting a little, the purl jumpers will be visible,

We knit one in. P.; we pull out the loops from the purl jumpers (1 on the hook + 5 from the jumpers + 1 from under the arch = 7 loops).

We close the row in pairs.

7. Next, we begin to cut the loops. In the sixth row, we begin knitting from a blind loop (insert the hook into the first jumper, grab the working thread and pull it through the loop on the hook). from further jumpers we pull out a loop and the last one from under the arch

We close the row in pairs.

To finish the first lower petal, we knit a blind loop into each purl jumper, and one under the arch

We make one blind loop in the next arch and begin to knit the second lower petal in the same way as the first. After you tie all three arches, it will look like this

To move to the upper petals, make 1 in. p insert the hook into half the loop of the small circle and knit a blind loop

On a small circle you need to tie 3 arches from 4 in. p (2 arches for petals and 1 for the core)
8. Dial 5 v. p and knit the first connection. upper petal column

First upper petal:

Two petals

We tie the upper petals with single crochets (I laid thin wire along the contour to better hold their shape). The lower petals were tied with stbn (without wire). It turned out like this
 Sew on beads, maybe small beads, and admire

Starching caps
1. Wash the cap in warm water (30-40 degrees). I use bleach laundry detergent for white hats and colored laundry detergent for colored ones.


2. Prepare the starch. To do this, pour 2 tablespoons of starch into a bowl and dilute it with 1/2 cup of cold water (to avoid the formation of lumps). Then pour boiling water, about 1 - 1.5 liters, stirring constantly. The mixture should be thick and transparent. Leave to cool.


3. Thoroughly starch the washed hats, squeeze them out (without twisting), removing excess starch.

4. To dry the hats, I use regular inflatable balloons, after inflating them to the desired size.


5. During the drying process, I periodically give the brim the desired shape, and iron the brim of the openwork caps through a layer of fabric.


Spring is just around the corner! We have a wonderful master class, thanks to which you will learn how to crochet voluminous flowers. You can use them to make a bright pillow case or a wonderful blanket.

Follow the instructions in the video master class:
I have collected in this article the simplest and most understandable lessons for crocheting flowers. Here you will find a method for knitting narrow petals and flower patterns with oval petals, as well as how to knit a voluminous flower with multi-layered petals and much more. I address this article not only to advanced masters, but also to beginners in this matter.

Crochet flowers

Crocheted flowers can be both small and large. With their help you can decorate absolutely any thing. You can decorate not only a napkin with flowers, but also a curtain holder, a bag, a hat, a scarf or mittens. With the help of knitted flowers you can add additional beauty to your hairstyle and make beautiful cards with your children. In a word, use your imagination and create great things!


These wonderful crocheted appliques will be an excellent decoration for both things and the interior. The article contains diagrams of three flowers: dandelion, tulip and tropical flower. All flowers are crocheted from 100% cotton “Iris” yarn No. 0.9.


Knitted flowers have become very popular. We crochet flowers, then decorate clothes, hats, and use them as keychains for a phone or backpack. Very beautiful bouquets can be created as a gift: flowers as decoration will please any girl or woman!
Crochet flowers


You can decorate a hat, beret, Panama hat, scarf, booties, sweater with a crocheted flower. Can be used as an element of knitted decoration: necklace or hair bands. Even beginners can handle crocheting this flower. Video master classes will help them with this!


Crochet daisy brooch
Using a crochet hook you can knit not only shawls and blouses. This tool helps you create very elegant jewelry like this brooch in the form of a daisy with green leaves.
The work is very elegant because a thin hook and thread are used. This allows you to achieve maximum resemblance to a living flower. This impression is complemented by a half-opened bud that looks like a real one. A brooch in the shape of a daisy looks very elegant and stylish.
In the language of flowers, daisy signifies youth and youth, so this brooch is perfect for young girls and those who are young at heart. Among the Slavic tribes, this flower was considered one of the sacred plants. Chamomile gets its name from the Latin “romana”, which translates as Roman. In the Middle Ages, it was often called “Roman flower”, and in Greek this word is translated as “white flower”. There is a beautiful legend that says that in the place where a star fell, a daisy grows. And these flowers themselves are very similar to small white stars.


Save so you don't lose

Crochet and knitted items are at the peak of popularity right now. Crochet flowers for adult and children's clothing and hats look especially interesting. We invite you to try knitting beautiful bright flowers. Our master class is simple and clear, with step-by-step descriptions and diagrams. Crochet flowers for decoration can be crocheted from completely different threads: cotton, wool, synthetic, silk, mixed and darning. The main thing is that they are tightly twisted and do not fall apart into thin threads.


The most popular crocheted flower is, of course, the rose. Knitted roses are often used to decorate children's and adults' hats, cardigans, bags, headbands, and so on. We offer you the simplest master class, which is suitable for beginners in crocheting. The center of the rose can be decorated with a bead or button, which is very popular now.

To work you will need:
- Threads of medium thickness.
- Hook number 2.
- Scissors.
- The needle is big.
Cast on an even number of loops. For example, if you crochet xxx50 loops, the rose will be 7-7.5 cm in size. The number of loops determines what size rose you want to get. In our master class we cast on 26 loops, we will make a small rose. First row - knit sc (single crochet).

Second row: we knit 2 VP (chain loops) for lifting, in the 2nd loop we make RLS + 2 VP.

Third row: in the 1st loop of the second row we knit 5 dcs (dc).

Do the same in the next loop: knit 5 dcs.

In this way we knit the entire row to the end.

A spiral has formed, which needs to be twisted into a column and stitched with a needle so that it does not fall apart.

In order to make a leaf, you need to knit a chain of 8 loops.

Second row: 2 sc (single crochet), 3 dc, 2 sc.

We continue until the end.

At the end of the work we knit a picot.


These beautiful crocheted flowers are easy to knit in one evening. The combination of colors in this master class depends on your imagination, because pansies can be amazing colors.

We will knit according to this pattern:

Let's get started: make a sliding loop. We put 5 sc into it.

Next we knit like this: 1 RLS (lifting chain loop), 2 RLS in the RLS of the first row, 6 VP, 2 RLS in the second RLS of the previous row, 6 VP, 2 RLS in the third RLS of the previous row, 6 VP, 2 RLS in the fourth RLS of the previous row , 6 VP, 2 RLS in the fifth RLS of the previous row.

Under 6 VP we knit 1 SS (connecting stitch), 1SC, 1 PS (half-dc), 1DC (double crochet), 10 CC2H (double crochet), 1 DC, 1 DC, 1 PS, 1 SC. Under the next six VPs we knit 1 sc, 1 dc, 10 dc2n, 1 dc, 1 pc, 1 sc.

Under the third 6 VP we will knit 1 sc, 1 pc, 8 sc, 1 pc, 1 sc. Under the fourth 6 VP we knit 1 sc, 1 sc, 8 sc, 1 sc, 1 sc. Under the fifth 6 VP we knit 1 sc, 1 sc, 8 dc, 1 sc, 1 sc.

We tie two large petals on top with contrasting threads.

These cool flowers can be crocheted to decorate clothes, stripes on your head, and so on. This lotus will make an excellent decor. You can choose melange yarn with a small print; it will look very beautiful in this product.

This flower needs to be crocheted gradually, in several steps. First, three sheets are knitted. In order to knit a sheet, you need to cast a chain of 5 VPs and close it into a ring. Next, you need to tie the chain with sc (single crochets). Then knit the leaves according to the pattern.

Next, let's move on to the petals. Let's start the lower petals with a set of 10 VPs. We tie the loops with double crochets and look at the diagram. At the end you need to tie the leaves with sc, and then tie with concave sc, as in the diagram.

We knit the top flowers carefully, otherwise the product may warp and it will not be symmetrical. For the top flowers, you need to cast a chain of 8 VPs and tie them with double crochets (dc), as can be seen in the diagram. When all parts of the flower are ready, they must be sewn together with the same threads.


The article about knitted flowers turned out to be quite popular. Therefore, we continue to publish a collection of knitted flowers.
Pansies:
knit the first flower
diagram 1. Cast on 6 chain loops with eggplant-colored yarn, close them in
ring. Knit the 1st and 2nd row according to pattern 1. Knit in orange
3rd row.
Knit the second flower according to pattern 2. Cast on 6 chain stitches,
close them in a ring. Orange yarn and knit from 1st to 4th row
scheme 2.
Bud: cast on 6 air loops from eggplant-colored yarn, close them into a ring. Knit rows 1-4 according to pattern 3.
Assembly:
starch the flowers and bud, put the second flower on the first,
place on a plastic stem and secure with stamens. buds
place on plastic stems.
 |
 |
 |
Knitting pattern for trefoil brooches  |
 |
 |
 |
 |
 |
 |
 |
 |
 |
 |
 |
| The following flowers are very easy to connect together
|
 |
 |
 |
 |
 |


We continue to publish a collection of knitted flowers.
Knitted daisies.
The core and petals of the flower are knitted with contrasting threads.
We knit a small flower:
cast on 5 air loops and close them in a circle with a half-column.
1st row: one air loop for lifting, 12 single crochets.
2nd row: *7 air loops, in the second loop we knit a stitch without
double crochet and then 6 single crochets, knit the 6th stitch in the second
circular column*; repeat from * to * 5 more times (total 6
petals).
Row 3: tie all the petals according to pattern 1.
Core of a small flower:
cast on 2 chain stitches.
1st row: 5 single crochets in the 2nd chain stitch
Row 2: We knit 10 single crochets behind the back wall of the loop of the previous row.
Row 3: increase through 1 stitch = 15 stitches.
For a small flower you need to finish knitting and break the thread. For a large flower we knit the 4th row: we make increases through 1 loop = 22 loops.
We knit a large flower according to pattern 2.
 small flower and the center of a small flower |
 big flower |
| Knitting pattern for daffodils:
|
 |
 |
 |
 |
 |
 |
 |
 |
 |
 |
 |
| Designer flowers from Nelya Solovey:
|


Master class on knitting a flower “Common poppy, field poppy” from Elena – koluchka.
 |
1. Close 8 VPs into a ring. (Yarn “Tenderness”)
2. Knit 12 sc in half loops.
3. In the same half-loops, knit the third row 16 RLS.
4. In the fourth row, 21 sc are knitted in the center of the “berry”.
5.6. Turn the “berry” over and knit a row of 21 sc.
7. Take a thinner yarn (“Tulip”) and pull a loop from the center of the “berry”.
8. Insert a hook and loop before the last row of sc, pull it out and knit a loop from the thread under the “berry”.
9. Knit sc for the edge of the “berry”, 3 ch, sc for the edge of the “berry”.
10. Make the other six jumpers in the same way, pulling the loops from the center of the “berry”
11. Knit a row of 21 sc.
12. On each loop of the previous row, perform a “stamen”: 16 VP, SS (21 pieces)
13.14. For the petal, attach the connection from the inside. stitch and knit
first row 10 VP, SS. Second row: tie the first row with 12 sc. Third and
fourth row: 14 RLS. Fifth and sixth row: 16 RLS. Seventh, eighth,
ninth: 18СБН. In the tenth row, evenly add 10 loops (total 28
loops). Eleventh row: RLS, PS, SSN, SS2N, SSN, PS, RLS
(repeat three times).
15. Knit the second upper petal in the same way. Make the lower petals
a little more, increasing the chain of VPs of the first row by 2 -12 VPs.
Accordingly, the number of columns in each row of the bottom will increase by 2
petals.
16. Finally, tie the poppy petals with a crawfish step (Canaris yarn 203 m -20 g).
This flower can be used to decorate a knitted product or
like an Irish lace motif. An online topic has been opened on Elena’s website
knitting items using the Irish lace technique for poppy lovers

To knit flowers you will need: Iris threads in 2 layers, a 1.3 mm hook and a flower pot.
Knit petals according to pattern 1 - 6 pcs.
Center of the flower:
Knit in the round
1st row: 2 ch, from the first ch. knit (st. b/n, 6 v.p.) 6 times.
Row 2: From each st. b/n the previous rows, knit 2 tbsp. b/n, with
this is a chain of 6 v. p. prev. leave the row in front of the knitting.
3rd row: st. b/n.
See photo 1 for the result.
 |
| Now you need to tie the petals with connecting posts in 2 take 3 pieces to the middle of the flower. The first 3 petals are tied to row No. 2 for the middle of the flower, and the second 3 - to row No. 3 (photo 2). For the stem you need to knit a row of st. b/n for connection columns and beyond knit in the round; if the stem is too wide, make decrease in the first rows, knitting 2 tbsp. b/n together. I reduced it to width Row 8 st. b/n. Then the stem just fits a cocktail tube (for stability) (see photos 3 and 4). |
 |
| Soil in a pot: In the last row of the stem, change the thread to brown. 1st row: 1 tbsp. b/n, (2 tbsp. b/n from 1 tbsp. previous row) 3 times, 1 tbsp. b/n, (2 tbsp. b/n from 1 tbsp. previous row) 3 times. 2nd row: 1 tbsp. b/n, (1 tbsp. b/n, 2 tbsp. b/n from 1 tbsp. previous row) 3 times, 1 tbsp. b/n, (1 tbsp. b/n, 2 tbsp from 1 tbsp. row) 3 times. 3rd row: 1 tbsp. b/n, (2 tbsp. b/n, 2 tbsp. b/n from 1 tbsp. previous row) 3 times, 1 tbsp. b/n, (2 tbsp. b/n, 2 tbsp from 1 tbsp. row) 3 times. Then we sew the resulting hexagons of earth of several colors together short sides. We tie it in a circle to the required width of the pot. To make the flowers in the pot stand stable, I cut out a piece of foam plastic according to the size of the inside of the pot and stuck tubes of stems there, and I glued the bound soil along the edge to the circumference of the pot. |

Petal:
Dial 5 v. p. and knit in the round.
1st row: 1 v.p. lifting, 4 tbsp., 2 tbsp. b/n to the last v.p. chains,
2 vp, 2 tbsp. b/n in the same extreme c. n. chains, 3 tbsp. b/n, 2 tbsp. b/n in
1st ch. chains, 2 ch, 1 tbsp. b/n in the same loop.
2nd row: 2 tbsp. b/n, 3 half double crochets, 2 tbsp. b/n, in a chain of
2 ch. knit (1 st b/n, 2 ch, 1 st b/n), 2 st b/n, 3 half sts. s/n,
2 tbsp, in a chain of 2 vp. tie (1 st b/n, 2 ch, 1 st b/n).
3rd row: knit in single stitches, in a chain of 2 vp. knit 1 tbsp.
4th row: we knit with connecting stitches one in one.
 |
Center of the flower:
1st row: 2 ch, from the first we knit 6 tbsp.
2nd row: 1 tbsp, 2 tbsp from 1 tbsp. of the previous row - repeat until the end of the row.
3rd row: knit st. b/n without increases.
Sheet:
1st row: cast on 20 ch, 19 double crochet stitches, 5 double crochet stitches from outermost stitch. n. chains, 19 tbsp. double crochet
Row 2: st. b/n.
Assembly: We attach 3 petals with connecting ones
in columns to the last row of the center of the flower Then with threads of green
colors on the connecting posts we knit a row of st. b/n and further in a circle until
required stem length. Sew 2-3 leaves to the base of the stem. IN
I inserted stems into the cocktail tubes for stability, and
I tied 2 old CDs around the base. So that the flowers don't fall,
I sewed the center through the hole in the disk tightly to the binding from below.

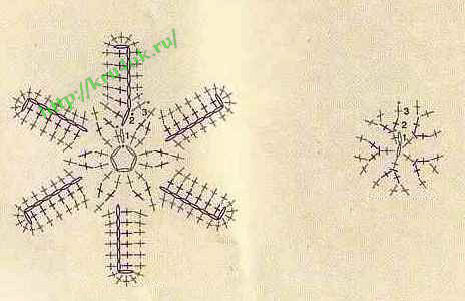
Several patterns of crocheted flowers for your piggy bank. They can be used to decorate a hat, dress, panama hat or make a brooch.
MATERIALS
Leftover yarn of various colors.
HOOK
Choose the size according to the thickness of your yarn.
Types of loops:
Air loop (v.p.): in p.
insert the hook, throw the thread over it and pull it through the loop.
Single crochet (st. b/n): insert the hook into the loop of the chain or bottom
row and pull out a new loop, grab the thread and knit 2 loops on
hook in one step.
Double crochet (st. s/n): make a double crochet on the hook, insert it into
loop of the chain and pull out a new loop, knit 3 stitches on the hook in pairs
2 doses.
Double crochet stitch (st. 2/n): make 2 double crochets on the hook, insert
hook into a loop of the chain and pull out a new loop, knit 4 stitches on the hook
in pairs in 3 doses.
Flowers: according to schemes 1,2 and 3.
DESCRIPTION OF THE WORK Flower “A”.
Dial a chain from the 16th century. p. and knit according to pattern 1.
ASSEMBLY
Roll the resulting braid in a spiral and secure the center on the wrong side with a few stitches.
DESCRIPTION OF THE WORK Flower “B”.
Dial a chain of 52 v. p. and knit according to pattern 2. Having finished the 4th row, cut the thread.
ASSEMBLY
Roll the resulting braid in a spiral and secure it in the center with the wrong side. sides with a few stitches.
DESCRIPTION OF THE WORK Flower “B”.
Dial a chain of 40 v. p. and knit according to pattern 3.
ASSEMBLY
Roll the resulting braid in a spiral and secure the center to the wrong side. sides
several stitches. In case of using flowers as a brooch,
attach with purl side pin.


Crochet has always been in demand, but to varying degrees. Today
this type of needlework is more popular than ever. Classic ones are integrated
types of knitting: the fillet knitting pattern becomes the border of a summer jacket;
elements of guipure tablecloths - a lush decor of blouses. Napkin patterns
hat brims are knitted, and jacket yokes are used as collar motifs. There are many examples.
This is a natural process, a kind of creative game. In value in
preservation of traditions and their modern embodiment.
Have you noticed, dear craftswomen, that the emphasis in knitting is on
complex options that cannot be reproduced on a knitting machine?
One of these trends is guipure. It is designed to simulate complex and
expensive Venetian embroidery.
The best examples of such crocheted lace were produced by the Irish
nuns, so over time it began to be called “monastic”, and later
- Irish guipure. Please do not confuse it with Irish lace, which is
the method of execution differs from guipure. Classic guipure knitting
complex and painstaking. Because it imitated needle-embroidered lace,
then they used lace linen, thin cream or white paper threads
for knitting elements and very thin for meshes and brids. Modern fashion
takes into account our busyness, fast pace of life, desire to move faster
realize the intended product. She favors models
large knit from thick yarn. This is beneficial for beginning craftswomen.
You may have noticed that the mesh holding the elements together is rarely
used. “Adhesive” guipure fabrics are relevant. Steel elements
larger, the thread is thicker.
So, let’s assume you are planning to knit a blouse entirely or
fragment with guipure elements. It is advisable to draw first
sketch on the pattern, you can improvise as you knit. Most
the compositions are occupied by leaves. Various books and magazines provide
many patterns for knitting leaves. It is impossible to discuss them within the scope of this article.
manifold.
For example, a classic guipure sheet is usually knitted in two ways: with
an extension from one RLS (diagram 1) and with an extension on an arch (diagram 2).
At the same time, knitting methods can be different: for both half-loops, for
back half-loop, behind the front half-loop, behind the purl horizontal
half loop of columns of the previous row.
The texture of the sheet in the first photo turned out to be flat, in the second - ribbed.
Photo1. The sheet is crocheted according to pattern 1 using both half loops:  |
Photo 2. The sheet is crocheted according to pattern 1 using the back half-loop:  |
Photo 3. Complex sheet.  |
Crochet pattern for leaves 1 and 2:  |
Photo 4. Sheet 1 is crocheted according to pattern 2.  |
Pattern 3. Crochet a leaf.  |
Pattern 4. Crochet a leaf.  |
The shape of the leaf, knitted according to scheme 1, is wide at the cutting and sharp at the
end. Increases on the arch according to scheme 2 create a sharper edge on the handle
leaf shape. With a large number of dialed air loops (10-12) and
With the generally accepted indentation of 2 single crochets, the sheet turns out wide.
The leaf denticles are concentrated on the front part; the stem has a smooth leaf.
This form is good when combining them into a complex sheet (photo 3). At
a small number of air loops of the initial chain (4-6) sheet
It turns out narrow and when knitting in multiple rows - long. cloves
located along the entire length of the sheet (sheet 2 in photo 4).
What if the composition requires a large leaf with teeth along its entire length? Increase the number of single crochet stitches (diagram 3).
For clear, ornamental compositions, one or two types are used
leaves. Leaves of different sizes and shapes are drawn in the sketch: small and
large, smooth and curved. The rotation of the sheet is obtained when knitting
different numbers of sc on the left and right sides of the arch: 1 and 2, 2 and 3
give a slight turn of the sheet, and 1 and 3 give a steeper turn. Sheet 4 in photo 4
associated with turning in one direction (Scheme 4). Such a variety of forms and
the size of the leaves only decorates the composition.
To be continued …

Let's continue the conversation about knitted leaves.
Diagram 5 shows a sheet in which the turns are connected alternately in
different sides. A variety of leaf shapes decorates the composition and gives
her expressiveness. Experiment too. How else can you
get curved leaves? In addition to the toothed ones, there are rounded and
arbitrary leaf shapes. Often found in compositions are small
leaves connected by columns of different sizes. To add rigidity and
beauty, tie them with single crochets with “picot” or “crawfish step”
(see diagram 6 and 7).
Tip: do not knit more than 2-3 half-stitches in a row. Their function is to create
smooth transition from single crochets to double crochets.
Similar to knitting
small leaves seems logical to knit medium sized leaves
double and triple crochet stitches. Yes, it is possible, but the sheet even after
The binding turns out to be somewhat loose. The leaves will be medium sized
look better if you knit them with single crochets, half crochets and
with single crochet stitches on both sides of the VP chain (Diagram 8).
Tie such a sheet with single crochets twice in the same
column heads. Of course, add
single crochet. For the cutting, knit 6-7 chain stitches and
In the opposite direction, tie single crochets on them.
 |
Another sheet option: knit stitches of different sizes on posts without
Yarn over, which tie a chain of air loops on both sides
(Scheme 9).
Tie this sheet with bourdon: fold the knitting thread in half (this
bourdon), fasten single crochets in the middle of the bourdon, fold the threads
bourdon together. Then hold the thread along the fabric and tie
single crochets. Having tied the sheet completely, tie 6-7 sc around
threads (on bourdon) for leaf cuttings. Tie the VP, tear off the bourdon
unevenly, apply the rest to the knitting and knit sc in reverse
direction. Lastly, tie the connecting posts at the base.
sheet, break the thread and pull it to the wrong side. Use the tail of the thread
for sewing elements together.
If you are planning a canvas made of openwork, transparent elements, then
The way of knitting leaves changes. The diagrams show options for such
leaves: small (diagram 10) and medium (diagram 11). Double row binding
Sc will give shape.
 |
 |
 |
Two more options for openwork leaves are presented in Diagram 12.
To be continued …

We continue to publish patterns of knitted leaves. Leaves in this part
real flowers and plants: clover, oak leaf, etc. They are perfect
for knitted appliqués, brooches, color compositions.
Knitted clover leaf  |
Knitted oak leaf  |
 |
 |
 |
 |
For example, how you can use knitted leaves in a composition:  |
Knitted maple leaves  |
 |
We also recommend
 Round table with parents of the middle group “By playing, we develop” Parent meeting with parents of children
 Features of the structure of the bones of a newborn
 Birthday at the Zoo Birthday at the Zoo
 We sew a warm hat with earflaps
 Spring appliques for children Paper applique
 How to make a mask, Batman costume, fox costume for the holiday?