How to make a chicken costume with your own hands: a description of different options for a carnival costume. DIY fabric chicken costume
If a child urgently needs a costume for a performance in the garden, but you don’t have anything like it - don’t despair, sort out your “handmade chests”, there will probably be some suitable fabric and buy what you need at your local sewing store. I assure you that, if desired, even the most inexperienced needlewoman can create a miracle.
Here I make a small amendment - my master class is dedicated to such novice craftswomen. I myself have very limited experience in sewing, so when faced with the task of sewing a chicken costume for a child’s matinee, I settled on the simplest and therefore accessible option for me. However, it turned out quite nice.
Our suit will consist of pants and a hat with a comb, which we can complement with a regular yellow T-shirt. So, for sewing we will need:
Fabric for pants (I used orange fleece - soft, pliable, beautiful fleece is very convenient for sewing such carnival costumes);
Fabric for a hat (in my “chests” I found yellow velor - the fabric is very impressive and soft, but a little “capricious”);
Threads of suitable colors;
Elastic band for pants;
Ruler, pencil, scissors.

I sewed pants without a pattern. To do this, I took old trousers that we no longer wear, but they were still just the right size, ripped the legs apart and traced two identical parts on the orange fabric. If you are making pants with an elastic band, add a little on the bend of the waistband. When cutting out parts, do not forget to leave a little fabric (one centimeter is enough) for allowances.

We sew each of the cut out parts to the protruding tip of the triangle.

This way. You get two trousers.

Now we chop the parts together. You can sweep it if you wish. And we stitch it on a typewriter.

These are our pants.

Fleece is also good because its edges do not fray, so it is not necessary to process the seams in the product. If you are sewing a suit from a different fabric, pay attention to the cuts; if the edges need processing, do not forget to overcast them by hand or by machine.
We make a belt. The simplest option is to fold the fabric inward and stitch it, leaving a small hole for threading the elastic.

We process the edge of the trouser legs in a similar way.

Turn the pants inside out.

We thread the elastic in the classic way - using a pin. Attach a pin to one end of the elastic and push it into the waistband of the pants until the pin comes out into the hole left, making a complete circle inside the waistband.

We tighten the elastic band until we obtain the desired size of the belt, tie the ends with a knot, and cut off the excess.

To make your pants look neater, hide the knot inside the waistband.

Here are our panties ready!

You can make a belt in another, more complex way. Cut out a rectangle from fabric with a width equal to the child’s waist plus 0.5 - 1 cm, and a height equal to twice the desired height of the belt. We sew the top of our panties in a circle and gather them a little. We grind the ends of the belt, fold it in half lengthwise and sew it to the panties, hiding the gathered top of the panties inside the belt. Due to the fact that fleece stretches well, this sewn-on belt itself will act as an elastic band.

Now, before we change the threads in the machine, let’s sew a comb. We sew the two parts together, leaving the bottom unstitched.

And turn it inside out, carefully straightening out all the bends. If necessary, make small cuts so that the fabric will not pull or wrinkle.

Let's move on to the hat. From the fabric we cut out a rectangle measuring 21 (head volume) by 18 (height of the cap) centimeters, plus allowances of a centimeter on each side.

We retreat six centimeters from above and draw a line. From the edges we retreat by a centimeter to allowances. And then we draw six identical triangles with a base of seven centimeters (for the volume of the head I indicated).

Trim off excess fabric.

And we sew two seams on the machine along the lines of the intended triangles.

On the other side of the part we do the same. The central triangles remain unstitched.

We fold the cap along the line of the triangles that have not yet been sewn and tuck the comb inside as shown in the photo.

To prevent the parts from moving, we pin them together with a pin. Then we sew it all on a machine, starting from the side seam and ending with the central triangles.

They turned the cap inside out. This is what we should get:

We turn the bottom edge of the cap and hem it.

Here's how it worked out for me:

That's all! The chicken costume is ready.
A cute chain is a decoration for any holiday. Especially New Year's carnival. It’s hard not to notice such a miracle among ordinary Bunnies and Snowflakes.

I suggest this fashionable Chicken costume for a girl.

To create it you will need yellow tulle (4 meters) and a white gymnastic leotard or white turtleneck.
We make our skirt easily and quickly without a single stitch.
We cut the tulle into strips half a meter long and twenty centimeters wide.

We cut a thick elastic (width more than 2 cm) to the circumference of the child’s waist minus three cm. Sew the ends together or tie them. We put the resulting elastic band on the back of the chair.

Take a strip of tulle and tie it with an elastic band. It is important that the knot should not squeeze the elastic.

We continue until the end.

Finally, we trim the ends of the skirt.

Beauty!!!


A very simple version of a chicken costume for a girl.
It consists of a yellow turtleneck with a collar and long sleeves, as well as a satin skirt with frills made of organza, tulle or nylon ribbons. The skirt should also be completely yellow color. We sew a skirt from a rectangle whose length is equal to the circumference of the child’s hips and another half of this number. At the top they make a drawstring for the elastic and insert elastic bands, and the frills are sewn directly on top in several rows.
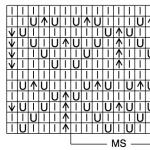
The set also includes a knitted hat with a scallop. which is not difficult to quickly sew yourself.

Below are two more chicken costume options with pattern diagrams for younger kids.


And here are some chicken costume ideas for those who can make their own patterns.


The chicken costume looks especially touching on young children. Often parents choose it for their children under three or four years old. It’s quite easy to sew such a suit - there's no need for too much here. Better pay more attention choice of fabric. It should be very bright and rich. You can take artificial fur, fleece, feather braid, bright yellow taffeta, organza, crepe satin. Then your child will definitely stand out at the party.
There is a very simple way to cut out a suit - the picture shows the pattern. It is the same for the cape and skirt. The edges can be trimmed with rain or feather trim. A pattern for a hat with a beak is also shown there. Eyes can be cut out from plastic bottle, stick paper on top and decorate it - draw pupils and eyelashes. You can sew only one comb and secure it on your head with a thin elastic band. By adding yellow tights and red shoes to your suit, you can go to the party!

In order to make a chicken costume It is not necessary to sew it completely; you can choose a sundress or a yellow dress for a girl, and a T-shirt with pants for a boy. Put a cap or hat on your head and sew a comb to it. The girl can weave a yellow ribbon into her braid or tie a bow.
You can make a hat with a comb using this principle, for this you can take either corrugated paper, or fold the fabric like an accordion:

The child can simply wear a chicken mask and yellow clothes, which is perfect for a quick option.
You can also look at the photographs and get some useful ideas for fancy dress:


Quite simply and inexpensively you can make this cutest chicken costume for a child of kindergarten age:

Well, since our baby is already moving independently and should be comfortable, we will need a little less feathers than in the first photo:

Here are the required materials:
We make a headdress for a costume like this:


Chicken costume may be useful for a matinee and for New Year's Eve. If you have a girl, then the suit can be created based on the dress.
This could be a dress with a black/yellow/orange top, and the bottom could be made, for example, of yellow tulle.
Tulle is so easy to work with that you don't even have to use a sewing machine.
Look, you can offer your child: a yellow turtleneck and a tulle skirt.
A tulle skirt can be made from rectangles according to this principle:

That is, we tie rectangles of yellow/white/orange tulle to an elastic band that corresponds to the waist circumference (plus two centimeters).
Nothing complicated.
The skirt is ready, the turtleneck is there, you can make an additional mask or face painting.
For example, face painting can be found in another author’s question - How to draw a rooster, hen, chicken on the face? How to do face painting?
For a boy, you can sew pants from yellow fabric (velor works well). The pattern could be like this:

You can also use regular sports (or pajama) pants. Fold in half and transfer all the contours to the fabric. Let's turn it over to the other side, again in half and again the drawing.
Cut and sew. Elastic bands or lacing are at your discretion. It is also optimal to add a yellow T-shirt and a mask.

To make a baby a tender and funny chicken costume you will need very little effort and consumables: thread, cotton wool (foam rubber), yellow fabric for a hat and cape, red fabric for a comb, a yellow turtleneck, yellow tights and preferably red shoes.
Below I suggest you familiarize yourself with the costume pattern.

Do not forget to work out all the seams; cotton wool (foam rubber) is necessary to give volume to the comb. You can sew a not too tight elastic band along the edge of the cap so that the cap holds well. The cape itself can be decorated with small pimples. Tights and turtlenecks and shoes will help complete the look.
It seems that original costume Chicken is very difficult to make. But, if you show your imagination, you can make an original costume from scrap materials. We take a turtleneck and a blouse of a neutral color as a basis. Better yellow or white. We sew a boa to it.
From felt we make a chicken mask and a comb for a hat.
Galina Mukhina
To make this suit you need a minimum of materials and time.
We will need:
- household napkins: two yellow and one pink;
A piece of orange cardboard.

Cut out a comb and a bow from a pink napkin.
Fold the first yellow napkin in half, cut off the corners along the fold line, rounding them, insert a comb and stitch. We fold the bottom edge, adjusting the length to the size of the child’s head and stitch it. The material does not require stitching - it does not fray along the edges. We cut out a beak from cardboard and attach it to the hat with a stapler.

Fold the second yellow napkin in half, cut off two strips from the bottom - these will be the apron ties. Cut out an apron from the remaining square. We sew ties to it and decorate it with a pink bow. The apron is ready.

We put a cap and apron on a child dressed in yellow clothes - in front of you chick. Everything is simple and looks very nice.
Publications on the topic:
A little about our preparation for winter holiday. Very soon the holiday of fairy tales and magic will come. A holiday of waiting for a miracle. We ourselves are.
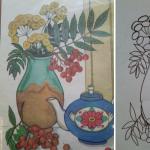
I bring to your attention a master class on making simple and beautiful flower. We made these flowers for mothers. But I think so.
Didactic game “Feed the chicken” Didactic game “Feed the chicken” In classes with children we learn how to work with clothespins. For many children this is not so easy. This.
I made it with my own hands Christmas costumes! Here is one of them: first shorts with a ponytail, then mittens, then a “butterfly” on the neck and “ears”.
Abstract joint activities with children to design a “chicken chair” (early age) Goal: Continue to develop understanding of speech and activate children’s vocabulary. Objectives: Teach children to perform basic actions with the same ones.
I would like to introduce you to ideas for designing a subject-spatial environment in a regional context. Nowadays, traditional national ones.
Kutenkova Elena Making a crown for the Snow Maiden in 15 minutes. To make a crown you will need: 1. 5-liter water bottle.
If your child urgently needs a costume for a performance in the garden, but you don’t have anything like it, don’t despair, take apart your “handmade chests”, there will probably be some suitable fabric there and buy what you need at your local sewing store. I assure you that, if desired, even the most inexperienced needlewoman can create a miracle.
Here I make a small amendment - my master class is dedicated to such novice craftswomen. I myself have very limited experience in sewing, so when faced with the task of sewing a chicken costume for a child’s matinee, I settled on the simplest and therefore accessible option for me. However, it turned out quite nice.
Our suit will consist of pants and a hat with a comb, which we can complement with a regular yellow T-shirt. So, for sewing we will need:
Fabric for pants (I used orange fleece - soft, pliable, beautiful fleece is very convenient for sewing such carnival costumes);
Fabric for a hat (in my “chests” I found yellow velor - the fabric is very impressive and soft, but a little “capricious”);
Threads of suitable colors;
Elastic band for pants;
Ruler, pencil, scissors.

I sewed pants without a pattern. To do this, I took old trousers that we no longer wear, but they were still just the right size, ripped the legs apart and traced two identical parts on the orange fabric. If you are making pants with an elastic band, add a little on the bend of the waistband. When cutting out parts, do not forget to leave a little fabric (one centimeter is enough) for allowances.

We sew each of the cut out parts to the protruding tip of the triangle.

This way. You get two trousers.

Now we chop the parts together. You can sweep it if you wish. And we stitch it on a typewriter.

These are our pants.
Fleece is also good because its edges do not fray, so it is not necessary to process the seams in the product. If you are sewing a suit from a different fabric, pay attention to the cuts; if the edges need processing, do not forget to overcast them by hand or by machine.
We make a belt. The simplest option is to fold the fabric inward and stitch it, leaving a small hole for threading the elastic.
We process the edge of the trouser legs in a similar way.

Turn the pants inside out.

We thread the elastic in the classic way - using a pin. Attach a pin to one end of the elastic and push it into the waistband of the pants until the pin comes out into the hole left, making a complete circle inside the waistband.
We tighten the elastic band until we obtain the desired size of the belt, tie the ends with a knot, and cut off the excess.

To make your pants look neater, hide the knot inside the waistband.

Here are our panties ready!

You can make a belt in another, more complex way. Cut out a rectangle from fabric with a width equal to the child’s waist plus 0.5 - 1 cm, and a height equal to twice the desired height of the belt. We sew the top of our panties in a circle and gather them a little. We grind the ends of the belt, fold it in half lengthwise and sew it to the panties, hiding the gathered top of the panties inside the belt. Due to the fact that fleece stretches well, this sewn-on belt itself will act as an elastic band.

Now, before we change the threads in the machine, let’s sew a comb. We sew the two parts together, leaving the bottom unstitched.
And turn it inside out, carefully straightening out all the bends. If necessary, make small cuts so that the fabric will not pull or wrinkle.
Let's move on to the hat. From the fabric we cut out a rectangle measuring 21 (head volume) by 18 (height of the cap) centimeters, plus allowances of a centimeter on each side.

We retreat six centimeters from above and draw a line. From the edges we retreat by a centimeter to allowances. And then we draw six identical triangles with a base of seven centimeters (for the volume of the head I indicated).

Trim off excess fabric.

And we sew two seams on the machine along the lines of the intended triangles.
On the other side of the part we do the same. The central triangles remain unstitched.
We fold the cap along the line of the triangles that have not yet been sewn and tuck the comb inside as shown in the photo.

To prevent the parts from moving, we pin them together with a pin. Then we sew it all on a machine, starting from the side seam and ending with the central triangles.

They turned the cap inside out. This is what we should get:

We turn the bottom edge of the cap and hem it.

Here's how it worked out for me:

That's all! The chicken costume is ready.
You happy mom, and your baby visits kindergarten? Or maybe he's studying at school early development children? Then we can say with confidence that in the next two years you will hear from a teacher the phrase: “Mommy, there’s a matinee in a week, your child needs a chicken costume.”
Since Soviet times, it has been the custom that methodologists and preschool teachers educational institutions They love to dress up children as little chickens. And no wonder! What could be cuter than little white and yellow lumps doing a funny dance and trying their best to recite their poem loudest!
Costumes for very little ones
Not only for a celebration in kindergarten you may need a chicken costume. It will look very cute and touching on babies from one to three years old. At a costume photo shoot in honor of Easter, wearing such a costume, your baby will become a real star, and a simple dance will New Year's Eve, performed in such a costume, will certainly get a standing ovation from the hands of grandparents.
Choosing a suit for absolutely small child Do not forget that the baby will not sit still. The outfit should not restrict movement. It is desirable that the material be as natural and pleasant as possible for the body, the suit fits comfortably on the figure, does not slip or rise.
All decorative elements of the product must be secured very securely, since children themselves younger age They put all the objects that interest them in their mouths and can easily choke on a torn bead or button.
Buy or sew yourself?

In markets and children's stores on the eve of matinees, a lot of children's carnival outfits appear. They represent the main characters kindergarten theater scenes. Among them there will definitely be a chicken costume.
A simple outfit can be bought at a very reasonable price. But such an acquisition has several disadvantages:
Firstly, the quality of inexpensive suits is very far from ideal; they are made from synthetic materials, cut out at random. As a result, they can hardly stand one performance.
Secondly, the assortment includes one or two models. If you want your child’s matinee costume to look original, this is unlikely to be possible with a purchased product.
DIY chicken costume, quick and easy
If you don't know how to make a chicken costume, don't despair. It doesn't have to be completely sewn. You can study your baby’s wardrobe and perhaps there will be suitable yellow items there. For a girl, it is enough to choose a sundress or dress, and for a boy, a T-shirt and pants are suitable. On top of this set will be complemented by a loose cape, cut according to the principle of a musketeer's cloak. It can be decorated with a ribbon made of artificial feathers.
Particular attention should be paid to the choice of fabric. Give preference to bright and rich shades. Then your child will stand out from the crowd of kids.
The texture of matter is also very important. Good choice will become fleece, satin or organza.
How to sew a hat with a scallop

Almost the most important element carnival costume is a headdress. It is he who concretizes the image and makes it recognizable from afar.
The set described above will be perfectly complemented by a hat with a comb. The principle of its manufacture is shown in the photo.
You will need a white baby hat, red felt, padding polyester and a hot glue gun. Using the template, we cut out two parts in the shape of a scallop, sew them together, and fill them with padding polyester to add volume, because the scallop is always in a vertical position. Then use glue to attach it to the hat. Everything is fast and simple!
Fluffy chick with funny paws

If you want your chicken costume to fill the kindergarten for a long time, you should decide to create a more complex, but really chic model.
Small and round, covered in feathers, with funny yellow paws on his feet - this is how you can describe the child in the photograph. This chicken costume looks like the work of a professional designer.
But in fact, the secret of its creation is simple and accessible to everyone. Hard to believe? Most people will ask: "How to make a chicken costume?"
To get started, choose a comfortable knitted T-shirt or turtleneck. It is desirable that the color be discreet. It should not stand out, as it will serve as the basis, " blank slate"for the future voluminous top of the suit.
It is advisable that the selected T-shirt or turtleneck be as long as possible. Then you won’t need to choose shorts or a skirt to match the set.

Sew a boa onto the selected top of the suit, just as it was done in the product in the photo. The required length of the feather ribbon will directly depend on the size of the suit and the style of the base T-shirt.
When the top is ready, you can start making funny yellow paws. To do this, we make holes in the household gloves and use glue to attach them to the shoes in which the baby will perform during the matinee.
Finished paws can be decorated with leftover feathers. This will make them more touching and chick-like. In addition, with the help of feathers you can hide all the seams and folds that appeared during the gluing process.
Well, the main elements of the costume are ready. They should be complemented with a hat with a comb. The process of its manufacture is described above.

Don't forget about the details. Choose plain yellow tights. They will visually continue the legs, the chicken costume will look holistic and very stylish.

Masterpieces from true craftswomen
Well, those whose experience in sewing cannot be called modest can safely begin sewing more complex chicken costume models. Unfortunately, it is unlikely that you will be able to find a ready-made pattern. All the options posted online and in various print publications revolve around basic capes and jumpsuits. They will become a convenient base. You will have to come up with the decor of the product yourself.
Useful ideas for creating a truly designer suit with loving hands mothers or grandmothers can learn by looking at photographs. A little imagination - and from simple things and leftover creative materials a real masterpiece will be born.
Tatyana Churzina
I want to tell you what chicken mask,we made it for the kids for the autumn matinee. First, I made a sample and showed it to my children’s parents, explained how to do it, but since the parents were not familiar with the cutting method, they asked for a master class at a parent meeting. And when the time came, I spent Parent meeting and started master class. The parents got down to business with enthusiasm. We needed sheets of white paper, eye and beak templates, and my favorite napkins. yellow color. I have been working with napkins for a very long time and my children and I really like them. Working with napkins develops fine motor skills hands, and motor skills needs to be developed at any preschool age, since at the same time the child himself, his speech, his mind develops. The parents did an excellent job. They turned out very beautiful chicken masks.


Getting closer New Year holidays, and parents are increasingly racking their brains about what to dress their child in for the holiday.
Today we will show you how to sew a chicken yourself; the costume is designed for a 4-5 year old girl. It consists of a dress and a hat with a comb. If this is not the first time you have sat down at a sewing machine, then chicken will not be difficult. But don't despair if you don't have any DIY skills. Check your daughter's wardrobe. Perhaps there will be a yellow dress there and all you have to do is sew a hat with a comb, and you will definitely master it.
For the costume you will need:
*
yellow satin - 70 x 130 cm
*
organza is also yellow - ZOO x 150 cm
*
faux fur, preferably white - 16 x 16 cm
*
red fleece – 10 x15 cm
*
lace braid – 60 x1.5 cm
*
padding polyester
*
smooth headband to match the suit
*
regular thread and elastic thread
*
glue "Moment"
 How to cut a chicken costume:
1 From the satin, cut out the parts according to diagrams 1, 2, 3 and 4. Make darts on the back part (red color in diagram 1). Cut out the skirt waistband piece to size 120 x 10 cm.
2 From organza, cut strips for flounces into sleeves (see diagram 5). For the shirt front trim, cut a strip measuring 150 x 3 cm. For the skirt, cut 10 strips measuring 150 x 15 cm. For ruffles on the skirt, cut 14 strips measuring 150 x 5 cm.
3 From fleece, cut out the scallop parts according to diagram 6.
 Top of the dress
1 Sew the shirtfront and the double-gathered trim for it onto the front piece (see photo and diagram 2 - highlighted with a pink dotted line). Sew the back and front along the side and shoulder seams.
2 Gather each organza strip in half for the sleeves. Sew onto sleeves. Sew them in.
Skirt
 1
It consists of a belt to which is sewn a double skirt with frills. Each skirt is made of two tiers - upper and lower.
1
It consists of a belt to which is sewn a double skirt with frills. Each skirt is made of two tiers - upper and lower.
2 Fold the waistband piece in half lengthwise with the wrong side facing in. Make 3 longitudinal lines with an elastic thread every 0.5 cm, departing 1 cm from the fold. The result is an elastic belt.
H For the top tier of each skirt, take 2 strips of fabric and sew them into a ring. Gather each ring from one edge to the size of the belt and sew to it. The top tier of the double skirt is ready.
5 For the bottom tier, take 3 strips of fabric and sew them into a ring. Gather each one from one edge to the size of the top tier and sew to it.
6 For each skirt, make a frill of 7 organza strips. To do this, sew them into a ring and sew them with an elastic thread along the center to gather them. Sew the ruffles to the skirt and the ruffles to the top of the dress.
 Hat with scallop
1 Sew the details of the hat with a hidden seam, stuffing with padding polyester. Sew lace along the edge.
2 Sew the parts of the scallop, also stuffing padding polyester inside. Sew the comb to the cap and glue it to the headband.
Master class on making a theatrical costume "Chicken" for a spring matinee.
Pukanova Natalya Nikolaevna, teacher, MBDOU "Listvyansky kindergarten", Ryazan region, Ryazan districtThis master class may be interesting preschool teachers, teachers, teachers of additional education.
Target: Making a chicken costume using improvised materials and waste material for spring holiday at the preschool educational institution.
Tasks:Select available materials for making a costume, develop imagination, create a festive, fabulous atmosphere.
"Chick-chick-chick! Cluck-clack!" -
We hear it on the street.
Calls all the chickens
Ryabenkaya...(Chicken)
Materials used:

Yellow fabric, sewing and knitting threads, needle, hook, scissors, elastic band, white and gray garbage bags, skin-colored leatherette remnants, padding polyester, red fabric remnants, 2 plastic round furniture handles, tape or superglue, ruler or measuring tape for measurements, chalk for drawing patterns.

The basis of the suit is sewn according to this drawing. The main measurements are the distance from the hand of one hand to the hand of the other, the length along the back, the length of the skirt. We cut it out, but before sewing everything, we sew the fringe onto a base made of garbage bags.


We cut the bags, both white and gray, into ribbons 15-17 cm wide, fold them into a stack for convenience and speed of cutting the fringe, and make cuts on both sides.
We arrange the fringe stripes approximately like this:

We sew the fringe in the center, and in the finished suit it will bend to one side and the “feathers” will be quite fluffy. I marked on the fabric where the sewing lines of the “feathers” will go and how they will alternate. And here you can also clearly see how it is made tail.
We sew the parts together only after all the “feathers” are in place.
Sew the skirt to the top.
The chicken's head will be the hood, crocheted from double crochets and chain loops (mesh) We attach strips of the bag to the mesh base behind each wall with a simple knot white size 12*3 cm. First we knit the hood, then we decorate it with stripes and only then sew it to the base. (Don’t forget to make the ties) I was inspired by Alla Ivanovna Efimova’s master class for this option for making a hood /blogs/ala-ivanovna-efimova/kostyum -snezhinki-svoimi-rukami.html


Pattern of comb and beard. We turn the sewn parts through the edge left unsewn and fill them with padding polyester, sew them to the head.


Furniture round handles were used for the eyes. They can either be glued to the walls of the hood mesh (threaded into the “cell”), or secured by wrapping a roll of tape around the tip of the handle from the inside of the hood.

The beak is made of a square-shaped piece of leatherette. Having folded it diagonally, we pull part inward and rounded the corners, sewing it to the head. The lower part of the beak hangs down without being sewn and covers part of the face, which is very convenient. And the view of those who are wearing a suit is not blocked , and at the same time hides his face

Our costume is ready, now we can hurry to the matinee...

Pied Hen, kind plump one,
He walks around the yard and calls the children:
- Ko-ko-ko, guys, where are you chickens?
Yellow lumps, daughters and sons?
Hurry to mom: we’ll eat with you
Seeds and crumbs, get out the spoons.
Mother chicken is watching
He squints at the chickens.
Even though they sit in the shade,
They are like suns.
Which you can easily do with your own hands! An ideal New Year's outfit for the little ones and for children who are already going to kindergarten.
Just look how cute the fluffy chicks are! It seems like a lot of hassle with such a suit, but in reality it is not. I'm revealing a secret:
- take a knitted T-shirt or turtleneck in a neutral color (preferably yellow or white);
- buy a boa or ribbon with artificial feathers;
- sew a boa onto a T-shirt;
- ...and we get such a cute little bundle of happiness!
Or you can also take a yellow hat and sew a red felt comb onto it!
If you don’t have a hat, but have a lot of felt, here’s an image that clearly shows how to make a bright one:

But when there is not just a lot of felt, but a lot, you can cut feathers out of it...

...take a children's T-shirt or bodysuit and sew them there:

And it will turn out to be such a beauty!

Or maybe you have a yellow vest with a hood? Then all that remains is to sew on the eyes, comb and beak - and the costume is ready!

Something similar can also be made from an old fluffy blanket or bathrobe:

Very cute New Year's costumes for little boys, aren't they? ;)
We also recommend
 How to greet your husband home from work?
 Russian folk costume: history and modernity
 Helpful Tips for Increasing Breast Milk Supply
 Mohair dress with knitting needles Knitted mohair dress with knitting needles with description
 How to wean a baby from putting a finger in his mouth How to wean an infant
 Video master class on creating animals using quilling technique