Quilling animals. Video master class on creating animals using quilling technique
Quilling is a technique for creating three-dimensional compositions using modules made from twisted pieces of paper. The term comes from the English word quill - “bird feather”. Quilling for children is a great way to develop artistic abilities, fine motor skills, perseverance and diligence. This is an ideal craft activity for preschoolers because it is safe and easy to learn. Quilling classes for children are practiced in many institutions as a group, but parents are quite capable of teaching a little creator this technique at home.
Quilling master class for beginner children 4-5 years old
It is permissible for children to begin learning to work in the quilling technique when they reach the age of 4-5 years. Under the strict guidance of their parents, kids can create simple applications, cards and other crafts that will make a good gift or interior decoration. To create a simple flower arrangement with your child, get the following items:
-
thin stick;
basis for the picture;
tassel
double-sided colored paper;
PVA glue or pencil;
The execution process includes the following steps:
Using a thin stick, colored paper is first rolled into half a sheet of paper and glued, then to the end and glued again.
The tubes are cut crosswise into narrow strips so that the finished elements resemble petals and leaves.
We are preparing the basis for work. Thick colored cardboard is perfect for these purposes.
Based on this we make a sketch of the composition.
Then the child himself chooses the elements to work with, laying them out on a base without glue.
Having made sure that the composition looks harmonious, we “plant” the modules with glue.
Glade of flowers
The following instructions will teach you and your child how to create a composition in the form of a meadow of flowers using the quilling technique. This is a simple job, and you can teach it even to a child aged 3-4 years. To do this you will need the following tools:
-
tube or round pencil.
colored paper;
material for the base (thick green cardboard is perfect);
felt-tip pens or pencils;
PVA glue;
Here is a sample plan for creating beauty with your own hands:
We begin preparing the modules by cutting colored paper into strips 5-7 mm wide.
We wind the strips onto a pencil, felt-tip pen or tube.
We give the required size to the resulting spirals.
We prepare the required number of multi-colored modules according to the planned plot.
We lay out the elements in the form of stems, petals and leaves on the base.
Carefully glue the modules.
You can complete some details or use regular appliqué techniques.
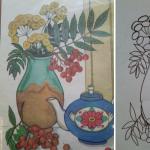
Autumn composition
Autumn is a time of riot of colors that can inspire little creators to create real masterpieces with their own hands. Let's try to create a picturesque autumn composition for children using the quilling technique. Standard set of tools:
-
toothpick.
colored paper (yellow, red, green shades are preferred);
vase stencil;
a simple pencil;
PVA glue;
A simple execution scheme will help you and your baby work:

Step-by-step instructions for crafts for children 6-7 years old
For children aged 6-7 years, learning quilling will be interesting and have undoubted benefits. Let's try to collect a flower together with the child. For the lesson you will need:
-
PVA glue;
stationery knife;
double-sided colored paper of two types - green and orange;
cocktail straws;
Preparing modules is the most critical stage. It is performed as follows:
Using scissors, the paper is cut into strips about 50 mm wide.
Using an awl, the strips are twisted into tight coils, the ends of which are secured with glue.
The center of the coil is pressed with a toothpick, as a result of which it should take the shape of a cone.
Please note that each cone must be the same length. Make sure that the child performs all the simplest actions without your help. When all the modules are ready, we proceed to assembling the finished composition:
It is necessary to glue the cones together so that it looks like a sphere.
Leave a small hole for the flower stem.
Cut a strip of about 1.5-2 cm thick from green paper.
We cover the straw with green paper in a spiral.
We cut a strip of green paper 5 cm thick into a fringe and glue it in a spiral manner.
We connect the flower with the stem using PVA glue.
Butterfly using quilling technique
We offer you a step-by-step description of creating a butterfly using the quilling technique. Making such a craft is more difficult than a standard applique, but the work itself can be used not just as a decoration, but also as a toy. For production we will need:
-
PVA glue;
glue brush.
colored paper;
a set of sewing needles;
board for work;

Let's get started, going through the scheme gradually, step by step:
Making the wings: cut three strips of paper of different lengths, being sure to choose matching shades.
We glue strips from short to long.
We twist them so that the shortest one is inside.
We seal the free end from the outside.
We insert the circles into the slits of the quilling board and unscrew them.
Using sewing needles, press the center of the circle to one side and glue the stripes in this place.
We make the body: we twist two circles, form cones, which we glue together.
We connect all the elements, complementing the composition with tendrils of thin spiral-twisted strips
Snowflake
Using the art of forming modular compositions using rolled paper, you can create incredibly beautiful snowflakes. They will be the perfect home decoration for the New Year holidays. Let's look at the instructions for creating a snowflake using this technique. For this you will need:
-
thin brush for glue.
white paper (ordinary office paper will do);
PVA glue;
toothpick;

This craft is difficult to complete and will require the participation of an adult:
We cut the paper into thin strips.
We twist them with a toothpick.
We open the resulting ring a little to obtain the desired diameter.
Glue the free outer tip.
We clamp the ring on opposite sides.
We prepare 12 similar elements and glue them together in the shape of a flower.
We twist the strips into tight rings and secure them with glue.
Glue the rings between the petals of the snowflake.
We make 6 paper curls and glue two at a time at the distance between the petals.
Glue a simple tight ring into the center of the snowflake.
Rowan branch
A rowan branch is a simple and effective composition that you can attach to a standard sheet of cardboard or a beautiful openwork napkin. To make it you will need:
double-sided colored paper in black, green and red or terracotta;
basis for the composition (colored cardboard, openwork paper napkin, etc.);
toothpick;

Let's get started by laying everything out on the table in a convenient order:
We make berries: cut red or terracotta paper into thin strips and twist them into tight rings using a toothpick, securing the ends with glue.
We make leaves: we twist rings from green stripes, squeeze them from both edges, giving the shape of a leaf.
We cut out a branch of the required thickness from dark paper and glue it to the base.
We place modules in the form of leaves along the branch.
At the end of the branch we place the berries in the form of a lush bunch.
Animal diagrams for creating paper crafts
Using the diagrams presented below, you and your child will be able to create compositions in the form of animals and birds using the quilling technique. It could be a funny chicken, hare, hedgehog and other fauna. Detailed instructions will allow you to avoid mistakes when performing work, and your child will more actively explore the animal world and develop creative abilities.
How to make a three-dimensional toy from corrugated cardboard
Corrugated cardboard is a convenient, versatile and easy-to-work material. It makes it easy to create impressive DIY crafts. We present to your attention a video tutorial that contains step-by-step instructions for creating a three-dimensional toy using corrugated cardboard.
Evgenia Smirnova
To send light into the depths of the human heart - this is the purpose of the artist
Content
The process known as paper rolling is easy, the key is to get started. Thanks to this type of needlework, chic miniature crafts are created that can be used as decorative elements. Beautiful compositions and patterns made of paper or thread are one of the best DIY gifts.
Quilling technique
The process of creating masterpieces involves connecting spirals, curls, and tight skeins of thin paper strips. The quilling technique helps to create charming paintings, toys, and various crafts with images of animals, trees, flowers, the sun, etc. Some people make similar masterpieces from threads. Quilling patterns for beginners with photos will tell you how to correctly connect the elements.
Paper quilling
You can buy craft paper or prepare it yourself. For workpieces, the density of the material is of particular importance, which must be at least 100 g per square centimeter. This indicator allows the strips to curl well and keep their shape. Paper rolling involves wrapping a strip around a toothpick, awl or comb, and securing the end with glue. After creating a skein, you can make any figures, and then paintings from them.
Quilling from threads
The technology for creating paintings from threads is more complex and requires painstaking work. Having gained experience and dexterity, everyone can create a beautiful openwork work. However, it is worth noting that even a child can master quilling from yarn threads: the activity is very exciting, and crafts made on cardboard turn out to be more lively than those made from cereals or plasticine. Such needlework promotes the development of fine motor skills, develops attention, imagination and perseverance.
Quilling elements
To create crafts on any topic, you need to know a few basic elements. If you learn how to twist the main blanks, then you will do such painstaking work with joy and pleasure. So, a roll (or spiral) is a basic unit, a basis, and in general the following quilling elements are distinguished:
- tight roll;
- loose roll;
- free roll;
- curl;
- c-curl;
- heart;
- arrow;
- a drop;
- heart;
- crescent;
- eye;
- leaf;
- rhombus;
- triangle;
- square;
- snowflake;
- star;
- twig;
- horns.

How to do quilling
If you are just starting to master this type of needlework, you can print out diagrams and stencils for yourself, because it will be much easier to work with them. To do quilling, you can use any base - fabric, paper, wood or plastic. Quilling crafts for beginners involve making basic elements - blanks, which you can see in the photo, and combining them together into a beautiful picture.
What you need for quilling
Quilling for beginners does not force you to buy expensive improvised materials or special equipment that is difficult to find. Check out what you need for quilling in addition to fantasy and imagination:
- colored paper;
- glue;
- scissors;
- ruler;
- cocktail straws;
- toothpicks;
- mat for cutting and prototyping;
- paper curling tool;
- quilling template;
- tweezers;
- colour pencils;
- gel pens;
- acrylic paints.
What can be made from quilling
There are a huge number of ideas for creating crafts based on this technique. You can make from quilling openwork pictures for decorating your home or as a gift, beautiful letters, three-dimensional figures of animals, trees in the Chinese style, etc. To make an original craft, you can use only a couple of basic elements or, using a few more, create large canvases, panels, postcards. Quilling flowers, peacocks, swans, and hummingbirds look charming.

Quilling crafts
There are many step-by-step quilling master classes for beginners that can help even a child create an original applique. A video tutorial or step-by-step descriptions with diagrams will clearly explain and show inexperienced craftsmen how to make quilling crafts in the form of different animals or flowers. Quilling lessons for beginners are simple and exciting, they help you have fun and be transported into the world of creativity.
Quilling - flowers for beginners
Small delicate jewelry made with your own hands is an exclusive gift for a loved one. Quilling - flowers for beginners look amazing on postcards, so take colored paper, glue, scissors, toothpicks and start creating a gorgeous picture:
- Make tight rolls from paper of different colors, then make loose spirals and drops from them.
- Make the middle of the flower - a free spiral shape.
- Drop a little glue onto a card or cardboard and attach it to the middle.
- Secure several petals around with glue.
- Make a stem: glue a green stripe to the side. You can create leaves from several elements: drops, eyes.
- Let the glue dry completely.

Snowflake using quilling technique for beginners
This craft is relevant during the New Year holidays or just for training purposes. How to make a snowflake out of paper? You can make quilling snowflakes for beginners if you prepare the main material for work: light blue cardboard (8x11 cm), glue, rhinestones, a toothpick or orange stick, paper. You will also need a ruler, pencil, tape, thread and a sharp utility knife. First you need to cut out the shapes that will make up the snowflake itself:
- 4 stripes by 8 cm for large tears;
- 4 strips by 6 cm for small tears;
- 8.5 half stripes by 3.5 cm for circles;
- 4.5 half strips per 4 cm for diamonds.
Knowing the basics of quilling for beginners, you can easily assemble a craft from blanks:
- Make a flower by alternating large and small tears, fixing them with glue.
- Glue two circles to the ends of large teardrops, and a diamond to them.
- Attach rhinestones to the central parts of the product, glue the ribbon so that the snowflake can be hung.
Quilling paintings
Experienced craftsmen, through training, have learned to create real masterpieces from paper or thread. To make quilling paintings you only need a little patience and imagination: the elements are joined together on a thick sheet and a variety of works are obtained. You can draw a sketch of your future creation or paste over the finished drawing with blanks of colored paper. It is better to place the picture in a frame under glass.

Quilling rooster for beginners
This animal is a symbol of 2019, so it must be present in every home, no matter in what form. A quilling rooster for beginners is an ideal option for a beautiful Christmas tree decoration or a three-dimensional painting. To create it, you need to prepare a standard quilling kit for beginners and a ready-made sketch of a rooster. Next you need to proceed step by step, as described in the instructions:
- Twist 5 red pieces in the shape of drops - this will be a comb.
- The bird's eyes are an alternation of black, white and orange stripes, which are twisted into a tight roll.
- White and light yellow paper blanks in the shape of drops will go on the head and beak.
- 5 components will go to the neck, and another couple will go to the earrings under the beak.
- Fill the body, legs and wings with twisted stripes, alternating colors in a chaotic manner.
- It is better to spend as many elements as possible on the tail: glue each of them together.
- Leave overnight until completely dry.
Quilling - butterfly for beginners
There are many different ways to create a beautiful craft, but pay attention to this master class. Quilling - a butterfly for beginners can be done even by a child, because the process is described in stages. You need to prepare:
- stationery knife;
- tweezers;
- glue;
- toothpicks;
- ruler;
- rug with needles;
- colored stripes (8 yellow, 8 pink and 2 crimson, 29 cm x 3 mm)
Quilling for beginners to create a butterfly consists of the following steps:
- Cut out a triangle from colored paper, the height of which will be 9 cm and the base 3 cm.
- Wrap the shape around the stick, starting from the base.
- Decorate the body with a strip of a different color, and make antennae for the butterfly of the same color.
- Prepare the wings: twist 8 spirals, turn them into drops. Glue 3 spirals together and 2 separately. Cover each piece with a raspberry strip.
- From the yellow strips, wind free spirals of different diameters: 15 mm and 10 mm. Fix the middle. Glue the larger diameter parts onto the wings of 3 spirals, and the smaller ones onto the small wings. Cover with the raspberry strip again.
- Glue the body of the butterfly onto the paper, then the wings.

Quilling - Christmas tree for beginners
On the eve of the New Year, many children and their parents decorate the Christmas tree with handmade toys. This is where quilling comes to the rescue - making a Christmas tree for beginners is not as difficult as it might seem when looking at the presented photo of the finished product. The technique used to make the craft is called corrugated quilling, because only corrugated paper is used. Prepare the necessary elements and start putting all the pieces together.
What is quilling, what is necessary for this skill and the technique of handicrafts. Easy quilling patterns, 29 photos and videos on creating shapes.
Quilling originated in the 14th century, and is now experiencing another renaissance. Many are attracted by the fact that such beauty can be created with their own hands from paper strips.
Quilling for beginners - what you need to prepare
For those who have never engaged in such creativity, it is better to start with simple crafts. It can be:
- postcards;
- snowflakes;
- flowers;
- panel;
- Pictures.

They will tell you how to make a craft using the quilling technique for beginners. Below are the main figures that are used to create real works of fine art. First you need to prepare everything you need for this type of creativity.

If you have the opportunity to buy a quilling kit, buy it. The basic kit includes:
- strips of colored paper;
- a template with a coordinate grid, radii, and guides applied to it;
- a device with a forked metal tip, with which paper tapes are twisted;
- glue;
- small scissors;
- tweezers.
If you can't buy a ready-made kit, that shouldn't stop those who want to create. The following can be turned into quilling tools for twisting ribbon:
- nail scissors with straight ends;
- awl;
- kernel;
- gypsy needle;
- toothpick
Cut off the sharp part of the toothpick, and bifurcate the resulting top using a stationery knife. You will place the edge of the paper tape into this hole and twist it.
When using nail scissors, paper strips are placed between the two blades. Next, the tape is wrapped around this tool and a spiral of the desired size is obtained.
When using an awl and a gypsy needle, the edge of the strip is placed on the metal part, held with two fingers of the free hand and twisted. They also work with a rod, but in this case the core of the workpiece may turn out to be larger than necessary, then any of the four tools listed above is used.
Strips of quilling paper can also be replaced. To do this, cut them out of white or colored double-sided paper.
Quilling schemes

A detailed description of the manufacture of various elements of this needlework will help you create real masterpieces over time.
The main elements of quilling are:
- tight and loose spiral;
- curl;
- drop and curved drop;
- semicircle;
- eye;
- arrow;
- sheet;
- heart;
- triangle;
- crescent;
- square;
- paw;
- horns.
You need to hold the paper tape with your left hand and the tool with your right. If you have a double-sided strip, then its wrong side should face the direction of the rod. Rotate the tool clockwise, and with the fingers of your left hand, hold the spiral that is beginning to form from above and below so that the curls are even and at the same level.
When the tape runs out, drop a little glue onto its free end and attach it to the spiral so that it does not unwind and the workpiece looks neat. So you have made one of the main quilling figures. Many others are based precisely on this element. Those who are better with their left hand need to carry out this process in a mirror image.
The next element is called a “free spiral”; make it from the figure you just obtained. To do this, remove the spiral from the needle and let it unwind a little. You can do it differently - do not let go of the fingers of your left hand, but rotate them a little in the center of this quilling element, and the spiral will weaken.
To make a “curl”, you do not need to glue the free end of the twisted tape to the spiral. To make a “drop,” you need to squeeze the “free spiral” on one side with your fingers for a few seconds. A “curved drop” will be created if you bend the corner of the “drop”.
The element called “eye” is also easy to make. To do this, the “free spiral” needs to be slightly pulled to the sides and clamped on two opposite sides, then released. The “leaf” shape will be obtained if you bend the corners of the “eye”, one to the right, the other to the left. To make a “semicircle”, take a loose spiral, press it so that the top side becomes rounded and the bottom is flat.

Visually shows how elements are made using the quilling photo technique. Looking at it, you will understand how to create an “arrow”. To do this, press your fingers on 3 sides of the spiral to form a triangle, now press two of its corners together, leave the third as it was.
To make a greeting card using the quilling technique, you can decorate it with an element called “horns”. To do this, you need to take a long piece of paper, bend it in half, twist the right side in a spiral clockwise, and the left side counterclockwise.
The “heart” shape is made in the same way, only the right half of the ribbon is wound counterclockwise, and the left half clockwise. The junction of these two elements must be pressed with your fingers to form the corner of the heart.
The “crescent” is made from an “eye”, its 2 opposite corners are bent in the shape of the letter “C”. A “triangle” will be obtained when the “free spiral” is compressed in three places, but to make a “square” this must be done from 4 sides.
For the “foot” you need to make a “triangle” shape, and then bend its two opposite sides with your finger towards the center.
How flowers are made using quilling technique
Now that you know how to make the basic elements for this type of creativity, you can begin the exciting process of creating original cards. If you want to decorate them with these flowers, then make a “drop” shape from the “free spiral”. To make the petals colorful, use quilling paper of different colors. The center of the flower will be made from a “free spiral” shape.

Apply glue to a card or cardboard and place a “free spiral” here. Also use glue to secure several petals around it. The stem is glued in the same way. For it, take a strip of green paper. The middle leaf, as you can see, is made from a “drop” shape, and the upper and lower ones are made from “eye” elements. Once the glue has dried, the job is complete.
You can make other postcards using the quilling technique. For beginners, there is another simple option.

As you can see, the middle of the flowers is a “free spiral”. The petals are made from the same element, but in a different shade. Decorate the card with a “heart” element, as well as an “eye” shape. A beautiful creation will be appreciated by the one to whom you present such a gift.
How snowflakes are made using the quilling technique

For the New Year you can make a snowflake. For it you will need:
- quilling paper;
- stencil;
- tailor's pins;
- glue gun or PVA;
- quilling tool.
To remove the spiral from the stencil, pick it up in the center with a toothpick and remove it by pressing the workpiece with your finger. Let it unwind a little, glue the tip. You have a “free spiral”. Place all 5 blanks in the center of the template, it will be easy to align them.
If beginners make a snowflake using the quilling technique, then it is better to attach the elements to the template with a pin and then glue them together. Then the parts will be arranged as needed.
As you can see in the photo, there are 10 “eye” parts around the five “free spiral” elements. Make them and glue them together and with the central parts of the snowflake.

The next 5 parts of the “free spiral” are made from solid strips, so they will turn out 2 times larger than similar snowflakes glued in the center. A stencil will also help to achieve their evenness. Use a hole with a diameter of 2 cm. Having glued the tip to the spiral, let it unwind and attach each such piece to the previous row of parts.
To prevent the “free spiral” in the snowflake from unwinding, direct the center of the spiral towards its edge and press. You can apply a little glue here so that the middle of the workpiece moves towards the edge.
As you can see, the “tight spiral” completes the production of the winter and New Year attribute. You need 5 of these elements made using a stencil. Glue them in place. If you are hanging a snowflake, pass a strong thread through the center of one "tight spiral" and out through the middle of the other. Tie it in a bow and hang it on the tree or wall.
The video clearly shows how to make quilling snowflakes:
You have read how to make flowers and a snowflake using the quilling technique, and you have become acquainted with the main elements that are used to create works of such creativity. A lot of new and interesting things await you; you will learn how to make a lake, paintings, and animals using the quilling technique. You will also learn how to make candy bowls that are almost as strong as glass ones, but, unlike them, will not break.
Other video tutorials on quilling (for beginners):
Other photos of quilling works:
Quilling is a word that few people are familiar with. This means making figures from strips of paper twisted into spirals. Is it really that simple and easy to do? The variety of options will surprise you.
Next, I will tell you how to create beautiful things from ordinary paper. This type of activity will help you brighten up long winter evenings or make a beautiful thing with your own hands and give it to your loved one. Or maybe after my lessons, it will become a hobby for you and will even bring in a small income.
But to understand what it is, to find out who invented it, let's plunge into the history of quilling.
A little history
This art form was invented by monks in Europe during the Middle Ages. When they trimmed the edges of gilded books and twisted them around the ends of birds' feathers. Thus, it turned out something similar to a golden miniature.
This is where the name quilling comes from. From the English word “quill”, which translates as “bird feather”. At the very beginning, this was done in poor churches, especially in the 19th century, quilling was a favorite pastime of noble ladies.
In the twentieth century they forgot about him. And at the end of the last century, quilling began to return to people's homes as a hobby.
As a result of his wandering around the world, their own schools began to be formed in each country. And each nation brought something of its own to this type of art. For example, eastern schools differ from European ones in the complexity of patterns, which allows eastern people to create masterpieces of art.
And the Korean school differs from the European one in that when winding the paper, a rod is not used, and everything is done by hand. The works of the Korean school are very complex. In our country this art became popular at the end of the twentieth century.
Therefore, few of us know this type of art thoroughly. I will introduce you to the basics of this art form, give advice, give examples and try to give you all my knowledge. Let's start with the basics.
But before you start doing this type of creativity, you need to prepare. That is, purchase the necessary tools for the job.
List of required tools
Below I have given a list of required tools if we want to create all kinds of beauty from paper.
You don't have to spend money on purchasing quilling kits. And make the necessary tools from household appliances.
For this purpose, ordinary women's manicure scissors with straight ends, an awl or a toothpick are suitable. Between the two ends of the scissors you need to put a long strip of paper, gently squeeze it so as not to cut it and twist it. With an awl and a toothpick, they do it a little differently: place the edge of the paper on the end of the awl and hold it with your finger, and with the other hand you twist the rest of the strip onto it.
Now, knowing and keeping close to us the tools that we will need, we can move on to learning the basics of quilling.
Quilling Basics for Beginners
The production of paper products begins with a drawing. In this type of art, a drawing is a diagram according to which in the future an unusual craft will be made, which can bring a bit of brightness and unforgettableness to your interior. First, let's look at how simple diagrams are drawn and which magical crafts come out of them using the example of making a snowflake.
We will need:
- Pencil.
- Colored paper.
- Scissors.
Now take A4 paper and fold the sheet so that you get a right triangle. Cut off the unnecessary excess part and fold it three times. Then we draw patterns on it and cut them out.
When we have mastered the initial and simple technique of making crafts, which we discussed above, we move on to more complex ones. Let's learn how to make rolls. It is the main element in the quilling technique.
We will need:
- Colored paper.
- Pencil.
- PVA glue.
- Scissors.
Rod for creating rolls
At the very beginning, you need to outline the future composition with a pencil on the blank for the greeting card or the place where this product will be located upon completion. The next thing we need is to make a roll. To do this, we need to take a thin and long strip of paper and wind it onto a specially prepared rod.
After this is done, we must let the roll unravel. The end of the roll must be carefully glued to the resulting spiral. Now you can give the roll any shape, be it a drop, a heart or a month.
Advice
To avoid getting smeared with glue, you need to apply it to the parts of the product quite a bit. This can be done using a toothpick.
Special paper for quilling is sold. It's better to use it.
And now we come to the main elements of quilling.
Essential elements
Now let's look at what parts quilling creations consist of. Any work starts with tight spiral. This is the first element in quilling when preparing a product.
Above, when we made the roll, we essentially used this element. But then we did not yet know its true name. Now we know this.
Let's repeat the process of creating a tight spiral once again. A rod is taken and a strip of narrow paper is wound onto it. And the tip of the latter is carefully glued to the spiral.
FYI
- If you are right-handed, you should hold the strip with your left hand and the rod with your right.
- If the strip is double-sided, then the back of it should face the direction of the rod.
- The rod must be rotated clockwise.
The next element is the “free spiral”. It is manufactured in the same way as a “tight spiral”. But after we have finished winding it, we need to remove the spiral from the rod and let it unwind a little.
Now we have learned how to create various kinds of spirals. The same technology is used to create the “curl” figure. But at the end of the work, the tip of the paper tape does not stick and hangs freely in the air.
In order to make a drop, you need to squeeze one part of the “free spiral” shape with your fingers and hold for a few seconds. This is done so that the figure takes the shape of a drop. You can also bend the tip of the “drop” shape, getting a slightly different “curved drop” element.
Advice
If you are just starting to learn quilling, never rush!
Well, we looked at simple quilling forms. Now it's time to move on to more complex ones. Such shapes are obtained from two or more folded together.
Complex shapes in quilling
The complex element “horns” is created from two “free spirals” twisted in different directions.
For this, take a long strip of paper and break it in half. The right part is screwed in one direction, the left - in the opposite direction. This element can be attached to a fun greeting card.
Underwater theme - will decorate a house near the sea
The next shape will be a “heart”.
It is done in exactly the same way as the “horns”. Only the directions in which the spirals are wound change. And the connection point is clamped with your fingers. This type of product is ideal for decorating a gift for your beloved girlfriend or wife.
The next most difficult one would be the “crescent moon”.
It is made from a simple “eye” shape, only the opposite corners are bent upward. It turns out something similar to the letter “C”. For the shape that in psychology denotes a leader, namely for a triangle, a “free spiral” is taken. Then it is compressed into three parts with your fingers and held for a while.
The next element is obtained from the triangle shape.
To do this, you need to bend two opposite sides into the center. And we will get “paws”. To make a “square” shape, I take a “free spiral”. Then I squeeze it into four parts to make a square.
So we got acquainted with the main forms of quilling products. And now we know what tools we need for this type of creativity. And we have some basis that will allow us to move on to creating more complex products.
Quilling flowers
Such flowers will serve as a kind of transition from simple to complex for a beginning quilling master. In fact, this is not yet the most complex product, but it contains many simple elements that complicate the manufacture of the product. Thus, the novice creator receives invaluable experience and beauty in his home, made with his own hands.
To create such flowers you need to make a “drop” from a “free spiral”. And so that the flower petals have different colors, you will need colored paper.
As you can see, the core of the flower is created from a “free spiral”. Next, the core of the flower is the first to be glued to the card or the surface that you plan to decorate. Around this figure I glue the “drops” that I have already made in advance.
At the very beginning, you need to draw a template according to which they will be made. It is necessary to divide the strips of paper in half. There should be three of them. Then I twist the first spiral. Then I insert it into the hole of the stencil. It is necessary to make the remaining spirals the same size. So I find out that the hole is one centimeter, which means the other four spirals will be the same size.
In order not to damage the workpiece, I carefully pull it out with a toothpick, and then let it unwind a little. And only after that I glue the tip to the spiral. Then I place these blanks in the center of the pre-drawn layout.
For beginners, it is advisable to use pins to attach the spirals to the layout. And then they can be glued together.
Now we have learned how to make complex snowflakes. The next stage will be the production of decorative jewelry in the form of lovely ladies' earrings. They are ideal for a birthday gift for your girlfriend.
Making women's earrings
To create this kind of jewelry, which is very beloved by our women, we will need:
- Colored paper. I will have blue and white colors.
- Scissors.
- Quilling rod.
- Quilling board.
- PVA glue.
- Pencil.
At the very beginning, in order for such jewelry to turn out symmetrical, I will have to imagine what the earrings will look like and draw a diagram on paper. This diagram will serve as a template for gluing the various parts together.
Step-by-step instruction
- I cut six strips of blue paper, one centimeter wide, and glue them together.
- I made three strips of white paper and glued them to the end of the resulting ribbon of blue stripes. And I add three strips of blue paper glued together. I do this twice to make two long strips.
- Then, I use a rod to turn them into a tight spiral shape. We discussed the creation of this form at the very beginning.
- I make the same strips again, only I cut the strips by two. That is, instead of six strips, I cut out four from blue paper, I also leave three from white paper and glue them together, adding two strips and blue paper at the end.
- I also use the rod to turn this ribbon into a "tight spiral". Only now it turned out to be smaller than the first one. And I create another similar spiral.
Take your time, this technique does not like to be rushed.
Step-by-step instruction
- And the third time I do the same with the paper as the first two times, only I reduce the number of strips of the first blue ribbons to two.
- Again, I turn the created ribbon into a “tight spiral”. Just like the first time, I will need two such spirals. You probably already guessed why I needed paired quilling forms. Of course, there should be two ladies’ earrings! Now I lay out the prepared forms on the previously created template and glue them together.
- Lastly, I cut out a few more strips of blue paper, glue them together and roll them with a dowel. But now I turn the shape not into a “tight spiral”, but into a “loose spiral” and pinch it along the edges with my fingers and slightly stretch it to form an “eye” shape.
- I make four of these types of figures. Two for each earring and glued according to the template.
- The final step is to thread the clasp ring through the eye-shaped holes. The picture below shows how excellent my beauty turned out.
So we learned how to create complex and beautiful ladies' jewelry. Let's now try to make an unusual quilling flower.
Making an unusual flower
Now we come to more serious things. I will tell you and show you how to make a volumetric quilling flower. To do this, you need to purchase or get tools already prepared in advance, namely:
Step-by-step instruction
- I take a sheet of white paper and divide it into strips three centimeters wide. Then I cut them and glue the strips one by one along the length. The result is one long ribbon.
- Now we need to paint it. Using a pipette, apply paint to the sponge. Apply yellow ink to one half of the sponge and red paint to the other half.
- Then, using a sponge, we paint our prepared long ribbon of white paper. And after the paint has dried on the paper tape, use curly scissors to cut out the pattern. What should happen can be seen in the picture.
- Now let's move on to creating the petals for our flower. They need to be cut so that both the petals and the corners sticking out between them. In this case, you need to leave four millimeters at the edge uncut so that the tape does not tear. As shown in the picture below.
- Then I make the core for the flower. To do this, I twist a strip of quilling paper into a tight spiral. The diameter of the roll should match the diameter of the pencil.
If the diameter is smaller, then you can easily add another tape.
Apply glue only to the uncut edge!
Step-by-step instruction
- The next step in creating a flower is to apply glue to the painted tape on the paint application side.
- Then I glue the flower petals to the core, as shown in the picture.
- After the flower is twisted, you need to glue its bottom with PVA glue to make sure that it will not come apart in the future.
- Now I remove the flower from the stem and straighten its edges with my fingers. In the end, it turned out to be such a miracle.
- Of course, at your discretion - you can straighten the edges or not. I straightened them out in order to insert the “pistle” there, thereby making the flower more like a real one.
- I cut off part of the sharpened pencil, coat the cut part with glue and insert it into the center of the flower. This is what we can do!
Any of these products can decorate cards for the first school day of the year and delight a child with its beauty and unusualness.
Previously, we looked at quilling techniques for adults. But you can also involve children in this needlework. Thus, they will develop breadth and originality of thinking.
Quilling for children
According to psychologists and children's pediatricians, modern children now have poorly developed motor skills of their hands and fingers. It is difficult for them to hold a pen or pencil in their hand correctly and firmly enough.
Therefore, it is difficult for them to learn standard skills and simple self-service in life. Quilling for children promotes the development of this type of motor skills. At the same time, it raises the level of logical thinking.
The development of fine motor skills helps to increase attention and memory in a child. He will absolutely need all this in his future life, and the quilling technique can help a lot with this.
It also helps to cultivate perseverance, accuracy, and aesthetic taste in a child. Of course, you need to start with simple things.
Master class for children - ladybug
To create a ladybug we will need the following materials:
- Sheet of cardboard.
- Colored paper.
- Screw rod.
- PVA glue.
- Scissors.
Step-by-step instruction
- At the very beginning, I cut out the body of a ladybug from cardboard - a semicircular oval. Then, from a sheet of red colored paper, I make an oval in the shape of the body and cut off the lower part as shown in the figure.
- Now I prepare the bottom part from a light yellow sheet and glue it onto the cardboard. Then I take and cut out a long black strip and glue it down the center of the cardboard.
- When the body oval for the “ladybug” is ready, you can begin “paper rolling”. Black dots on the ladybug’s body will consist of “loose spirals”. Then I glue these created shapes to the cardboard.


A type of handicraft in which flat and three-dimensional crafts are created from narrow strips of paper is called quilling. It is quite easy for beginners to master it if you follow the basic instructions step by step, presented in the form of detailed descriptions, photos and videos.
Quilling is useful for both children and adults. All the features and distinctive features of this type of handicraft are presented in the following table.
| Children | Adults |
| Development of fine motor skills and imagination | Paper rolling calms the nervous system |
| Developing accuracy, perseverance and dexterity | Products made using the quilling technique are an original solution for interior decoration and gifts for loved ones and friends. |
| Formation of spatial thinking | Having achieved certain success in the art of paper rolling, you can make it a source of additional income |
| Availability and cost-effectiveness of materials used in the work | |
| Ease of implementation of basic elements from which various compositions and figures are made | |
Quilling for beginners (it’s easier to do the work step by step with photo instructions) can be done using the following techniques:
Materials and tools for work
A set of materials and tools for quilling can be purchased in specialized stores. But novice craftsmen can use improvised materials for their work.
Paper
The main material for quilling is paper strips with a width of 0.3 to 1.5 cm. The final result depends on the quality and density of the source material. The standard density of quilling paper is 120-140 mg/m2.
It is initially cut into strips of a certain width and length, which is usually 30 or 60 cm. On sale you can find sets consisting of multi-colored or plain strips of the same length.

Cutting sheets of paper is carried out using a sharp stationery knife along pre-marked lines. To speed up the work, several sheets are connected with paper clips and placed on the tablet. Using a metal ruler as a limiter, cut the required amount of material.
In addition to paper of various densities, the following materials are used to create crafts using the quilling technique:
- textured and corrugated cardboard;
- various types of paper for creativity;
- foil;
- film of varying degrees of transparency.
Twisting tool
Paper strips are rolled using a special tool, which is a metal rod that is inserted into a comfortable wooden or metal handle. The European school of quilling uses a tool with a forked end. Eastern craftsmen use a device similar to an awl.
Beginning authors should start working with a European tool, as it is more convenient to use. The tip of the strip is inserted between the metal teeth, bent and rolled into a roll. 
You can make a working tool yourself from scrap materials.
There are several options for a homemade device:
- The end of a thin wooden skewer or toothpick is cut 1-1.5 cm with a sharp stationery knife.
- For children's creativity, you can make a safe tool from a used pen refill. Its metal part is cut off, and the remaining part is split with a stationery knife.
- From a large needle, use pliers to remove part of the eye and the sharp end. The resulting blank is inserted into an eraser at the end of a simple pencil and fixed with a drop of glue.
Auxiliary tools and materials
The following are used as creative aids:
- PVA glue in a small jar with a thin spout. Also, a thin brush is used to apply glue to parts.
- Stencil with round or shaped holes. It is used to make many elements of the same size.
- Tweezers with pointed ends are used for manipulating small parts.
- To work, you will need several types of scissors. Small scissors with sharp ends for cutting fringe in children's creativity are replaced by a tool with rounded blades.
- Safety pins are necessary for securing parts in large compositions.
- A rubberized mat is used for cutting paper strips yourself.
- A sheet of cork or foam plastic will be needed for modeling compositions and gluing parts.
- Metal ruler.
- Stationery knife.
Basic forms of quilling and how to make them
Quilling is made from various small elements, which are divided into closed and open parts. For a step-by-step description, photographs are provided to help beginners do the job correctly.
Closed parts
In closed quilling elements, the end of the twisted strip is glued to the main part:

Open elements
In open elements, the end of the paper tape is not secured. Such details are used for additional decoration of products made using the quilling technique.

Basic geometric elements
Rolled paper strips can be used to form many geometric shapes.
All of them are formed on the basis of a basic part - a free spiral (roll).
- Square, rhombus, rectangle. The roll of the required size is squeezed with your fingers. If you press evenly on all sides, you will get a square. If you press harder on two opposite sides, you will get a rectangle.
- Trapezoid it will work out if, when forming a rectangle, the parallel sides are shifted relative to each other.
- Triangle. The loose roll is squeezed with three fingers, forming a triangle. The shape of the triangle depends on the force of pressure.
- Semicircle. One side of the free spiral is leveled, while simultaneously sharpening the adjacent corners.
- Arrow. The base of the triangle in the middle is pressed into the element and the corners are sharpened.
The examples of elements given are the basis for creativity. By showing your imagination, you can create many new shapes that will make your craft using the quilling technique unique.
Flowers
Quilling for beginners is mastered step by step with photo instructions by creating simple compositions. Flowers are a common subject for many crafts. To make your first works, you should choose crafts from a small number of elements.
Cornflowers
To create a composition you need the following elements:

Progress:
- On cardboard, using a simple pencil, draw a sketch of a bouquet of two flowers and one bud.
- The sketch is attached with safety pins to a cork board.
- The details that make up the composition are laid out in the drawing. To ensure that all the parts remain in place, they are secured with pins.
- The gluing work begins with flowers. 6 arrow petals are glued to the donut located in the middle at a short distance. At the same time, the flower is glued to the base.
- The concave part of the month is covered with a small amount of glue and three arrows are attached.
- One edge of the paper strip is covered with glue and fixed to the appropriate place in the composition.
- Droplet leaves are distributed in random order on the stems and glued.
Dandelions
A small composition of dandelions is used to decorate postcards, frames, boxes, or used as a magnet.
Required items:

Progress:

Volumetric flowers
Flowers made using the quilling technique can be given volume. Such buds are used both as part of a large composition and as an independent product.
simple rose
A paper rose bud is used to create various panels and paintings. The technique for making it is slightly different from traditional quilling.
Materials:
- paper circle with a diameter of 10 cm;
- green stripes 5 mm wide and 30 cm long;
- thin wooden skewer.
Progress:
Peony
A fluffy delicate flower made from simple modules is used to decorate crafts. You can assemble a bouquet from them and place it in an elegant basket.
Materials:
- 20 stripes of pink color 5 mm wide;
- 2-3 stripes 2.5 cm wide.
Progress:
- Glue narrow strips in pairs. The size of the joint should not exceed 4 mm.
- The resulting blanks are twisted into tight spirals and, pressing on the middle with a finger, a small bulge is made.
- The resulting parts are glued in two rows of 5 pieces.
- The rows are connected by shifting them relative to each other so that the components of the upper row cover the seams of the lower tier.
- The middle of the flower is made from a wide ribbon, cut into fringe 1.5 cm high. It is rolled into a tight roll and glued into the middle of the workpiece.
Snowflakes
Quilling for beginners step by step with photos demonstrating the creative process clearly can be done by children of senior preschool age for the New Year holidays. To work on openwork snowflakes, you need to draw or print a round template with 6 rays and put it in a transparent file.
Snowflake made from tight rolls
To make a simple elegant snowflake, you need to prepare a large number of tight white spirals. For the first work, take simple diagrams. 
For example, the following:
- For each beam of the template, lay out 3 rolls, which are secured with pins.
- Two parts are attached to the top of the last circle so that there is a distance between them equal to the diameter of one roll.
- The next row of beam repeats the previous level.
- The resulting fork is connected with one roll.
- Then 2 more spirals are laid out on the beam, between which 1 circle is glued on each side.
- According to the described scheme, 5 more rays are laid out.
- All parts are fastened with spirals located at the level of the 4th row.
Openwork snowflake
When starting to work on an openwork snowflake, you need to draw or print a diagram and attach it to a file. It is better for novice authors to use schemes consisting of 3-4 repeating modules.
Materials:

Progress:
- All parts are distributed in appropriate places in accordance with the diagram and secured with pins.
- Glue the central part of the figure, consisting of a donut and 6 drops.
- Large eyes are glued between the drops.
- The end of the beam is assembled separately and then connected to the base. The end of the V-element is glued together. Between the free ends is the middle eye. The end of the part is placed between tight rolls and fastened together.
- The resulting part is glued to the top of the drop part.
Trees
Quilling for beginners will help you realize many different ideas. Trees, made step by step with photos using traditional techniques or combining several directions, help to consolidate basic working techniques and master new techniques.
Birch
Materials:

Progress:
- Strips of white paper are folded into a stack, the edges are aligned and glued together.
- One side of the resulting workpiece is glued and connected to the base (sheet of cardboard).
- The upper part of the part, consisting of individual strips, is carefully straightened into a thick crown and glued.
- Multi-colored petals are randomly distributed among the branches and glued.
- Use a marker to draw vertical black stripes on the table.
Oak
Wood using traditional techniques can be done by any novice author.
Materials:

Progress:
- On the base, draw a silhouette of the trunk and branches with a simple pencil.
- The entire space of the picture is filled with brown and black modules.
- Use a pencil to sketch the approximate volume of the crown.
- The crown is filled with spirals in random order.
It is necessary to ensure that during operation the parts are located at a minimum distance from each other.
Animals
Animals made using the quilling technique can be either flat applications or voluminous functional toys.
Cat
An example of a simple application using the quilling technique is the Scientist Cat, which can be placed under an oak tree and get a beautiful illustration for a famous fairy tale.
Materials:

Progress:
- A sketch of a cat figure is drawn on a piece of paper, which is placed in a file and placed on a cork board.
- Select the necessary parts to fill the silhouette, fixing them with pins.
- All parts are connected sequentially, starting with the large components of the figure.
- Glue the eyes, nose and tongue onto the muzzle.
Piglet
Beginners learning quilling techniques can easily make a small toy. For example, a pig is a symbol of the approaching New Year.
Materials:

Progress:
- Glue 2 tapes, each of which consists of 15 strips 30*1 cm.
- Roll one long strip into a tight roll.
- Cut pink and burgundy blanks measuring 30*1 cm in half and glue 2 multi-colored strips.
- Roll each of them into a tight roll, starting from the dark part.
- Glue the resulting parts together, forming the nostrils of the piglet.
- The end of the long pink strip is glued to the nose and started to be twisted tightly.
- After 6 turns, glue a 4*1 cm strip (mouth) onto the turn under the nose and continue twisting the part. Both circles should have the same diameter.
- The resulting blanks are bent into a high dome. On the front, you need to lift the nose up.
- The inside of both parts is coated with glue.
- 4 strips of 30*1 cm are rolled into tight rolls and formed into cones of equal height.
- 2 ribbons 30*0.5 cm are rolled into a loose spiral and given the shape of ears (a concave triangle). The parts are given a small volume and lubricated with glue.
- A strip of 30*0.5 is coated with glue, folded in half and wound around a pencil, giving the shape of a spiral. The end of the resulting tail is bifurcated for attachment to the body.
- The parts of the body are glued together and their joint is masked with 30*1 cm tape.
- Using pins, mark the locations of the legs and secure them with glue.
- Glue the tail, ears and plastic eyes into place.
- V-shaped hooves are cut out of rectangles and glued to the legs.
Postcards
Quilling cards for beginners consist of simple elements that are assembled into elementary patterns.
Valentine's Day card
Quilling (for beginners, it’s easier to do the details correctly step by step with a photo) made in the form of a Valentine’s card will be an original gift for a loved one. 
Materials:
- a sheet of thick white paper, size A 4;
- 20-30 red loose spirals with a diameter of 10 mm;
- 15 light pink and dark pink stripes 1.5*30 cm;
- the same number of strips 0.5*30 cm.
Progress:
- A sheet of paper is folded in half along the long side.

- Draw a silhouette of a heart with a pencil, placing its upper points on the fold line.

- Using curly scissors with wavy blades, cut out the workpiece.

- Stepping back 5 mm from the edge of the figure, lay out a frame of free spirals.

- Wide strips are cut into fine fringes 10 mm high.

- Two-color ribbons are glued together, consisting of a wide fringe and a narrow ribbon.

- Using a tool, roll up a tight roll, starting with a narrow strip.
 Without removing it from the device, the end of the fringe is secured. In a similar way, 30 multi-colored small flowers are formed.

- The resulting flowers are glued in random order inside the frame, filling the entire space.
New Year card
The traditional quilling technique is ideal for creating New Year's decor and decorating greeting cards.
To create a simple New Year's card you will need the following materials:
- a sheet of cardboard white or any pastel color;
- 15 green elements in the form of a drop;
- 5 brown drops;
- 10 pearl beads;
- stars made of shiny cardboard.
Progress:
- On a sheet of paper, draw a sketch of a triangular Christmas tree with a rectangular trunk.
- The sketch is placed on a cork board and a Christmas tree shape is formed. Its Bottom row consists of five drops, located with the sharp part up. Each subsequent row is reduced by one piece.
- The barrel consists of two rows of elements. I attach one brown drop to the middle part of the lower tier of the crown on both sides. 3 similar parts are placed in the next row. All elements are glued together and the figure is allowed to dry.
- A sheet of cardboard is folded in half. A Christmas tree shape is glued to the center of the front side.
- The crown of the tree is decorated with beads, and a shiny cardboard star is glued to the top.
- Several of the same stars are placed on the surface of the postcard.
Paintings
Paintings made using the quilling technique are a fun activity that is suitable for people of any age and skill level. The plot of such paintings can be devoted to various topics. With children you can make a painting “Goldfish” 
Materials:
- A4 sheet of blue cardboard;
- blue and blue elements in the form of a curved eye;
- yellow semicircles and drops;
- orange, red, green curved petals and tight spirals.
Progress:
Composing pictures using the traditional quilling technique is reminiscent of making a mosaic.
- The entire surface of the cardboard sheet is filled with curved blue and blue petals. The elements are distributed as close to each other as possible. The prepared base is left to dry.
- On a separate sheet draw a sketch of a goldfish with a crown on its head. It is placed on a working cork surface and, using pins, a figure is formed from yellow, red and orange elements. The head is made from a large diameter free roll, slightly sharpening it on one side.
- Having composed the figure, all its elements are carefully glued together.
- Algae threads are formed from green parts.
- Individual elements of the composition are fixed on a blue background.
Quilling for beginners is not limited to decorative crafts.
This technique allows you to create functional interior items:
- candlesticks;
- caskets;
- Photo frame;
- candy makers;
- baskets;
- vases
A box for small items is a simple interior craft. It consists of tight rolls of various diameters, twisted from strips 0.5 cm wide. You can use a plastic lid for jars as a template. 
Progress:
- Several strips are glued into a long strip, from which they are rolled into a tight roll with a diameter equal to the internal size of the template. This part is used as the bottom of the craft.
- One side of the bottom is well coated with glue and left to dry.
- The walls of the box are made using a template. Parts of two contrasting colors are laid out along the inner diameter of the template, forming the first ring.
- The parts of the second ring are laid offset, placing the middle of the roll at the junction of the elements of the previous row.
- Five more levels are formed using the same principle. The wall of the box is left to dry.
- Making the lid begins with laying out round elements in multi-colored rows, alternating with each other. The lid is covered with glue and a number of elements are laid out on top of the second ring of the lid.
- The bottom and walls are connected using glue.
- The main part of the product and the lid are coated with aerosol varnish.
What else can be made from quilling
Using the quilling technique you can make original jewelry and accessories. Beginning craftsmen can easily cope with making a small New Year's crown for a girl.
- Making a crown begins with creating a sketch of the product, which consists of a rim and 5 identical segments.
- In accordance with the sketch, the required number of elements is prepared (drop, eye, s and v elements, free spirals, tight rolls). The color of the parts is selected in accordance with the author's idea.
- Measurements are taken from the child’s head and a template ring of the appropriate size is made.
- Using a template, a rim is formed, consisting of free spirals, which are laid out in three rows. The inner part is glued for reliability.
- Five segments are formed according to the sketch and glued on one side.
- After all the components have dried, assembly begins. The segments are glued together in the shape of a fan, securing them with paper clips while they dry.
- The rim and the top part are connected with glue and secured with pins.
- The dried product is coated with varnish, after which the fixing pins are removed.
Quilling is interesting for both beginners and people who have been interested in needlework for a long time. Beginners should rely on step-by-step instructions and photos of products.
Article format: Vladimir the Great
Video about quilling crafts
Basic elements of quilling:
We also recommend
 Video master class on creating animals using quilling technique
 Using coconut oil for the face and hair: benefits and harms Which skin is coconut oil suitable for?
 Condition of the woman and fetus in the eighth week of pregnancy How the baby develops in the 8th week of pregnancy
 Aggressive child - why and what to do Aggression in an 11-year-old child at home
 Advice for future dads The doctor as a mediator
 How to make a weapon from paper Weapons from a4 paper