Kite. Snake made of colored paper
There are entertainments that are very interesting for children and no less popular among adults, such as creating a kite and flying it into the sky. Of course, you can buy it ready-made. But it’s much more enjoyable to make a kite with your child with your own hands. So you can choose its color and color it to your taste. In this article you can get acquainted with very a simple master class on how to easily make a miniature kite. And if you like it, then your next kite may be of a larger size.
How to make a kite?
You can show your child the principle of aerodynamics in an easy and accessible way with the help of a flying kite. It will be very pleasant to watch from the ground, and creating it will be even more interesting! Before you start creating your kite, check out the list necessary tools and materials for its creation.
We will need:
- craft paper - 2 pcs;
- paper straws - 2 pcs;
- a skein of thick thread;
- decorative ribbon and thread;
- glue stick;
- scissors;
- ruler;
- pencil.
Mini kites: step by step instructions
Take a look at the picture below, which shows all the steps to create a craft. And after it you will see detailed description every step.
- We draw a kite in the form of a diamond along the vertical line of the sheet. The top of the kite should be slightly shorter than the bottom. Let's cut it out. From another sheet of paper we create the same rhombus.
- Apply strong adhesive to the entire sheet, and glue another one on top. Iron the paper well so that no air bubbles form on it.
- Cut a piece of thread and tie one end to a paper straw in a two to three ratio. The long part should be at the bottom. Cut the second straw into thirds to create multiple pieces. They don't have to be the same.
- Tie a thread in a spool strictly in the center to one of the pieces of paper straws. This will be the handle of the kite.
- Apply a little glue to the knot you tied on the handle. This way the thread will not slip or move to the side.
- Draw a cross on the inside of the kite and add glue there.
- Place the straws in glue to create a frame for the kite. Leave it to dry for a while. Before pressing the straw into the paper, make sure that the knot of string is exactly in the center of the cross.
- Cut a long piece light tape or string to make a tail for the kite. Pass it through a long straw. Add glue to the top of the straw to keep the string from falling out.
- Tie some decorative ribbons to the tail and let the glue on the craft dry completely.
- Decorate the kite as desired, such as glitter. Ready!

A great summer craft that you can take to the park or into nature. It will be fun and interesting for children to fly such a kite into the sky. Also kite can become part of a themed children's party or game. This one is the simplest aircraft, which is so easy to make from paper and scrap materials with your child, will give you many positive impressions and emotions.
Materials for production:
Base:
slats made of bamboo, pine, linden or plastic ball sticks.
Canvas:
tape with a width of 2 cm;
string, fishing line from 0.5 cm, strong thread;
paper, fabric, dense polyethylene, oilcloth;
scissors;
ruler, weight, stationery knife;
pencil or pen;
felt-tip pen;
moment glue or PVA.
Bridle and rail:
bobbin thread or silk thread;
rubber ring (optional).
Tail:
thread with weight;
bows or paper tail.
Nowadays, many new and unique models have appeared in the kite market. Professional sports kites have reached unimaginable sizes that even in stormy winds, these units calmly soar in the sky. But the cost of such structures is very high, so why not make a simpler kite from scrap materials? Today we’ll look at how to make your own hexagon-shaped kite.
Manufacturing process
The entire structure is built from one main load-bearing beam and two additional ones attached perpendicularly. Due to this arrangement of sticks, the stretched canvas resembles a hexagon. All bases are tightened with strings or fishing line.
1. Take a stick (in our case, plastic). If the length of the base is less than 40–60 centimeters, then you can glue the two parts together. Cut the fishing line equal to 0.9 times the length of the stick. (We have a frame 60 centimeters long, cut off 54 centimeters of fishing line).

3. Thread the fishing line and secure it to the edge. We made a ball out of ordinary paper and glued it to the end of the fishing line, then put it in a tube and dropped it again instantly. When you connect the two ends of the fishing line with the ends of the tubes, you get something like a bow.


4. We do the same with two small sticks. We took plastic sticks 30 centimeters long, the length of the fishing line turned out to be 27 centimeters.

5. We mark on the main rail the future places of attachment of our auxiliary elements. The distance is measured as 0.2 of the entire length of the stick. We got 12 centimeters from each end. (Points H and H1)
6. Attach additional parts to the base using thread and glue.
7. After the structure has dried, stretch the fishing line along the entire perimeter of the hexagon, capturing each vertex.
8. The result is a design that is curved on one side and a straight hexagon on the other.
9. Unfold the oilcloth or paper on the table.
10. Lay the flat side of the structure on paper and mark the vertices. Using the obtained points we draw a hexagon.
11. Make an allowance of 2–4 centimeters. Cut out the paper.
12. We attach the structure and carefully bend the sides and glue with tape.
13. Having pasted over the entire perimeter, we proceed to making the bridle and handrail.
14. On the convex side, in the places where the beams are attached to each other, we tie a silk thread approximately 15 centimeters long. We do this on both sides.
15. We connect the threads together, insert a rubber ring (you can do without it).
16. We tie the main thread to the bridle.
3 23 447
The desire to soar and reach unknown heights is inherent in each of us. And although, unlike birds, we cannot soar in the skies on our own, we are able to give the joy of watching free flight to ourselves and our children. Do you think we're talking about a plane ticket? But no. We just want to tell you a few ways to make a kite. This simple aircraft, made from improvised materials with your own hands, will give you a lot of positive impressions and emotions.
Did you know that the first kites plied the skies of Ancient China back in the second century BC? e.? Today the art of building and running them is back in fashion. And every year, on every second Sunday in October, World Kite Day is celebrated.
By the way, the hero of our article today is sometimes called “kite” in a foreign manner. So, when you come across this term, don’t be surprised.
And now it's time to start building snakes.
The easiest way
Do you want to spend a nice day having fun and usefully, watching how a kite you made with your own hands cheerfully soars in the sky like a bird? If you do not yet have experience in creating such aeronautical structures, we advise you to start your journey by assembling the lightest kite model. It is attractive because it can be done without a complex drawing.
To work, you will need the simplest materials at hand:
- tracing paper;
- scissors;
- wooden twigs or skewers about 60 cm long;
- tape or tape;
- thick threads or twine.

Instead of wooden twigs, thin window glazing beads will do, and tracing paper can be replaced plain paper(but remember that the lighter the kite, the better it will fly).
Fold the twigs crosswise as in the photo, secure the joint with thread or thin rope, and lubricate it with quick-drying glue for strength.

Place the resulting blank on tracing paper and cut out a quadrangle (well, it’s hard to call it a rhombus from a mathematical point of view), for which the crossed sticks will be diagonals. Glue the twigs with tape to the paper base, Special attention pay attention to the corners.
Cut a tape about 2 m long and 2 cm wide from tracing paper. Glue it around the perimeter of the quadrangle with tape.

Cover the intersection of the rods on both sides of the tracing paper with tape. Using a nail heated over a fire, carefully burn a through hole to secure the thread to the kite.

Thread the thread through the hole, make a loop and tie it around the cross. Remember that the loop should be on the inside of the kite. Tie a thread, cord or fishing line wound on a spool to the loop (see how to make a spool at the end of the article).

The most important stage has arrived - decorating. Entrust this task to your child: he will independently decorate the craft at his own discretion. If you are assembling a test copy to study its flight characteristics, you can skip the design stage.

The simplest kite is ready. You can go outside to catch the wind and cheer yourself up.
Diamond-shaped kite made from a plastic bag
Want to make your kite more resistant to the elements. We suggest you use polyethylene as a material at hand. You will receive it absolutely free by opening an old thick package. Another good option to give new life old things - take umbrella fabric. It is dense, light and does not get wet.A little time, accuracy, strict adherence to step-by-step photo instructions - and your kite will be ready to take off on its first flight. You will see that conquering the skies is a most exciting activity. Moreover, this version of the kite is more improved compared to the first. He equipped with a bridle, making it easier to control.

Original version
Who told you that a flying kite can only be triangular or diamond-shaped? Away with these outdated stereotypes. A little imagination and you can assemble a flying machine at home in the shape of a butterfly, flower or fish.
To work you will need:
- thick flexible wire;
- colored paper;
- marker or pencil;
- scissors;
- glue stick;
- thick thread and a piece of thin rope.

Now it's time to bring ideas to life. Take pieces of flexible wire and bend them according to your design. Wrap the ends of the wire tightly with thread, to secure the fixation, make at least a dozen turns at each connection and tie a knot.

Place the workpiece on the paper, outline it with a marker, leaving a couple of centimeters around the perimeter for allowances. Make notches on the seam allowances so that the edges do not wrinkle when folded.

Coat the remaining allowances with glue and glue them to the base of the workpiece. You can make a kite from paper or fabric of several colors. In this case, when cutting out the necessary elements, proceed in the same way.

To strengthen the frame, tie additional pieces of wire on the back side of the structure.

You can decorate the product with tissue paper or shreds thin fabric, you need to glue them to the front side.

All that remains is to secure the cherished thread of control. For a kite to fly, it must be done correctly. Regardless of its size and shape, fasten the rope in 3 places on the frame on the back side of the product. Next, tie its ends, departing 30 cm from the center of the structure, and tie the thread.

Your very own fantasy kite is ready to fly. Any child will appreciate such a toy. But he will get even more joy from launching his new pet if adults take the time to teach him this art.

Rectangular kite
We present to your attention a master class on creating a rectangular flying kite.Make it with your children and you will get triple benefits:
- give the younger generation the skills to work with their own hands;
- show that reality is much more interesting than the virtual world of gadgets;
- Get a lot of pleasure from joint creativity.
Why triple! We could go on and on about the advantages of such a handmade product, but it’s time to start making it.

* based on materials from handmadecharlotte.com
To work you will need:
- parchment paper, sheet 36*51 cm;
- wooden sticks or light slats, 2 x 60 cm, 48 cm and 36 cm;
- colored corrugated paper;
- strong thread;
- reel with fishing line;
- glue stick and PVA;
- small metal ring;
- scissors.
Grease a 48 cm long stick with PVA and glue it to the center line of the workpiece.

Place the remaining sticks along the diagonals of the rectangle.

Glue them with pieces of paper as shown in the photo.

Cut out squares or random shapes from colored paper and paste them onto the front side of the rectangle.

Make a hole on both sides of the intersection point of the diagonals.

Using pieces of thread, tie the ends of the sticks along the upper corners of the rectangle, pulling them together a little.

Tie a long piece of thread to the upper right corner of the kite. Thread a ring onto a thread, it will help control the flying machine. Then thread the thread through the holes previously made in the center of the rectangle and pass it through the ring again. Tie the end of the thread to the upper left corner of the product.

Tie the end of the line tightly to the control ring.

Glue long strips of corrugated paper to the bottom of the kite. These “tails” will help him balance in air currents. Their optimal size is 5 cm * 2.5 m.

The air wanderer is ready to surprise you with its flight characteristics. Have a good flight!

Cardboard reel for kite at home
In order for a kite to soar proudly into the air, you need a very long thread or fishing line. Naturally, walking around with an armful of thread in your hands is inadvisable. For comfortable starting and control, a coil is used. You can buy a ready-made one, or you can make it from cardboard at home.
* based on materials from eventor.ru
To work you will need:
- corrugated cardboard;
- glue gun;
- scissors or cutter;
- pencil;
- ruler;
- compass (preferably, but not required).

Cut several strips 2.5 cm wide.

Mark the inner circle, use a compass or a suitable template.

Roll the cut strips along the contour of the cutouts and glue them with hot glue.

Glue the inner ring in the same way.

Glue the second circle on top of it.

Glue the end of a long thread to the inner surface of the spool and wind the thread.

To prevent it from getting tangled, tie a match to its end and secure it with glue. Thread the thread into the slot on the outer ring.

With such a convenient device, your flying kite will conquer not only the sky, but also the hearts of your children.
- Choose an open place to fly, otherwise, instead of enjoying the flight, you will have to take your kite out of the trees over and over again.
- Make sure there is a breeze outside. Without it, you will not be able to launch your creation. The optimal wind strength is when thin tree branches are swaying and there are ripples in the water. If it is stronger, there is a risk of a snake crash. Then stand with your back to the wind and hold the kite in front of you. If it is designed correctly, it can take off right out of your hands. Why isn't it magic?
- Having problems with flight control? Check if the thread is attached to the bridle exactly in the middle. Failure to comply with this condition will result in the kite becoming uncontrollable.
- The bridle is fastened correctly, but the snake lives own life completely ignoring your commands? Checking the tail. Try it alternately lengthen and weight. Increase the length, if this does not help, tie a weight to the tail. It could be a paper bow or just a bunch of grass - use what you have on hand.
- Is it difficult for a kite to fly? Doesn't he want to gain altitude? Try to lighten the tail. Get rid of excess decor or shorten it a little. But remember the golden rule: measure seven times, cut once.
How to make a snake out of beads with your own hands (photo and video)
A beaded snake is a fairly universal symbol that symbolizes eternal life, wisdom, fertility, home comfort. Therefore, we suggest you do joint craft with a child made of beads - a snake. 


Master class on weaving a snake from beads
To work you will need:
- beads of 4 colors (green, orange, yellow, gray);
- thin wire with a diameter of 0.3 mm and a length of 3 m 20 cm;
- aluminum wire 1.5 mm thick - for a snake vertebra.
Since the beads on the snake go in 2 levels, we will work in volumetric technology. The highest level is the back, and the lower level is the stomach.
1 row top level. The tongue will be located in it. To do this, we put three orange ones on a metal cord and place them in the middle of the wire.
We pass the tip of the metal
who remained on the opposite side.
We tighten the steel wire so that the beads remain in the middle of the cord. 


We perform the following manipulations using photographs with descriptions: 


While weaving, do not forget to straighten the shape of the craft from time to time to create a three-dimensional look. For this manipulation we recommend using ballpoint pen or a cap. 
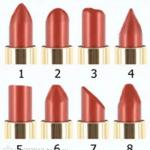
Weaving pattern for the 6th line of the highest sublevel: for this we take 1 green, 1 gray for the eyes, 3 green, 1 gray for the second eye and 1 more green.
We make the lowest floor of the same row from 7 yellow beads. 


The next important stage: how to make an asymmetrical pattern on the back of our craft? We will make such a pattern using the tip of a wire, onto which we need to collect beads in each row.
To weave 12 r. the highest sublevel requires wearing one yellow bead and five green ones. For the lowest level of the same row you will need 6 yellow ones. 


A beaded snake is woven according to the following pattern. It is necessary to repeat the next seven rows four times:
- the nineteenth row must be woven like the twelfth;
- we make the twentieth like the thirteenth;
- we do the twenty-first according to the principle of the fourteenth;
- the twenty-second is identical to the fifteenth;
- the twenty-third trudges along like the sixteenth;
- the twenty-fourth is identical to the seventeenth;
- we do the twenty-fifth on the eighteenth;
- the twenty-sixth is identical to the twelfth;
- the twenty-seventh is identical to the thirteenth;
- We do the twenty-eighth by analogy with the fourteenth.
The pattern of such weaving continues until the forty-fifth row. As a result, we will see five diagonal yellow stripes on the snake’s back.
46 rub. We craft the highest sublevel using six green ones. The lowest floor of the same row consists of 5 yellow ones. 
We make the next six lines according to the previous rows. However, there will only be five pieces of the corresponding color in each tier.
How to make the forty-seventh line of the top level: it consists of one yellow and 4 green ones. We make the bottom layer from five yellow ones.
The forty-eighth row of the top floor consists of one green bead, one yellow bead and three green beads. We model the lowest floor of the same row from five yellow ones.
49 rub. the top level consists of 2 green, one yellow and two green beads. The lowest level comes from five yellow ones.
50 rub. upper floor - 3 green, 1 yellow, 1 green. Bottom layer – 5 yellow ones.
51 rub. the upper tier consists of: 4 green, 1 yellow. The bottom layer is 5 yellow beads.
52 line of the top layer: 5 green. The lower floor consists of 5 yellow ones. 
Next, you need to repeat the last six rows twice:
- 53 rub. we weave like 47;
- 54 similar 48;
- 55 as well as 49;
- 56 similar 50;
- 57 exactly 51;
- 58 is identical to 52;
- 59 exactly similar 47;
- 60 in the image of 49;
- 61 in the image of 48;
- 62 similar 50 RUR;
- 63 is identical to 51 r.;
- The 64th line of the top layer is 5 green beads. The lowest layer is 4 yellow.

We make the following rows:
- 65 rub. The top floor consists of 1 yellow piece, 3 green pieces. The bottom one is four yellow beads. We model this way until we see nine diagonal stripes on the back of the craft.

How to make a spine? To do this, you can insert a thick aluminum cord inside the snake. If you want to get it long and untwisted, do not use wire.
Next, our weaving pattern will go like this: the next 8 lines are similar to the previous ones. The only difference is that each level contains three pieces:
- 70 rub. The top tier is created from 1 yellow and 2 green. We make the lowest one from 3 yellow ones;
- 71 rub. We make the highest tier from 1 green and 1 yellow, 1 green. We create the lowest sublevel from 3 yellow ones. In this way we weave up to the 77th row. Then we reduce the number of beads by 1 piece.

Starting from 78 rub. we weave plain rows without stripes. 
That's actually the whole process of making a snake. 
Patterns for weaving snakes from beads
As a bonus, we suggest using patterns for weaving a snake: 


Video: Weaving a voluminous snake
Comments
Related posts:
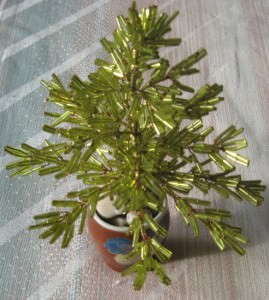 How to make a Christmas tree out of beads for the New Year with your own hands (photo)
 DIY beaded heather for beginners (photo and video)