New Year's boots for gifts. DIY New Year's boot made of paper How to decorate a New Year's boot made of cardboard in volume
New Year's holidays are just around the corner, so today I want to share a "recipe" for a holiday decoration that can be sewn very quickly - this is a simple New Year's boot.
New Year's boots come in all sorts of shapes, sizes and types, and the ideas for decorating them are truly inexhaustible, but I decided to start with the “basic model”)) And I was inspired by this panel (or in other words, a coupon) that I found in the World of Sewing - my favorite sewing store.

They make adorable mini boots, I can see them on the Christmas tree - they’re beautiful and you can hide small gifts for children.
It seems to me that with this fabric you can sew boots together with your children - it’s not difficult, the child will cut along the lines, and the mother will sew. Festive mood guaranteed!

There are 24 boots in total on a piece of fabric - only the front parts, the back part and the lining will need to be cut from a different fabric. There are also Christmas balls and gingerbread men at the bottom of the coupon. You can decorate the entire Christmas tree with handmade toys. I plan to give away the boots, the Christmas tree in our house is small and 24 boots is clearly too much.
But even without such a panel, the process is still very simple and, most importantly, fast! I have prepared for you 2 free patterns of boots of different sizes, you can download them just below. Let's get started!
Simple DIY New Year's boot
Materials and tools:
1. Fabric - I use cotton fabrics for patchwork with Christmas prints. You will need fabric for the front and back of the boot, fabric for the lining (mine is Stof fabric) and eyelets.
2. Filler - it is not necessary to use it, but with it the boot holds its shape better. I use regular cotton quilt filling Aurora Simply Cotton, the boot turns out soft and fluffy. Instead of quilt filler, you can use adhesive interlining.

3. Pattern— you can download two versions of the pattern:
4. Tools:
- Scissors or cutter and cutting mat
- Ruler
- Disappearing fabric marker or tailor's chalk
- Pins
- Threads to match

5. Sewing machine

How to sew a simple New Year's boot
1. Let's cut out the details
The first thing we need to do is cut out 2 parts for the front and back of the boot. Make sure they are facing in different directions.
For the loop you need a rectangle of fabric 4 x 15 cm

And 2 parts for the lining - also in a mirror image.

One piece of filler - we will fill only the front side of the boot with filler. 
All the details are ready, let's sew!
2. Sew a loop
Fold the rectangle in half lengthwise, iron it, then fold the edges toward the center and iron again. Fold the strip of fabric so that all cut edges are hidden. Sew along the edge of the loop.

3. Quilt the boot
Take the front part of the boot and place it on the filling. Pin and quilt. You can skip this step if you decide not to use filler. You can also skip quilting the boot if you use adhesive interlining instead of quilt filler.

4. Let's sew a boot
Take 1 piece of the lining, place it facing you, the toe of the boot should point in the same direction as the front part. Sew the loop to the lining at a distance of 3 cm from the right edge.

Fold the front part and lining WITHOUT eyelet Face to face, sew along the top edge with a seam allowance of about 1 cm.


Do the same with the back and lining. with loop.

Trim seam allowances so that they do not create excess volume.

Lay the 2 pieces face to face - lining to lining, front to back, line up the seams and pin together.

Sew around the entire perimeter, leaving a hole in the lining. It is necessary in order to turn the boot inside out. Don't forget to backtack at the beginning and end of the stitching. seam increase is about 1 cm. 
Trim the seam allowances and make notches on the rounded parts of the boot, so they will turn out better. I trim the seam allowances with zigzag scissors; with them there is no need to make notches.

Turn the boot inside out and sew up the hole in the lining.


Tuck the lining inside the boot and loosen it. Ready!

Especially in an unusual package - like a funny sock or a handmade boot hung from the mantelpiece or stair railing. Santa Claus's favorite shoes have become as important an attribute of the winter holidays as a Christmas tree with shiny tinsel or a bottle of champagne. We'll show you how to make and decorate a boot using scrap materials!
The story of the New Year's boot
The tradition of wrapping gifts in stockings and boots came to us from the West, where the place of Father Frost is taken by St. Nicholas, or Santa Claus. According to legend, he helped people unnoticed. One day Nikolai learned about three sisters who lived in poverty on the outskirts of the city. To help the girls, the Saint climbed to the roof of their house and threw three gold bars through the chimney.
Pieces of precious metal fell into the girls' stockings, which were drying over the fireplace. In the morning, a wonderful surprise awaited the sisters. They shared their joy with their neighbors, and they also hung stockings over the fireplace to receive a present from Nikolai. This tradition appeared in the 16th century and is gaining more and more popularity every year. Well, in modern houses where there is no fireplace, stockings or boots for gifts are attached next to the bed or Christmas tree.
New Year's boot made of paper or cardboard
 Cardboard boots can be great!
 Even a child can do the simplest decoration option. On the other hand, it gives room for imagination: the shape and decor of the product depend only on you. Prepare materials for creativity:
- thick paper or cardboard;
- scissors;
- PVA glue";
- a simple pencil and eraser;
- ribbon for hanging.
Instructions
- Fold the sheet in half. On the back side, draw a felt boot so that its inner side coincides with the fold of the paper. Cut out the design along the outline and unfold it. You will get a pair of boots connected to each other.
- Fold the white paper in half too. Draw the fur trim of the felt boots - a rectangle with softened corners, one side of which falls on the fold of the sheet. Transfer the design to the fabric. Cut out the part, unfold it and glue it to the boot shaft from the back side.
- Glue the boots together, leaving space for gifts inside.
- For decoration, use pencils, felt-tip pens or glitter paints, paper or fabric snowflakes, sequins, pebbles, bows, and so on.
- Fold the ribbon into a loop and sew it to the corner of the craft for fastening.
Striped stocking with pompoms
 Step-by-step instructions for making stockings for gifts
 A variegated boot can be made from any thick fabric of a suitable color. You will also need:
- braid with pompoms (you can make them yourself);
- thread;
- thin tape;
- needle;
- scissors;
- paper and pencil.
Instructions
- Make a stocking pattern, transfer it to the back of the fabric and cut out two identical pieces.
- Connect them from the wrong side, turn them outside and hem the edges.
- Decorate the boot with pom-pom braid and attach several balls along the length of the sock.
- Add a ribbon loop, fill the stocking with gifts, and hang it in a visible place.
 An example of a pattern for creating a felt boot with decor
 Felt is in the arsenal of every needlewoman. The material is suitable for small and large crafts, including boots. You will need:
- a large piece of white, red, green or blue felt;
- some white material;
- cardboard or paper;
- pencil;
- threads and scissors;
- glue "Moment";
- thin satin ribbon.
Instructions
- Draw and cut out full size templates for the base and top of the boots. If you plan to make an applique from felt, depict these details.
- Cut out the base template, attach it to the back of the fabric and trace it. Then cut out two identical pieces and sew them on the sides by hand or on a machine.
- Repeat with the boot templates and white felt. Wrap the resulting rectangles around the top of the boot and sew, turning the edges outward.
- From the remaining felt, cut out decorative elements: snowflakes, holly branches, red flowers, silhouettes of birds. Glue them to the base.
- Make a loop from the ribbon to attach the boot.
New Year's boot made of multi-colored ribbons
 Creating a woven base from colored ribbons
 If you're into crafts, you'll quickly find a collection of fabric scraps and ribbons at home. It's time to put them to work and sew a bright boot for gifts! In addition to the tapes, you will find the following materials useful:
- bias tape with lurex;
- adhesive web with a paper base;
- cardboard and scissors;
- canvas;
- red satin cord;
- red and green floss threads;
- pins;
- iron.
 Step-by-step instructions for making a Christmas boot from ribbons
 Instructions
- Place a soft cloth on the table and a cobweb on top, leaving the paper part at the bottom.
- Cut the ribbons to the required length, lay half on the web diagonally, and secure with pins. Thread the remaining ribbons through the already secured ones to create a kind of weaving. Follow the same pattern to make the second part of the boot.
- Iron the base to secure the ribbons to the web and remove wrinkles.
- Cut out two identical boots from cardboard. Apply them one by one to the front side of the blanks, remove the paper part of the web and place the tape “boots” on the canvas. Iron them again, finish the edges of the fabric and sew the details.
- Decorate the edges with Lurex trim and the tops with treated canvas with Christmas embroidery (snowflakes or holly branches):
 New Year's embroidery pattern for the boot (holly with knotted berries)
 In order not to waste time on embroidery, you can safely decorate the tops with white faux fur.
Elegant felt boot
 Step-by-step instructions for making a felt boot for the New Year
 A Christmas boot doesn’t have to be a felt boot! A ladies' boot with a pointed toe and heel will complement the New Year's interior just as well. It can be used as a stand for. To make a craft, prepare the following materials:
- brown or gray felt;
- white cardboard or paper;
- scissors;
- dense red and white threads;
- large needle;
- round beige buttons;
- bells;
- white lace;
- red stones or beads for decoration.
Instructions
- Draw the outline of a high boot on paper or cardboard. Using the template, cut out two identical boots from felt.
- Sew buttons to each one using red threads and glue on pebbles.
- Attach the lace ribbon to the inside of the boot and fold it outward. Sew bells along the edges.
- Sew the boots by hand using large stitches of white thread.
- Sew a large bell to a long sock. Place gifts for relatives or fir branches inside.
Ideas for decorating New Year's socks

- Embroider initials or family names, as well as Happy New Year greetings, onto the white boot.
- Knit boots or decorate the fabric with festive embroidery.
- Make a garland of small paper boots. Place a small gift in each: a candy cane or a card.
- Make green elf boots with curled toes and scalloped tops.
- Use embroidered mini boots for serving cutlery.
Examples of New Year's boots
 Small boots made of fabric will be great!
  You can safely use old velvet dresses to sew socks.
  An unusual Christmas stocking can be cut from burlap
  Can you sew or knit? Use this skill when making crafts!
  Boots with cartoon characters whose feet are made of beads
  Combine stocking stuffers with other holiday decor items.

Gradually, we are adopting the tradition of hiding gifts in New Year's boots and decorating the house with them. A New Year's boot with embroidery looks very beautiful, but it is a rather labor-intensive and time-consuming process. If you don’t have time for such a man-made miracle, then sew a boot from fabric, such as felt. It will turn out very elegant and quickly!
On the eve of the New Year 2014 - the Year of the Horse - we invite you to sew a New Year's boot with your own hands with the silhouette of a cute horse.
This boot comes in red and white, but would look great in other colors as well. The combination of blue and white colors is ideal for the Year of the Blue Horse.
The horse you see on the finished boot is called Dala. This tailless horse, Dala, is the national symbol of Sweden and is very loved by its inhabitants.

Before you begin, print out this pattern template:

If you sew according to this pattern, you will get a boot 30 cm long. But you can increase or decrease the size as you wish.
Anything you need:
- red and white felt
- red and white floss threads
- sharp scissors like manicure scissors
- needle

Using the template, cut out all the elements from felt. Colors, sizes and number of parts are indicated there.
Looking at the photo of the finished boot, we arrange all the elements in the order shown.
Assembling the boot
First, we sew the horse figurine and hearts onto the front of the boot. You can sew with a seam “over the edge”, or “forward with the needle”.
Then we sew one of the cuffs, the heel and the toe to the front of the boot with red threads.
We also use red thread to sew white “plus signs” onto each red heart, and make a French knot in the center.
We make a few more red French knots around the horse's saddle and under each heart.

Using white threads we make a French knot for the horse’s eye, and also decorate the nose, heel and upper cuff of the boot with white threads.
On the back of the boot we sew the second cuff, toe and heel.
Now we put the two parts of the boot together with the wrong sides inward and sew them together. We sew with white threads on the red areas, and with red threads on the white areas.
Don't forget to sew on a hanging loop!
The bright and beautiful boot is ready!
If you want to make several of these New Year's boots with your own hands, use felt of other colors, and sew beads instead of French knots.
Do you prefer embroidery to felt applique? Then embroider Dala's horse, taking note of these ideas:


If you are indifferent to Sweden, then take one of these as a horse pattern:


The tradition of putting a Christmas present in a boot was born so long ago that no one really remembers why it was necessary to do it.
One of the legends says that this happened in a poor hut, so poor that there was not even anything to put a Christmas tree on. And there was nowhere - the hut was too cramped. But poor parents loved their children no less than rich ones and could not deprive them of one of the joys of the New Year - receiving gifts.
 The mother sewed a doll from scraps, and the father whittled a saber out of wood. But they didn’t even have a box in which to put these treasures. But there was either a pair of worn-out shoes for all the children at once, or a pair of darned and over-darned stockings. And when the children fell asleep, the poor parents put their gifts, made with such love, into these shoes.
So it was customary to put gifts in the boot on Christmas or New Year's Eve. All the villagers liked this idea so much that it was adopted by those whose gifts simply did not fit under the tree.
 Well, in our time, a beautifully designed New Year's boot is a part of a festive interior, a Christmas tree decoration, or even a gift in itself (quite utilitarian, which can be worn like house slippers).
What it will be, so tiny that even a small diamond ring will not fit there, or huge, like a whole house, is up to you to decide. And additional decoration for the holiday never hurts.
More ideas for New Year's boots and socks:
 New Year's boots can be made from very different materials, ranging from traditional ones - felt, fabric and knitted wool - to completely incredible ones.
 Braid, multi-colored ribbons, buttons and other accessories will help make the boot unique, even if you bought it in a store.
 You can use the most ordinary boot as a New Year's boot. Naturally, it must be new, clean and elegant.
 An old sweater or jacket is also suitable for making an original New Year's boot.
 A boot made of brocade, velvet or satin, as well as a simple plain fabric, would be good.


The main thing is that they are made with love and filled with truly desired gifts.
Or you can make such a New Year’s tear-off, or rather pinch-off, calendar - a garland for the New Year holidays.
To do this, just embroider on each sock or write with a fabric marker the capital letter of the name of the person to whom the gift is intended. These could also be the dates of the month on which you need to get gifts. For every day of the New Year holidays, one gift, albeit a small one, you must agree, this is great!
It’s much nicer to receive a New Year’s gift in a smart boot than in a regular paper package. Making such a boot will not take too much time.
To make an elegant New Year's boot we will need:
- colored canvas with a pattern for the lining, for example, pink;
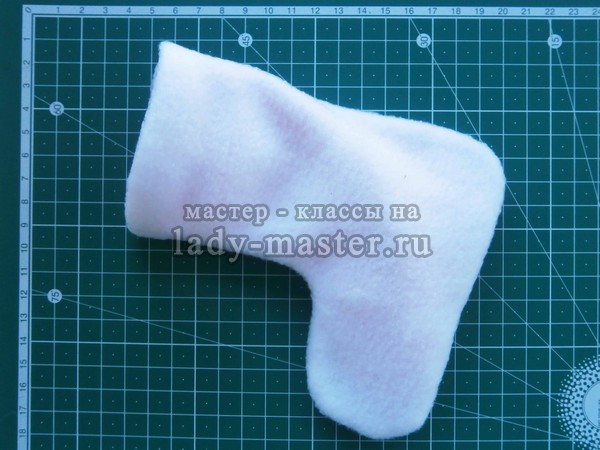
- white soft fabric for the outer part of the boot, for example, fleece;
- felt in blue, green, blue, red, pink and yellow colors;
- satin ribbons of different colors;
- red decorative cord;
- sewing threads of different colors;
- bright sequins and beads;
- needle;
- scissors.

The procedure for making a New Year's boot
1. Draw a boot on paper. We will use this pattern to sew our gift boot. Let's draw a Christmas tree next to it - using this pattern we will make a decoration for the boot. Let's cut out the details of the boot and Christmas tree from paper.

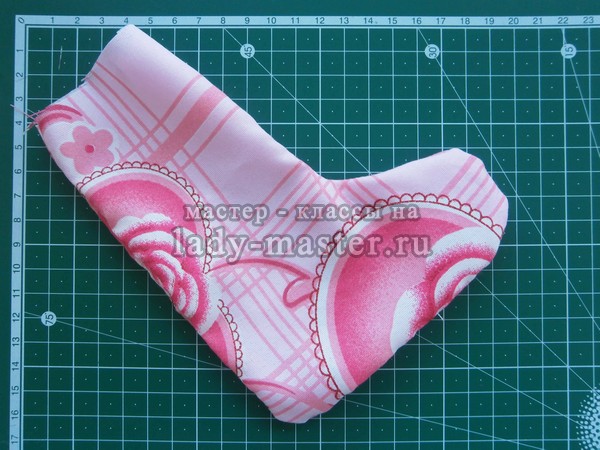
2. Using the boot pattern, cut out two pieces of lining from colored fabric with small seam allowances.

3. Using the same pattern, cut out two parts of the boot from white fabric, also adding seam allowances.

4. Place the parts of the white fabric boot with the right sides right and sew them by hand or using a sewing machine.

5. Now we will fold the lining parts from colored fabric and also sew them by hand or on a sewing machine.

6. Turn the lining inside out and straighten it.
7. We will not turn the part sewn from white fabric inside out. Let's put the lining piece into it in the order shown in the photo.

8. Sew the lining of the boot and its outer part along the top edge, leaving a small section unsewn. Turn the boot inside out through the unstitched hole and straighten it out.

9. Tuck the lining into the outer part of the boot. Sew up the unstitched area using a blind stitch.
10. Using a paper pattern, cut out a Christmas tree from green felt. And from blue felt we will cut out a decorative strip 17 cm long and 2.5 cm wide. We will cut one edge of this strip so that we get a wavy line.
Now you need to sew these parts to the boot. To make sewing more convenient, you can cut out a cardboard part of the boot using a paper pattern and insert it inside. It is more convenient to sew small parts with a cardboard part - this way you will not accidentally sew the back of the boot to the front.
Using green threads, sew a Christmas tree to the front side of the boot. And using blue threads we will sew a decorative stripe at the top of the boot.

11. Cut out small rectangles of any shape from felt in blue, yellow, pink and red. We will make gifts from them for the Christmas tree.

12. Sew felt rectangles to the front of the boot. It is better to arrange the gift rectangles so that they slightly overlap each other. We will sew with a basting stitch and small stitches.

13. Take narrow satin ribbons of different colors and cut them into small pieces. Fold each piece into a bow and secure with a few stitches. We will sew a bow on each gift.

14. Let's decorate our Christmas tree - sew bright sequins to it, and sew a bead in the center of each sequin.

15. Take a red lace approximately 45 cm long. Tie a knot at the ends of the lace. Use red thread to sew a lace at the top of the boot. You need to sew small stitches so that they are invisible.

16. Let's take out the cardboard part from the boot - we don't need it anymore. And we'll tie the lace into a bow.

The elegant New Year's boot is ready. All that remains is to hide the gift in it and put it under the tree. And if your gift is large, then you can sew a larger boot.

We also recommend
 Inexpensive birthday gift for a friend
 Women's gifts: simple but win-win options
 Openwork Christmas tree made of paper - stencil: print
 Jack Sparrow - New Year's costume for a child
 DIY New Year's boot made of paper How to decorate a New Year's boot made of cardboard in volume
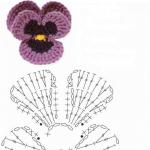 Knitted flowers: composition “Pansies”