How to paint a birthday card. Summer card you can make with your kids
A beautiful card is an invariable attribute of any holiday. After all, with its help you can tell a person about your feelings for him and wholeheartedly congratulate him on his triumph. There is a huge variety of postcards in the world for every taste and any theme. But the best of them is considered to be created with your own hands. To make a presentable greeting craft, all you need is creative thinking and the right materials. Our article will tell you how to decorate a postcard correctly so that it has all the necessary parameters.
Spring drops
Speaking about postcards for such a bright holiday as March 8, we can say that they should all look sunny, as they symbolize the arrival of spring. Therefore, each product dedicated to this holiday must be filled with light, warmth and tenderness of colors. In such cards it is best to use a combination of light green, pink and yellow tones, because they inspire and saturate with the energy of solar warmth after a long cold winter. An example of what homemade postcards from March 8th can be are the photos below and a master class on making crafts. To do this, you will need the following materials: colorful cardboard with an ornament, pearl beads of different colors, double-sided colored paper, glue and scissors.
Progress:
- A sheet of colorful cardboard must be folded in half to form the desired size of the future postcard. If necessary, cut off the edges on it, making them slightly rounded.
- On a sheet of pink paper, draw an oval with openwork edges and use a special knife to cut out all the necessary details. The result should be a figure with a solid middle and lace edges. The oval should be glued in the center of the card in a horizontal position.
- From white and pink paper you need to cut seven with carved edges (preferably different shapes). In order for all the flowers to be beautiful, they must first be drawn and then cut out.
- You need to cut out a lot of leaves of different shapes and sizes from green and light green colored paper. The more lacy the edges of the finished leaves are, the more beautiful the postcard will look.
- Next, you should begin manufacturing parts for big flower. It will consist of several parts. To do this, you need to draw 15 elongated petals on a sheet of white paper and cut them out. Then you need to bend each petal in half (vertically) and press the edges with your fingers. After this, you need to cut out 10 petals from pink paper, but of a different shape (as indicated in the photo). There is no need to bend the pink parts.
- When all the details for decorating the card are ready, you need to glue them. In the lower right corner of the card you need to glue white petals in the shape of a flower. The parts should be placed close to each other, with sharp folds down. Next, you need to start forming the center of the flower, gluing the pink petals so that they have a cup shape. In the center of the resulting flower you need to use glue to attach many small white beads.
- To the left and right of the large flower you need to glue pink flowers with pearl beads in the middle.
- In the upper left corner you need to fix 3 white flowers with pearl centers.
- Now all that remains is to decorate the craft with carved leaves, and it is almost ready for use.
Similar postcards "Happy March 8th!" can be made in absolutely any color and have other shapes of flower petals. And in the center of the lace oval you can write a beautiful wish.
Friendly congratulations
Original cards for congratulating friends and girlfriends are especially popular. To make an unusual card for a teenager, you can use fashion trends. Namely, the image of outfits on paper products. Let's look at how to decorate a postcard with your own hands using design methods.
Initially, you should select a base for the craft using a sheet of folded cardboard. Then you need to draw a girl with a sophisticated figure on it. Next you need to cut out thin fabric and glue the clothes onto the girl. The skirt or dress should be made very fluffy so that the fabric blows out of the postcard. This craft can be decorated with sparkles or beads, as well as ribbons.
To my beloved mother!
For the most loved one in the world, for mom, you always want to make the best and most unique surprise. Therefore, let's look at how to decorate a card for mom that will be suitable for any holiday. To make it you will need the following materials: double-sided cardboard purple, a sheet of white paper, a satin ribbon (lilac).

You will also need: 2 sheets of white paper, rhinestones, a butterfly stamp, glue, scissors and any paints.
Work progress:
- Bend a sheet of cardboard in half.
- On a sheet of white paper, trim the edges using scissors.
- Next, make prints of butterflies of different colors on the same sheet.
- From the satin ribbon, cut a piece the size of the width of a white openwork sheet.
- Then you need to glue a sheet of white paper with curly edges in the middle of the cardboard. At the same time, you need to stick a piece of cut tape onto this sheet, bending its edges under the paper. The tape should be located at a height of 3-4 centimeters from the bottom of the white sheet.
- Make a bow with beautiful edges from another piece of ribbon and secure it to the glued ribbon.
- On another sheet of white paper, leave several butterfly prints in different colors. Then they need to be cut, folded in half and flattened. The resulting butterflies must be glued onto the postcard, applying glue to the sharp folds of the parts.
- The final stage in decorating the product is gluing rhinestones onto the openwork edge of white paper.
If you don’t have the necessary stamps to make such a craft, you can draw the butterflies yourself. They will look no worse than printed ones.
Citrus delight
In the process of creating a unique postcard, all means and materials are good. After all, you can also use organic things to decorate them, for example, slices of dried citrus fruits, coffee beans and dry herbs.
If you beautifully arrange these decorative particles on the surface of the card, they will give the item a completely different, more interesting view. To do this, you don’t need to know how to decorate a card with citrus fruits correctly. The main thing is to follow your feelings and create your own vision of a beautiful world. If desired, you can glue pieces of burlap and lace to the card. Also, by using cinnamon sticks and dried mint leaves, a person will create not just a paper product, but a whole aromatic complex that will refresh the room and please the eye.
To the delight of lovers
The bright holiday of Valentine's Day has millions of fans all over the Earth. Therefore, lovers try to give each other the most beautiful cards and valentines. How to decorate homemade postcard in the style of lovers, consider below.

As you can see from the photo of the craft, it is not at all difficult to make. For this you will need: a sheet of cardboard folded in half, hearts made of paper of different colors, a bow made of satin ribbon, white thick threads, a sheet of gray cardboard. Do all the work in the following order:
- Glue a rectangle made of gray cardboard onto a sheet of cardboard folded in half.
- Glue hearts with threads in the form of balloons onto the rectangle.
- At the bottom of the threads collected in a bundle, glue
The card is completely ready, but if you wish, you can stick a lot of multi-colored hearts of different sizes inside it.
And the ribbon curls...
Using ribbons helps make the craft more sophisticated and delicate. That is why this material is so popular in this type of creativity. Let's look at an original idea on how to decorate a card with ribbon to make it look great.

This craft can be given to anyone for their birthday, but it is most suitable for men. To make this card, you need to cut out car parts from any suitable materials and glue them onto a sheet of cardboard folded in half. Also need from corrugated paper make gift boxes and tie them with ribbons. Such a postcard can be glued around the edges with thin satin ribbon. To make the craft more colorful, it must be made on a sheet of light green or pink cardboard.
Photo for your loved one
Sometimes it happens that you want to make a postcard to your loved one for no reason. But it's not always enough creative thinking to create things like this. Not knowing how to decorate a card so that it evokes bright feelings, and not vice versa, some risk finding themselves in an awkward position. Therefore, in this case, it is better to use ready-made ideas for making such crafts.
One of the interesting ideas is the use of photographs in the making of postcards. You need to take pictures of both lovers (faces) and beautifully glue them onto a cardboard base. It is advisable to use colored hearts, rhinestones and lace to decorate crafts. The result will be not just a postcard, but a frame that will stand in a prominent place.
Strong defenders
Men, by their nature, do not particularly like to accept various souvenirs. But the only time, besides their birthday, on which all men wait for them is Defender of the Fatherland Day. Therefore, it is extremely important to prepare appropriate crafts for husbands and sons. Knowing how to creatively decorate a postcard for Defender of the Fatherland Day, you can please your husbands with an unusual souvenir. You should not depict weapons and other attributes of military life on such crafts. It is best to depict peace and love throughout the land, which is protected by men.

This card takes a lot of time to make. a large number of butterflies and glue them. But creating something beautiful is worth it. They can be pasted not only on the front, but throughout the card, as a symbol of freedom and joy. If the white background of the craft does not suit someone, then it can be replaced with any other one.
For the little ones
Children love when they are given colorful cards. To do this, they need to be made using a lot of decorative details. Not every mother knows how to beautifully decorate a card for her baby, so you need to use a clear example or recommendations for its production.
Generally, little boys and girls like toys. You should take advantage of this and create a postcard with various game elements. For example, cut out a bunny from fabric and glue it to cardboard. The bunny should be dressed in clothes, preferably in colorful colors. You also need to use lace details and ribbon bows. The inside of the card should also look bright and colorful.
Hidden Splendor
Any postcard created with your own hands must have beautiful view not only outside, but also inside. There are homemade crafts that, when opened, transform into interesting details. Let's figure out how to decorate the inside of a card in an unusual way.

As you can see in the photo, the creation interesting crafts It won’t require a lot of time and materials, but despite this, the greeting card looks great. All that is required is just to cut out a few balloons and stick them on cardboard, connecting the threads in a bundle. This card has a congratulatory inscription in honor of the birthday, but you can write any wishes on the flags. You also need to take into account that to give the balls volume, they are glued onto small pieces of foam.
Breath of the sea
There are a large number of original ideas for creating postcards. Crafts using marine theme. To understand how to beautifully decorate a card for lovers sea travel, you should use this product description.
So, first you need to prepare the necessary materials. These are sand, blue cardboard, shells, blue cardboard, glue and scissors.
- You should take a sheet of blue cardboard and bend it in half.
- Cut a rectangle out of blue cardboard, smaller in size than the card itself. Then you need to glue it in the center of the craft.
- Sand and shells should be glued onto the rectangle.
In principle, the card is ready, but if desired, it can be further decorated with sparkles and small pieces of glass.
Drawing Joy
Do beautiful postcard You can not only use a lot of decorative details, but also by drawing it. Many people do not know how to decorate a card beautifully with pencils without having the talent of an artist. Using only pencils and colorful buttons, you can create an interesting greeting element as you work. For example, like in the photo below.

The use of buttons in this case is unexpected and unusual. Together with framing them with colored pencils, they began to play in a new way. The brighter and more colorful the buttons and pencils used to design the card, the more original it will look. You shouldn’t stop at this type of product, because you can add stems and leaves to the buttons. And also depict the sun and blue clouds in the sky.
For grandparents
Some people have a question about how to decorate a card for people old age so that they like it. After all, they don’t like many modern ideas. But in this case, you can come up with an interesting solution by using applique to decorate the product.
This applique can be made from paper, as in quilling, or from magazine clippings. If all these elements are skillfully placed on bent cardboard, you will get quite interesting models greeting cards. Do not forget that in such a craft, not only flat objects will look great, but also those with volumetric forms. For example, a house with open shutters and a flower bed. Surely this will please the elderly.
Useful tips
Content:Volumetric postcard, made with your own hands, this a nice gift for a loved one or friend. There are postcards for all occasions, so you can choose for any holiday the right gift with your own hands.
On our website you will also find:
- DIY postcards for March 8
Make a three-dimensional postcard with your own hands. Eight-bit heart.

This original three-dimensional postcard is quite simple to make, despite the fact that its design seems intricate.
It is ideal for a loved one (girlfriend, mother, grandmother) and the occasion can be any: birthday, March 8 or Valentine's Day.
You will need:
Cardboard or thick paper
Stationery or wallpaper knife
1. First you need to print the card template found in . Just in case there are 2 copies.
* You can try to draw a heart layout yourself using a pencil and a ruler, it’s not difficult.
2. Using a utility knife, make vertical cuts on your template.
3. Now you need to carefully fold the card without creasing the parts. First make the folds, which are indicated by yellow lines in the picture. Next, begin to carefully fold the card.


*The rest of the card should fold on its own. Don't forget to smoothly stroke the card with your fist so that all the elements work smoothly.
* For convenience, you can temporarily attach the postcard to the table using tape.
4. Decorating a voluminous card. You can cover the edges of the card with paper of a different color.
Now almost everything is ready, all that remains is to add warm words.
Do-it-yourself voluminous postcard. Heart.

Despite its simplicity, this card will look beautiful if you do it right. Anyone can make a Valentine card like this.
You will need:
White thick paper
Red paper
Scissors.
1. You will need a postcard template (or you can draw one yourself - look at the picture for how to do this).

2. Cut out a card from white paper.
3. Fold the red paper into an accordion shape. Next you need to cut it out.
4. P Glue the resulting hearts to the card.

Ready! All that remains is to decorate to taste and sign.
Do-it-yourself voluminous postcards. Scheme. Rainbow.

This card is very easy to make even for a child.
You will need:
White thick paper
Scissors
Markers, pencils or paints
1. fold the paper in half
2. draw a rainbow as shown in the picture
3. make cuts along the top and bottom of the rainbow
4. Unfold the paper and color the rainbow
* You can add whatever you want to the card, decorate it to your liking using stickers, glitter, etc.
5. Now you need to carefully bend the rainbow out of the paper (see picture)
6. To hide the hole from the cut out rainbow, glue more paper to the back of the card.
When opened, the rainbow should peek out, decorating the world you have imagined in your card.
How to make a three-dimensional postcard. Volcano of hearts.

This card consists of two halves that are glued together.
You will need:
Colored paper
Thick paper
Scissors
* You can try to draw hearts yourself, but you need to know certain rules - they are listed below.
1. Remove the large heart from the middle (it's right on the fold).

2. Cut out the hearts, leaving only their folds intact (see picture).
3. Make cuts on the hearts shown in the picture (gray lines on opposite hearts), this way you can fasten them.

* The card will close better if you cut the paper at the center fold and glue them separately to the base (the base is thick red paper that serves as the background for the card).

4. Glue the halves to the base and connect the hearts in which you made the cuts.
Rules

*The sizes of the hearts on both sides are the same.
*The blue line in the diagram shows that the distance from the fold in the middle to the cut is the same, and the red lines indicate the same distance between the hearts close to the middle of the card.
Volumetric paper cards. Eight-bit weirdos.

This card is ideal for both teenagers and adults.

You will need:
Stationery knife
Ruler (preferably metal)
Postcard size approximately 8.5cm x 6.5cm
1. Download the weirdo or skull template and print it out. You can try to draw them yourself.
Volumetric postcard templates
2. Make cuts in the indicated places (see the picture - where the red lines are to make cuts, where the green lines are to make folds).


3. As you begin to fold the card, your little monster will begin to “hatch” out of the paper. Take your time, do everything carefully.
* If the mold does not come out automatically, try helping yourself with a toothpick or something similar.
4. Glue the card to separate paper, which will hide the holes and serve as a base for the card.

*You can put your postcard in an envelope.
Master class - voluminous postcard "Jolly Crab"

Exist different techniques making voluminous cards and this “funny crab” is made using one of the simplest.
You will create volume by gluing the main elements of the card onto bulk tape.
You will need:
Thick paper
Colored paper
Patterned paper
Black beads or felt-tip pen (for eyes)
Bulk tape (or foam)
PVA glue.
* You can replace bulk tape with a piece of foam plastic. To do this, you need to cut out small cubes from foam. The side of one cube should be several millimeters.
* Use glue to glue the foam pieces first to the card elements and then to the card itself.
1. First, you need to download and print this template. You can also draw the same crab or other cute creature yourself.

Cut out all the main parts of the crab from colored and patterned paper.
2. Prepare thick paper.
Fold it in half to make the base for the card.
Glue patterned paper for the background onto this base using PVA glue.
Glue wavy shaped paper onto patterned paper yellow color, it will represent sand.
Glue the parts to the “sand” using bulk tape or polystyrene foam. starfish and jellyfish.
You can decorate the sea friends of the crab with beads.
3. After you have cut out the crab parts from plain and patterned paper, you need to glue it.
Glue the legs of your paper crab to the card base.
Glue the crab's eyes to its body (or you can draw them yourself).
Connect the remaining parts using the same bulk tape or polystyrene foam.
4. Draw a mouth and write any wish.
How to make voluminous cards. Chick.

This card can be prepared for Easter or a birthday, or maybe there is another occasion.
You will need:
Wrapping paper
Thick paper
Stationery knife
Colored paper
Scissors
Ruler
1. First we make two blanks for our postcard. The dimensions of one are 15 cm by 12 cm, and the second is 15 cm by 15 cm. It is on the second base that you will attach the parts. Bend 3 centimeters from the bottom edge of the base (see picture).

2. Step back 3 cm from the left edge and the same amount from the right and draw strips, the width of which is 1 cm and the length of 3 cm. Cut the lines with a stationery knife. It is necessary to make three such strips, since we have three parts.


3. You need to bend the strips forward, and you will get a kind of stand for the postcard parts.

4. Glue the main part of the card to the inner one, as shown in the picture.
*You can decorate the card using wrapping paper. You can paste it over the base.

5. We cut out eggs from thick paper and decorate them. You can use circles cut out of colored paper or made with a stapler, or stickers, glitter.

7. Glue the eggs onto the stands and glue the remaining parts.

*You can decorate your card with feathers and/or glitter.
We love holidays and love gifts. And we all love postcards - receiving and giving. Postcards are given for many occasions - birthday or New Year, March 8 or the birth of a child.
You go into a store - there are a lot of postcards, even the text is already printed inside - everything has already been thought out for you and said, but not from the heart.

Gift with love
Only handmade postcards can convey your feelings towards the recipient. Buying a regular cardboard card is easy, but making one yourself means putting a part of yourself into it. After all, when making such a gift, you imagine the person for whom it will be intended.

Remember, we are all in childhood, in kindergarten or at school they tried, they made cards for parents for the holiday - they carefully cut it out, folded it, and glued it on. Then they handed it over. Remember how carefully mom and dad accepted the gift, kept it, and many still keep it with your children's drawings and crafts.
Today, handmade products are becoming increasingly popular. Embroidered pillows decorate the home, knitted items are worn with pride. Only the very lazy do not sew, knit or glue.

Scrapbooking is gaining more and more admirers - photo albums, paper cards, made with love, made in a single copy - are becoming a unique gift for various holiday events.

For anyone who has mastered at least the basics of scrapbooking, there is no question of what to give to a loved one, and these gifts evoke admiration.

The art of giving joy
Creating postcards from paper is called cardmaking. It is based on the use of paper and various additional materials. An experienced scraper will use everything when making a postcard - ribbons, small paper flowers, fabric flowers, cutting - elements cut out of paper, buttons, lace and much more.
There are many techniques for making postcards from paper.

Experienced craftswomen make multi-layered three-dimensional products; the more layers, the more interesting the postcard looks.

The elements are connected to each other with glue and even stitched. The styles in which the craftsmen work also differ - shabby chic, steampunk and others.

It is impossible to create two completely identical postcards.

It is impossible to say that cardmaking is a simple art. Indeed, in the process of creating just one thing, a composition is created, changed, and formed. A scraper must be an artist - know the basics and subtleties of creating an ideal composition, selecting materials, and combining colors.
Sometimes this process of selection and application takes more than one hour, or even a day - the artist is a delicate nature, there is no inspiration, and nothing masterpiece will be created. And sometimes everything seems to come together on its own - and now a handmade card for the birth of a child or for the birthday of a loved one is ready.

Look at a variety of photos of postcards - how rich the imagination of the craftsmen is, creating harmonious compositions from many small scattered details.

We create the gift ourselves
Experienced scrappers use special scrap paper for their work - it is thick and has the property of not fading or fading over time. This ensures that your gift will retain its beauty for a long time.

Scrap paper comes with various designs and is sold in sets or individual sheets.
Note!

We will also need:
- Thick plain paper for the base - watercolor is suitable.
- A utility knife and a metal ruler (if you get into scrapbooking, you can later purchase a special cutter to cut the paper evenly - scissors are not the best option for this).
- Scissors for cutting out small parts.
- Glue - ordinary PVA, stationery - will not work, it warps the paper, and over time it will turn yellow. Take Titan, Moment and the like - scrap goods stores will advise you and others - see what is available to you.
- Double-sided tape - it can also be used to connect elements of a postcard, and with adhesive tape on a porous basis you can create multi-layer three-dimensional compositions.
- Decorative elements - flowers, cuttings, ribbons, pieces of lace, elements cut out of scrap paper - butterflies, birds, twigs and others.

Buttons, pendants, buckles and other small objects can be used to create the composition.

Stamps are often used - with their help you can create an interesting background for a future postcard, add certain elements, and make inscriptions.

An interesting technique for creating three-dimensional cards is embossing - a transparent stamp is applied to the base, which is sprinkled with special powder.
The last stage - the powder is dried using a special hairdryer - the result is a three-dimensional image: most often this technique is used when creating the contours of a picture and inscriptions.

Figured hole punchers - they can make an openwork edge, they can be used to make voluminous flowers and cuttings.
Note!


At all professional tools There are many for scrapbooking and cardmaking; it only makes sense to purchase some when making postcards for sale. But having mastered the art, you will not only please your friends original gifts, but also replenish the family budget.

Select several sheets of scrap paper that match the style and color, apply a background to the base, and then decorative elements, selected by color. The composition must form a cohesive whole so that each element has meaning.
You can use special sketch diagrams; they will tell you how to arrange the elements to create a harmonious composition. Having carefully prepared everything, making sure that every element is thought out, glue it.

If something seems to be missing, add a couple of sparkles along the edges of the flowers, rhinestones, half beads. The main thing is the unity and thoughtfulness of the composition so that the postcard does not look like an appliqué.

There are many tricks on how to make a beautiful card:
- quilling - curls are twisted from thin strips of paper, then they are shaped various shapes- these elements are glued to the base, creating a pattern, a drawing - three-dimensional postcards are obtained;
- iris folding - small strips of paper, ribbon, fabric are folded in a spiral, overlapping each other - an unusual pattern is obtained;
- shaker card - a multi-layer card with a transparent window, inside which small elements move - foil rhinestones, beads;
- postcard-tunnel - a three-dimensional postcard with many layers, the cut out elements of each layer create an overall spatial pattern.

Note!

The inside of the card can also be decorated with stamps and paper. You can make the inside of the card unusual - when opened, the three-dimensional element expands - a heart or a bouquet of paper flowers will undoubtedly surprise the recipient.
You can't help but like such a paper postcard - it keeps warmth and a piece of your soul. If you want to master the art of cardmaking, attend master classes by experienced craftsmen who will tell you all the intricacies of how to make a beautiful card with your own hands.

Photos of postcards with your own hands


A touching event is my mother’s birthday. And even more touching - congratulations loved one not just a purchased gift, but to make some kind of craft yourself. To present a pleasant surprise for your mother, you can make her a birthday card with your own hands.
To bring a flight of fancy to life and make a truly original postcard, you will need a standard set of tools:
As well as a variety of materials:
- sheets of thin cardboard or thick colored paper;
- multi-colored paper, suitable for gift wrapping;
- various ribbons, scraps of material, laces;
- rhinestones, beads, beads, buttons.
Postcard using quilling technique for mom “Bouquet of flowers”
A “Bouquet of Flowers” postcard made using the quilling technique (paper rolling) will be a wonderful addition to a gift or as a small surprise. To make it you will need a sheet of cardboard, colored paper that matches it in contrast and color, tape, a quilling stick and a standard set of tools.
Now you can get to work:

Volumetric card “Hearts”
A DIY birthday card for mom will look especially heartfelt if the central figure on it is a heart. To make it you will need sheets of thick white A4 paper and scarlet paper, glue and scissors. 
All work consists of 4-5 stages:

Postcard pendant “Butterflies”
For your mother's birthday, you can make your own card-pendant in the shape of a butterfly.
A gentle and romantic craft, made in the birthday girl’s favorite colors, will require a set of tools:
The work takes a little over an hour and is divided into 4 stages:
- A blank for the postcard base is cut out of a sheet of white paper and folded in the middle. On the outside, this part is decorated with a sheet of scrapbooking paper of the same size with an unobtrusive pattern.
- After joining the two sheets, a small hole is made in the upper left corner with a hole punch, which can be fixed and reinforced with a grommet. Now you can thread a beautiful cord through the future postcard and hang the craft in a prominent place.
- The base is ready, all that remains is to decorate the front part of the craft. Pieces of lace are glued just below the middle of the cover, imitating the fencing of a flower bed. 3 flower heads are attached to one of the edges with double-sided tape. A pair of butterflies are glued above them so that their wings remain free. You can make flowers and butterflies yourself, find ready-made ones, or cut them out of postcards.
- The decoration process is completed by randomly gluing beads or beads, as well as attaching a small chipboard against the background of flowers.
The birthday card for mom is ready. Now you can decorate the inside of the product with your own hands by writing a couple of warm lines in calligraphy.
Postcard with a surprise: step-by-step production
A surprise in a postcard is something unexpected and extraordinary. 

One of the options for such a gift is very simple:
- On a sheet of paper you need to draw 2 circles using a compass, one inside the other, where the inner circle is 2 times smaller than the outer one.
- Petals are drawn between the circles. As a result, the drawing looks like an open daisy.
- A congratulation is written in the middle of the flower.
- The petals are cut, separated from each other, painted over with colored pencil and folded inward. On one of the petals you can write “I bloom in water.” This will be a hint.
- The postcard is ready. Now all that remains is to give a surprise to the birthday girl and watch as a flower with warm words opens in the water before her eyes.
Postcard with a secret inside
A pleasant surprise remains in the memory for a long time, so you can congratulate the birthday girl with a card with a secret. To do this you will need colored paper, glue, scissors and lace. 
Preparing a gift consists of several stages:
- The basis will be a sheet of paper equal in size to a double postcard. The workpiece is bent in the middle, where paired cuts are made different lengths. The number of cuts (future holders) is determined by the overall composition, consisting of 2-3 secret parts.
- The cuts are folded inside the future postcard. Flexion/extension movements are made several times so that the paper takes the required shape.
- Preparation of the actual secret pictures. They can be a bouquet of flowers cut out of colored paper, Balloons, anniversary date, as well as a chipboard with congratulations. A card with a wish together with a photographic figurine of the artist of the card will look original.
- The outer side of the craft is covered with paper of the same color and size as the base. Glued onto picture holders.
- If it suddenly seems that the outside of the card does not look festive enough, then you can decorate it by gluing lace with beads over the entire surface. The main thing is that all the details are in harmony with each other.
Postcard with two wings
To make a card with 2 leaves you will need 2 sheets of photo paper, ribbon, tape and decorative elements at the discretion of the congratulator. 
Just 4 steps and your exclusive gift is ready:
- One of the sheets is cut into 2 parts - they will become flaps. The blanks are glued to the main sheet using tape.
- A piece of ribbon is attached to each sash so that you can tie a bow from it. You can secure the fabric with glue or a stapler.
- It is recommended to decorate the doors on the outside with several small details so as not to end up with an overloaded surface. You can, for example, use beaded edging.
- The inside of the gift should contain the text of congratulations. To make everything look decent, you can use a computer typesetting, decorating the congratulation itself not only with an interesting font, but also with vignettes.
Postcard in scrapbooking style
For those who are not very familiar with the technique of making cards in the scrapbooking style, It is advisable to purchase a ready-made set of materials, which includes:
- several options for cardboard bases;
- colored paper with various patterns;
- lace patches and ribbons;
- beads with a flat base for ease of gluing;
- elements of figured decor: artificial flowers, various types figures, frames, templates.
If you already have experience making cards in a similar style, then your imagination may suggest replacing cardboard with photo paper, artificial flowers with dried and covered with a protective layer, factory lace with lace made by yourself. 


In addition to the availability of materials, you need a clear understanding of what exactly you want to capture on the postcard:
- traditional birthday greetings,
- a reminder of some pleasant event,
- a hint of a hobby
- humorous collage.
Only after this does the selection of decor begin.
The most simple idea to congratulate the mother - this is a frame glued to photo paper or special cardboard.
You can put a photo of the birthday girl in it and write a few sincere words. The corners of the impromptu portrait are decorated with small bows or flowers, into the core of which beads can be attached. The most important thing is not to overload the surface of the gift and stick all the details so that together they look like a single, holistic composition.
Original card with flowers embroidered with cord
A DIY birthday card for mom will look original if you embroider flowers on it with a cord. 
To complete the work you will need:
- silver-tone and colored lace (thickness 1 mm, can be purchased at a specialty store);
- dark cardboard;
- 2 needles – with a large eye and a small one;
- ordinary white threads;
- simple pencil, colored markers;
- scissors;
- copy paper.
First, you need to bend the cardboard in half with the colored side facing out. On an ordinary white sheet, draw the outline of an elegant flower or beautiful bouquet. The drawing should not be complex, since the trick is not in its sophistication, but in the resulting volume. The finished outline is transferred onto the colored base of the postcard using carbon paper.
The surface is prepared for embroidery with a silver cord, which is threaded through a needle with a large eye (gypsy needle). A white thread is threaded into an ordinary needle and is designed to secure the lace in certain positions and places. The flower head can be embroidered with a cord of a different color. You need to pierce the cardboard very carefully so as not to dent it.
The words of congratulations can be written with a marker or printed on a printer and pasted on the gift in a convenient place.
Unusual card with fabric flowers
 You can make a DIY birthday card for your mom from scrap materials.
 It will require:
- fabric tape;
- buttons;
- needle, silk and regular threads;
- set of paper and cardboard;
- glue.
A piece of fabric tape is stitched with zigzag stitches, then it is pulled together and the edges are sewn. The blank looks like a flower. Its core will be a bright, catchy button, which is sewn in the center with silk threads. If a bouquet is planned, then there should be 3 or 5 blanks.
The base of the card is formed using cardboard folded in half, onto which colored paper of slightly smaller sizes is glued. Now, using glue, you can begin to form a bouquet. It may consist of flower heads only or have stems made from suitable cord.
A small piece of congratulations is pasted below the flowers. Its shape can be played like a leaf, the bark of a tree, or just a handwritten note.
3D postcard from scrap materials
Imagination and diligence will help you do a lot for your loved one. an interesting postcard 3D.
It will require:
- sheet of photo paper;
- sheet of cardboard;
- double-sided adhesive tape and glue;
- ribbons (lace and satin);
- scrap sheet;
- small scissors.
To begin with, a picture depicting different colors is selected from the Internet. It is printed several times on photo paper using a color printer.
Now you can make blanks of 5 colors, cutting out parts for each flower as follows:
- 1st – life-size;
- 2 – slightly less than the first;
- 3 – even less;
- 4 – a little more center flower;
- 5th – almost the center.
Double-sided tape is glued to the back of each piece, after which the flowers are carefully collected. 
The base of the postcard will be cardboard folded in half, onto which a slightly smaller scrap sheet is glued. A lace ribbon is attached a few cm from the edge of the latter along the width, and a satin ribbon is attached on top of it. These manipulations are best carried out using double-sided or foam tape.
From the remaining scraps of cardboard and scrap sheet, 2 ovals are cut out - the colored one is slightly smaller than the white one, they need to be glued together and attached to the base of the card. A composition of made flowers is formed on the oval part. All that remains is to write wishes for a loved one either on the card itself or on a figured piece of paper (card), which is then attached to the inside of the craft gift.
Original ideas for making birthday cards for mom and daughter
How many pleasant memories will flood over a mother’s mind after many years when she comes across a postcard once made by her daughter. Particularly touching are crafts where the main detail is children’s hands outlined on paper with a pencil. 
To implement one of these ideas, you need to trace your hand on cream-colored paper with a pencil, cut out the outline and stick it on a postcard base prepared at your discretion so that your fingers remain free. Next, using the quilling technique, make 3-5 flower heads and cut out stems and leaves from green paper.
flower composition attached with glue so as to create the impression of a hand holding flowers. Pair good wishes will complement the postcard. Another idea for a card will require a photograph of the birthday girl (preferably together with the recipient of the gift), which is pasted onto the prepared base of the craft. The photo can be taken in a lace frame.
The second step is cutting out the outline of the right and left hands with the continuation of the wrist. The blanks are glued in such a way that it appears that the children’s hands are crisscrossing or holding the photograph.
You don’t have to waste time making your own cards for your mom for her birthday; you can choose something suitable in ready-made printed abundance. But will a purchased postcard absorb warmth? loving hands, is it a template congratulatory words will reflect the whole gamut of the daughter’s feelings for her mother?
Video: DIY birthday card for mom
How to make a postcard for your mother with your own hands, watch the video:
We make a card for mom with our own hands:
DIY birthday cards are a wonderful holiday attribute. It is often used in schools to congratulate students. During craft lessons, many of the readers made their own cards as children. A lot of time has passed since then and today, especially on the Internet, you can find a large number original postcards for handmade congratulations.
Relevance of the gift
Especially for children, many lessons have been created for development fine motor skills. During labor at school, students are offered to perform various exercises related to the creation of paper products. A postcard will be a great solution for this. In addition to this fact, it is also worth considering that the child is trying to make such products and the process itself brings him pleasure.

The article will discuss different ways creating postcards from paper and related materials different styles. Manufacturing methods will be presented to readers:
- three-dimensional pictures;
- with added fabric;
- collected from figures;
- with added confetti;
- and an envelope for money and coins;
- With volumetric figures on the main part;
- with the addition of cut-out images of animals.
It is also worth noting that all the postcards described below can be made easily at school or at home. For this purpose, improvised materials can also be used. The main thing is to use your imagination and be smart.
Table of materials used
Before you begin to consider how to make a card from paper and what may be required for this, you need to make a table of commonly used materials and tools that may be useful in the process of creating an original gift.
As can be seen from the objects presented in the table, almost all of them can be found at home or bought at the nearest store.
If the youngest readers will be making postcards at school or at home, you must always follow safety precautions and be careful when using piercing and cutting objects.
You can watch the original solution for making paper birthday cards in the video.
VIDEO: Paper card
Master class DIY Happy Birthday card
General instructions using the example of 3 postcards
In order to move on to more complex paper products, you need to practice on the simplest ones. To do this, three options for creating a paper postcard will be outlined below. After practicing with these examples, you can move on to more complex instructions for making them.
For the first option you will need the following set of tools and materials:
- Colored cardboard.
- Colored paper.
- Scissors or utility knife.
- Regular writing pen.
- PVA glue or glue stick.
Production time is no more than 15 minutes.

The first thing you need to do is cut out the base in the form of a frame. Thick cardboard is used for this. The color can be any depending on the preferences of the master himself. The edges of the postcard frame can be made curly, as in the example, using scissors or a stationery knife.
To create even shaped frames, it is better to use markings made using a pattern or ruler.
A second layer of colored paper is applied on top of the prepared cardboard base. Instead, you can use an image printed on a printer as the main background.
Now the most important task remains - making holiday candles and lights. To do this you need to use a pen. A thin sheet of colored paper must be wrapped around the handle. The edge where the paper joins is glued. In this position, you need to maintain the shape for 30 seconds. After that, remove the handle. Repeat the action depending on how many candles you need to place on the card.
Lights are cut out separately from colored paper and then attached to the candles. The resulting design is glued onto a postcard. After this, you need to sign it and write a wish for the birthday person.
The second card will have an award medal with the age of the hero of the occasion.

To create it you will need:
- Cardboard as a base.
- Set of colored paper.
- Threads.
- Stationery knife or scissors.
- Glue stick.
You can make such a postcard following the instructions in just half an hour. In order to do everything correctly, the instructions will be described step by step.
Instructions
- Preparation of all necessary materials.
- Prepare a base in the form of cardboard of any color at the user’s request.
- Decorate the cardboard with different paper elements.
- Take a thin colored sheet of paper and fold it like an accordion.
- Using thread, tie the folded accordion in the middle.
- Spread the accordion so that it has the shape of a circle.
- To fix the edges of the straightened accordion, secure it with glue.
- Cut a circle with a smaller radius than the accordion.
- Draw the age of the birthday person or cut and glue numbers from paper.
- Glue the circle onto the accordion.
- Glue the finished medal onto the base.
Now that's it, the postcard is ready.
The last postcard for training will have three-dimensional elements.

It will also take a maximum of 30 minutes to create. To make a postcard you will need:
- Thick colored cardboard as the main background.
- Colored patterned paper or real gift wrapping paper.
- Ribbons for dressing.
- Scissors.
- Glue stick.
The process of making such a postcard consists of the following steps:
- Prepare a cardboard base. The background can be painted or additional elements can be glued.
- At the top of the cardboard write the word “Congratulations!”
- Take colored paper or gift wrapping and cut it into squares in the shape of wrapped gifts.
- Glue the squares at the bottom of the picture.
- Make ribbon bows and ties for each of the stick-on gifts and attach them to them.
Instead of ribbons, you can also use colored threads or twine.
All is ready. The card looks quite bright and interesting and has voluminous elements in the form of gifts and bows.
Volumetric 3D postcard
Now we will consider more complex options for paper postcards. The first to be presented will be postcards containing 3D elements.

To create the product you will need:
- Several sheets of thick colored cardboard.
- Scissors.
- Glue stick.
- Set of colored paper.
The first thing you need to do is make a thick cover for the book. To do this, several cardboard sheets are glued together and folded in half.
On the outside of such a cover you can write congratulations and wishes, as well as place elements cut out of paper.
Now we open the resulting cover, and mark out a pyramid of future gifts in the center of the open cover. The workpiece is split in half so that the corner of the gift boxes begins to protrude forward when opened. Next, the base of the gifts is cut, except for the places where they are attached to the main sheet. Glue the resulting blank to the cover.
There is no need to glue the places where the gifts will stick out when opened.
When the glue dries, you need to decorate the pyramid of gifts that protrudes when you open it and glue a bow at the very top.
Cards made of paper with added fabric
To create a card with fabric you will need the same set of tools and accessories. The only thing that needs to be added is different types fabrics.

In the future postcard, fabric will replace colored paper. It is attached to a base in the form of cardboard. It is noteworthy that such a product looks quite interesting and is pleasant to the touch. To securely fix all elements on cardboard, it is better to use PVA stationery glue.
However, you should be careful. Many types of fabrics absorb moisture well. If you overdo it with glue, after drying there will be traces on the material, which will ruin the overall appearance of the postcard.
From the shape of a heart
For the next type of card you will need an even heart shape. It's better to print it on a printer on colored paper or find a good, large template to trace around it. You need to be careful, if the edges of the heart are not even, the postcard envelope will not work out.

It is also recommended to use gift wrapping instead of colored paper. All actions are designed in 5 steps:
- A template is prepared and the heart is cut out.
- Turns over with its back side facing the user.
- The sides of the heart fold evenly.
- The heart turns over and the part that is at the bottom is folded to half the product.
- The top part becomes the lid of the envelope. The sides are glued for fixation.
You can put a small bow or ribbon on the front of such an envelope.
With added confetti
Confetti is always a holiday. In order to make it, you don’t need to go out and buy special home fireworks. A hole punch and a set of colored paper in all the colors of the rainbow will help solve this problem.
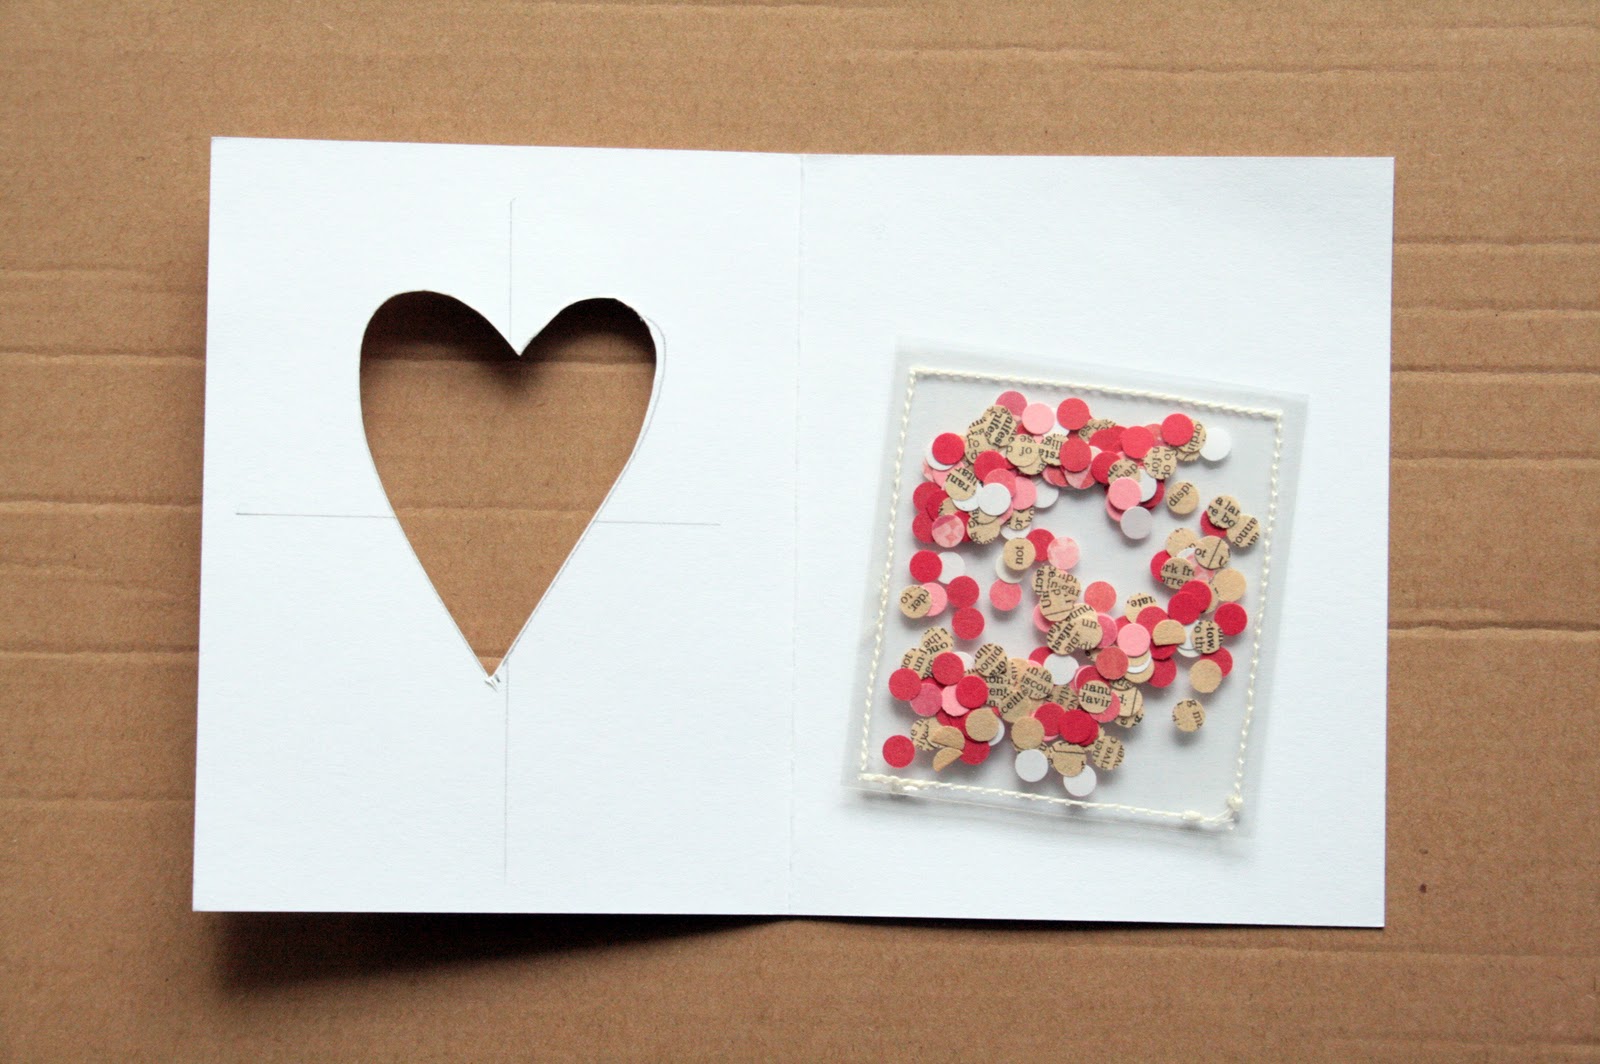
First you need to make a base out of cardboard. It can be any color. It is better to make a postcard in the form of a frame. To do this, a large cardboard sheet is folded into pieces to form an isosceles triangle.
The base is glued to one part of it. To diversify it, you can make an envelope as shown in the picture. It is better to use thick cellophane or transparent paper for this.
By securing an envelope or other transparent object with glue, you need to make confetti. To do this, take a hole punch and a set of paper of different colors. Now the slits are made using a tool. The shavings have an even circle shape and look like confetti. Parts of the circles are glued to the card, and the other part is placed in an envelope.
We also recommend
 Fashionable men's winter jackets: warmth and style
 How to choose the right mascara Methods of applying mascara depending on the type of eyelashes
 Areas of application of industrial diamonds How diamonds are used in agriculture
 For the first time in history, a princess was arrested in Saudi Arabia.
 The choice of Ani Lorak cosmetics and the secret of evening makeup from the star
 Hair salon games for girls