Do-it-yourself flags: how to make a variety of designs using different techniques for beginner needlewomen. Fabric flags
Summer is just around the corner, and this is a great opportunity to throw a couple of memorable parties for the kids! Whether it's a birthday celebration, graduation, or the eve of summer camp - any of these events can serve as a great reason to have fun.
The set consists of 12 unique flags in turquoise-blue and sand-coral colors and looks simply wonderful: so expressive, bright and at the same time laconic!
Master class on assembling a garland of flags with your own hands
In the package you will receive printouts on thick printing paper in A4 format (maximum print quality).

2. Printed flags must be cut out. It is best to do this with a utility knife and a metal ruler.
Attention! In order for thick paper to bend absolutely evenly, you need to do the so-called creasing - draw along the dotted line with a metal ruler or lightly cut with a stationery knife.

3. Cut out all the flags, folding the gluing area inward.


4. Use double-sided or interior tape, Moment glue or a glue gun to secure the flag’s lapel.
Attention! Glue only the gluing area marked on the workpiece!

5. Thread a string or decorative cord into the resulting through hole of the flag.

Do the same with all the flags, collecting them into a festive garland!
6. Holes for hanging flags can be made using. To do this, on the reverse side of the flag, mark the locations of the eyelets (2 pieces on one flag)

7. Using punching pliers, make holes and securely secure the eyelets along the edges of the flags.


8. Thread a string or decorative cord through the holes of all flags.

The garland of paper flags is ready! Hang them on the veranda, in the room or on the balcony - anywhere! Enjoy all summer - during warm evenings outside, alone with yourself or in a noisy company!


Development of design layouts for flags - Nadezhda Shadrina
Author of the master class - Anna Ganzhina
Creative workshop “HERE IS COZY” at your service! Write to the group messages, in friendly correspondence we will tell you
Do-it-yourself garland of flags for the New Year: pattern and master class. DIY bottle decor: living colors of nature. DIY bottle decor in eco style. Decorating bottles is a very rewarding activity, because the material for work is always at hand.
Section: Holivar ( New Year's garland). Well, how is that?? I come running, all blissful - jogging with my dog in the autumn park, magic, beauty in the light of the lanterns, rustling leaves under my feet. A garland of flags - with my own hands for the New Year: pattern and master class.
Do-it-yourself garland of flags for the New Year: pattern and master class. On September 16, the Detsky Mir store on Vozdvizhenka will host Play-Doh Day. Here you can find a bunch of games, detailed step-by-step instructions for master classes...
Section: Brag! :o) (New Year's trinkets). Next winter-new year bauble. New Year is getting closer and closer, New Year's decorations more and more :) But there are too many of them. Garland of flags - with your own hands for the New Year: pattern and master class.
New Year's master- classes. Location: Novoslobodskaya metro station, 5 minutes walk... Do-it-yourself garland of flags for the New Year: pattern and master class. New Year cards It’s very easy to do it yourself, and your loved ones will receive a piece of it along with the postcard...
The pattern must be quite accurate, because... embroidery is expected on the slices. Any ideas on this? Do-it-yourself garland of flags for the New Year: pattern and master class.
Do-it-yourself garland of flags for the New Year: pattern and master class. DIY gift for the birth of a child: felt mobile for a baby crib, master class with photos. ribbon to decorate the hoop (optional). a little padding polyester for stuffing. and...
Do-it-yourself garland of flags for the New Year: pattern and master class. DIY Valentines - 2 master classes for the holiday. 2 hearts: master class with children for Valentine's Day and template Heart Children's rug: decorating a room with wool...
Do-it-yourself garland of flags for the New Year: pattern and master class. How to decorate a room for a birthday with your own hands. On the Internet I found pdf versions of jewelry templates: No. 1 template – HAPPY BIRTHDAY - checkbox - http All the best to you...
Do-it-yourself garland of flags for the New Year: pattern and master class. For applique, you can cut out motifs from fabric. For the New Year it could be snowflakes, snowmen. Crochet and knitting patterns for children and toddlers - Vyazalki.ru [link-6] 57.
Birthday flags are probably the most traditional and popular holiday decoration. This is due to their amazing ability to revive and transform an ordinary interior into a festive one.
On this page you will find free birthday flag templates and step by step instructions for their production.
But before we start creating these decorations, let's look at what types of flags there are and how they are used in holiday decor.

The most common are paper flags. But sometimes they are made from fabric. And even photographs.They decorate tables and cakes.


Flags come in different shapes.
The traditional one is triangular, but there are also rectangular and oval ones and even in the shape of clouds.Perhaps calling them “flags” is not entirely correct, but their role is the same - to serve as a birthday decoration.


They could be one color range at all holiday decor, or can contrast with it.


About various color solutions You can read about birthday decorations in our other articles:
Party in pink,
Blue color in holiday decorations,


Flags can be cut from regular colored paper.You can cut out any letters from it and make your own inscription on the decoration.They can successfully complement the thematic design.


Flags can be connected in different ways into a common banner or garland:
Pull the tape through the holes;
Connect adjacent flags with bows;
Secure each flag individually and using decorative clothespins or stationery nails.


We hope these photos of festive interiors have inspired you to create your own garland of flags.
And that means it’s time to get started!
Making instructions: “Do-it-yourself paper birthday flags”
Will need:
Paper;
Sample;
Scissors ;
Thread or tape;
Hole punch (optional).
Free Birthday Flag Templates
 We have prepared for you several birthday flag templates on A4 sheets, which you can download and print for free on a color or regular black and white printer.
Template #1 “Color” - designed for a color printer.
Template No. 2– if you don’t have a color printer, these flags can be printed on a regular printer if you use colored paper.
Other checkbox templates and various decorations for your birthday you can download for a symbolic price in the section of our website .
Procedure:
1. Print the template and cut out the flags. If you don’t have a printer, cut out flags from colored or any other paper using the same template and glue the component parts on top of each other.
2. Connect all the flags into a common stretch in the way you like best. For example, make holes and thread ribbon through them, or secure each flag individually.
3. Decorate the room with flags.
If you have already decided on the design of your birthday, you can move on to.
Happy holiday!
Templates for download
Attention!Templates are intended for personal use only - posting templates on the Internet or other use or distribution is possible only with the permission of MasterFuns ()
Red flags made of colored paper are the first craft that people learned to make with their own hands in kindergarten Soviet children. Then the surging abundance of goods made handicraft impractical and even unprofitable. It became possible to buy everything inexpensively. But in last years what was a vital necessity for our grandmothers has turned into an ultra-modern and in-demand trend. Moreover, garlands glued together from colored paper are valued today and warm the soul much more than shiny glass beads bought in a retail chain for the Christmas tree. And New Year's flags made from purple colored paper turned into incredibly fashionable retro.


- A holiday flag does not have to be rectangular. The photo shows its possible contours. Choose any you like, copy and cut out the stencils.
- Take a sheet of colored paper, fold it in half and cut out a double flag using a stencil.
- Hang it on a thread and glue the paper from the inside.
- To make your own Christmas tree garland, you can use old glossy magazines with illustrations, wallpaper, and advertising posters.

Every family has a stack of old baby books. They can be used to create crafts with images of your favorite fairy tale characters. The shortage of material will not allow us to make a double flag, so we simply measure up 2 cm and wrap the strip.
Lubricate the lapel with glue and hang the picture on the cord. So Soviet paper garlands can decorate not only the Christmas tree. New Year's flags will look good above a window, on a door, or even just on a wall.

You can make original and very beautiful flags with your own hands from ordinary paper strips 30 cm long and 2.5-3 cm wide.


- Cut multi-colored strips from colored paper and bend them into a U shape, as shown in the photo.
- Place a wooden stick and, wrapping the ends of the strip around it, thread them into the loop.
- Attach the craft with glue so that the paper holds its shape firmly. This flag cannot be bought in a store. You can attach it to a thread and make an original garland for your Christmas tree with your own hands.

When decorating your rooms for a holiday, don’t rush to buy different stickers and streamers in stores. If the upcoming holiday concerns only your family members, try to make it yourself. A garland collected from memorable photographs reflecting different moments in the life of your loved ones will not go unnoticed by anyone and will bring an atmosphere of closeness and warmth to the festive feast.
All you need to do is attach a beautiful ribbon to the wall. And then pin photos to it using regular clothespins.


A collapsible mobile transformer garland made of colored cardboard or thick paper looks good. Making it yourself is very simple. Even in Soviet times they were sold in the office supply department. Simply cut out the flags and punch two holes in each one with a hole punch. That's all! All that remains is to hang the crafts on a fishing line or strong thread and the garland is ready.


Surely, over the past year your child has drawn some pictures, made elegant cards and bright appliqués. What if all these sparks of emerging talent and creativity of your child were collected into one garland, strung on a beautiful cord, and hung on the Christmas tree. After all, by and large, New Year is not only a celebration of meeting future happiness, joy, accomplishments, but also a summing up of the past 12 months.
In this tutorial I suggest you create a simple beautiful greeting banner using Photoshop.
A text banner is a very simple and at the same time functional image. You can always personalize this image, either by making small changes and creating greeting card for any holiday!
So as a result of the lesson we will get a high-quality blank that everyone can use in various projects.
Let's begin!
To complete this tutorial we will use:
- program: Photoshop CC;
- time spent: 30 - 90 minutes;
Step 1
Create a new document:
- size: 10 x 11 cm;
- resolution: 300 pixels\inch;
- color mode: CMYK
Set up a ruler in your workspace: View - Ruler(View - Rulers (Ctrl/Cmd + R)). Then you need to add a binding: View - Snap to - Guides(View - Snap To - Guides).
In order to set the measurement units of the ruler, right-click on the vertical or horizontal scale of the ruler and select the desired unit of measurement in the list that appears. In this tutorial I will use centimeters (cm).
Let's place the guides! Hold down the left mouse button, point it at the border of the vertical ruler and drag the first guide. Place it 1 cm from the left edge of the canvas.
Using a similar workflow, add vertical and horizontal guides as shown in the example below.

On the toolbar, activate the tool Polygon(Polygon Tool). Set the number of sides to 3. Hold down the Shift key and draw an equilateral triangle on a new layer. Place the shape as shown in the image below.
Translator's note: draw in layer-shape mode

Then activate the tool Arrow(Direct Selection Tool). Click on one of the corners of the triangle.

Using the triangle's anchor points, drag the top corners to the intersection points of the guides.

Place the vertex of the triangle at the intersection of the central and lower horizontal guide. Thus, you get a figure located clearly in the center of the canvas.

Step 2
Double-click with the left mouse button on the layer with the triangle. This will take you to the menu Layer Style. In this menu, go to settings Pattern overlay(Pattern Overlay).
Use any pattern you like from the set “ Colored paper" Once you decide on the type of pattern, you can adjust Scale(Scale) texture, in this example, I use a scale value of 70%.

You can also change the location of the pattern. To do this, simply move the cursor over the working canvas with the pattern, hold down the left mouse button and drag the pattern.
If you do not use the suggested “Colored Paper” set, you can decorate the triangle differently. Select the image you want to place on the triangle. Drag it to the main working canvas and place it above the triangle layer. Apply this image as clipping mask(clipping mask) to the layer with the triangle.

Activate the tool Ellipse(Ellipse Tool). In the tool settings, go to Geometric panel(Geometry Settings) and check the box next to " From a cent"(From Center).
Hold down the key Shift, hover your mouse over the center guide and draw a circle inside the triangle. You can choose the size of the circle arbitrarily, and later, if necessary, adjust it.

Refer to the circle shape settings panel. Add a stroke along the outline of the circle, stroke color - # 59c2aa, stroke size (size) - 3 pt, stroke position - outside (outside). Also change the fill color of the shape itself to # fef5e0.
If you're using a different pattern or texture for your triangle, you can experiment with different stroke and fill colors for the circle.
Translator's note: If you are using another version of Photoshop, you can add a stroke to your circle by going to the Layer Style menu. In this menu, go to the “Stroke” settings and enter the required values. In order to change the fill color of the shape itself, double-click on the circle shape color thumbnail and select a new shade.

Duplicate the circle layer. Then go to Editing - Path Transformation - Scaling(Edit - Transform Path - Scale).
Now let's reduce the size of the copy shape. In order not to lose proportions and transform from the center of the circle, press and hold the key combination while scaling Shift +Alt. When you get the desired size of the copy circle, press the Enter key to apply the changes.

Don't forget that when working with shapes, you can adjust their settings and appearance. For example, for new figure We can change the type of stroke by selecting the stroke type in the settings panel - dotted.

Step 3
Go to the triangle layer and create a copy of this layer.

Standing on the copy layer with the triangle, go to Editing -Free transformation(Edit - Free Transform). In the settings panel, set the transform point as shown in the image below.

Then go to again Editing - Transform - Flip Vertical(Edit - Transform - Flip Vertical). Press Enter to make changes.

Activate the tool Rectangle(Rectangle Tool). In the settings, set the function " Subtract from Shape Area"(Subtract Front Shape). Then, standing on the inverted triangle layer, draw a rectangle that covers almost the entire area of the triangle, leaving only a small part at the base of the triangle.

Click on the "Path Operations" icon and select the action " Combine Components"(Merge Shape Components).

Activate the tool Arrow(Direct Selection Tool (A)). Using this tool, activate the upper anchor points of the trapezoid. Then go to Editing - Transforming - Scaling(Edit - Transform Points - Scale). While holding down the key combination Shift +Alt Zoom out the trapezoid a little. To apply the new scale, press Enter.

Reduce the fill of the trapezoid layer to 0%, and then in the settings add a stroke: stroke type - dotted; position - inside; size - 1 pt.
Now you have a nice template for a holiday flag that you can print. Thanks to the fact that we created a spine outlined with a dotted line, the flag can be easily hung on the tape by bending and gluing the spine!

Step 4
Now let's start filling out the checkbox. For this I will use the tool Horizontal text(Horizontal Type Tool) and the font “Sofia”. In the text settings, set the letter size to 150 pt and color # 399782 . Write the desired letter in the center of the circle. Instead of a letter, you can add some shape or symbol.

Merge all layers (except the background) into a single group. Duplicate this group. Now you can expand the copy group and make the necessary changes: replace the letter, select another pattern from the “Colored Paper” set, etc...
In the same way, you can create the required number of checkboxes with different symbols.

At this stage, you can already use the result for printing!
In addition, you can apply our work to various collages.
Step 5
Open the Fence texture in Photoshop. Activate the tool Frame(Crop Tool) and crop the texture to your liking. You can also postpone cropping until the final step and use the Crop Tool when the work is completely ready.

Standing on the wood texture layer, go to Image - Correction - Levels(Image - Adjustments - Levels). Change the Highlights slider to 245.

Select a tool Feather(Pen Tool). In the settings of this tool, set the drawing mode to “Path”. Draw a curve as shown in the example below.
If you need to adjust the shape of the curve, use the tool Arrow(Direct Selection Tool (A)).

Activate the tool Brush(Brush Tool). Set the following settings for the tool: size - 3 px, hardness - 100%, color - #f0f0ee.
Create a new layer on top of the background one, name this layer “Thread”. Then activate the tool Arrow(Direct Selection Tool (A)). Right-click on the previously created arc path. In the submenu that appears, select “ Stroke the outline"(Stroke Path), and set the stroke tool to "Brush". To remove the visibility of the outline, press Enter.

Now we will place our holiday flags on the string.
In order to do this, return to the document with the checkboxes and select all the groups. Then go to Layer - Duplicate Layers(Layer - Duplicate Layers). Move the copies of the groups into the wood grain document.
In order to make the work more comfortable, we will combine each group into a single layer. To do this, stand on one of the groups with a flag and go to Layer - Merge Layers(Layer - Merge Group ( Ctrl/Cmd+E)). Repeat the merge for each group.
When you get layers instead of groups, select all the layers with checkboxes and scale them ( Editing - Free Transform(Edit - Free Transform ( Ctrl/Cmd + T)). Change the size of the flags to your liking. To apply the transformation, press Enter.
Then you need to rotate each flag and place it on the string. To do this, also use the transformation ( Ctrl/Cmd + T)).

Step 6
Let's add a little volume. To do this we will use the Layer Style menu. Stand on the layer with the first flag and double-click on it with the left mouse button. Enter the settings as shown below:
Inner glow(Inner Glow)

Shadow(Drop Shadow)

Now the edge of the checkbox looks better:

Right-click on the layer to which we just applied layer styles. In the submenu that appears, use the function “ Copy Layer Style"(Copy Layer Style). Then select all the remaining layers with checkboxes, right-click on them again and select the function “ Paste Layer Style"(Paste Layer Style).

Using the menu Layer Style(Layer Style), add a shadow falling from the thread.

Merge all the checkbox layers into a single Flags group.

Step 7
Click on the "Create New Adjustment Layer" icon at the bottom of the Layers panel and add an adjustment layer Gradient map(Gradient Map).

In the gradient settings, set the colors to #bbb07 and #ffffff. Change the blend mode of the Gradient Map adjustment layer to Multiplication(Multiply), and lower the opacity to 20%.

Let's add another adjustment layer called Gradient(Gradient).In the settings, set the gradient type - radial, scale - 300, angle - 90, transition color from transparent - to # a7a297 - to # b3a78c.

Set the Blend Mode of the second adjustment layer to Linear dimmer(Linear Burn), and opacity (opacity) - 20%.

Step 8
Press the combination Ctrl / Cmd + click on the layer thumbnail with a checkbox to create a selection along the outline of the triangle.

Now hold down the key combination Ctrl +Shift + click on the next layer thumbnail with a checkbox in order to add another selection to the existing one.

Using a combination Ctrl +Shift + click Using the layer thumbnail, create a selection along the outline of all the checkboxes.

Create new group inside the Pennants group and name it Texture Overlay. Then click on the "Add Layer Mask" icon. As a result, a layer mask filled with black will be added to the group, and the previously selected area with checkboxes will be displayed in white.

Open the "Paper" image and place the texture inside the "Texture Overlay" group. As necessary, scale the texture so that it covers all the flags. Change the blending mode of the paper layer to Replacement with light(Lighten), and lower the opacity (opacity) to 50%.

Add an adjustment layer above the paper layer Levels(Levels).

In the midtone level settings, lower the value to 0.7, this will make the image more saturated.

Also, you can go back to the wood texture layer and adjust it a little using the tool Spot Healing Brush(Spot Healing Brush Tool). In the tool settings, set a round, soft brush with a size of 30 px. and hide areas that seem unnecessary to you. This step is optional.

This concludes my lesson! I hope you find it useful!
We also recommend
 New Year's goat costume for children
 DIY crafts for the New Year for school, kindergarten: diagrams, ideas, photos
 Methodological development in the German language on the topic "fashion"
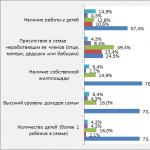 Material well-being Material need and material well-being
 Crocheting the edge: “crawfish step”, “picot” and “openwork” patterns
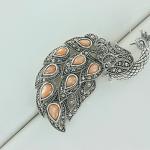 Magical and healing properties of marcasite Who is suitable according to their zodiac sign: compatibility in astrology