DIY brooch tie: master class with step-by-step comments and photos. How to make a frill tie from satin ribbons with your own hands step by step with photos Do-it-yourself women's tie from ribbons
Frill tie for girls from satin ribbons with your own hands. Master class with step by step photos.
Shabanova Marina Gennadievna, teacher primary classes, MBOU Sarasinskaya secondary school, Sarasa village, Altai district, Altai TerritoryDescription of material: this material will be useful to teachers, educators additional education, parents. The work can be done with middle and older children school age. Decorations self made exclusive and very popular. A frill tie using the modeling technique is easy to make; the product can be completed in one lesson.
Target: improving skills in working with satin ribbons.
Tasks:
Educational: to develop skills in making jewelry from satin ribbons.
Educational: develop attention, Creative skills And aesthetic taste, fine motor skills and eye.
Educational: cultivate a caring attitude towards work.
To work we need the following materials and tools:
- satin ribbon white 2.5 cm wide;
- satin ribbon 1cm wide with polka dots/any color;
- felt circle with a diameter of 4 cm;
- fastening;
- middle;
- lighter (candle);
- ruler;
- scissors;
- tweezers, clamp;
- thermo gun.

Labor safety rules when working with scissors:
1. Scissors should have blunt, rounded ends.
2. Work with well-adjusted and sharpened tools
3. Place the scissors with the rings facing you and the closed blades away from you.
4. Do not leave cutting tools open.
5. Watch the movements of the blades while cutting.
6. Pass the scissors rings forward, holding them by the closed ends.
7. Do not play with cutting instruments, do not bring them to your face.
8. When working with scissors, do not walk around the office. Work at a desk.
9. Use these tools only for their intended purpose.
Labor safety rules when working with candles, matches, and lighters:
1. Remove loose hair.
2. Do not lean low over the flame of a candle or match.
3. The candle should be in a glass or tin container.
4. Do not throw burnt matches into the trash can, but put them in glass or tin containers.
Labor safety rules when working with a heat gun:
1. Do not leave unattended.
2. When working, place the heat gun on the stand, and not lay it on its side.
3. Work only with a serviceable tool.
4. Do not touch the tip of the gun or handle the hot glue.
5. When finished, turn off.
The frill consists of two parts. Let's start with the top - an imitation bow.
Take three pieces of white satin ribbon 2.5 cm wide and 18 cm long.

We mark the middle on the segment and glue the edges (!), not reaching about 1 cm from the middle.

Glue the resulting parts together in this way.

For now, put the resulting workpiece aside and prepare pieces of satin ribbon of the following sizes:
- 6 pieces of white satin ribbon 2.5 cm wide and 8 cm long,
- 6 pieces of satin ribbon with polka dots, 1 cm wide and 8 cm long.

We place the polka dot ribbon on a white satin ribbon in the middle along the length, solder the edges using a lighter or over a candle fire.

Hot glue glue each piece together on the edge. We get 6 such details.

We begin to collect the bow. Glue a couple of loops onto a blank of white satin ribbons.

Then the second pair.

And the third pair.

Again, set aside the almost finished bow. We will make the second part of the frill.
we need:
- 1 piece of white satin ribbon 2.5 cm wide and 22 cm long;
- 12 pieces of white satin ribbon 2.5 cm wide and 9 cm long;
- 3 pieces of satin ribbon with polka dots, 1 cm wide and 9 cm long.

We solder three pieces of white satin ribbon and three pieces of polka dot ribbon along the edges with a lighter or over a candle fire.

We glue all prepared sections with hot glue along the edges.

Let's start assembly. We glue two loops of white satin ribbon to a piece of 22cm ribbon like this.

Glue the combined loop with a slight upward shift in the middle.

Again two white ones at an angle to the base.

There is a combined loop in the middle.

Glue three more loops in the same way.
How to sew a bow tie
|
For this bow tie you will need scraps: 50 x 13.5 cm (actual tie); 50 x2 cm (for fastener); 8 x 4 cm (cross section). And also a special set of “tie hooks” Fold the tie blank in half lengthwise, right to front, and stitch the edges together.
Turn right side out, iron, when ironing, move the seam from the fold by about 1 cm. Using an iron, mark the middle and one quarter of the length of the workpiece.
Fix the quarter line by stitching 1 cm from the edges
Form a bow, the cuts should overlap each other by 3 mm.
Sew along the center using a zig-zag stitch.
Form a fold and secure it hand stitches
Iron the blank for the fastener along the long sections by 0.5 cm, fold in half and stitch
Iron the blank for the transverse part on one side by 1 cm, and on the other by 0.5 cm, then bend the part in half lengthwise and iron it again, stitching is not necessary. You can use a fabric glue stick for temporary fixation.
From the received parts we assemble a bow tie. The hooks are secured with hand stitches.
Another variant: You can sew a bow tie from a wide satin ribbon (5 centimeters) or a strip of fabric. In addition, you will need contact (or “sticky”) tape. First you need to cut out a ribbon 35 centimeters long, 5 centimeters wide, fold it in half lengthwise, sew the edges and turn it inside out (photo 1). The result is a stitched strip measuring 34x2 centimeters.
Then you should sew up both ends of the strip, iron it and sew contact tape on them, so that the strip can be closed into a ring. After this you need to sew two more fabric strips- wide and narrow - directly for making the butterfly itself. Dimensions wide - 23x4 cm, narrow - 7x1.5 cm (photo 2). In order to sew a bow tie, a wide strip of fabric intended for its manufacture should also be sewn into a ring (photo 3).
Then you need to fold the future bow so that the seam is in the back in the middle and sew it together, forming folds (photos 4a and 4b).
On final stage you need to sew a bow to the main, long strip, and a short narrow strip should be grabbed across the bow (photos 5 and 6). Like this simple instructions how to sew a bow tie. |


How to change a tie into a bow tie
A bow tie counts stylish accessory, a fun decoration, and also a cute gift. Just choose suitable fabric and start sewing. Today we will make a “false” bow tie from a regular tie - you don’t need to know how to tie such a bow tie, just fasten it around your neck.
So, you will need:
- tie of the color you want;
- black elastic band (about 20 cm long, 15 mm wide) or Velcro tape - 20 cm;
- scissors;
- matching threads.
Yandex.Direct
| Business ideas and proposals Search for partners, ideas and proposals. Business contact service, all over the world. businesspartner.ru | Radio Online Listening to radio online is easy! The best radio stations - live broadcast! tipatop.ru | The secret of the richest people in the world! 5 commandments of a private investor. How do they make 300-1000% per year? academyprivateinvestment.com |
1. Open the tie at the widest part. It usually includes a main and lining fabric, as well as a special thick interfacing that gives the tie its density.
2. Cut out 2 squares of 10*10 cm from the main and lining fabric. Don't forget the seam allowance - 1 cm.
3. Cut an identical piece from thick fabric where there are no seam allowances.
4. Place two squares right sides together. Sew along a pair of opposite corners (distance from corner 8 cm). Do not grind down the remaining couple of corners - a butterfly detail will form through them. Unscrew and insert the gasket.
5. Fold the corners with the holes to the wrong side of the butterfly and secure with a few stitches by hand.
6. Open out a strip of main fabric 11cm*4cm, finished width - 2cm. Gather the butterfly piece in the middle with even folds, fasten through stitches, wrap it twice with a strip of main fabric, and then fasten it manually from the wrong side.
7. Fold the corners of the butterfly inside out, about 3 cm wide, and secure with a few neat stitches.
8. From the main fabric, cut out a strip of 22 cm * 3 cm, the finished width is 1.5 cm.
9. Hand sew the butterfly to the middle of the strip. Sew an elastic band the size of the shirt collar to the free ends of this strip. Attach hooks to the ends of the elastic. Instead of elastic and crochet, you can use Velcro tape.
The husband does not wear a tie left over from gala event or is the accessory out of fashion?
Don't rush to throw it away useful thing– will turn it into a stylish brooch! Using this master class, make your own decoration from men's tie for yourself beloved! An original brooch will decorate the lapel of a jacket, coat, raincoat, hat or large textile bag. A fashionable new thing will suit a lady of any age and style, it all depends on the finishing decor of the designer item.
Preparation of materials and tools
For work, take the following materials and tools:
- Men's Tie;
- brooch holder;
- beads;
- chain;
- sewing threads in the color of the tie;
- needles and pins for hand sewing;
- scissors.

Master class on making a brooch from a tie
Clean out your closet and find ties that are taking up scarce space. If you find unnecessary jeans while cleaning, then set them aside to make and sew.
Ask permission to confiscate the item you like from the owner and start making women's jewelry from a man's tie.
Untie and carefully inspect the accessory. If it seems even a little dirty to you, wash and iron it. In case the iron does not have special sole and delicate ironing functions, iron through damp cotton cloth.

About 10 centimeters from the wide end, make the first fold at an angle of about 45 degrees. Some products have a label sewn on the back that needs to be peeled off.

Wrap the first loop, trying to keep it symmetrical. Secure the loop with a sewing pin.

In the same way, fold the second loop in the other direction from the wide end. Pull double thread through a hand sewing needle and use random stitches to sew both loops to the wide end. Keep the stitches on the front side of a man's tie small so that they are not noticeable and the decoration looks neat.

Fold and sew one small loop between the two loops.

Form the next two loops into a circle.

From the remaining length of the tie, add another loop and leave the narrow end open. Secure the decoration by stitching with thread.

On the reverse side, sew all protruding lines and folds.

Decorate the middle of a man's tie with beads. Sew them in an oval shape, imitating a buckle.

For added strength and to even out the outline, use a needle to pass the double thread through the beads several times, pulling slightly. Fasten the end of the thread to the wrong side of the brooch.


Take the almost finished jewelry in your hands and, after twirling it, decide how you will wear it. Additionally, decorate with a small piece of chain, sewing it near the beads so that it hangs beautifully.

Attach a suitable clasp to the back side. You can also use a standard shaped pin.

The unusual brooch is ready! Stylish women's jewelry made from a men's tie, made with your own hands, looks very beautiful. No one will guess that an old accessory is taken as the basis; they will rather think that the needlewoman worked for a long time on the craft, wanting to get an item, a brooch, similar to a man’s wardrobe item.

Brooches with bright and contrasting designs, polka dots, stripes, and plain ones look original. Laying out loops and pleats to your liking, using various accessories for decoration, you will create your own unique decoration.
If you have time, check out various materials. Stylish things can be made from ribbons, leather, plastic suede, polymer clay. They are always unique and attract attention.
Today, school ties for girls are gaining more and more popularity. Such jewelry can be considered brooches. They look incredibly beautiful with black and white school uniform, and themselves are usually executed in the same color scheme. To turn a plain white blouse into a party wear for your first or last call, you just need to decorate it with a tie, like the one shown in this tutorial.
What is needed to create an accessory

Ribbons for creating a tie
For the ponytail, prepare:
- white grosgrain ribbon 4 cm – stripes 30 cm and 25 cm;
- black grosgrain ribbon 2.5 cm - strip 30 cm;
- black lace 2 cm – strip 25 cm.
For the bow:
- white grosgrain ribbon 4 cm - stripes 26 cm, 24 cm (2 pieces), 22 cm and 18 cm;
- black grosgrain ribbon 2.5 cm – stripes 24 cm (2 pieces);
- black lace 2 cm – strip 18 cm;
- a stone and a base for it or a camellia - to decorate the middle of the brooch;
- a pin and a strip of felt 2 cm by 3 cm.
How to make a school tie-brooch from ribbons step by step:


This tie measures 12 cm by 17 cm. To prevent the accessory from being too heavy, it is better to use a lightweight center.
Shared master class
Svetlana Sorokina
We also recommend
 Four beautiful DIY hair ties - master classes for fashionistas and their mothers Homemade hair ties
 Sometimes you really need to be supported...
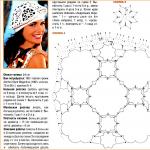 Several options for knitting a beret for beginners
 Men's dark gray noble vest
 We sew cool pillows: step-by-step master classes
 We sew a simple nightgown for beginners: everyone can do it!