Volumetric number 1. Bright numbers made from napkins with your own hands and cool ways to decorate them
And the attributes for decorating the room have been prepared. But how can we emphasize that this is the first anniversary? And not just a celebration, dedicated to a child. Here the number 1 will come to the rescue. Moreover, it can be used in decoration in the most unexpected way. But large decorative numbers look especially interesting. We will teach you how to make a birthday card with your own hands.
Let everyone around you at the party just shout that today is your baby’s first birthday. And not only themed decorations, outfits, and treats will help with this. But also the number 1, which can be used in various ways:
- Be sure to add the words “I’m 1 year old” to your holiday garland. Let guests see from the threshold what the holiday is dedicated to.
- It's fun to make hanging garlands with numbers. Decorate each unit in accordance with the chosen theme.
- To decorate dishes, sweets, drinks, use toppers with a picture or in the form of a single.
- Lay out the unit on the wall with balls, bows, or make such a decoration out of paper.
- The photo zone must have a volumetric or flat number, which will later remind you of when the photographs were taken.
And most importantly, a large decorative number, which will practically become the central attribute of the name day. It can be miniature or huge, flat or voluminous.
This decor can be easily ordered or bought ready-made. But a do-it-yourself number for your 1st birthday will look much more interesting. Indeed, in this case, you can take into account the chosen theme, the baby’s outfit, and the size of the room.
And most importantly, preparing for any holiday brings relatives closer and gives it special significance.
DIY birthday number 1 made from balloons
Kids just love it air balloons. Even very little ones are delighted with the decor made from balloons.
Moreover, making the number 1 for a birthday from balloons is quite simple.
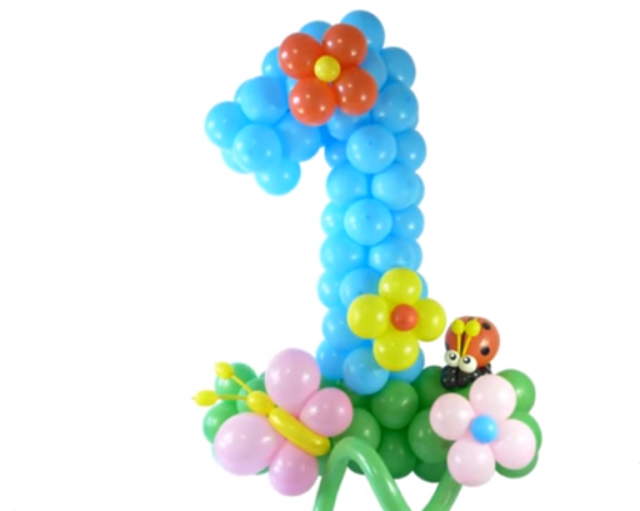
We offer a master class on making the number 1 from multi-colored balls.
We will prepare all the necessary materials and tools. We will need blue balls up to 10 cm in diameter in the amount of 52 pieces. and 36 green ones of the same size. But it is better to buy balloons with a reserve in case something goes wrong.
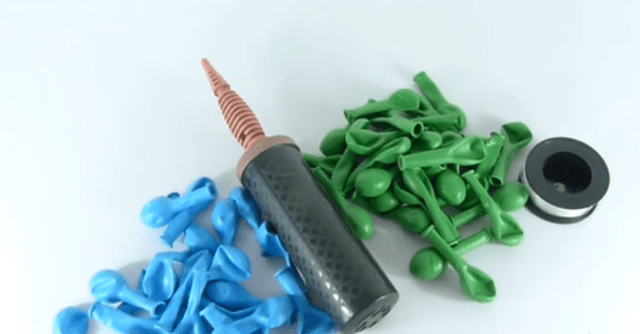
To inflate such a number of balloons, it is better to use the simplest pump. This will speed up the process significantly. We will tie the blanks together using fishing line.
We begin the process of making a unit with preparation basic elements. Each segment will consist of 4 balls.
To do this, fill the balloons with air using a hand pump. At the same time, we control the size of the balls. We tie each ball.

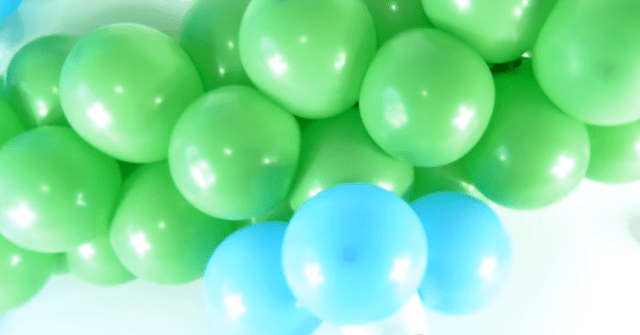
Take 2 balls of the same color and tie them together. Let's make another one like this. We connect the two finished pieces together by twisting them. We've got the basic segment of the craft.

We make the green segment in the same way.

In total, you need to make 9 green segments and 13 blue “fours”.

Let's start making the base of the unit from green balls. We fix the fishing line on the first segment, wrapping it several times between the balls. Now we press the next green segment to it and secure it with fishing line. In this way we connect all the green “fours” with each other.

We cut the fishing line and tie the remaining tail around the balls several times and hide it.

We have the base of the number 1.

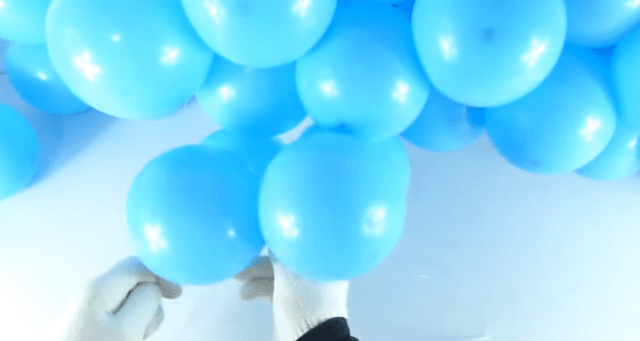
We tie a fishing line to the center of the green clearing and begin to attach the blue segments. They will go vertical. In total we will attach 10 blue segments.
From the remaining three “fours” we make the nose of the ones. To do this, we will attach the segments to the side of the vertical part. When we connect all the segments, we pull the edge of the spout to the vertical part. We cut the fishing line, tie it and hide the edge between the balls.
Our unit is ready. If desired, you can decorate it with balls of a different color, from which you can easily make a butterfly, flowers, or ladybug.

In the same way, you can make numbers in a different design.
Sizes, patterns, decoration options for flat number 1 for birthday
Flat units look original and can be placed on the wall, curtains, simply resting against other decorative elements.

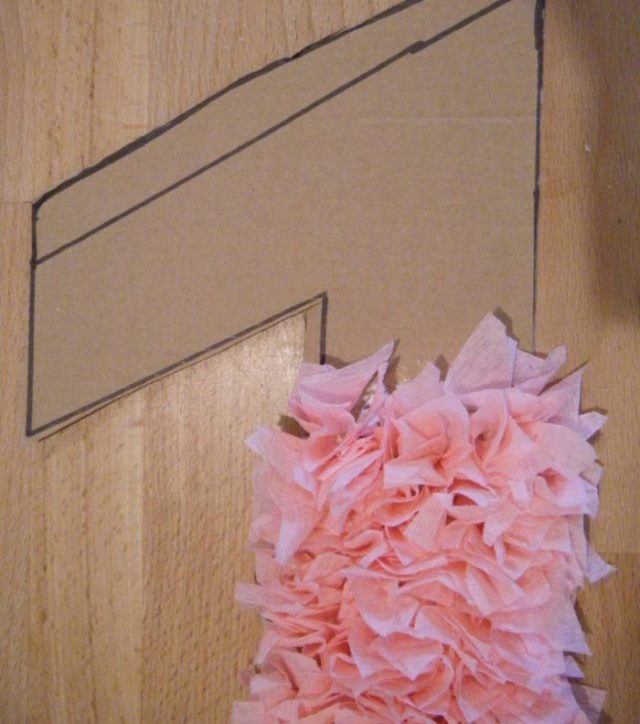
It is enough to decide on the size and height of the workpiece and make a template from paper.
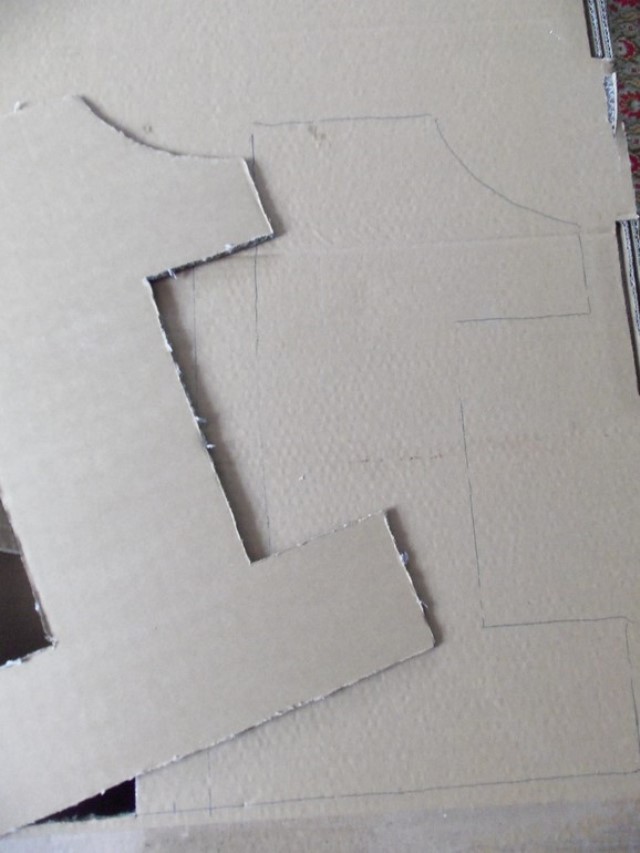
We transfer the finished template onto a cardboard base and trace the outlines with a pencil. Cut out the number along the outline.
The cardboard blank for the festive unit is ready. You can decorate such a blank with anything you like, choosing the design and material to match the overall style of the holiday.
The easiest way to decorate a flat number is to use twine or multi-colored threads, corrugated or colored paper, bright fabric or floral film, flowers or napkins.
These materials are used to wrap or paste over the base.
To give the decoration additional volume, the base is decorated with voluminous flowers, pompoms, and bows.
Volumetric figure 1 from cardboard for birthday
But a volumetric figure will look much more interesting. Her birthday boy will be able to rearrange and play with her. Such a voluminous unit will fit perfectly into a photo zone and into the design of a room or garden area.
To make it, you can use thick foam. But if such material is not at hand, the blank can be easily made from ordinary cardboard.
Even if you don't have large boxes, you can glue the base together from several parts. First, we make two templates for the unit itself.
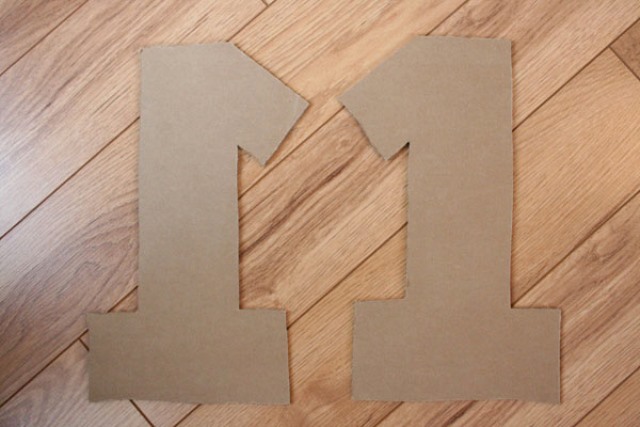
We cut out the side parts and the base of the number to size.
We connect the blanks together with tape.

The result should be a three-dimensional cardboard figure like this.
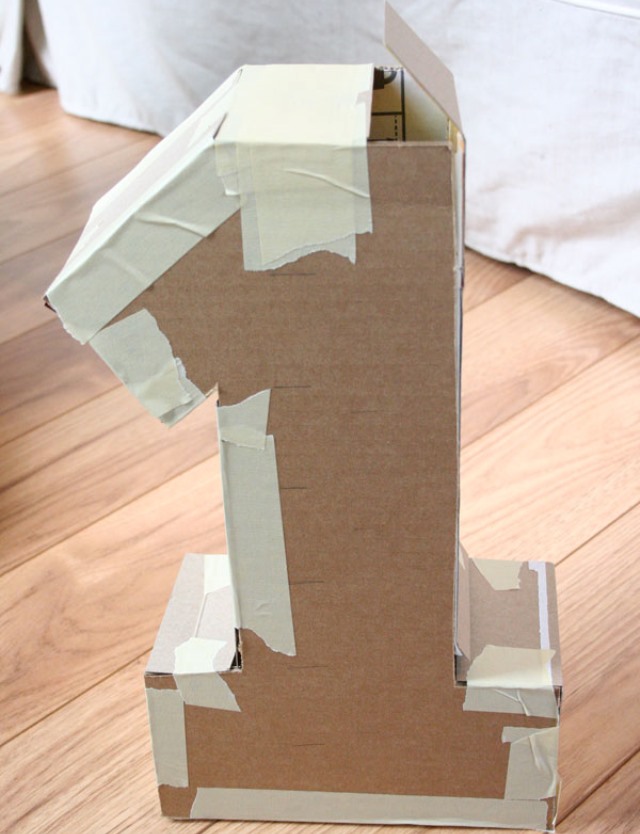
Don't be upset that she isn't too pretty.
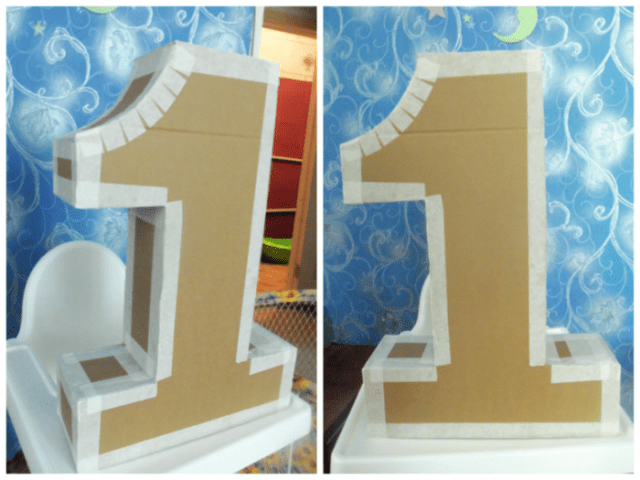
All flaws and irregularities will be securely hidden under decorative elements. You can decorate such a base with paper umbrellas and flowers, fringe and photographs, felt and thread.
How to decorate one for a birthday
We offer several original options DIY number 1 decorations from scrap materials. Save these master classes for yourself - they will definitely come in handy for decorating three-dimensional figures for other children's parties.
Number 1 in eco-style made of twine and threads
A very simple option for decorating a flat piece. We will need regular twine and glue.

Gradually apply glue to the cardboard. Wrap the treated area with twine. You can make neat turns, or you can slightly change the angle of inclination. When you have wrapped the glued area, apply glue higher and continue winding the twine.
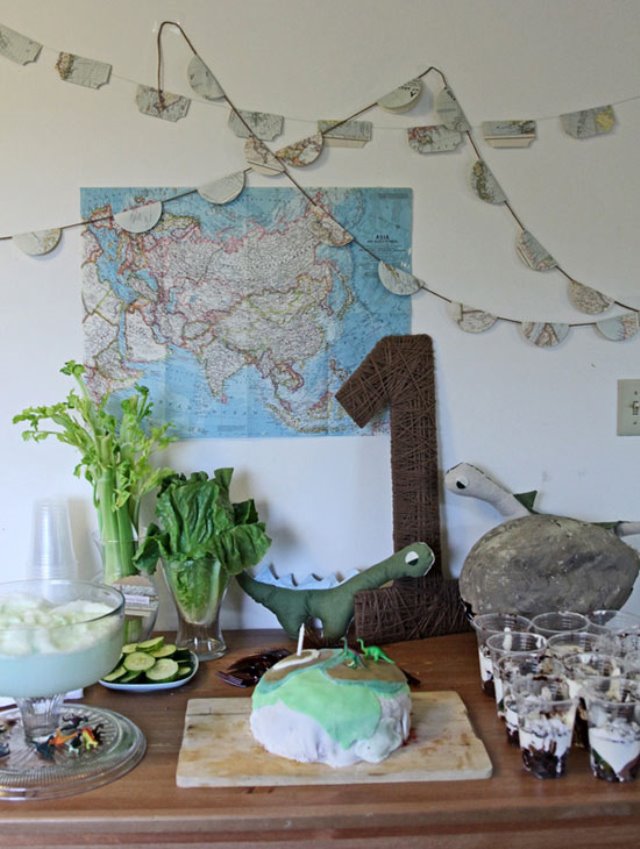
When you have wrapped the entire piece, leave the number to dry. Almost one is ready. But if desired, the twine can be painted with acrylic paints or decorative elements can be added.
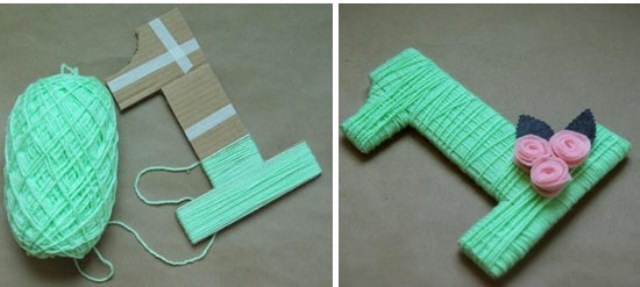
But you can initially use not twine, but bright threads with which we will wrap the cardboard blank.
Number 1 from napkins for a boy's birthday
Make the fluffiest birthday number for your little one.
This will require colorful napkins, a lot of napkins and patience. But the result is worth it.
This decor will be much cheaper than ready-made figures.

We buy several packages of blue or blue plain napkins.
If you want to dilute the blue background with white flowers, purchase napkins of the appropriate color. The numbers with a smooth color transition look very cool. In this case, you will need napkins in blue, light blue, sky and white.
To make napkin flowers, it is better to take single-layer napkins. Without unfolding, fold the napkin twice. It is not necessary to cut the squares; in the future, all folds will be cut off. We fasten the workpiece in the middle with a stapler. You can use regular wire to secure the base of the flower.
Now cut the square to the size of the flower to make an even circle.

We carefully collect the first layer of the napkin upward, forming flower petals. We perform this operation with each subsequent layer. Once you have lifted all the layers, spread out all the petals.

If you want to make a more magnificent flower, take two napkins. You can also cut the round blank into several petals without cutting to the base.
We decorate a cardboard blank with ready-made flowers. It is better to do this with glue in a gun.

After pasting with napkin flowers, you get a beautiful lush number 1.
Number 1 for a girl's birthday made of corrugated paper
Roses from corrugated paper look great. A number decorated with such flowers will become chic decoration anniversary You can get creative, experiment with the color and arrangement of multi-colored flowers, or just make a single-color unit.

You will need quite a lot of corrugated paper, and also time to make a lot of blank flowers.

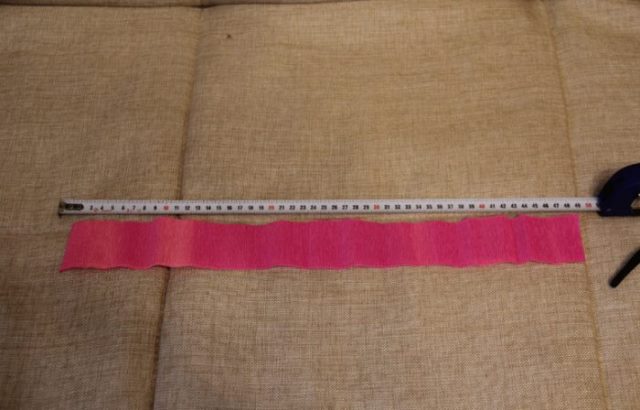
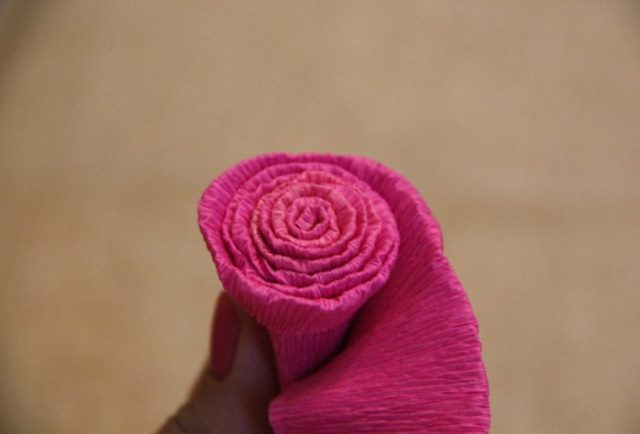
Unfold the paper and cut strips from it. The folds on the workpiece should be located across. The width of such a blank will be 3.5 cm. But decide on the length yourself. It can be 20 or 50 cm. The longer the strip, the more magnificent the rose will be.
We slightly stretch one side of the strip and bend its edge. By stretching the folds you should get beautiful waves.

We bend the edge and form a curl.

We begin to collect the flower itself, for which, holding the edge, we begin to twist a strip of paper around the base.

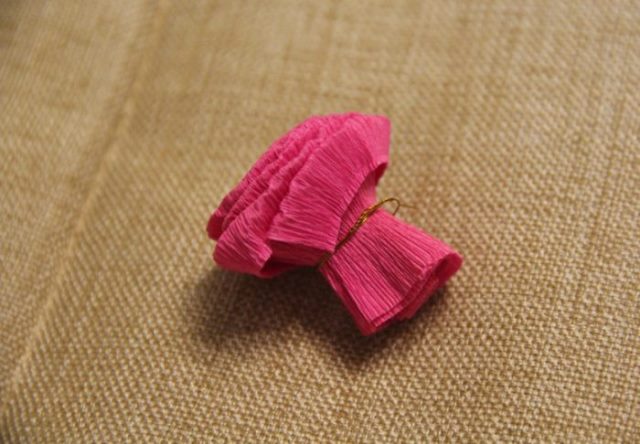
When the entire strip is folded, the bottom of the flower must be secured with an elastic band or thread.
The first rose is ready. But you need to make another 50, 100, 300 flowers.
We cover the cardboard base of the number with paper.

This will help hide possible gaps that may occur during gluing.

Glue the finished flowers to the base using PVA glue or a hot glue gun.

The result is a beautiful decorative piece that will invariably please the birthday girl.
Other uses for corrugated paper
Don't have the time or desire to tinker with corrugated paper roses? Take advantage of simpler ways to decorate a unit using it.

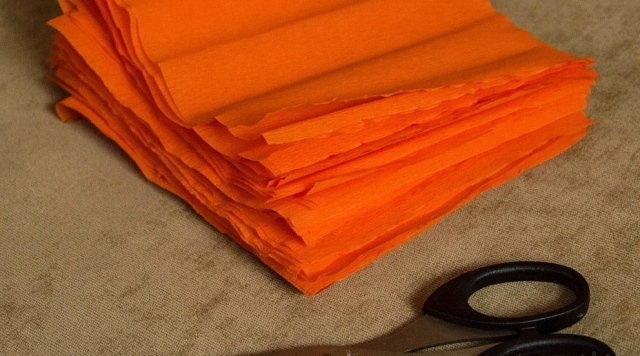
It is enough to cut multi-colored corrugated paper into squares.

To do this, we fold the blank strips several times and cut them along the resulting folds.

We will get a lot of corrugated squares.
Lubricate the cardboard base with glue. We take a pencil and wrap it in corrugated paper so that the rod is in the center.
All that remains is to dip the bottom of the flower in glue and attach it to the base, straighten the petal edges.
Gradually we cover all the walls of the cardboard blank. Try to ensure that the petals cover the entire surface of the number.
But there is a much simpler way.
We cut long strips of corrugated paper of different colors. We make cuts along the edge of each strip to create a fringe.
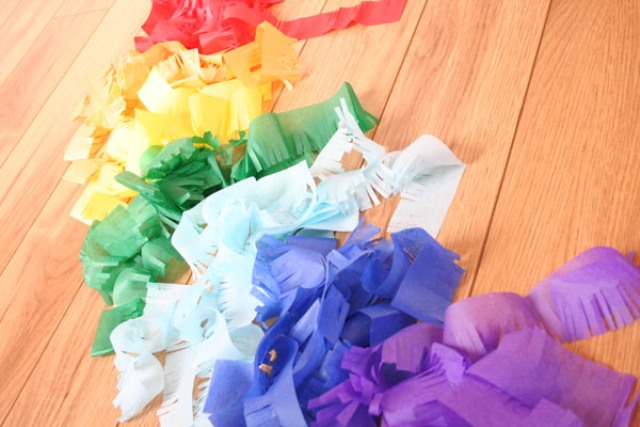
We begin to paste over the cardboard unit from below. Glue the first strip of fringe by applying glue to the entire part of the strip.

Stepping back a little, glue the next strip. Make sure that the next fringe overlaps an entire section of the previous one.

We continue to paste over the entire surface of the unit, changing the color of the stripes.
Birthday number 1 made from pompoms
If you have a lot of colorful ones at home wool threads, you can use them to decorate the number 1. Only this time we will not wrap a cardboard blank, but make pompoms from threads.
We will need two rings that must be exactly the same size. They can be cut out of thick cardboard. 
Put these rings together. We gradually wrap the rings with thread. You can take a single-color thread or threads of different colors.

When the entire ring is covered with threads, cut the threads along the outer edge of the circle. At this stage you need to be especially careful so that the workpiece does not crumble.
We tie all the threads with additional thread, slightly moving the rings apart. Remove the cardboard rings and shake the resulting pompom thoroughly.

We make enough pom-poms from threads to cover the entire unit. In this way you can decorate both flat and volumetric figures.
Video: Birthday item made from balloons
You can learn in detail about all the stages of making the number 1 from balloons in the video:
- cardboard (preferably a large box) household appliances);
- regular tape;
- paper napkins of the desired color;
- stapler;
- glue.
Your baby is already 1 year old and his first birthday should be memorable. Dress up the room for the holiday and for a photo shoot. An excellent solution would be to make an elegant item from napkins.

If you try, you can make one out of napkins with your own hands. For this you will need cardboard, glue, several packs of napkins of different colors, and masking tape.

We make a blank for our unit from cardboard. Its sizes can be different, depending on what effect you want to achieve.

You can, of course, make the figure flat and attach it to the wall; this will be suitable for a photo shoot.

But a volumetric figure looks much more impressive. But to do this, we need to give our unit volume by gluing it together with masking tape. As a result, you should end up with something like this.

Now let's start making flowers from napkins. You need to fold the napkin several times and fasten it in the middle with a stapler. Next, cut out a circle from a folded napkin. Each layer of our napkin flower needs to be trimmed a little along the edge, no more than 3 millimeters. Now each layer of the napkin needs to be lifted and slightly flattened, leaving the lowest layer flat for gluing.

Next you need to paint the layers so that you get a flower. Now all that remains is to glue the flowers onto our unit frame, all around the perimeter, except for the bottom of course. Now the number is ready. The piece turns out to be light, voluminous and very beautiful.

To make the number 1 from napkins for your daughter or son’s name day, you must first cut out a frame from cardboard. I advise you to use several colors of napkins - it will turn out more beautiful.
When you cut out the frame, tear the napkins into small pieces, mark on the box where to glue which color and use PVA (or better yet, use a liquid gun) to glue the napkins to the cardboard. This way you can create something like this:


A voluminous figure made from napkins can be an ideal solution for a children's party. Its production will cost very little, you will only need cardboard (you can take a box from household appliances), tape, double-sided tape, and several packs of disposable paper napkins. In this video you can watch the entire process of making this original decoration.
There are many interesting things you can do for your baby’s anniversary. So, for example, you can make a very beautiful, voluminous and elegantly decorated number just by using ordinary napkins of different colors as decor.
First make a template like this out of cardboard:


Now, using glue, attach the flowers to the number like this:

Number 1 from napkins is simple to make, but takes a long time. You can make a flat base of the unit from cardboard and paste it with flowers from napkins, or you can make it three-dimensional and paste it on all sides.
For our child's first birthday, my husband and I made a three-dimensional figure for a photo shoot and decoration of a candy bar.

Our little one went through a photo shoot in the studio, a photo shoot on the street and eventually decorated the sweet table.
The base was made of corrugated cardboard. For stability, several layers of cardboard were added to the base, plus cylindrical stiffening ribs inside so that the number would not sag when pressed. For ease of carrying, a small hole was cut in the back.
All cardboard parts were glued together with a hot-melt gun. Then they covered it with straightened napkins so that the cardboard did not show through between the flowers. Flowers were made from napkins in the simplest way, as in this video:
In order not to spend a lot of money on buying a variety of decorations for your one-year-old child’s birthday, you can do everything using napkins. To do this, you just need a few packs of multi-colored napkins + glue and a little time and effort.
You should end up with a figure like this:
First you need to create a strong frame for the number 1 from cardboard. You can make the figure three-dimensional or flat.


In any version, the figure will look solemn.
Then, from napkins we make small flowers, which we will later glue onto the cardboard with the core.
To make a flower, you need to fold the napkin several times to make a square. Next, we fasten the napkin in the center using a stapler. We cut out the circle so that the connection of the bracket is in the center. We separate the petals and glue the numbers onto the cardboard blank.


You can also experiment a little with multi-colored napkins to make the number more colorful.

The first birthday in life is a very important event, primarily for mom and dad.
And you want your baby to have a beautiful cake, and to decorate the table with the room, and to dress up the birthday boy himself beautifully, so that everything is remembered and all the shots turn out successful.
One of the most popular decorative elements for a first birthday is a three-dimensional unit.
It can be easily made at home using available materials.
In order for a three-dimensional one for a year to turn out beautiful, we only need cardboard boxes, colored napkins, a furniture stapler, scissors, and tape.
First, we’ll make the frame of the unit out of cardboard.
To do this, we need to draw and cut out 2 units, then connect them with a strip of cardboard, which will give thickness, and fasten everything with adhesive tape.
For decoration, units need to be made a large number of pompoms from napkins.
This is easy to do using the photo diagram below.
That's it, a one-year-old baby, bright and beautiful, ready!


Enough original decoration for a children's party in the form of the number one. In order to make it you need cardboard for the frame and napkins, a lot of napkins and glue. Need to do beautiful flowers and stick them on the frame.
The creation process can be viewed in the video.
How to make number 1 for a one year old from napkins - step by step instructions

Necessary materials:
Manufacturing:

Children's birthday is the biggest holiday for parents. Preparations for the celebration of this occasion begin several months in advance, because the menu, outfit and home decorations must be thought out to the smallest detail. In this article we will tell you how to make your own holiday number indicating the age of a child for his birthday.
The festive number is the main photo zone, near which all the guests you invite will be photographed together with the baby. Therefore, you need to try to make her the center of attention.
As a rule, two options for digit sizes are used:
- Large - corresponding to the height of the birthday boy or above him
- Compact - products that can be placed on the table with sweets and photographs of a child celebrating a birthday
Based on the area of the room in which your family plans to celebrate the celebration, you need to calculate the dimensions of the future decoration. There are no restrictions in this matter. In this article we will tell you in detail how and what to make large numbers from.
DIY frames for large numbers for birthdays
To make a number for your baby’s birthday, you first need to find a durable and reliable material from which the frame of the future product will be made. We recommend using for this purpose:
- Thick cardboard (from old boxes)

- Styrofoam

- Thick wire

Of course, if you are proficient in the art of wood carving or know how to weld metal products in the shape of numbers, you can use your talents and make a unique frame for decoration.
DIY flat birthday numbers
If, according to your idea, the number should be flat so that it can be hung on the wall, then you can cut out a blank from thick cardboard and then decorate it beautifully.

However, cardboard tends to wrinkle. If this is for you important point, then to make a flat number it is better to use plastic or chipboard. Draw the outline of the product on them with a regular marker, and then cut it out with special scissors.
Do-it-yourself volumetric numbers for a birthday
Most best option To make a three-dimensional figure with your own hands, use thick foam plastic. You just need to draw an outline on it and then cut it out using a special cutting tool with heated nichrome thread. Why is it important to use it? Because polystyrene foam tends to crumble if not handled correctly.

You can add volume to the figure using ordinary cardboard, but here you will have to remember the basics of drawing in order to correctly calculate the dimensions of each part of the product, then carefully cut them out and glue them together with tape.
Wire is also used to create three-dimensional figures. It creates a frame, which is then very easy to attach Balloons. They will create volume for the decoration and will look very bright at a children's party.
DIY birthday number decoration
Making an original decoration for a holiday number is not at all difficult. You can create an extraordinary product from any stationery material and decorative elements.

We will present a few of the most simple ways making decor for numbers for a child’s birthday.
Decor of numbers from napkins for a birthday
Napkins are the most affordable material for work. Even if you plan to make a large number, you will not spend much financially on purchasing such material. In addition, napkins are easy to work with - they quickly stick together and are simply cut and stitched.

For example, you can make flowers from napkins:
- To make one such flower you will need one napkin, folded in half.
- Its middle must either be stitched with thread or secured with a stapler
- You will end up with a square from which you need to make a circle using regular scissors
- When you trim the edges of the square, you will see a flower blank consisting of many thin paper layers
- Each layer, except the last one (glue will be applied to it), needs to be lifted up one after another, slightly fluffing
Decor paper numbers for birthday
You can make several options from any decorative and corrugated paper beautiful jewelry for holiday numbers:
- Roses

- Cut strips of paper of the same length and width.
- Fold the top edge of each strip slightly (by 5-7 mm).
- Then take the regular one ballpoint pen or a simple pencil and begin to wind the blank onto it, forming a rosebud.
- When it is ready, tie its base with thread or decorative wire, and sprinkle the petals with sparkles or paste them with rhinestones.
- Chrysanthemums

- Roll several layers of thin decorative paper into an accordion shape.
- Then cut the ends of the resulting accordion into a semicircle or an acute angle, and tie its middle tightly with thread or decorative wire.
- After this, each layer of paper that you used on the right and left sides of the accordion needs to be fluffed so that you end up with such a beautiful chrysanthemum, as shown in the photo.
- Fringe

- Cut out long rectangles from paper
- Cut the lower part with fringe, fluff it up, and glue the numbers to the frame with the even part
- Despite the fact that the preparations are made quite quickly, it will take a lot of time to decorate the holiday decorations
Decor cardboard numbers for birthday
Cardboard is a material that allows you to make three-dimensional decor from it for a future figure. You can cut beautiful butterflies from it different sizes, soccer balls, bows, hearts, cartoon characters, fairy-tale heroes and so on.

The image will depend on your child's preferences and interests.
Decor numbers from photos for a birthday
This method of decoration will look best on a flat number. You will need to prepare bright family photos with the birthday boy and glue them beautifully to the base using quick-drying glue.

From photographs you will create an original and touching decoration, looking at which you will be filled with pleasant memories associated with the growth and development of your child.
Ideas for decorating numbers for a birthday with your own hands
We have selected ideas for decorating holiday numbers for each year of a child’s life. By the way, you can also use these decoration options to decorate an adult’s holiday. Each technique will be described using one of the ten numbers as an example. You can use any technique you like on any number.
DIY number 1 for birthday
To celebrate the baby's first year of life, you can make a large but flat number from corrugated cardboard. We suggest decorating it with knitting threads of any color. If you do DIY number for a boy's birthday, it is better to use blue or turquoise threads.

How this decor is made:
- You need to wrap the base of the product very tightly with threads, first in a horizontal direction and then in a vertical direction.
- To avoid visible gaps, we recommend making a multilayer winding.
- If you know how to knit, then you can make a number knitted flowers and leaves. They will decorate the product and make it brighter.
DIY number 2 for birthday
Using the same principle, you can make decor from bright wide ribbons. To make them hold tighter, we recommend lubricating the base with PVA glue in advance.

You can use old beads or seed beads as additional decoration. You can tie bows from the same ribbons and also attach them to a festive ribbon.
DIY number 3 for birthday
Homemade numbers decorated with artificial or fresh flowers look gorgeous. This option numbers are suitable for decorating a girl’s birthday.

DIY number 4 for birthday
If you know how to sew, then you will really like the idea of creating a festive number from felt.

What is needed to make such a figure:
- Plain paper frame numbers
- Cotton wool or foam rubber, which must be glued to the paper base using PVA glue
- Felt of different colors for covering the number blank and making additional decorative elements
DIY number 5 for birthday
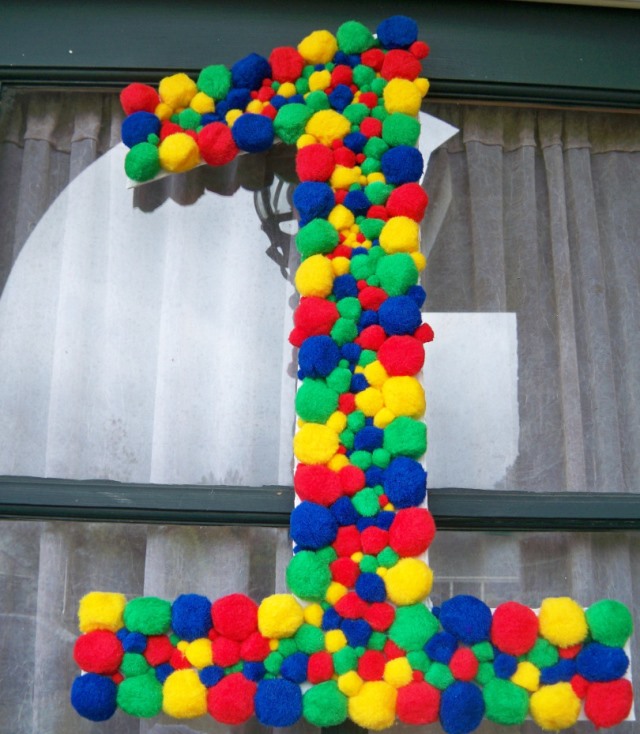
You can make fluffy pompoms from multi-colored bows, which can be purchased at any fabric or craft store. Using quick-drying glue, they need to be glued tightly to each other onto a flat or three-dimensional figure. The product will be bright and soft.

Each pompom can be starched and sprinkled with glitter in advance.
DIY number 6 for birthday
Fans of the decoupage technique will be able to use it to make a festive number for their child’s long-awaited name day.
- The first thing you need to do is prepare a three-dimensional frame and apply plain paint to it.
- Then glue the cut-out drawing to the number, apply acrylic paint on top, wait until the product dries and cover everything with colorless varnish.

If you want, you can match this figure with three-dimensional decorative elements - flowers, children's toys. It is better to attach them with a glue gun.
DIY number 7 for birthday
Balloons are a symbol of celebration, fun and good mood! You can not only decorate your house with them by hanging them in the corners of the rooms, but with their help you can make a bright three-dimensional number for a child’s birthday. Take a wire frame as a base and inflate balloons of the required size and color, and then attach them to the base. Just pre-prepare “primitives” - small strings of balls, consisting of 4-5 pieces. Then it will be very easy to braid the frame with them.

You can also attach other products to the balloon figure. For example, if your number is an imitation of a beautiful cloud, then you can attach a sun or a flower meadow, also made of balloons, to it.
DIY number 8 for birthday
Candy is a favorite sweet for all kids. Therefore, your child will be very happy if he sees a number made from his favorite candies at his party. Of course, a considerable number of them will be required, so significant costs will have to be incurred.

Candies directly in candy wrappers need to be attached to the base with quick-drying glue in any order. Due to the shiny packaging of sweets, the overall product will look very bright.
DIY number 9 for birthday
Very wide popularity in Lately We purchased Mexican piñatas - surprise toys. Using this technique you can also make a number for your birthday:
- Prepare the base of the number from papier-mâché;
- Pour a lot of goodies inside and festive tinsel– cookies, sweets, chocolates, streamers, confetti;
- Decorate the outside of the piñata with paper fringe.

At the end of the birthday celebration, invite the birthday person to hit the number with a heavy stick - the piñata will burst and surprises for the guests will fall out of it. This whole process will give children many unforgettable emotions.
Number 10 with hands for birthday
Original flowers for decorating the holiday number can be made not only from paper or napkins, but also from plastic bags.

To make the product the same as in the picture, you need to twist the bags into tubes, which in appearance will resemble the buds of unopened roses. In this form, using a stapler or glue gun, they can be attached to a flat or three-dimensional figure.
Video: Volumetric numbers for a birthday
In this video, we invite you to watch a master class in which the needlewoman shows step by step how to make an elegant number for a child’s birthday with her own hands.
15 comments
Master class “One for the first birthday”
In March, we were not the only ones who celebrated our one year anniversary:) Our fiancé, Daniil, also celebrated his first birthday, and his mother, Tatyana Vasilenko, creatively approached the organization of this event.
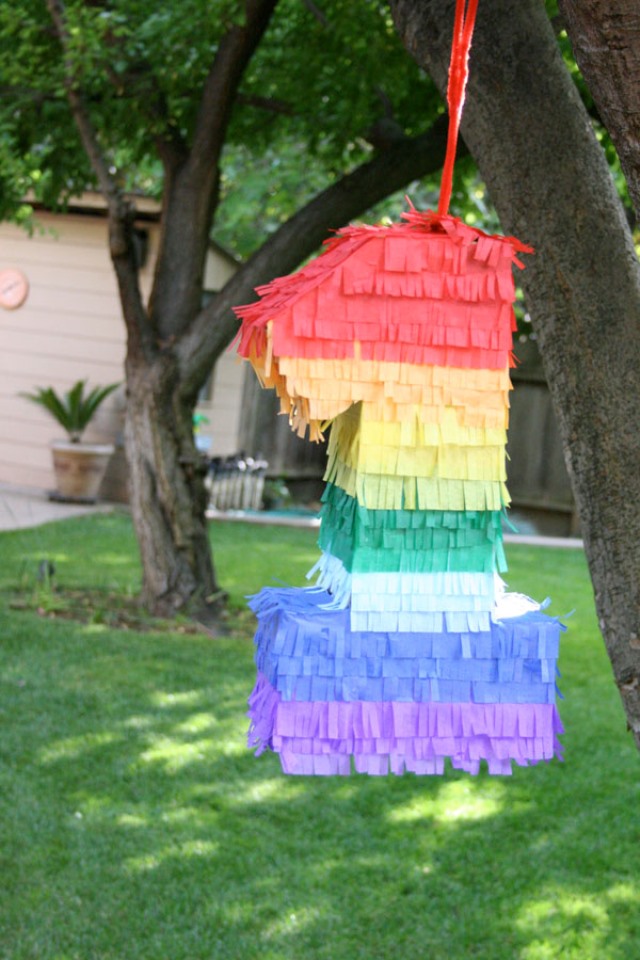
A month before the celebration, she, together with Dani’s dad, scrupulously tinkered rainbow one for the upcoming photo session and is happy to share with us master class for its manufacture! I give her the floor :)
The birth of a child is a particularly important moment in the life of any family. And the first year of his life leaves the most unforgettable memories: the first smile, the first “aha”, the first tooth, the first steps and first birthday…
I was waiting for this one first birthday, like the day when Danechka is born. I wanted to capture in my memory, and in holiday photographs, the special significance first year! And so, I decided to make a symbolic decor, in the form pieces of paper flowers.
For manufacturing units You will need:
- Graph paper (to draw the outline smoothly and beautifully);
- Ruler
- Simple pencil
- Scissors
- Stationery knife
- Thick cardboard (preferably from household appliances)
- Paper tape
- Stapler with large staples
- Corrugated paper
- PVA glue
- Paper napkins
- A lot of patience:))
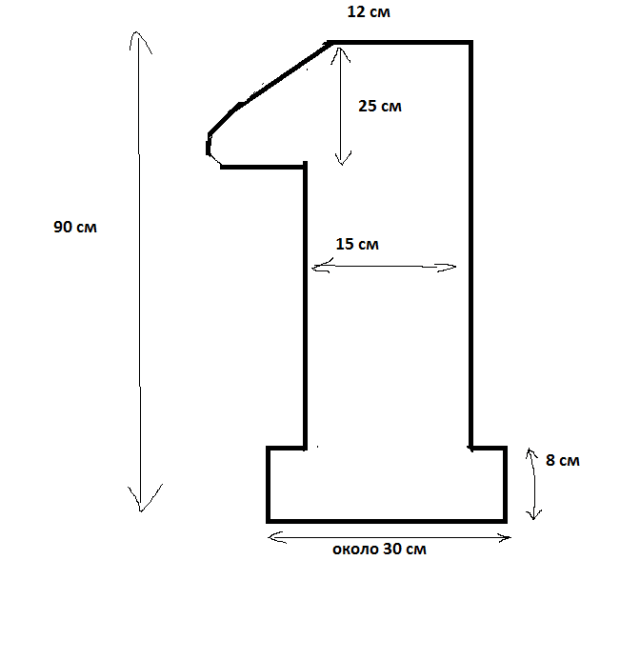
First we draw the desired shape of our numbers, it will turn out evenly and easier on graph paper. I had these sizes:
 Next, we transfer our layout to cardboard.

To number looked beautiful and was stable, I made it voluminous (depth units 16 cm), so we cut out the back side and duplicate all the side parts with rectangles of appropriate sizes.
I would like to especially draw your attention to such an important detail. To make the bend beautiful and smooth, we make cuts from the inside.
 We glue all parts with paper tape outside and inside for reliability.
Next, we paste over one from the front side paper napkins. I have white ones, but it is advisable to use bright colored ones, or the same color as paper flowers, if one will be monochromatic.
 This concludes the most difficult part of the work. Now the most monotonous
Making a flower is very simple. Take corrugated paper, cut out squares 25*25, fold each square 4 times. We fasten this square in the middle with a stapler and cut out a circle from it.
 When all the flowers are made (≈350 pcs), we begin to glue them with PVA glue.
 I didn’t decorate the reverse side with flowers, so I covered it with paper napkins in several layers.
Our holiday unit became an excellent decor in the photo area, and left pleasant memories in the baby’s first photo album!

In conclusion, I want to say a huge thank you to Margarita, during the time we have been communicating, I have discovered a lot of new and interesting things for myself creatively, new ideas are appearing, and most importantly, the desire to implement them!
And of course, thank you very much for offering to publish an article about me on your Very Cozy Blog and my Master Class « Ones for the first year»!!!
Tanya, thank you for your cooperation, we will continue to inspire each other to be creative;)
A child's birthday should take place in a special festive atmosphere. I would like to decorate the birthday boy’s room and hang a large sign in the hallway so that right from the doorstep the little guests will be charged with positivity and fun.
You can call professional decorators for help. They will quickly hang expensive decor. But it is much more interesting to decorate the interior with beautiful “things” of your own making for both parents and children. Collaborative creativity will allow you to have a fun time.

This article contains various ideas fulfilling the numbers for the birthday boy. You can make it from balloons.
But if you are tired of this design, then arm yourself with scissors, cardboard, corrugated and colored paper, decorative elements, threads and get to work. The main thing in such an important matter is good mood and a positive attitude.
What to make a birthday number from?
Numbers corresponding to the age of the birthday person, made from small balls - this is the most familiar way for us to decorate a room. Could anything be simpler than placing an order for the required number at the nearest event agency? But if you make a number with your own hands from any other material, it will look unusual.

Don’t give up the idea of making your own numbers for the birthday person if you don’t have much time. The number is cut out of cardboard quickly, and the needlewoman always has fabric and threads at hand.
If you don’t need digital images urgently, you can print out bright photographs in advance or come up with something completely original. An interesting photo session for the birthday boy in such a room with large numbers is guaranteed.

What methods of making numbers are there?
- A large number can be cut out of cardboard and decorated with whatever your imagination and resources are capable of.
- For the base, take a regular cardboard box of your preferred size. The contours of the desired number are outlined on the cardboard. The figure is cut out with a stationery knife and decorated. This figure will be flat. It can be hung on the wall.
- If you need a voluminous figure or you have the time and desire, then it is better to make a figure that the birthday boy can play with and move from place to place if desired.
- To make the figure three-dimensional, you will need two identical cardboard blanks. But besides them, you will also need to cut out long cardboard strips with smooth edges(of the same width) to cover the sides.
- The frame is easily assembled using a heat gun or masking tape.


The decor of the numbers must be selected in accordance with the overall design style. The most commonly used materials are:
- leg-split
- colored yarn
- bright fabric (organza, chiffon, satin, velvet)
- floral film used for packaging
- colored paper
- corrugated paper
- flowers from napkins
All these materials are used to wrap the base. But you can use them to give additional volume to the numbers. To do this, you need to make flowers with protruding petals from paper or fabric, or make fluffy pompoms from woolen threads, add various “pounds” and bows.

Number in eco-style
- To make a figure in eco-style, you will need a cardboard base and twine. The base is gradually smeared with glue and carefully wrapped with twine over the glued area.
- The finished number can be painted acrylic paint, or you can leave the twine unpainted. This figure will decorate any interior, and its production will require very little time and effort.


Number made from flowers
- To make a number with a floral pattern, we will need a lot of roses cut and glued from paper
- The flowers are packed tightly together, filling the entire base.
- Such a figure, even in the absence of other decor, will look excellent

The time spent cutting out paper flowers is compensated by the smiles of the children and the joy of the birthday boy. After the holiday, the number can be hung in the children's room until the child becomes a whole year older
Number made from pompoms
- To make a number from pompoms you will need a large number of wool pompoms
- The process of filling the base with pompoms is the same as with paper flowers.
Birthday number made from napkins
You can decorate a frame cut out of cardboard with flowers from napkins. By being patient and cutting out flowers of the same size from ordinary napkins, you can please the birthday boy with the fluffiest number in the world!

Manufacturing process:
- We cut out napkin flowers in unlimited quantities: divide a single-layer napkin folded in four into 4 squares
- We lay the squares in an even stack and fix them in the center with a stapler or a piece of thin wire
- The square stack is cut to make a circle.
- All that remains is to cut the edges of the resulting circle, not reaching the center
- Raise the napkin petals and straighten them.
- This way we will create fluffy flowers, which then will only need to be glued to the base with PVA glue


 This is the figure we got after pasting it with flowers.
  Deuce and scenery
 Birthday number made from corrugated paper
Flowers made from corrugated paper look simply gorgeous. They can be done in two ways. All you need is a large amount of corrugated paper desired color. The number will turn out more beautiful if you glue flowers of 2 or 3 different colors onto it.
Method 1:
- We cut the paper into strips. Approximate dimensions in centimeters: 50 / 3.5. We make sure that the “veins” of future flowers are correctly positioned: they should stretch along, and not across, the flower.
- Next, you need to stretch the flower on one side to get waves. This stretching is possible due to the “veins”.
- We hold the stretched flower blanks tightly by one side with the waves upward, and grab the base-cup.
- Use an elastic band or thread to match the paper to secure the lower part of the flower.
- The softer the corrugated paper, the larger and fluffier the flowers will be.
- The walls of the cardboard base are covered with corrugated paper to hide possible gaps between the flowers.
- The base is covered with flowers. To do this, it is convenient to use a hot glue gun. You can “plant” flowers using regular PVA glue.


Method 2:
- Cut corrugated paper into equal squares
- Apply glue to the cardboard base of the numbers
- We wrap the pencil in corrugated paper, placing its central part towards the rod
- Dip the lower part of the future flower in glue and apply it to the cardboard base
- So we gradually fill the entire surface of the cardboard base with squares.

Filling the cardboard base with squares
Inflatable numbers for birthday
A children's party is not complete without balloons. You can do it for your birthday great wall decoration:
- you will need a polystyrene foam base (this is a rectangular piece or a square piece)
- small size balloons
draw the desired number - we inflate the balls and attach them to the base with double-sided tape according to the pre-drawn shape

Cardboard numbers for birthdays
- The easiest way to make a number from cardboard is to draw it on a piece of cardboard or cardboard box and cut it out, without bothering with creating a three-dimensional product.
- The number can be covered with colored paper or smeared with glue and sprinkled with tinsel. You can cut out a stencil of the desired design or pattern, attach it to a painted cardboard number and paint over the areas inside the stencil with contrasting paint.
- The volumetric base made of cardboard consists of two identical parts of the number (the second one can simply be circled) and long strips of cardboard of the required thickness for the sides.
- The parts are connected with a glue gun, and for the reliability of the structure and better fixation, the stiffening ribs are glued from the inside.
- The volumetric figure can be placed vertically directly on festive table. If you make a horizontal platform from cardboard, then the number can be placed on the floor. Then it will become a chic attribute for photographing as a keepsake.
 Flat shiny digit
 How to make a volumetric figure:

 Glue the parts together with tape


Decorative numbers for birthday
Decorative numbers can be made using the quilling technique.
You can glue many paper umbrellas of different sizes and attach them to a cardboard base.

The details of the number can be cut out of fabric and sewn large volumetric pillow. Ribbons, fabric flowers, lace and beads are suitable as decorative elements.

If you make the base from a special floral sponge piaflora, then fresh flowers can be used as decoration: the sponge retains moisture for a long time and nourishes the plants. But a significant drawback of such a decorative item is its fragility.
Numbers from birthday photos
The kind of numbers that will be truly unique are those made from photographs. They can be pasted onto a flat cardboard figure or in Photoshop you can select photos for a collage and arrange them according to the intended shape. The finished collage only needs to be printed and pasted on a base or wall.

Felt birthday numbers
A felt number, if decorated with small toys cut out of felt, can be used by the child in his games after the name day.

To make a figure you will need one piece bright felt(for a flat figure) or two (for a voluminous figure). The number is sewn like soft toy and stuffed with filler - cotton wool or padding polyester.
Birthday balloon numbers
Can not imagine children's party no balls. Although numbers made from balloons are a permanent attribute in photos of birthday people, they can also be made in an original way.

How to decorate a number for a birthday?
Anything is suitable as a decoration for a number. If only it looked beautiful and festive. You can make paper flowers, you can cover the number with buttons, or sew small animals from felt and attach them to the number.
Ribbons, lace, pieces of fur, crowns and hats, beautiful bouquets of artificial flowers and large beads are suitable for decorating numbers.
Ways to decorate numbers:
- quilling decor
- use of internal lighting
- gluing squares of corrugated paper or flowers prepared in advance
- metallized, pearlescent or embossed paper
- textile
- satin ribbons
- sequins
- painted pine cones


Number 1 for a birthday for a boy and a girl
- To make the number 1 for a birthday, you will need a large piece of cardboard or a cardboard box, tape or masking tape and a utility knife.
- Draw a letter of the desired shape. Cut it out. We trace the second part along the cut out unit and cut it out too.
- We fix the sides with tape. And let's start decorating.
- We cut out roses from napkins and glue them onto a cardboard base, gradually filling the entire figure. You can pre-paste the number with colored paper to match the napkins used for the roses.


Number two for birthdays for boys and girls
The number 2 can also be made voluminous and decorated with “napkin” roses.
For a girl, the number can be decorated with a crown, a chic bow, or dressed up in a skirt.

We suggest doing number from tapes. You will need a large piece of corrugated cardboard, double-sided tape, scissors and a bright ribbon about 7-8 m long and 5 cm wide. We will decorate the number with beads.
- Cut out 2 cardboard base blanks. If the cardboard is thin, then for strength it is better to cut out two identical sides and glue them together.
- Next we proceed to wrap the number with tape. We fix it with a stapler or tape. You can secure the ends of the tape with threads or hide them behind the tape and secure with tape.
- We glue the beads with a heat gun.


The number for a boy can be made in a nautical style: from blue and white stripes. A number made in the same color as a bow tie or tie is also suitable.
Number three for a birthday for a boy and a girl
For variety, number 3 can be “grown” in a flower pot.
You will need:
- flower pot
- cardboard box from which we will cut the number
wooden sticks - various decorations
- ribbon
- heat gun
How to make a number?
We also recommend
 Law of attraction and how it works
 Reasons for the appearance of bacteria in urine during pregnancy - effects on the fetus and treatment
 Congratulations on Valentine's Day Who is customary to congratulate on Valentine's Day
 Saxophonist for an event
 Why does a baby cough during sleep or after feeding?
 How to make an owl from pine cones