Street lamp made from paper diagrams. Paper street lamp
Photo: thehousethatlarsbuilt.com
You can make a variety of New Year's decorations and decor from paper and cardboard - from simple to unusual!
1. Paper garlands and lanterns

One of the simplest and most effective paper options New Year's decorations- garlands and lanterns. This way you can decorate both your home and office.
All you need is a pack of regular A4 sheets, paper scissors and glue.

Paper chains are the simplest decor. Cut the sheets crosswise into strips of 2.5–3.5 cm. Glue one strip into a ring. Pass the second strip through this ring and also glue it into a ring. Continue until you get the garland to the desired length.

Making a flashlight is also easy. For each flashlight you will need one sheet of A4. First, cut a strip along the sheet - the strip will be needed for the handle of the lantern. Fold the remaining sheet in half lengthwise and make cuts as shown in the photo. Unfold the sheet, glue it into a lantern and add a handle.

You can also make a garland of Christmas angels. To do this, fold each sheet crosswise in four like an accordion. On one side, draw the silhouette of an angel, as shown in the photo. Cut along the contour, unfold and connect with other similar parts of the garland.
The decor can be hung on the walls, windows and ceilings.

2. Garland of small Christmas trees

An idea for those who love minimalism. Among other things, this garland is very easy to make! You will need double-sided cardboard in three shades Green colour, scissors, thick thread and large needle. For each Christmas tree, cut out 2 identical triangles, cut one to the middle from the top, the second from the bottom, and assemble the Christmas tree. When all the blanks for the garland are ready, assemble them onto a thread, piercing the cardboard with a needle.

Photo and source: aliceandlois.com
3. Paper candles for the Christmas tree

Such candles are not only beautiful, but also much safer than ordinary ones: decorating a Christmas tree with them would be a great idea.

You will need heavy yellowish candle paper, small paper baking cups (if you can't find gold ones, you can paint them), gold glitter/loose glitter, a hot glue gun, and clothespin holders. Christmas decorations(by the way, they can be replaced with clothespins for curtains) and scissors.

For each candle, cut out a 5x8 cm rectangle. Glue it into a ring, connecting the long sides. For the top of the candle, cut out a circle of the required diameter and glue it on top. Cut out the flame and glue it onto the circle.

Using a glue gun, apply drops of glue to the flame and on top of the candle to form drops, and while the glue is wet, sprinkle them with glitter.

Glue paper molds to the bottom and clothespins to their bottom. Ready.

Photo and source: thehousethatlarsbuilt.com
4. Christmas tree decorations made of colored paper

These decorations are easy to make, the main thing is to choose beautiful paper. It's better to take a fairly dense one.

You will also need something round as a template, scissors, glue, pencil and floss.


Draw circles on paper using the template and cut them out. For each decoration you will need 4 identical circles. Fold the circles in half and glue them together as shown in the photo. When gluing the last of the four circles, place a loop of thread in the center, making a knot at the bottom.

Photo and source: aliceandlois.com, minted.com
5. Garland of colored paper lanterns

To make such a garland, you will need sheets of colored and black paper, pencil and ruler, knife, glue and long string.

Draw a template based on the picture above. Using it, you need to cut out blanks for lanterns from colored paper. Don't forget to make holes for the cord. Also, for each lantern you need to cut out a part for the base from black paper (see photo above).


On each workpiece, draw lines for bending with the blunt side of the knife, as shown in the photo. Fold and glue the lantern. Thread a string through the holes and tie. Add a black base piece on top, gluing it into a ring and gluing it to the lantern. Now all the colorful lanterns can be assembled into a garland. By the way, you can hide small sweets inside.

Photo and source: thehousethatlarsbuilt.com
6. Garland of lanterns: simplified version

You can make a similar garland in a simplified version. You will need colored double-sided paper, scissors, cord and colored (in this case black) tape. Cut out parts in the form of light bulbs from colored paper and glue them with tape to the cord - you're done.
7. Paper snowflakes on a branch

Just find some suitable branch while walking, clean it, paint it White color and use it as a basis for a New Year's installation of paper snowflakes! The idea is well suited for a nursery, and you can implement it together with your children.
8. Volume star made of cardboard

To make such a star, you need thick, thin cardboard that holds its shape well. If you don’t have gold cardboard, you can take regular one and then paint the star. You will also need scissors, a pencil and a ruler and a knife, glue and thread for the loop.

First draw a star or use the template above. Transfer the image onto cardboard and cut along the outline.

Mark five lines, each from the center of the beam across the entire width of the star. The lines must be drawn with the blunt side of the knife along the ruler. And then fold the cardboard so that the folds are alternately inside and outside.

Glue a loop of thread to one of the rays. To make the star double-sided, it can be painted on both sides.

Is it possible to make stars like this? big size and decorate the room with them.
Photo and source: mintedstrawberry.blogspot.com, katescreativespace.com
9. Garland “collage”

To make such a garland, you don’t have to buy special paper: you can use unnecessary postcards or magazine covers (it’s better that the paper is quite thick). You will also need a craft knife and/or scissors, glue, a ruler, and strong thread.

Cut the postcards into shapes - circles, hexagons, triangles and so on. Each figure of the same shape and size needs two pieces. Glue the figures into a garland so that the thread is inside.
Flashlights do not have to be a source of light. For example, paper lanterns can be a wonderful decoration for your home in connection with any holiday: New Year and Christmas lanterns can be hung on the tree, and paper lanterns for birthdays or Halloween can be hung or placed around the rooms.
This decoration will go well with other holiday decor and will fit into almost any style, since they can be different - it all depends only on the flight of your creative thought, if you want to make paper lanterns with your own hands.


Preparation
A flickering flashlight, like a tiny light, immediately evokes a fairy-tale mood, creating an atmosphere of magic, mystery and enigma. Paper lanterns are so easy to make that even kids can get involved in preparing for the holiday and help you make these wonderful decorations.
In order to make a paper lantern, it is better to take plain office paper of different colors. Corrugated paper is also suitable for you, but you should not use cardboard, as it often breaks at the bend and the product may deteriorate.
In addition, during the work you will need glue, scissors, decorations (if you want your craft to be exclusive and original), a pencil and a ruler, as well as special templates for cutting.

A little patience, imagination and perseverance - and your DIY paper lantern is ready! You can decorate your house for the holiday.

Making classic paper lanterns
The base of any lantern is rectangular and looks like a cylinder, open at the top and bottom. Already on this base you will glue or attach various volumetric designs and decorations.


- Before you make a traditional paper lantern of this type, you can think about how and what you will decorate it with. There are no special templates for a classic lantern, but there is a diagram that you can use as a guide.
- First you need to make a base. To do this, you will need to cut out a rectangle from colored paper (determine the dimensions depending on the size of the future craft).
- Then this paper rectangular piece needs to be folded in half (widthwise), and stepping back a little from its upper edge, mark a horizontal line with a pencil.
- On the same blank, make markings for vertical stripes (take the width small, about 1-1.5 cm). Cut the paper along these lines, but so as not to cross the marked border line.
- Next you will need another rectangle. It can be cut out from the same colored paper, or you can take paper of a different color. The length of this rectangle should be the same as the first one, but the width may be slightly smaller.
- Also fold it in half, and then cut it into small strips from the fold side (as in the first case, do not make the cut all the way through, because you need to leave at least a centimeter for gluing to the base).
- You can glue the blanks to each other (if you want, use a stapler). To make it easy to hang the lantern on a Christmas tree or other place, attach a small strip of paper to the two sides of the top of the lantern.
If desired, for decoration for the New Year, you can decorate the craft with stickers, sparkles, stars, snowflakes, rhinestones, etc.
Several of these lanterns will make a wonderful garland.
And if you don’t make a core in the lantern, then with the help of such a product you can decorate vases or other objects in an original way, making them elements of New Year’s decor.

Other manufacturing methods
By using your imagination and imagination, you can easily figure out how to make unique lanterns to decorate your home. For example, if you glue corrugated paper into cylinders, as is the case with classical technology, but do not make a second layer, but simply attach these shapes to the ribbons, and cover them along the bottom edge with light colored ribbons that will sway and flutter with the slightest movement. Such New Year's lanterns also look beautiful in a large garland.
If you want a candle to burn inside the product, then take two layers of paper for the base: plain paper for the top, and white parchment for the bottom, which will transmit light. Or use safe LED candles.
Another one simple craft- a flashlight made of multi-colored stripes. To make it, you need to cut a lot of paper strips (their length and width should be the same; the longer the strip, the larger the flashlight will be). These strips must be folded and holes pierced at both ends. Then take a beautiful lace and fasten it first on one side, and then thread it through the other hole and pull it well so that the strips bend in a semicircle. All that remains is to straighten the flashlight so that the stripes form the shape of a ball.
You can also do beautiful craft in the form of an openwork lantern that will decorate any festive table and on New Year's Eve at the Christmas tree, and on birthdays, and on other holidays.
- To make such a romantic decorative element, you will need special cutting templates. If you are trying to make such a craft for the first time, then first it is better to take a blank drawing in which there will be a minimum number of gaps, since cutting out this part can take a lot of time and require some skills.
- The selected template must be printed and carefully cut along the contours.
- Select glasses, glasses, jars or other transparent objects that will serve as the base for the wrapper (candles can be placed in them). Measure their height and width. You need to cut the templates so that the containers can be completely wrapped.
- Try on the templates again and adjust if necessary.
- If you want to make colored lanterns, then under openwork patterns You will need to attach sheets of colored parchment (you also need to cut it to the size of the vessels). They are attached with tape.
- Then you can attach the openwork templates, also carefully attaching them with tape.
Light the candles and enjoy the romantic atmosphere of a New Year's fairy tale.

Choose any method of making lanterns you like and create small crafts that will decorate your home in an original way for any holiday.
A wonderful New Year's decoration that came to us from China is paper lanterns. They are very easy to make, so you can easily make them together with your baby. You can use lanterns to make a garland, decorate a Christmas tree with them, or simply hang them around the room. After all, it is believed that such decorations attract good luck to the house and scare away evil spirits. Today we will look at several ways to make a paper lantern with your own hands.
Classic paper lanterns.
Classic version
You probably did these kinds of crafts as a child. You can make lanterns using this master class with very young children. To make it you will need colored paper, scissors, and glue.

Buman lanterns with tube.
Schematically, the manufacturing looks like this:

Manufacturing diagram.
Step-by-step production:
- Prepare two sheets, one 2 cm smaller than the other in width - for a double-walled product. For a regular flashlight, you can just take a sheet of any size.
- Fold a large sheet in half and make cuts from the middle to the sides, not cutting 1 cm to the edge. The width between the slots should be the same, about 1 cm.
- Lay out the sheet and roll it into a tube. Also roll the smaller sheet into a tube, glue it and place it in the outer cut sheet. Glue the top and bottom.
- To hang the decoration, you can make neat punctures and attach a loop or glue a paper handle.
Read also: New Year's paper toys to the Christmas tree.
Idea: You can place LED candles inside paper lanterns to create a fabulous New Year's atmosphere.

Lanterns with a candle inside.
You can diversify the look of classic lanterns using simple techniques: combinations of multi-colored paper, decor with ribbons, sparkles, cut out figures.

Product examples.
Figural decoration
To make the next type of lantern you only need paper and a beautiful thread to match the color. You will also need a needle, if you have one, a hole punch (awl).

Figured lanterns.
Manufacturing process step by step:
- Take a rectangular sheet of paper, fold it like an accordion, bend the edges well and lay it out.
- Using a needle or hole punch, make holes in the middle on all edges, at the same distance from the edge.
- Fold the sheet in half and bend it, straighten it and bend it the other way.
- Thread the threads through the holes at the top and bottom. Pull a little so that the product tapers at the top and bottom. You can make a loop from the top thread. Ready!

Manufacturing process.
You might be interested in: paper garlands for the New Year.
Such lanterns can be strung on the bulbs of an LED garland to make the light softer and the garland original.

Finished goods.
Multilayer decoration
The next craft has a more original shape and is a little more difficult to make - it will require great care. To make it, select colored cardboard (you can use leftover thick wallpaper), double-sided tape, and scissors.

Multilayer flashlight.
Manufacturing process:
- Cut out 10 to 15 blanks according to the template (see below). It is important that they are all neat, even, and identical. The more blanks, the more magnificent the product will be.
- Fold each piece in half with the printed side facing inward.
- According to the photo below, the blanks need to be glued together at points 1 and 2.
- Then you need to glue the core of the flashlight and connect the two outer pieces to fix the structure. All that remains is to thread the loop and hang the decoration!

Manufacturing process.
You may be interested in: DIY New Year's deer.
The finished product looks like this:

An example of a finished decoration.
Spherical flashlight
Spherical lanterns are shaped like balls. You can make them small to decorate the Christmas tree, or large. In any case, the manufacturing process is very simple and fast.

Spherical flashlight made of stripes.
For creativity, prepare multi-colored cardboard or thick packaging paper, a hole punch or awl, scissors, a ruler with a pencil and 2 rivets.
How to make a New Year's lantern out of paper with your own hands step by step:
- Cut the paper into equal strips 1 cm wide. There should be about 10-15 strips. If it is less, there will be large gaps in the flashlight; if it is more, the stripes will be distributed unsightly.
- At a distance of 3-5 mm from the edge, make holes with an awl or hole punch on both sides.
- Stack the strips and fasten them with rivets along the holes. The stripes should scroll.
- Carefully, taking out the strips one by one, distribute them and form a ball.

Step-by-step production.
Also don't miss: New Year's pig made of fabric.
There is another way to make such a flashlight - using thread.
The paper also needs to be cut into strips, holes must be made on both sides 5 mm from the edge. Next, you need to thread the thread on one side and mask the tip with a sticker. Thread the thread into the second hole, pull it a little so that the strips become arched, tie the thread into a knot or make a tassel. Next, distribute the strips around the thread and form a ball.

Step-by-step production.
These are the cute lanterns you get in the end:

Lanterns made of strips and thread.
Drop flashlight
Another super easy option for making paper lanterns.

A small flashlight.
The manufacturing principle is extremely simple - according to the template (see below), you need to cut out a lot of blanks, glue them in halves to each other, thread a thread in the center and make a loop on it.

This is what the product looks like during the manufacturing process:

Flashlight in the making.
The products themselves look very simple, even boring. Therefore, diversify their design to your taste - make openwork cutouts, add a tassel at the bottom, choose printed paper, sprinkle the finished drops with glitter. For example, blanks of this shape can easily be styled as fruits.

Manufacturing variation.
Lantern house
The considered craft options are quite simple, so we offer you another master class where you will learn how to make a more original product, stylized as a real lantern. This type of flashlight is also often called a gnome flashlight.

Lantern house for a gnome.
To do this, you can search on the Internet, draw your own, or use the proposed house template:

House template.
For production you will need:
- thick cardboard;
- breadboard knife;
- thin translucent fabric or paper;
- a board or special cutting board;
- glue.
To decorate the house, you can use any materials: paints, sparkles and rhinestones, fringe, various inserts. But even without decoration, such products look wonderful if you use LED lighting inside:

Illuminated flashlights.
You need to cut out a blank from cardboard, use a breadboard knife to carefully cut out the design. Next, along the fold lines, you need to carefully bend the cardboard. On the inside of the house, all edges need to be pasted over thin cloth or paper - these are stylized windows. In addition, if there is a light source inside, the veil will soften and diffuse it. Finally, the house needs to be glued together and, if necessary, a loop attached.

Product example.
A couple more templates for cutting out a house:

Original heart house with 6 sides:

House with square windows and gable roof:

We looked at 6 options of varying complexity on how to make a Chinese lantern with your own hands from paper. With such crafts, your home will surely be transformed for the New Year!
Paper toy “New Year's lantern”
Master class using step-by-step photos “Lantern for the Christmas tree”
.Description: Master class for children preschool age, intended for kindergarten teachers, teachers additional education, parents.
Purpose: The toy can be used for decoration New Year tree.
Target:
Manufacturing New Year's toys. Development creativity children and the formation of imaginative thinking skills and creative imagination in the process of decorating a New Year's lantern.
Tasks:
Strengthening technical skills in working with materials and tools (paper, thread, glue, scissors, sequins).
Developing skills in working with sequins.
Development fine motor skills, perseverance and patience.
Fostering accuracy and a rational approach to the use of materials.
Material for the lesson: On the TV panel there is a photo depicting a flashlight, photographs depicting the sequence of work on the toy, a sample of the toy, paper: rectangle 14x10cm, lined into 14 narrow strips vertically, narrow paper strip, glue, scissors, thread, sequins.
Safety rules when working with scissors:
You CANNOT use scissors: play with them, wave them, throw them, bring them to your face, take them without permission, walk with them, much less run.
DO NOT leave scissors open.
DO NOT approach a friend while working.
You need to work with scissors while sitting at a table.
Place the scissors with the rings facing you.
Watch the movements of the blades while cutting.
Pass the scissors only closed: with the rings forward, holding them by the closed blades.
Safety precautions when working with glue:
Handle the glue with care. Glue is poisonous!
Apply glue to the surface of the product only with a brush.
Do not let glue get on your fingers, face, especially eyes.
If glue gets into your eyes, rinse them immediately large quantities water.
After finishing work, be sure to wash your hands and hands.
When working with glue, use a napkin.
Let's decorate the Christmas tree green, sing it a funny song,
Let's make toys, lanterns, firecrackers.
Make the children happy, Christmas tree, invite your friends to the round dance.
Step-by-step manufacturing process:
1. Tools and materials for work

2. We make vertical slits on a strip of paper, not reaching the edge of the strip.

3. Cut the entire strip along the drawn lines.

4. Turn the strip over to the wrong side and glue an additional strip at the bottom, thus gluing the lower ends of the cut structure.

5. Fold the strip in half and smooth the fold line with your fingers.

6. Apply glue to the edge of the strip.

7. Roll the strip into a roll, gluing the two sides of the strip together.

8. Flatten the flashlight downwards, pressing the top of the toy with your palm. The result is a more voluminous and interesting figure of the flashlight.

9. Secure the thread inside the flashlight with glue.

10. Decorate the top of the toy with sequins, gluing them to each section of the cut strip.

11. Glue sequins to the bottom of the toy.

12. The flashlight is ready. We hang it on the Christmas tree.

Happy New Year!
In anticipation New Year's holidays A special time is coming: every family, every home and every city is preparing for the upcoming celebration. Some buy gifts for loved ones, some look for recipes for delicious dishes, and some decorate the Christmas tree and home. New Year - fabulous holiday with its own atmosphere and mystery. It’s worth preparing for it properly.
Decorating a home is a separate tradition. It is customary for all family members to take part in it, and for good reason: it is precisely moments like these that bring people together and envelop people in the warmth of home. There are a lot of New Year's decorations for the home on sale, and you can buy everything your heart desires - New Year's tinsel Almost all store shelves are littered. But it will be much better if you put a little effort into decorating your home. This is not at all difficult to do, and the activity itself will bring pleasure.
On the eve of the holiday
For New Year's creativity there are thousands of ideas: you can cut out snowflakes and decorate rooms with them, make garlands and New Year's lanterns, paint windows with patterns, make toys, firecrackers, and decorate candles in a festive manner. Perhaps someone will even decide to perform Father Frost and the Snow Maiden on their own.
Making your own paper lanterns is a great idea. Paper is a simple, pliable and accessible material; all you need is a little free time and imagination. Paper crafts can be completely different in both shape and size. You can decorate a Christmas tree with them, they can be placed in different places in the house or collected into garlands and hung from the ceiling. By placing tiny light bulbs inside a paper lantern, you can get real New Year's light garlands. They will softly illuminate the room, giving it even more comfort and fabulous mystery.
The idea of making New Year's lanterns out of paper and decorating the house with them carries with it secret meaning. In Ancient China, it was believed that such products were able to protect the home from the mythical New Year's animal, whose name is Nien. Today they are used as decoration for parties and help emphasize the festive mood.
The simplest
We will offer several options on how to make paper lanterns with your own hands. Let's start with simple ideas, which even small children can easily implement. Take colored paper or any other suitable material, scissors, glue, stapler, thin fabric tape or thick thread on which you will then hang the lanterns. We can start.

Fold a piece of paper diagonally and cut off the part that will protrude beyond the line. This way you will get an even square. Next, fold the paper figure as shown in the photo above. Paper lanterns can be added with a loop and hung on a ribbon, or brought to life with light. Place a Christmas garland bulb inside each lantern and secure with tape. All that remains is to decorate the house.
Traditional lanterns
This is one of the most simple options crafts. Surely many of you have already seen similar products.

- Take a rectangular sheet of colored paper. Cut it off straight strip 1 cm wide. After that it will be used for the loop - handle.
- Fold the paper in half lengthwise. Make transverse cuts from the folded part of the sheet to the edges. Be careful not to cut the paper all the way through, leave 1 cm from the edges.
- Unfold the sheet.
- Fold the paper as shown in the photo above. Secure the edges with tape, glue or a stapler. Attach the handle.
Pumpkins
To make these paper lanterns with your own hands, fold a sheet of paper in 3 times. Then cut off 1/3 of the part along the fold line.

Fold the larger piece in half and use scissors to make equal cuts along the entire length of the sheet, leaving only the top part intact. You will get a paper fringe.
Unfold the piece of paper. Turn the uncut parts in the opposite direction, you should get a tube. Secure with glue and the remaining strip of paper.

All that remains is to attach a small loop on top so that you can hang the flashlight. At the bottom you can add a tail made of chopped ribbon to the figure.
For good luck
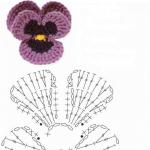
According to Chinese belief, such a paper lantern brings good luck to the house. It is made using red and yellow (gold) paper. To make these paper lanterns with your own hands, you will need to cut out multi-colored circles and connect them together in a certain way. The photo below will help you with this.

Use a coffee cup or any other handy object that will allow you to draw even small circles on paper. Cut out 4 yellow and 4 red circles - this will be enough for one flashlight.
Fold the edges of the circles as shown in the picture above and fasten them together with tape or glue. Attach a loop on top and a multi-colored tail on the bottom. The flashlight is ready!
Houses
This piece of decoration is perfect not only for any holiday, but can also be a permanent element of decor. The shape can be completely different, as well as appearance flashlight. New Year and Christmas motifs are perfect for winter holidays, bats and pumpkins - for Halloween, doves with angels - for Easter. The idea of making New Year's lanterns with your own hands is practical and original, and most importantly, every home has the material for such a craft.

Use sturdy paper or cardboard. Small juice or milk boxes are perfect. In this case, all that remains is to cut out windows in the box, paint it in desired color or decorate using decoupage. You can cover such a flashlight with felt or gift paper. On top, use various decoration elements, in our case these are birds with berries and leaves.
For the windows of the house flashlight, you can use small pieces of plastic (from bottles) or tracing paper. They can be glued with double-sided tape or glue.

If finding a suitable box is problematic, don’t give up on this idea. You can easily make the body of the house yourself by cutting out parts from thick paper. In this case, you can improvise with models: they can be triangular or semicircular, diamond-shaped, or have the shape of a real street lighting fixture. Hanging paper lanterns will perfectly complement New Year's garland, and free-standing ones will become an original element
Christmas stars
Why not decorate your home with stars? Making your own Christmas lanterns in the shape of stars is a great idea.

Take suitable paper, scissors and glue. Cut out several templates according to the pattern shown in the photo above, glue the corners. Now all that remains is to assemble the tips of the star together. Place several garland bulbs in the middle of the paper lantern. This craft can also be used as a New Year's toy. You can get a little creative and cut out fancy curls, snowflakes or small stars on paper for the future star - they will look impressive when backlit.
Balloons
This is another great idea for any party or family holiday. It is very easy to make such paper toys with your own hands, and finding a use for them is even easier. They are suitable for decoration; they can be placed together in a large glass bowl or vase, used as cases for small gifts for children, or added to garlands of paper lanterns. These balls will add color to your home and decorate your holiday table.

For creativity you will need the following tools: scissors, a ruler, a stapler, a hole punch and suitable paper with a thematic pattern. Now you need to cut the sheets into equal strips. The longer and wider they are, the larger the ball will be.

Place the strips in a stack. Stepping back a little from each end, we connect them using a stapler - now they are securely fastened to each other on both sides.

All that remains is to roll the ball. Start with the bottom strip. Turn it over in the opposite direction from the others. Turn the remaining fastened elements - this is how the product is formed. Level to your liking. The paper lantern is ready! Agree that it is very easy to do!
From China with love
Chinese paper lanterns are structures stretched over wooden frame. They are also called sky lanterns. In addition, such products are an excellent platform for creativity. They are light, airy and not expensive at all. All that remains is to decorate them to your liking, and New Year's miracle will be ready. Paper lanterns can be painted or pasted over using the decoupage technique, using New Year's motifs; you can use lighting for them or leave them without it. Such products are perfect for New Year's decor.

Take several white lanterns, connect them together, add a hat, scarf, and a great New Year's snowman ready! Use a little creativity - simple materials can lead you to thousands great ideas for a special event.
Safe holiday
Paper is most often used as decoration materials, because, as you know, it will endure anything. For example, you can make a paper lantern or a beautiful toy as origami. But whatever you choose, remember that paper products highly flammable. Therefore, if you decide to focus on this particular material, to illuminate the lanterns, use those lamps that do not heat up when illuminated and refuse candles. The holidays should be beautiful, stuttering and safe!