How to make holiday pom poms. How to make pompoms with your own hands - photos of textile and paper products

Gorgeous decorative pompoms made of paper in silence - this is a simple and original decoration for any holiday or event.
This decor creates festive mood and will emphasize the style and originality of the design.
For the safety of paper and safety of transportation, paper pompoms are supplied assembled and straightening them will require a little time and care.

When assembled, a paper pompom looks like a wide strip of thin paper folded several times.

1.Tie the pompom with one end of the ribbon in the middle. But do not tighten the tape too much - this may damage the paper.

2. Gently fan out the folded pompom on both sides.

3. Separate the paper layers one by one, but be careful and careful, thin and fragile paper may tear with sudden movements. But even if such a nuisance happens, it’s okay, it won’t be visible when the pom-pom is assembled and straightened.
 4. Give the straightened pompom round shape and a magnificent decoration for your holiday is ready.
Don't know how to decorate your interior for the holiday? Original paper balls will be an effective and inexpensive solution, especially since they are made very easily and quickly. The following master classes will tell you how to make bright and airy paper pom-poms with your own hands, which are suitable for decorating birthdays, weddings and any party.
Method 1

- corrugated paper;
- 2 sheets of thin cardboard;
- 2 markers of different colors;
- glue;
- scissors;
- needle and thread.
Fold a sheet of cardboard in half and draw a semicircle on one side. The diameter of the finished craft will depend on the size of the cardboard circle that will serve as the base. Cut a circle out of cardboard.

Cut the cardboard base circle in half.

From the stack corrugated paper You need to cut off the excess part according to the width.

On the second sheet of cardboard, use different felt-tip pens to draw vertical stripes. The density of cells on the ball will depend on the number of these stripes and their frequency. We will have 5 stripes, the blue ones should be coated with glue and the first sheet of corrugated paper should be glued to them.

Then coat the green stripes with glue.

Glue the next sheet of paper.

Repeat the procedure similarly with the remaining sheets, alternating gluing the sheets to the blue and green stripes.


Place a cardboard semicircle on the finished stack of sheets of corrugated paper and cut the paper along its contour.

Glue the cardboard onto the last sheet of paper.

Use a needle to make a hole at one edge of the craft and thread a thread through it. Do not sew tightly, otherwise the ball will not open. Tighten the thread into a loop so that you can hang the craft.

Unfold the ball. Take the craft by both cardboard parts and carefully move them apart. Be careful not to tear the thin paper.

Glue the cardboard joints together and the ball will take shape.

Similar balls can be made different sizes, plain and multi-colored.
Method 2
Pompom with rounded edges

Required materials and tools:
- 8-9 sheets of plain or multi-colored corrugated paper;
- sharp scissors;
- thin wire;
- lace or skein of thick thread.
Cut the paper into equal rectangles or squares. The diameter of the finished product depends on the width of the sheet.

Gather the sheets together and fold them like an accordion. The fold width is 1.5-2 centimeters.

Finish the edges of the accordion. Depending on what shape you want to make the ball, its edges can be jagged, torn, sharp, it all depends on your imagination. Our ball will have rounded edges. To do this, you need to trim the corners of the accordion with scissors, giving them a rounded shape.

Take the wire and bend it in half.

Wrap the accordion in the center with wire and tighten. The edges of the wire should be twisted into a loop; you can later hang the craft from it.


Unfold the paper accordion. Carefully separate each sheet and straighten it first on one side, then on the other, forming a fluffy pompom.

Pompom with sharp edges
Please note, this is the same master class, but the pompom has pointed edges.


Method 3
Consider the option of creating a pompom from paper napkins, which can be used to decorate a gift box.

Required materials and tools:
- paper napkins of 2 different colors;
- scissors;
- pen;
- needle with thread.
Take 4 napkins of the same color.

Place them together and bend them three times as if you were planning to cut out a snowflake.


Draw a semicircle along the edge of the folded napkin.

Cut off the excess part.

Unfold the craft, you get neat flowers. Cut similar ones from napkins of a different color.

To put all the pieces together, take a hole punch, fold the flowers in half and make a through hole.

Pull the thread through the hole and tie tightly.


Method 4

Required materials and tools:
- corrugated paper;
- wire;
- scissors;
- glue gun;
- foam ball;
- ribbon.

The paper needs to be cut into sheets measuring 12 by 24 centimeters. For one flower, you need to fold 4 sheets of paper together and bend it like an accordion. Tighten the accordion in the middle with wire, and cut the edges in a semicircle.

Spread the petals. Stick the finished flower into foam ball and fix with glue.

Depending on the size of the ball, make the number of flowers that will cover it completely.
Method 5

Required materials and tools:
- corrugated paper of different colors;
- scissors;
- stapler;
- glue gun;
- foam ball;
- ribbon.
Wrap the ribbon around the ball and secure with hot glue. Do not cut the ends of the tape; they will be used to secure the finished product.
Cut the paper into strips measuring 10 by 25 centimeters. Fold each strip in half to form blanks 5 by 25 centimeters.

Wrap the workpiece around your finger and secure one edge with a stapler. The result is a rose.


Make the required number of roses and glue them to the foam ball.

A ball with a diameter of 60 centimeters will require at least 300 buds.
Method 6

Required materials and tools:
- corrugated paper 3 colors;
- needle and thread;
- scissors;
- pen;
- ruler.
Fold all the sheets of paper together and cut out 20-30 circles of the same diameter.


Sew them together in the center, having previously aligned all the blanks.


Draw the upper circle into sectors.

Carefully cut the workpiece along the lines strictly from the edges to the center.

Fluff the pompom. If necessary, string a long thread through the center of the piece to hang the ball.

Handicrafts help develop thinking and fine motor skills hands creative thinking. After all New Year very soon. Make decorations for the Christmas tree or the house in general. For example, do-it-yourself pom-poms made from corrugated paper. So bright, lush and colorful. They definitely brighten up any gray day. They are often used for decoration in different rooms.
Required materials
It is not difficult to obtain corrugated paper. Buy rolls at flower shops or look in office supply departments, they sell them there different types paper. It doesn't cost much, but there are so many different crafts you can make from it! In addition to paper, you will need scissors, a regular small ruler and a marking pencil for making. You also need to take a ball of thread or several multi-colored ribbons.

Don't worry if you don't know how to make pom poms yet. There are always plenty of photos of finished products, step-by-step pictures and a master class available to everyone on the Internet. Previously, in order to learn something from needlework, you had to enroll in special courses.

Now with the discovery of the Internet everything has become much easier. By watching videos, people learn languages, play instruments, dance and even fight. Of course, a lot depends on the quality of the videos and the degree of interest of the student, but here everything is much simpler. Christmas balls from available materials.
Cooking process
The paper has a normal size - 50 cm wide and 2.5 m long. Take a roll and first measure it all with a ruler to determine the location of the middle. Mark it with a pencil line.

Then we cut the unwound roll in half, following the line. It turned out to be two identical shorter rolls.

Carefully unfold each of the rolls and cut 25*50cm rectangles from both. You'll get up to 5 pieces each. Then fold them into a neat stack, matching all sides to the corners. It is more convenient to apply light weight, because the squares themselves cannot lie flat.

Having unfolded the stack with the short side, carefully fold all the sheets like an accordion.

Make sure that the accordion has identical edges, so the corrugated paper balls will turn out more beautiful.

Hold the accordion and measure it to mark the middle and draw a pencil line there. Then take a thread (or a ribbon from the prepared materials) and tie the accordion tightly along the line, leaving one end of the ribbon long.

Now it's time to determine the ends of the future pompom. As you can see from the finished photo, two semicircular lines are needed at the edge.

It is difficult to determine the desired angle or length of a line with a ruler, so use your eye, just make sure that the lines are the same on both sides. This is how pompoms made from paper and made with your own hands will turn out beautiful step by step. Cut one by one. First one corner.

Then the second one. The result is a petal.

You need to do the same with the second end of the accordion, performing the process in stages.

Corrugated paper is quite thin, so unfold it carefully, first one layer, then the next, lift everything up, imagining your pom-pom how it will turn out. At the end you should get a fluffy half of the ball.

Turn your “fan” over to the other side and fluff it, only trying not to wrinkle what has already been done. The paper ones will turn out big and fluffy.

Such splendor is ensured by the many faces of squares cut into a semicircle. Correct its edges so that the junction of the two sides is completely smoothed out. These large pompoms can be hung as separate element decor, somewhere by the window or put under the Christmas tree, on a shelf. To make the product smaller, measure the squares in smaller sizes.

There is also an option with multi-colored balls. The Christmas tree pom-pom should be two times smaller than this, so that it looks harmonious on the branch, next to the rest of the toys. However, such a ball will decorate any Christmas tree. Voluminous, fluffy and soft. To make it multi-colored, cut out squares from two or three colors of corrugation initially.
Fold them one by one, then admire the result. You can experiment by understanding how it should be done in general. Step by step photos and explanations make any activity accessible and understandable, especially needlework.

True, small balls are more difficult to make than large ones. Keep track of the number of squares, measure their size so as not to reduce the splendor of the finished product.
Where to post
Despite their size, such balls are quite light and do not pose a danger, even if they accidentally fall on the head of one of the guests or household members. Therefore, they are easy to hang somewhere from the ceiling or on a Christmas tree. It is more difficult to make such pom-poms from plain or thick paper; the balls will not turn out so fluffy, because corrugated paper has volume, it is initially terry, has bends, holds its shape and is easy to bend and fix the edges of the ball. Yes, flowers are wrapped in such sheets, so corrugation can be found in any flower shop.

Make balloon garlands and hang them at home, work or in the classroom. This is such a bundle of brightness and positive emotions, it’s nice to look at, you can even play with it, toss it to each other or just hold it in your hand.

By the way, when choosing colors, look at the Rooster’s preferences - he loves red and orange, yellow and gold, green. It is curious that at Christmas these colors are considered the main ones. Bring the holiday spirit to yourself, let the bright colors once again remind you of the approaching New Year! In addition to the ball, you can make various crafts from this paper. Cut out roses or several small balls to assemble into one wreath! The result will be fluffy and light.
I represent not only new article, but I’m also opening a new section for her on Master Classes, which will be useful to future newlyweds and simply curious people. The section will be devoted to lessons and activities that promote self-development and will allow you to do many things yourself when preparing for wedding celebrations, without resorting to the expensive services of specialists.
A fairly simple and unpretentious lesson that anyone can do. And its result is unique, intricate, colored balls with which you will transform the space. DIY paper pompoms made from crepe or tissue paper are an inexpensive but very effective way to decorate, for example, a wedding. No special skills are required, and it won’t take much time.
So soft and fluffy paper pompoms looks light and airy! They can be used both as hanging decor and for table decoration, for example, to decorate napkins, or chairs at a banquet.
For making pompoms You will need:
— Crepe or tissue paper or thin wrapping paper;
- Scissors;
— Thin wire, or strong threads, or a stapler;
- Ruler;
- Pencil;
— Ribbon to hang the pompom.
— Step-by-step instruction to create pompoms:
- Prepare paper (crepe paper is usually sold in rolls) approximately 20*30 cm in size. Optimally, 8 sheets of paper are needed for one pompom, however, the quantity can be changed. And besides, you can make pompoms of any desired diameter, for which you select the appropriate sheet format. Remember that the width of the sheet is the measure of the diameter of the pompom. Fold the paper like an accordion with a fold width of about 1.5 - 2 cm to the end, as shown in Figure 1.
- Mark the middle with a ruler and bend the workpiece at this point. Here, at the fold (i.e. exactly in the middle), tie tightly but carefully so as not to tear the paper with wire or thread (you can also fix it with a stapler). Pompoms are often hung, so make a loop out of wire or thread.
Cut the edges of such a blank on both sides, as shown in Figure 2. You are free to make them in any shape, but the most common are: semicircle and triangle. Thus, your pompom will either have rounded edges or sharp edges. - Carefully straighten the paper and “fluff” it. Crepe paper, and especially tissue paper, is very thin, so carefully separate all the accordion petals, starting from the center.
- The result will be such a cute pom pom. Now you can hang it using a loop and colorful ribbon.


Paper pompoms are an excellent decorative option for children's parties, outdoor parties, weddings or any other occasion. gala event. These products look very gentle, weightless and elegant. They are made both small and large, depending on the idea, in one color scheme or completely different, both bright pom-poms and pastel colors look great.
Over the past few seasons, paper pompoms have firmly established themselves in wedding decor, since this option is not very expensive financially, and creates the impression of a stylish and expensive jewelry. And lovers of handicrafts will like the idea of creating such pompoms, since they are made very simply, the main thing is inspiration and purpose. In this article we propose detailed master- a class with a description and photo on how to create paper pompoms with your own hands.
How to make voluminous paper pompoms with your own hands
In order to make such paper decorative elements, you need to prepare the following materials:
- Thin paper (wrapping paper works well, you'll need 8 sheets);
- Thick threads or lace;
- Scissors;
- Fishing line or transparent invisible thread.
After everything is prepared for work, you can start creating paper pompoms.
The paper should be rectangular in shape, in our case the size is 50 by 80 cm. This is not a strictly necessary size; you can manipulate the width and height of the sheet, depending on how large you want to make the pompom. The main thing to remember is that the diameter of the workpiece - a ball of paper - depends on the width of the sheet.
8 sheets of paper must be folded on top of each other evenly. If, according to your idea, the pompom will consist of paper of different colors, these multi-colored sheets need to be stacked on top of each other in the order in which they will ultimately be viewed on the finished product. The ombre technique is very popular nowadays; it is actively used in paper decor. It involves a gradual transition from a light color to a dark color or vice versa. Alternatively, you can use 2 cream-colored sheets, put 3 pale sheets on top - orange color and 3 leaves of rich orange color.
After the sheets are prepared and stacked on top of each other, they need to be assembled into an accordion. The width of the fold can vary from 3 to 8 cm. You need to fold all the paper to make one long strip of paper.

The next step is to fold the paper strip exactly in the middle. Take the thread and tie it at the fold. There is no need to tighten it too much, this stage is simply fixing.
Our pompom should have the shape of a ball, so it is necessary to round the edges of the workpiece - a paper accordion. While working with scissors, the paper must be held firmly so that all edges are cut equally evenly. You also need to pay attention to the sharpness of the scissors, this is also very important, since due to the dullness of the blades we can get torn edges, and we don’t need this at all.

The next very important step is to separate each layer of paper from each other, each leaf should be independent. It is better to do this first on one side and then move to the other. You need to act carefully, because the leaves may tear, but if this happens, you should not panic, because the ball will turn out to be very voluminous and fluffy and a slightly torn leaf will not be visible. When all the leaves are separated from each other, the ball will be very fluffy.
With just a little effort, you get these wonderful pom-poms. They can be used in different ways in wedding decor. One option is to decorate the ceiling with them. You can hang both large and small pompoms at different heights, so there will be a feeling of volume and weightlessness, but most importantly, due to the material used - paper, the atmosphere will not be overloaded.

Paper pompoms can be formed into a garland. This is done simply - attach the pompoms to a thread and stretch it indoors or outdoors, along the walls or hanging it from the ceiling.
Pompoms can simply be placed on the wall. The order of their fastening can be either definite or completely chaotic.

A few more options: simply place pompoms around the hall or room on the floor or on the stairs, decorate a formal table with them, decorate chairs with them, you can even make a bouquet for the bride from paper pompoms.
Video on the topic of the article
We also recommend
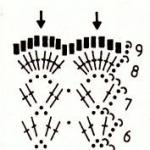 Knitted toys - bells with patterns, crocheting bells
 List of products and important complementary feeding rules for a six-month-old baby
 Letter Y (And short) in poems, stories, proverbs All about the letter Y short
 Natural ingredients to protect hair health
 Hardware pedicure step by step Hardware pedicure step by step
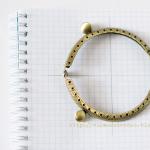 We sew wallets and handbags with a clasp: templates and master classes